HAPPY NEW YEAR! Hello, everyone! I am back! I wish you all a great year ahead of you and may 2015 fulfill all your wishes! Anyways, I’m glad to be back blogging, it’s been a while, but the holiday was awesome! I was quite confused as to which post do I want to publish as my first post of 2015, wasn’t sure if you guys want to see another tutorial, or review and what not. Then, I remembered, I wanted to share with you my travel makeup essentials, since I did just came back from traveling and I do quite travel a lot.
I have to be honest, I am quite lazy when it comes to doing my own makeup, especially when I travel, and I do travel a lot. I try to keep my makeup bag small, and basic. I don’t bother wearing makeup at all when I travel, heck, I barely wear any on a daily basis unless I’ve important meetings/events to attend.

As you can see in the picture above, there’s my makeup bag! I usually do carry this bag with me when I travel, or another makeup pouch, but this year I’ve been using this one. The bag is just the perfect size for me when I travel. It’s not too big, as you can see, it is as wide as my palm. That’s all I need, or even less.
Below, you can find all the makeup I bring with me when I travel. Let me list it for you:
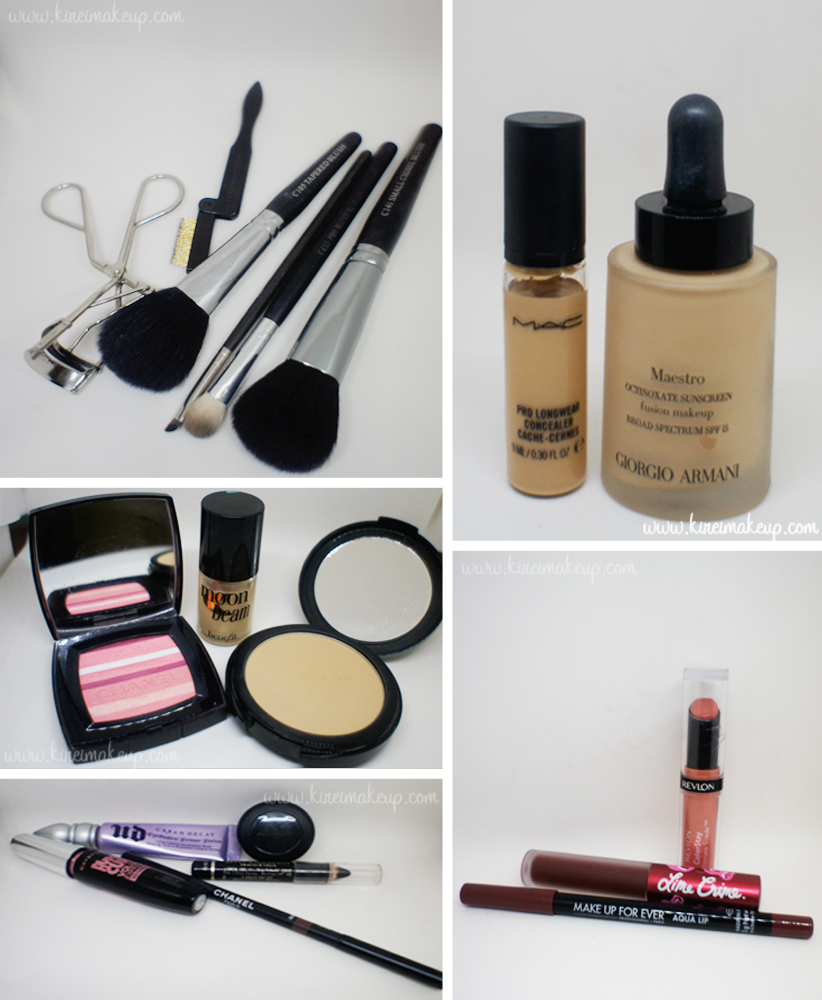
- Tools – (R-L) Blush brush, blending brush, angled eyeliner brush, powder brush, eyelash comb, and eyelash curler.
- Base – Giorgio Armani Maestro Foundation, and MAC Pro Longwear Concealer.
- Cheeks – Chanel Soft Glow Blush (Blush de Horizon), Benefit Moon Beam, and Make Up For Ever Pro Finish powder.
- Eyes – Urban Decay Primer Potion, MAC Carbon eyeshadow, L’oreal Voluminous Smoldering eyeliner pencil, Chanel Brow Pencil, and Maybelline Volume Express Turbo Boost mascara.
- Lips – Revlon Colorstay Ultimate Suede lipstick in Socialite, Make Up For Ever Aqua Lip pencil in 11C, and Lime Crime Velvetine lipstick in Wicked.
If you noticed, I don’t have colored eyeshadows/palettes, that’s because I don’t use them. Sometimes I carry my Chanel eyeshadow quad or UD Naked Basic, it will still fit in the bag.
For the brows and lipsticks, I usually change what I bring. For brows, I alternate between Anastasia Brow Wiz, Shu Uemura Hard Formula brow pencil, or my Chanel brow pencil. For the lipsticks, I do bring several shades with me when I travel – most of the time I bring my YSL glossy stain #27, MAC Russian Red, and MAC Diva. However, last month, I recently purchased the MUFE #11c lip pencil, and Lime Crime Wicked, so I carried those when I traveled to Taiwan this Holiday season.
How-to:
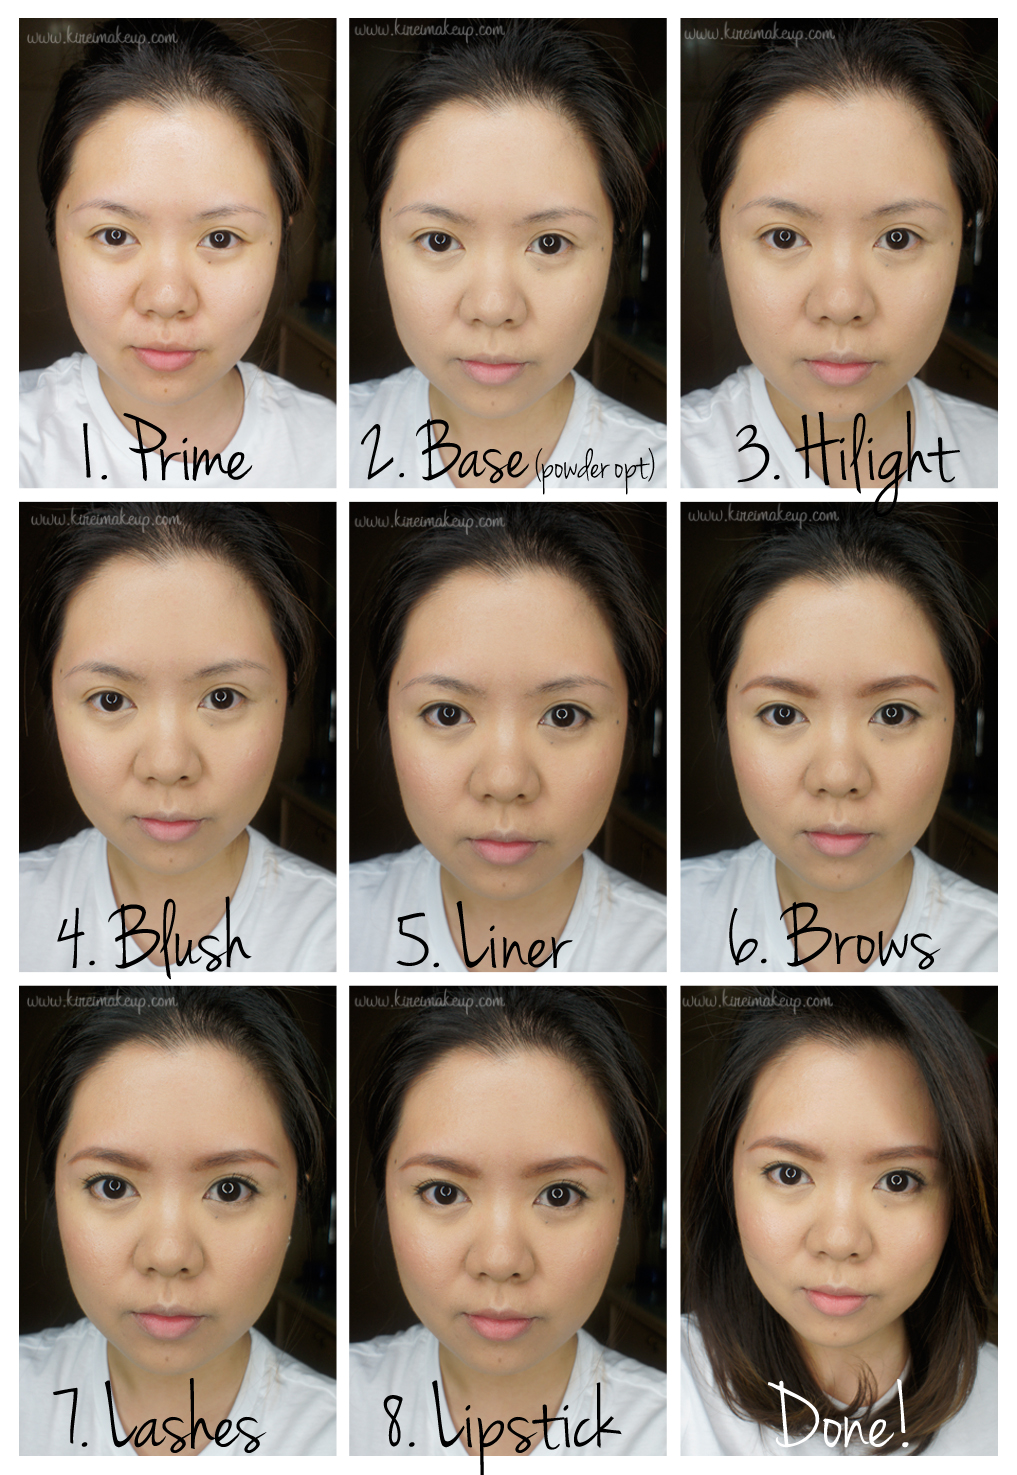
1. I prepped my skin by applying a good amount of moisturizer. I do 2 layers of moisturizer, let that sit and soak into my skin. At this point, you can also apply primer to your skin if you’d like. I usually apply MUFE HD Elixir, but I don’t usually bring it when I travel, so I just moisturize.
2. At this moment, I either apply my powder foundation or the liquid foundation. For this tutorial, I applied my Giorgio Armani Maestro Foundation using my fingertips – from the center of my face blending it to the outer edge.
- The great thing about this foundation is that it’s a serum-type of foundation. Very liquid-y, and what’s even great about it is the fact that it dries out powder. This foundation is perfect for those with oily skin.
- I also lightly apply concealer on my imperfections – under eyes, blemishes, redness etc if needed. I don’t usually bring concealer, but I had huge zit on the left cheek (right if you’re looking on your screen), which now has dried out.
- You can lightly powder your face at this step if you don’t have any more “cream” products to be applied to your face.
3. I applied highlighter (yes, I know, I spelt “hilight”…”highlight” was too long to fit into the box) on some parts of my face – bridge of nose, under my eyebrows, cheekbones, and cupid’s bow.
4. Using my blush brush, I applied Chanel Soft Glow blush on my cheeks.
5. I lined my upper lash line, as close to the roots of my lashes as possible. This helps to make the lashes appear fuller.
- Using an angled eyeliner brush and MAC Carbon, I set the eyeliner along the upper lash line.
- Using whatever was left on the brush, I ran the liner lightly on the outer half of my lower lash line.
6. I filled my brows using my brow pencil.
- The Chanel brow pencil does have a reddish undertone, but I’ve already bought it at an airport, and had no way of returning it so I decided to just use it till it’s done. However, as you can see on the final photo, my hair does have some warm brown colors, so it turned out ok.
- I recommend going for a more taupey shade like the Anastasia Brow Wiz in Taupe or Brunette if you are Brunette.
7. I curled my lashes and applied mascara.
8. Lastly, I applied my peachy nude lipstick and we are done!
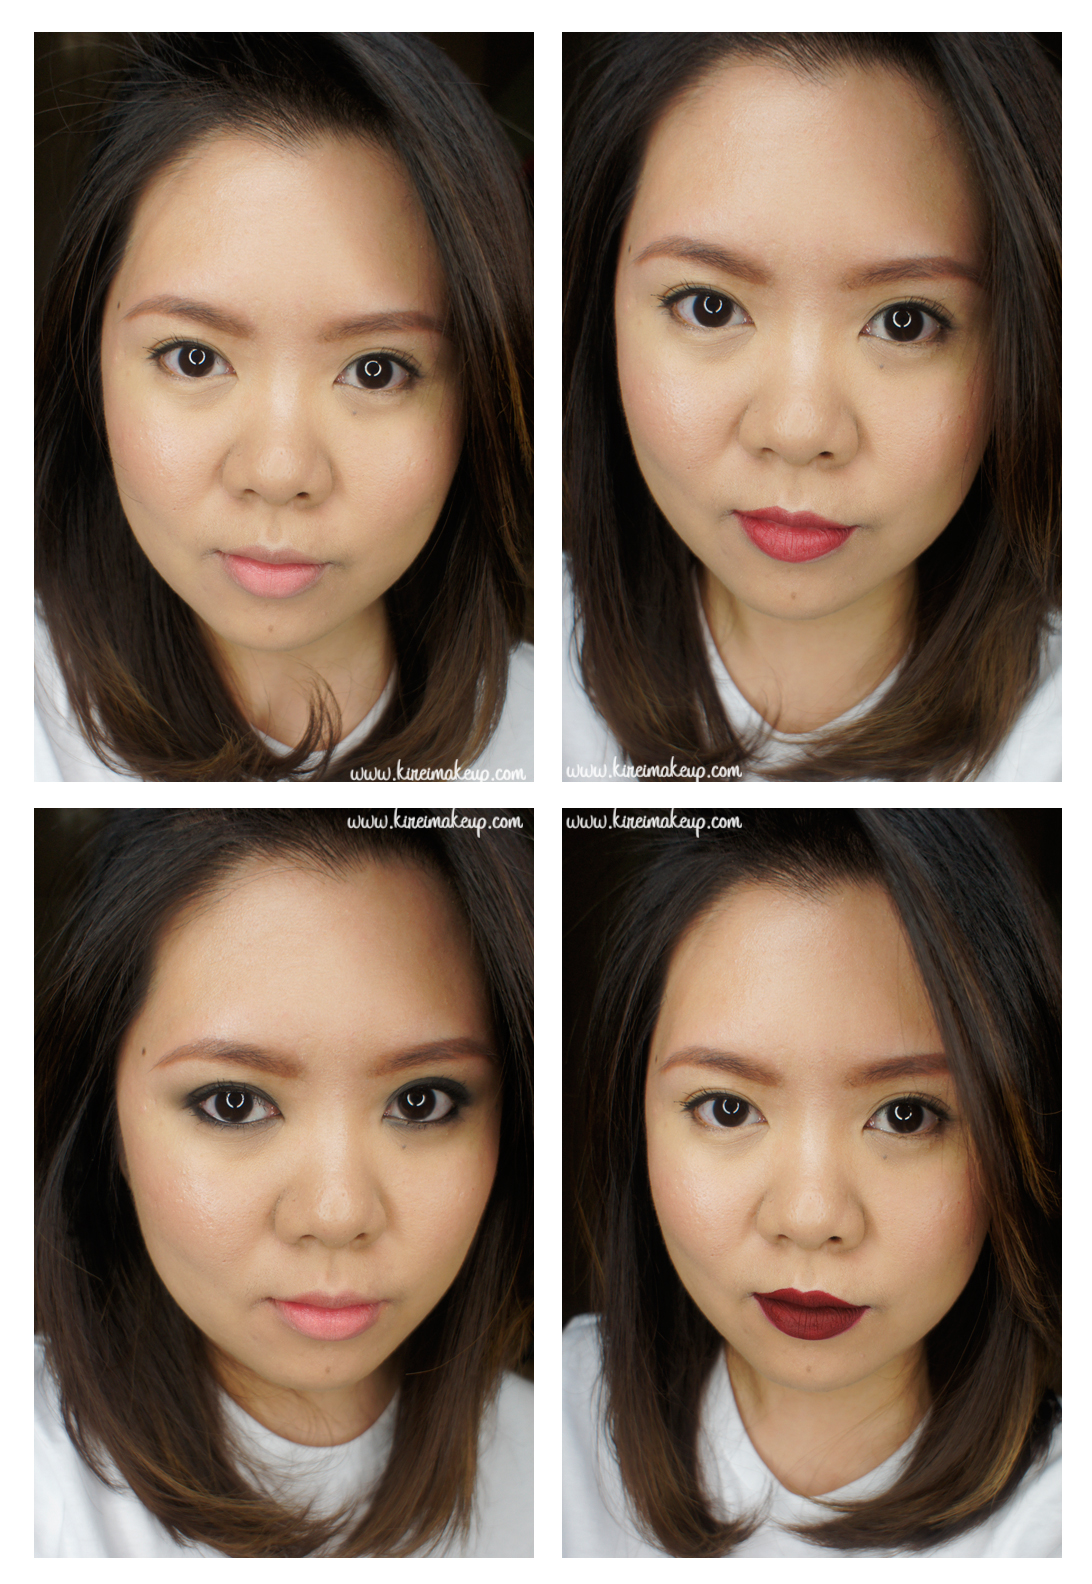
Let me just show you, with whatever I have in that bag, I can create 4 different looks! Actually I can create more, but I decided to just show you what I normally do.
Top left – no-makeup makeup…or as I’d called it “barely there” makeup.
Top right – Added MUFE aqua lip pencil #11c if I have to go for a brunch meeting (yes, somtimes traveling = work)
Bottom left – smoky eyes using eyeliner pencil (all over the lid, blended using fingertips) and MUFE pro finish powder (applied all over the lid on top of the pencil) using blending brush. I’d wear this for a night out if I don’t feel like doing bold lips.
Bottom right – added Lime Crime Velvetines Wicked. This is the look I’d wear for a dinner/night out if I don’t feel like doing smoky eyes.
Anyhow, I hope this was helpful! I think you don’t have to carry a ton of makeup products and brushes when you travel. Find the right products that work for you!