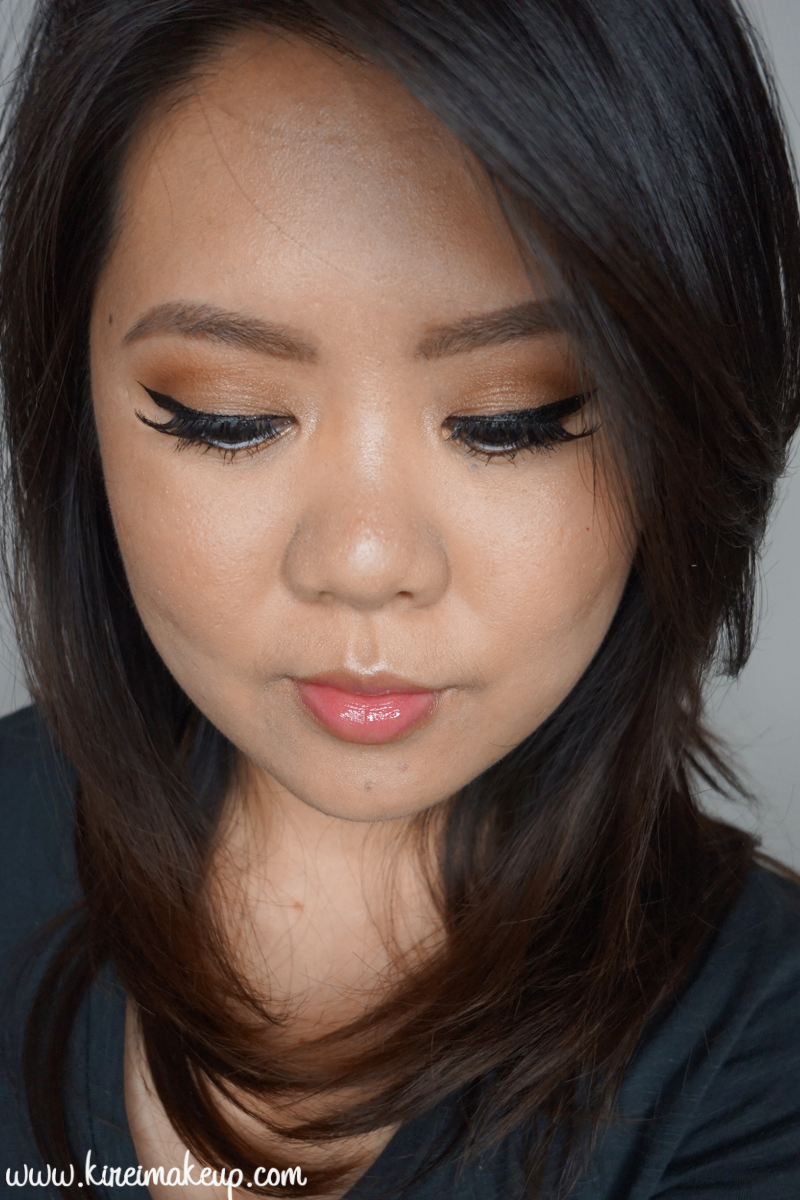
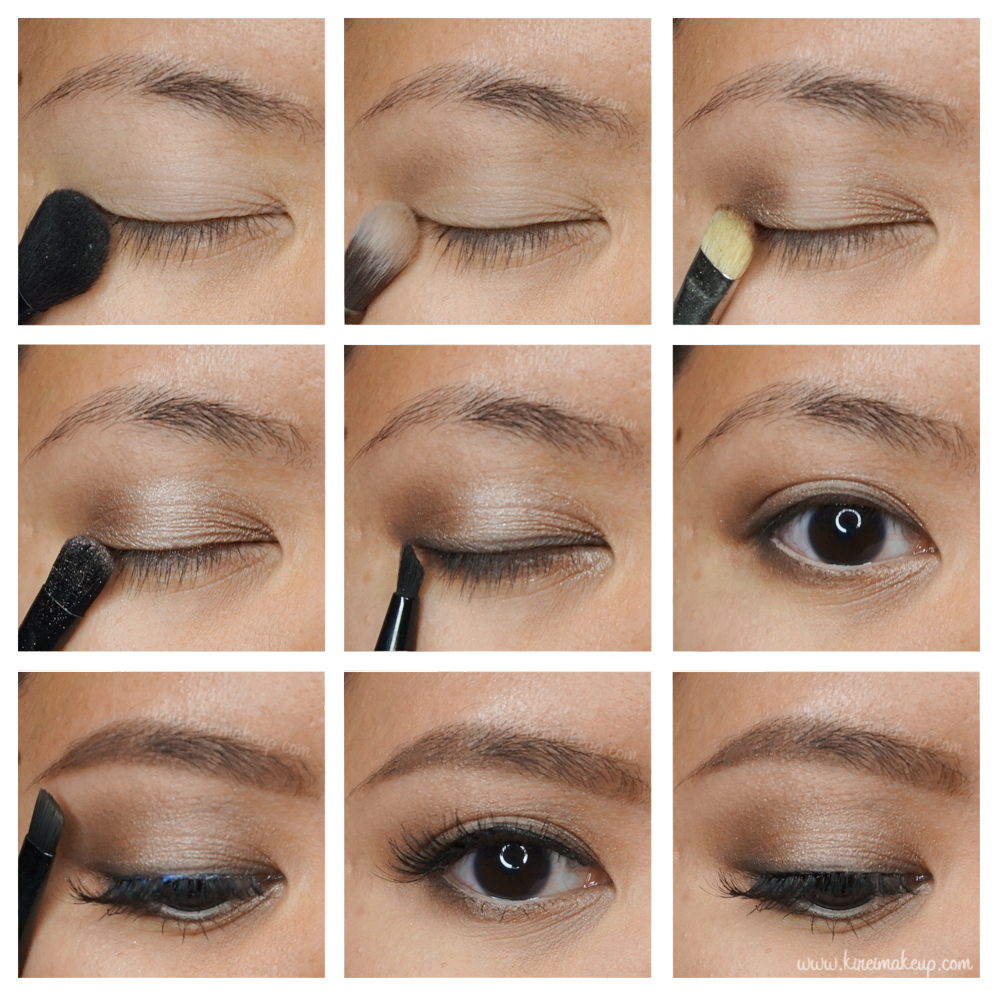
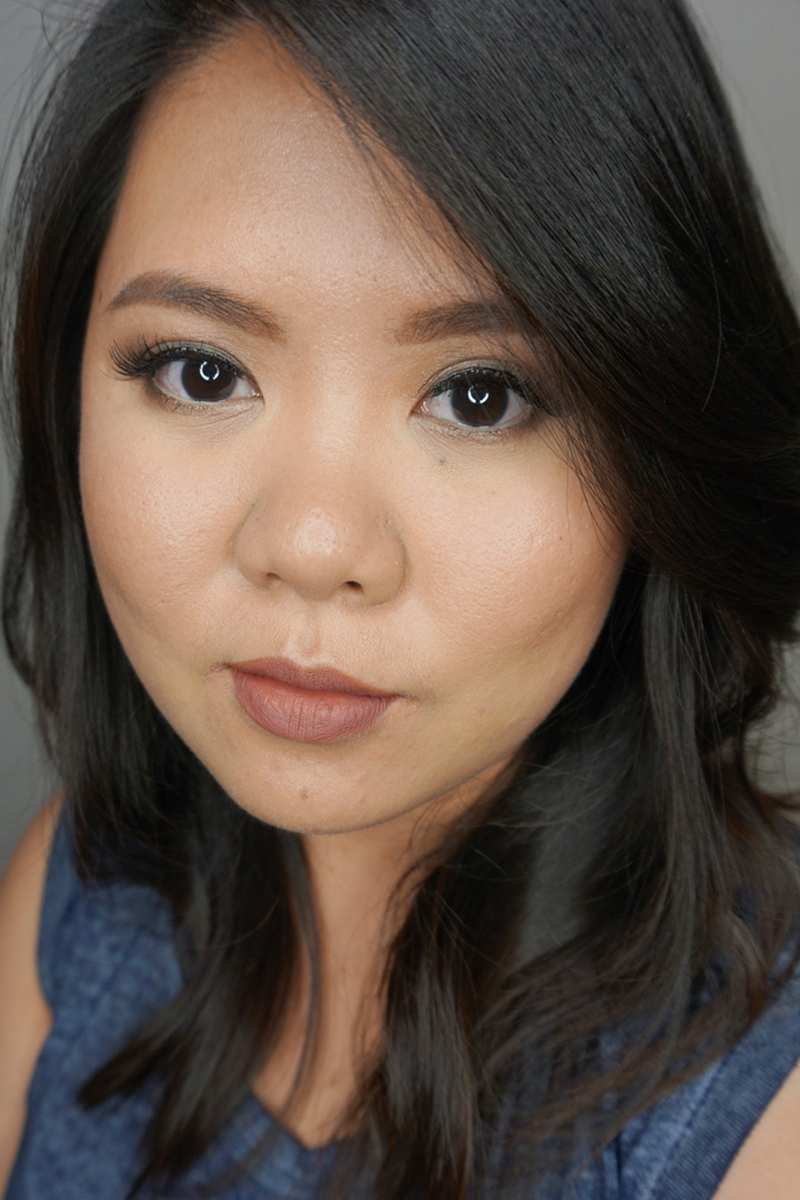
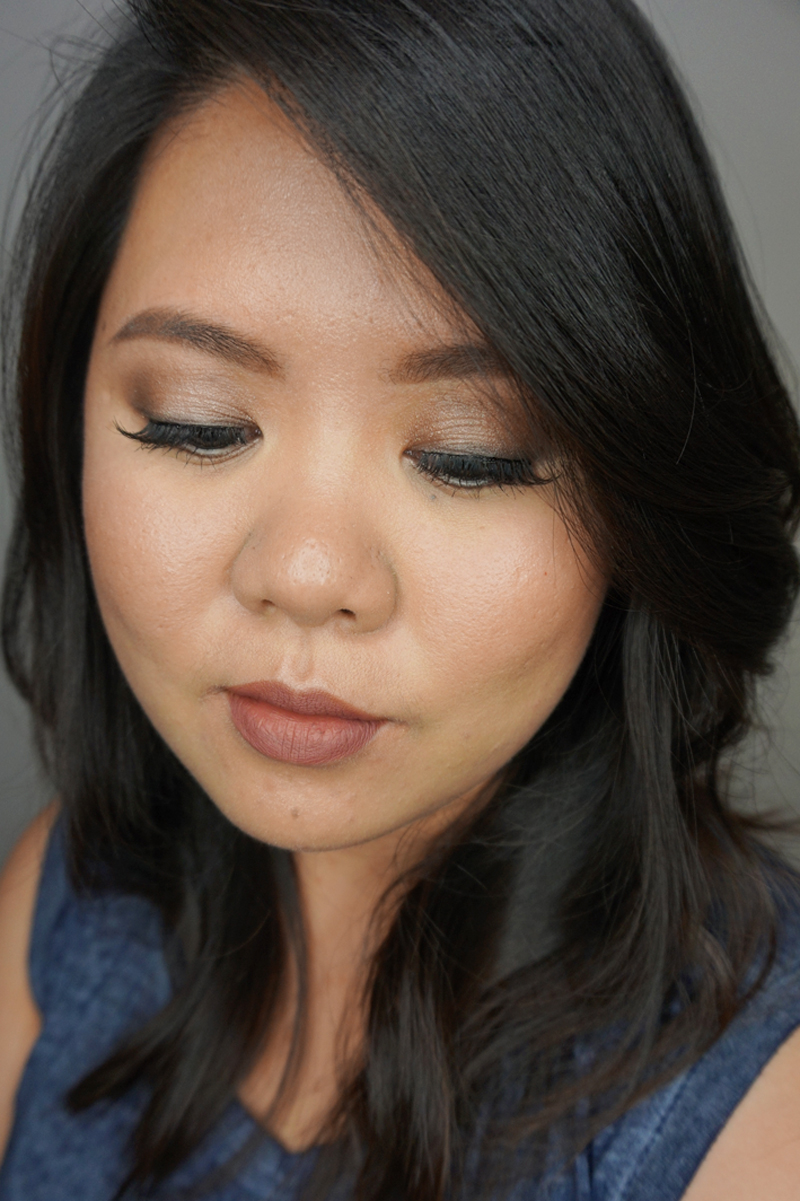
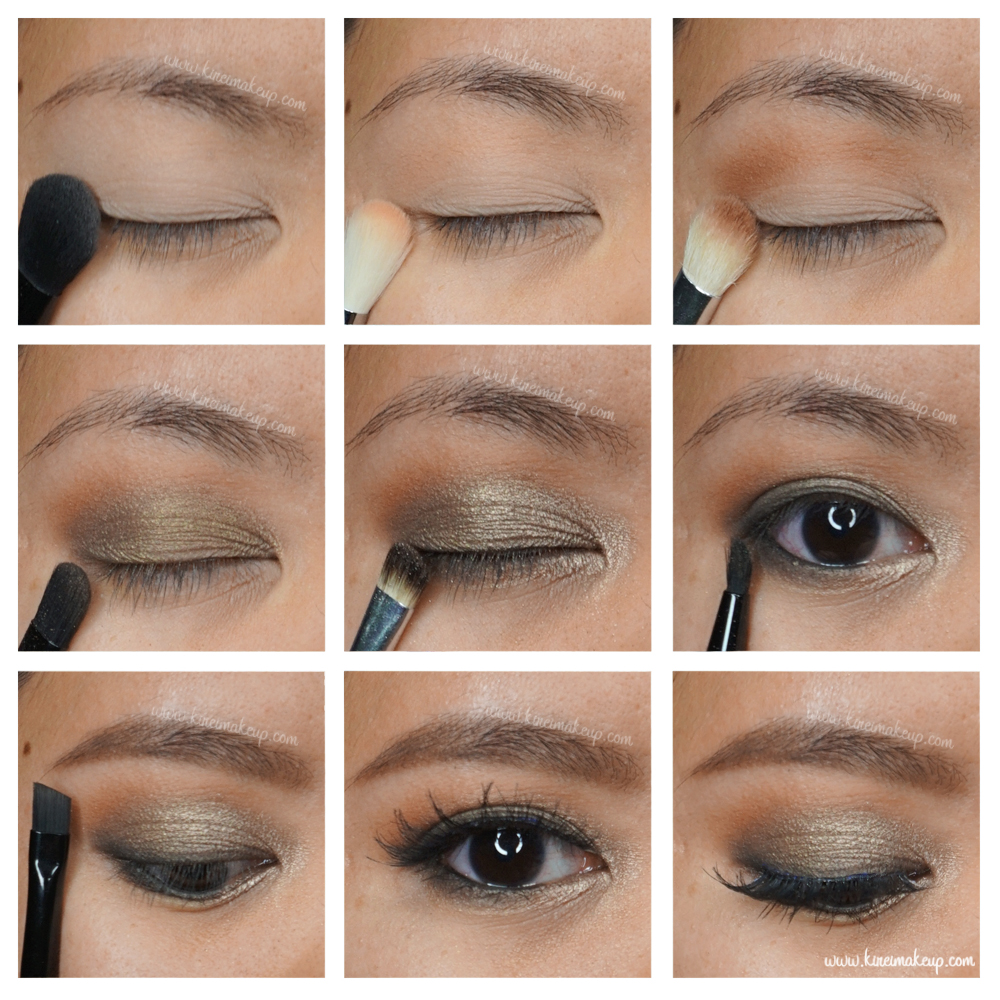
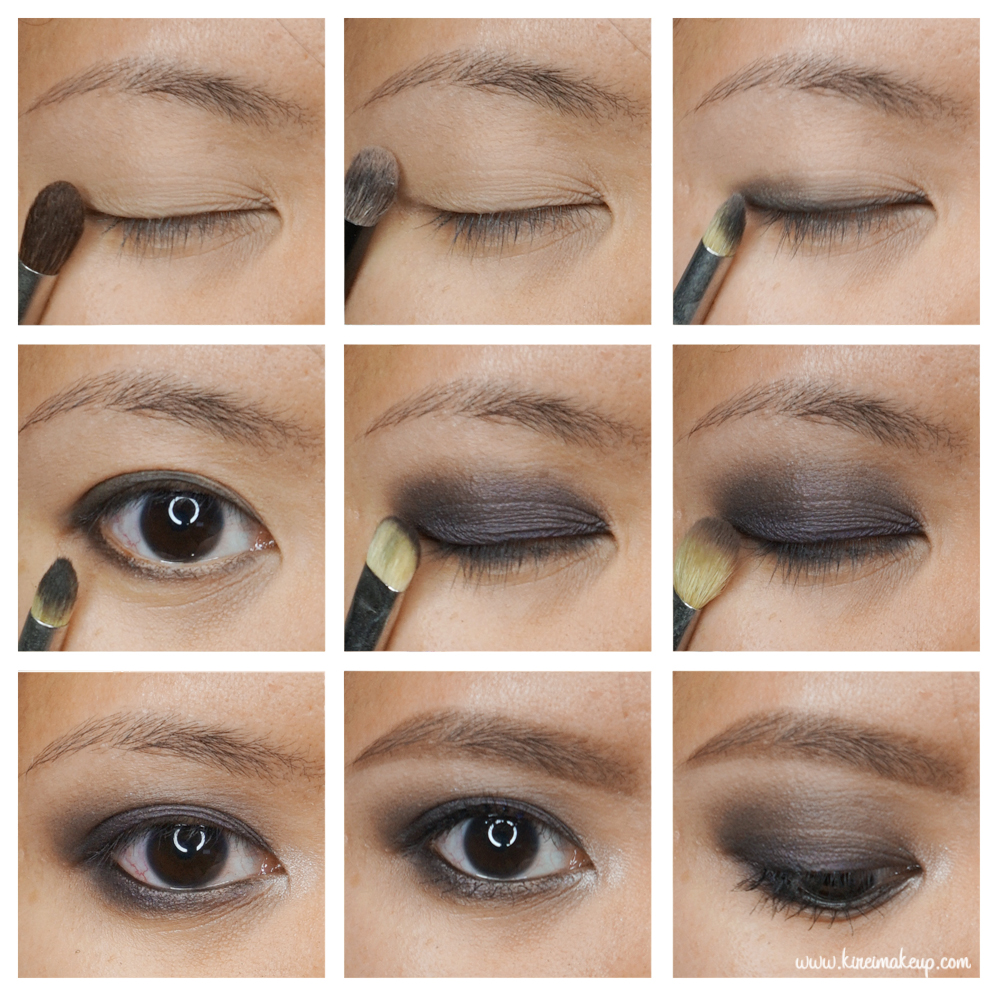
I recently purchased NARS Pygar Hardwired Eyeshadow, and I thought this eyeshadow has such an interesting colour. It looks like dirty gold, thus I named today’s tutorial as Tarnished Gold. Watch the tutorial below, or read more for the step-by-step pictorial.
Tag: smoky eyes for asian
New Year Party Makeup
Alright, I think we can start with New Year Party makeup and move on past the Christmas party makeup for now. If you are still looking for makeup inspiration for Christmas parties, please check my Party makeup tutorials, or use the search bar for specific brands or looks. For this tutorial, I used mainly UD Gwen Stefani palette for the eyes.
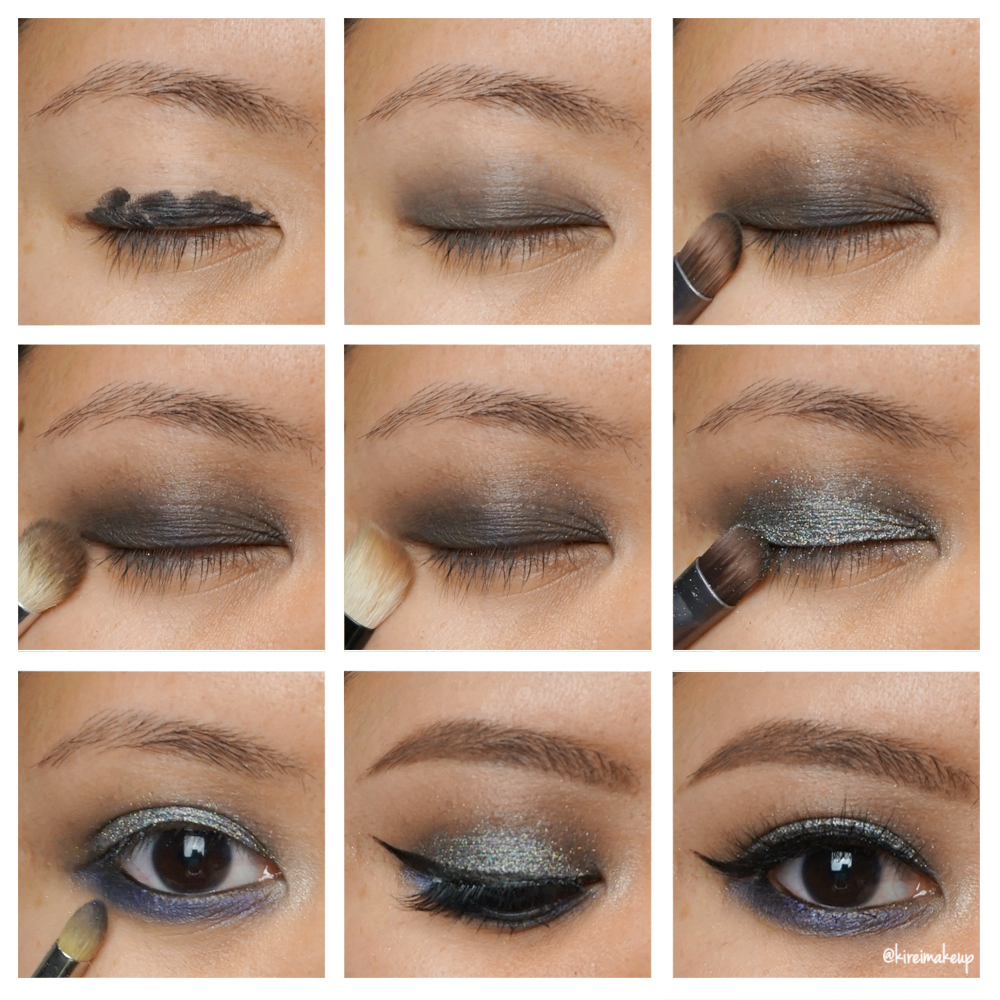
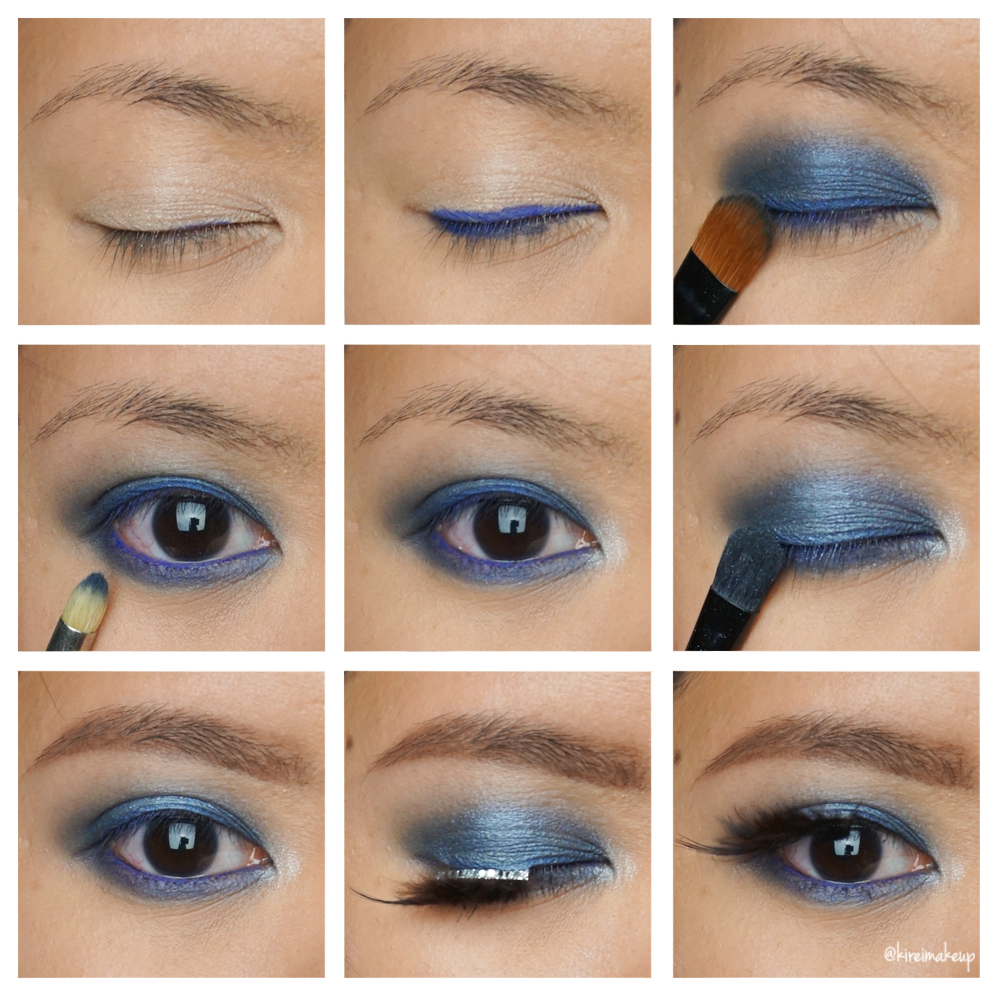
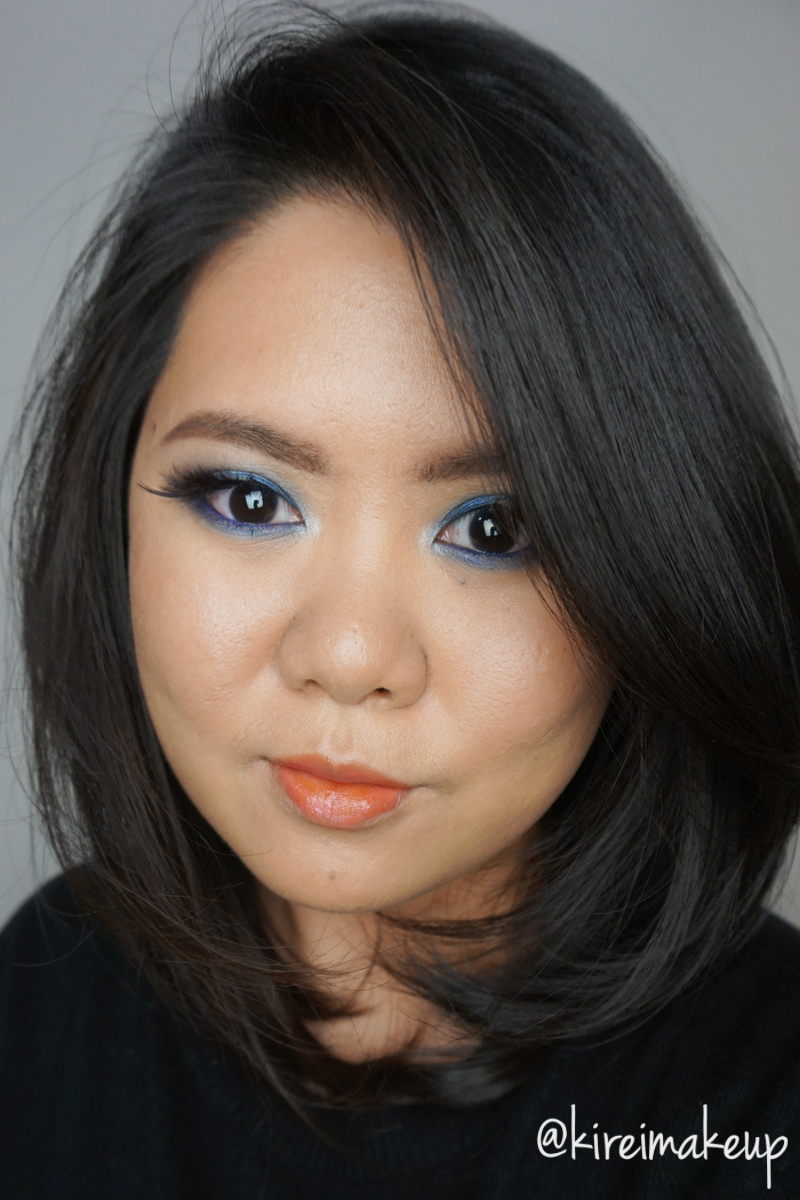
Maison Kitsune for Shu Uemura Smoky Eyes
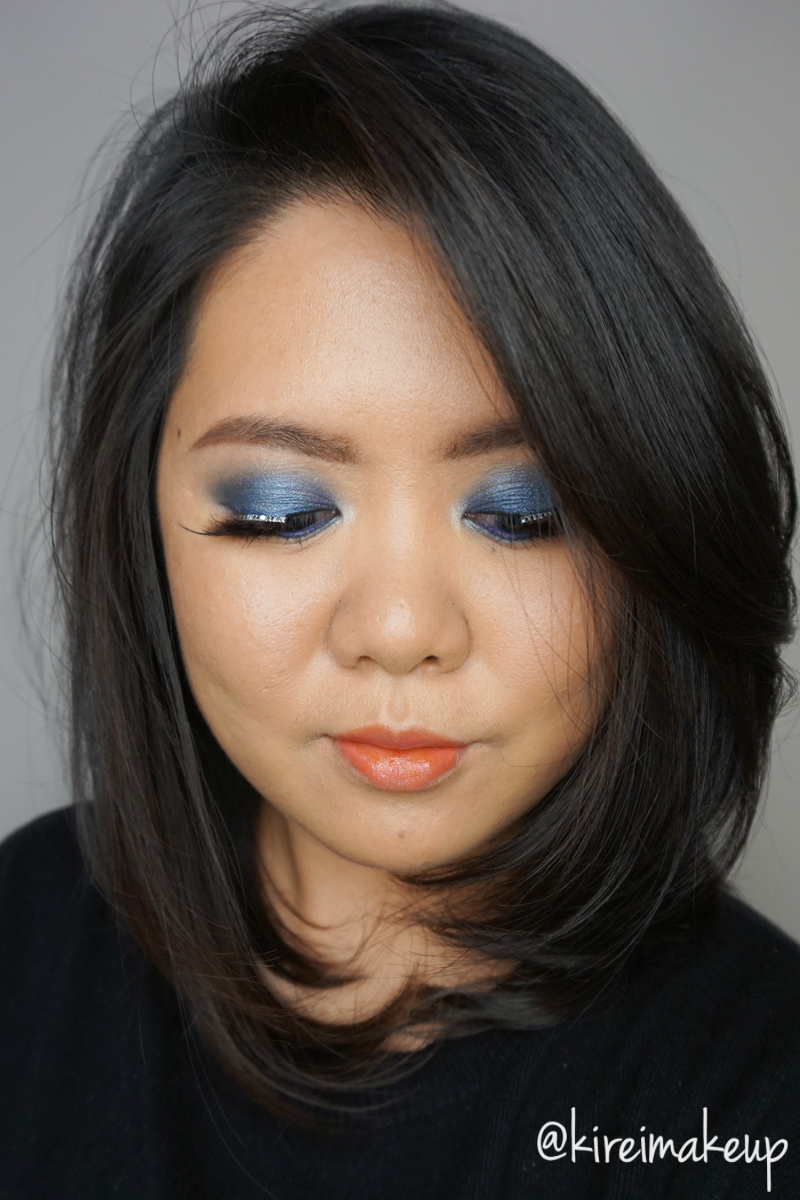
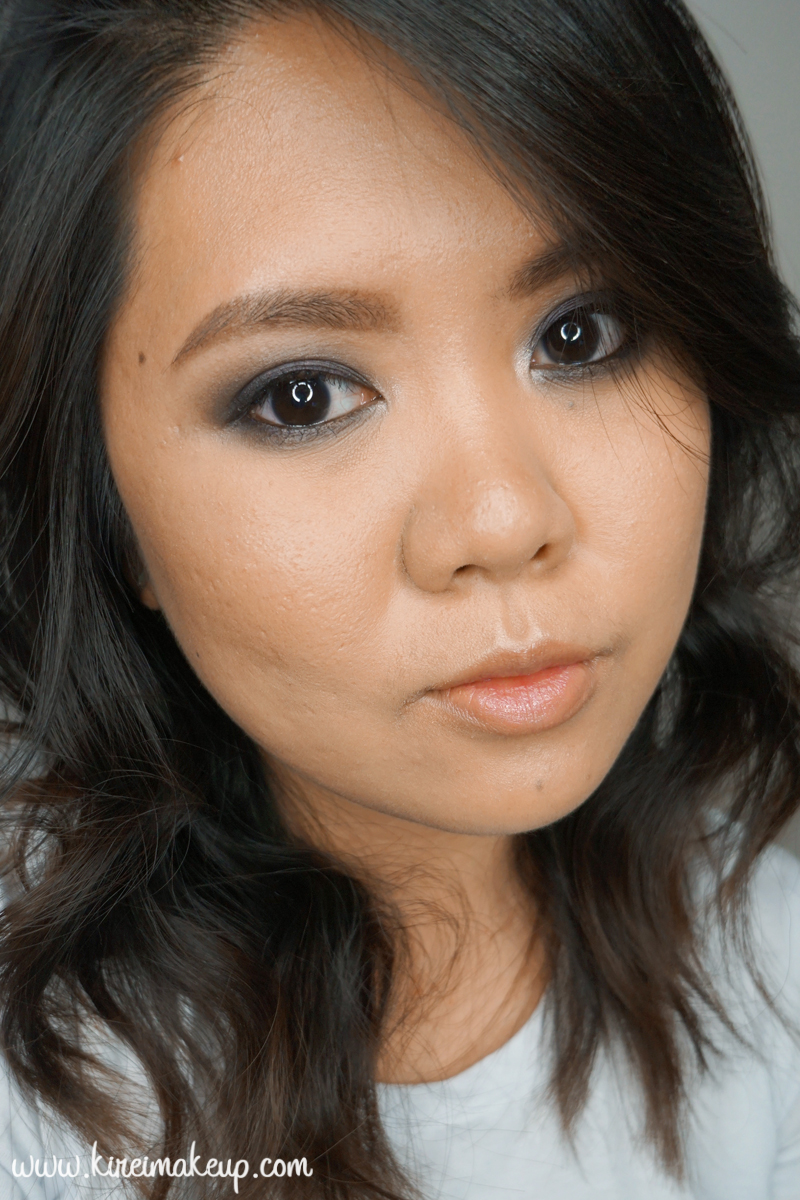
Another look using Maison Kitsune for Shu Uemura Indigo eye/cheek palette! This time, I really wanted to showcase the gorgeous blue eyeshadow fron the palette, so I created this blue smoky eyes look! This look is super easy to recreate, and it’s a really fresh take on a non-black smoky eyes.The only product that is black is my mascara, even my eyeliner is blue (surprise, surprise..lol).
We’ve all seen black smoky eyes, brown smoky eyes, grey smoky eyes, well why not an all blue smoky eyes? This blue smoky eyes will bring out those with brown, or green, or grey eyes! I love how the blue shadow from the palette looks almost jewel like. It’s not too dark, yet still have a rich deep blue hue.
For the lashes, I decided to apply the Maison Kitsune Jewel-Fur-for-a Wink falsies since I thought it was going to add a bit of fun to the whole look. Very extravagant, perfect for Holiday party makeup! Of course, you can skip this special falsies and wear the regular ones, but I think this falsies are amazing! Also, if you want to know what else I’ve bought from this collection, check out my Instagram account!
*Please check out my other Maison Kitsune for Shu Uemura tutorials*
Products used
Eyes
- Base – Shu Uemura cream eyeshadow “Ivory”
- Eyeliner – Shu Uemura Maison Kitsune Play & Remix Drawing pencil “Indigo”
- All over eyelid – Shu Uemura Maison Kitsune Indigo Palette “Navy”
- Inner corner – Shu Uemura Maison Kitsune Indigo Palette “White”
- Center of lid – Shu Uemura Maison Kitsune Indigo Palette “Soft Blue”
- Brows – Shu Uemura Brow Sword
- Mascara – NARS Audicious mascara
- Falsies – Shu Uemura Maison Kitsune “Jewel-Fur-For-A-Wink” false lashes
Face
- Primer – Bobbi Brown “Vitamin Enriched Face Base”
- Foundation – Shu Uemura Lightbulb foundation #754
- Concealer – YSL Touche Eclat
- Setting powder – Shu Uemura Lightbulb Glowing Face Powder “Colorless”
Cheeks
- Highlighter – Guerlain Meteorites Powder
- Blush – Shu Uemura Maison Kitsune Indigo palette glow on blush “Pink”
Lips
- Lip lacquer – Shu Uemura lip Lacque Supreme “CR1 Chu Chu Coral”
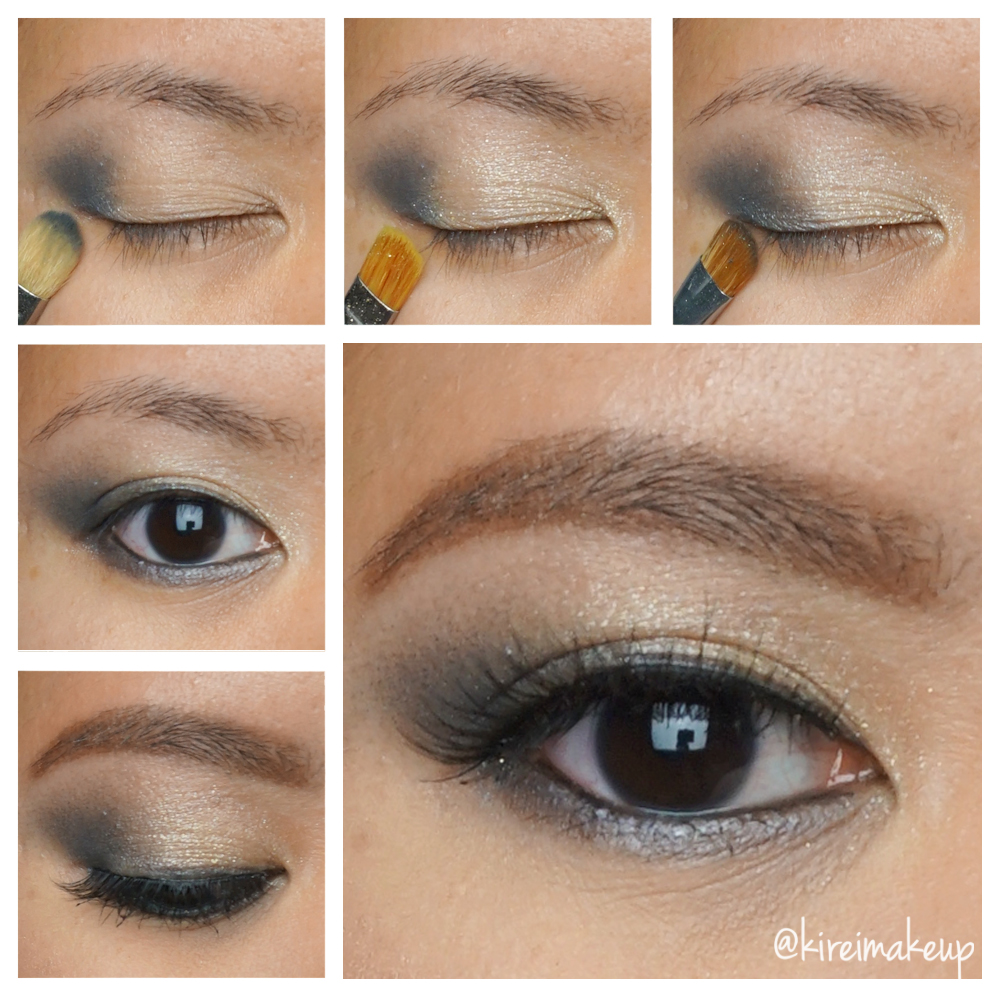
Shu Uemura Maison Kitsune Indigo Palette
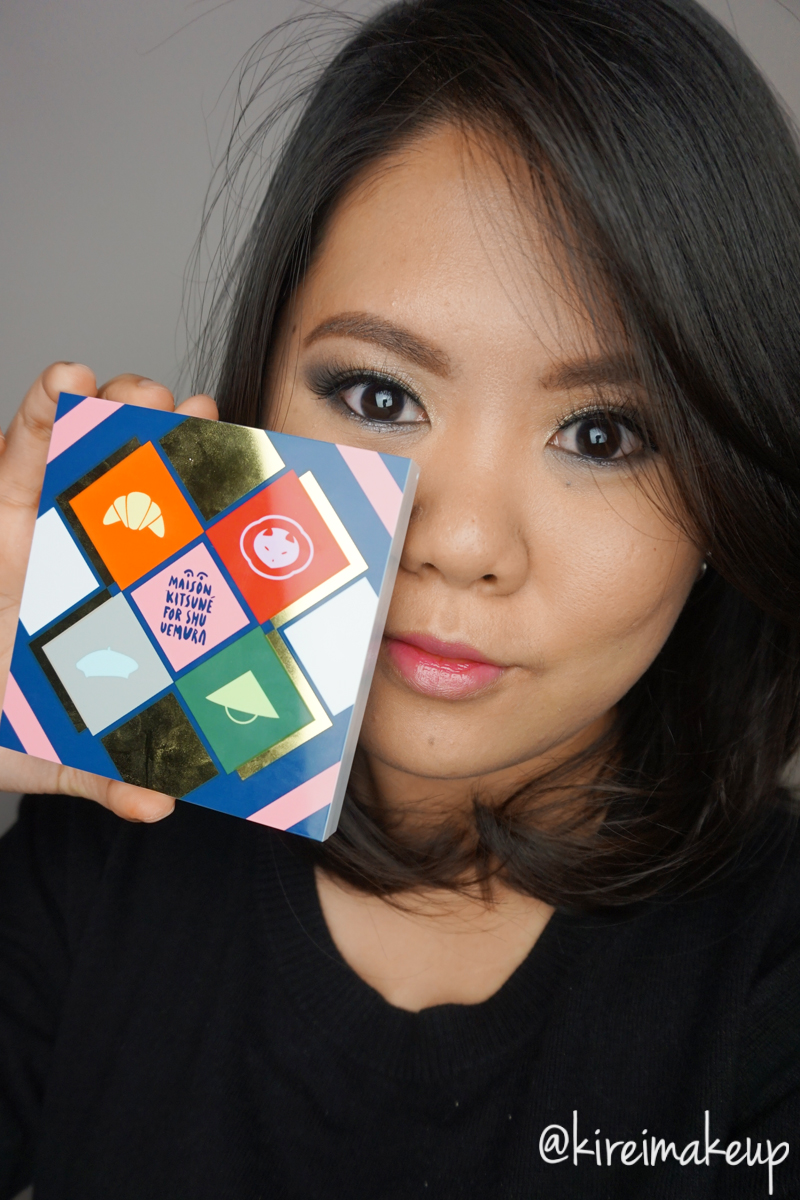
Now that Halloween is over, it’s time for the Holiday looks! I recently bought Shu Uemura Maison Kitsue Indigo palette, which is part of Shu Uemura’s 2015 Holiday collection, and this palette shall opens my Holiday looks for 2015! I bought several other products from the collection, but for today I’ll only use the palette. The Shu Uemura Maison Kitsune Holiday 2015 Collection consists of amazing products, and you guys should really check it out! The palettes are limited edition, so grab them before they’re sold out!
For today’s look, I decided to do a cat-eye smoky look. This look is great for monolids or hooded lids. If you have hooded lids, open your eyes when you’re applying the outer V shade (the Indigo). You need to apply this shade just slightly above the hooded part so that when your eyes are open, you can still see the color.
*Please check out my other Maison Kitsune for Shu Uemura tutorials*
Products used
Eyes
- Primer – Shu Uemura cream eyeshadow “Ivory”
- Outer V/lower lash line – Maison Kitsune Indigo palette “Navy”
- Inner lid – Maison Kitsune Indigo palette “Gold”
- Center lid – Maison Kitsune Indigo palette “Black 985”
- Waterline/tightline/upper lash line – MAC kohl liner “Smolder” + MAC Carbon (to set)
- Brows – Shu Uemura Brow Sword
- Lashes – Esqido falsies “Oh So Sweet”
Face
- Foundation – Shu Uemura Oleopact foundation
- Powder – CoverFX setting powder
Cheeks
- Blush – Maison Kitsune Indigo palette glow on blush “Pink”
- Highlighter – The Balm “Mary-Lou Manizer”
Lips
- Lip lacquer – Shu Uemura Laque Supreme “Pink Scandal 01”
Sleek Makeup Candy Palette
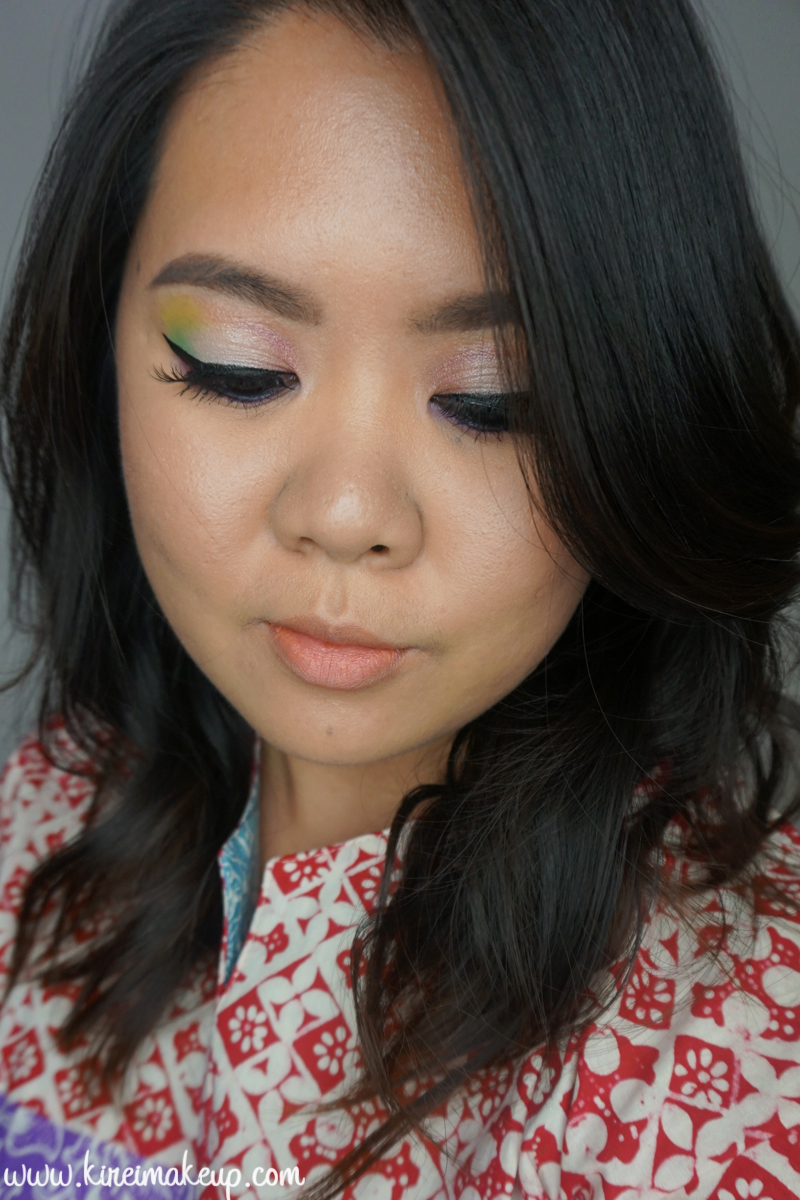
My Sleek Makeup Candy Palette is back in my hands again! I accidentally left it back in Jakarta last year, and my brother brought it back to Canada for me! Woohooo!!! So happy to have this Sleek Makeup Candy palette back to create many colorful looks.
So the inspiration behind this colorful look is actually a “Batik” top (worn in pictures below) I received yesterday from Sofia via my brother. My friend, Sofia from @Sophie_Tobelly, is an amazing fashion designer, and she actually created this top and sold it in her store. A big THANK YOU and shout out to Sofia!!! You guys should really check her out on Instagram (IG)! She also sent down a clutch she created, I posted it on my IG account so please do check it out and follow me on IG!
The top has several different colors like red, purple, white, and blue. I was going to use the blue from the palette, but it ended up being too chalky, so I changed it to green instead. I do love the end result, it almost has a watercolor feel to it. Should you decide to replicate this look, please do tag me on IG or add #kireimakeup.
*For other Sleek Makeup Candy Palette tutorials, please check out Psychedelic and Very Purple*

Products used
Eyes
- Primer – Urban Decay Primer Potion “Original”
- Base – MAC Mineralized Skinfinish “Medium Plus”
- Transition – Sleek Makeup Candy Palette “Pear Drop”
- Outer V – Sleek Makeup Candy Palette “Mint Cream”
- Inner V – Sleek Makeup Candy Palette “Bon Bon”
- Center lid – Sleek Makeup Candy Palette “Cream Soda”
- Lower lid – Sleek Makeup Candy Palette “Parma Violet”
- Waterline – MAC “Smolder” kohl pencil
- Winged liner – Kanebo “Kate Super Sharp Eyeliner”
- Brows – Anastasia Beverly Hills Brow Pomade “Taupe” + “Medium Brown”
- Mascara – Lancome “Hypnose”
- Lashes – Ardell falsies “120s”

Face
- Primer – Bobbi Brown “Vitamin Enriched Face Base”
- Foundation – Diorskin Star Foundation “031”
- Concealer – Diorskin Star Concealer “03”
- Setting powder – Diorskin Nude Air Healthy Glow Invisible Loose Powder “#30″
Cheeks
- Blush – Benefit “Hervana”
Lips
- Lipstick – Revlon ColorStay Ultimate Suede Lipstick “Flashing Lights”
UD Naked Smoky & KVD Lolita
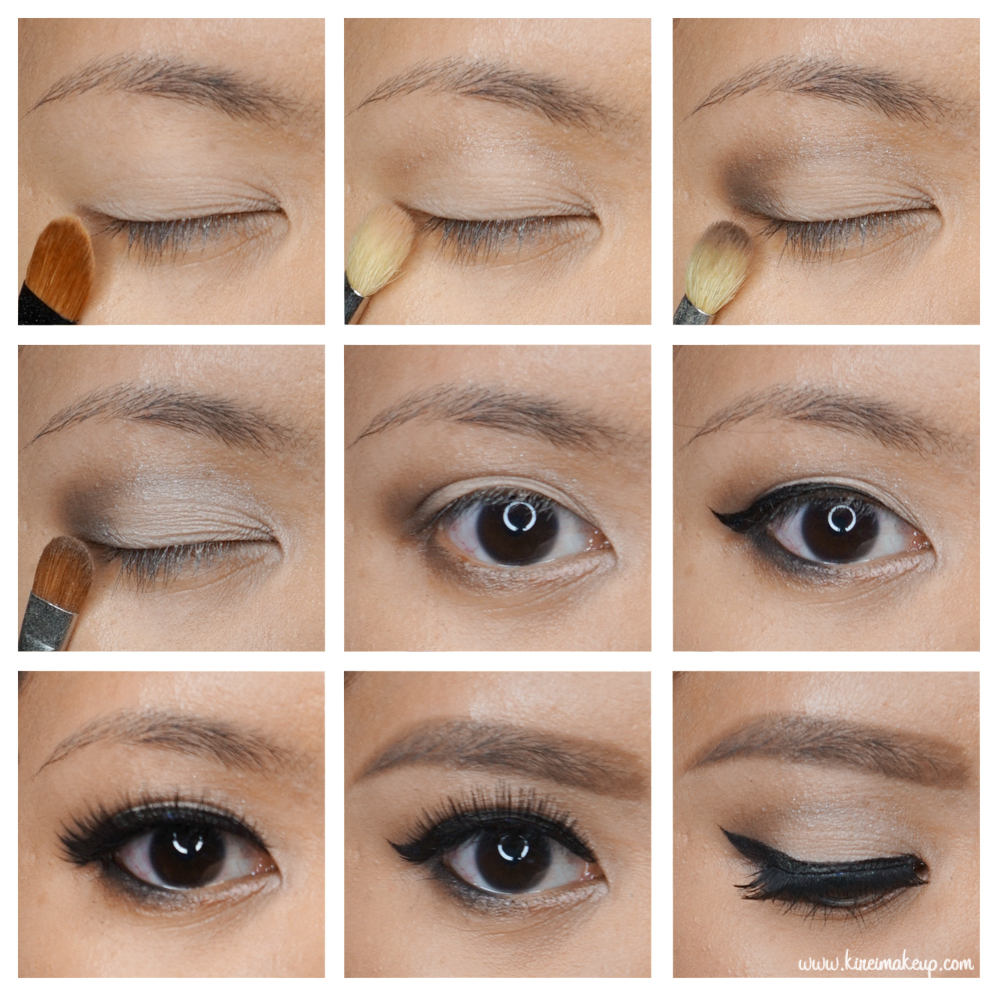
Today, I’m creating a light daytime look using UD Naked Smoky, and I’m pairing it with my new KVD Lolita liquid lipstick. The eyes are very light and simple, and obviously you can skip the false lashes altogether if you’re going to wear it as a daytime makeup.
The lips are quite different than what I’m usually used to. I usually like to pair a peachy or corally lips with this kind of eye look. However, I stepped out of my comfort zone, and decided to pair this with KVD Lolita liquid lipstick, which is a mauve color. I have had mauve lipstick before, but this KVD Lolita is slightly darker than what I’m used to. I didn’t mind it, I think it’s still a very pretty color. Just a word of warning, this liquid lipstick will dry to a darker shade than what you see on the tube.
For other looks using UD Naked Smoky palette please check out my other posts – “Iconic UD Smoky“, “MAC D for Danger“, “Grey“, and lastly my review on this palette “UD Naked Smoky Review“.
Again, I’m featuring Tweezerman Brush IQ brushes that were sent to me by Preen.me as part of their PreenMeVIP program. The brushes used in this tutorial are: “Blender“, “Shader“, “Line Glider“, and “Brow” brushes. Not in picture: Tweezerman ProMaster lash curler, used to curl the false lashes and my lashes.
Products used
Eyes
- Primer – UD Primer Potion “Original”
- Base – UD Naked Smoky “Combust”
- Crease/lower lash line – UD Naked Smoky “Whiskey”
- Inner/Outer third – UD Naked Smoky “Radar”
- Center of lid – UD Naked Smoky “High”
- Upper lash liner – UD Naked Smoky “Blackmarket”
- Waterline – MAC Chromagraphic pencil liner “NC30”
- Brows – Anastasia Beverly Hills Brow Pomade “Medium Brown”
- Falsies – Ardell falsies “Demi Wispies”
Face
- Foundation – Diorskin Star foundation “31”
- Concealer – Diorskin Star concealer “3”
- Setting powder – Diorskin Nude Air Healthy Glow Invisible Loose Powder “#30″
Cheeks
- Blush – Smashbox Halo Blush Powder “In Bloom”
- Contour – MAC powder “Blunt”
Lips
- Lipstick – Kat Von D “Lolita” liquid lipstick
Tweezerman Brush IQ Tutorial
Today’s Tweezerman Brush IQ tutorial feature the makeup brushes that were given to me as part of the PreenMe VIP program. Earlier this week I received the Tweezerman goodies (picture on Instagram), and today I’ve decided to do an easy Bronze smoky eyes look using mostly those brushes. A big THANK YOU to Preen.me for sending me the Tweezerman products!
The Tweezerman brushes that are featured on today’s tutorial are “blender brush”, “shader brush”. “liner glider”, and “brow brush“. I’ve also used the “Pro-Curl lash curler ” and “no-mess mascara guard“, but it was used off camera. I’ll try to post a short Instagram video on how-to use the curler and mascara guard next time! So, don’t forget to follow me on Instagram!
Just a quick note on these brushes, they are amazing! I’m saying it not because I received it for free, but truly these brushes are on the best synthetic brushes I’ve ever used. The shader brush is very sturdy and really great for packing on the color on the eyelid. The liner glider brush is awesome in creating a soft diffused liner look. I’ll talk more about the brushes when I have the chance to review them. Until then, you’ll see these brushes popping on my tutorials!
Scroll all the way to the bottom to skip the how-to, and jump to the Product List.
How-to:
1. I primed my eyelids using Urban Decay Primer Potion “Original”. Using Tweezerman Blender Brush, I applied MAC Skinfinish “Medium Plus” powder all over my eyelid.
2. Using a blending brush, I applied KVD Shade + Light Eye palette in “Ludwin” as a transition shade.
3. Using another blending brush, I applied KVD Shade + Light eye palette in “Succubus” on my crease.
4. I applied L’oreal Infallible eyeshadow “Bronze Divine” on my eyelid using Tweezerman Shader brush. I also applied this eyeshadow along my lower lash line using Tweezerman Liner Glider brush.
5. Using a small shader brush, I applied L’oreal Infallible eyeshadow “Sahara Treasure” on the inner corner of my eyes.
6. Using Tweezerman Liner Glider brush, KVD Shade + Light Eye palette in “Shax” along my upper and lower lash line. I lined my waterline using L’oreal Voluminous Smoldering eyeliner.
7. I filled my brows using Tweezerman Brow brush and Anastasia Beverly Hills Brow Pomade “Medium Brown”.
8. I curled my lashes using Tweezerman Pro Lash Curler, and applied Dior Backstage mascara on both upper and lower lashes.
9. I applied Gwiyomi Boutique False lashes #3 on my upper lashes.

10. For my face, I applied NARS Luminous Weightless Foundation in “Punjab”.
11. I applied NARS Radiant concealer in “Custard” under my eyes and on my blemishes.
12. I set my face using CoverFX translucent powder.
13. I lightly contoured my face using Smashbox contour kit.
14. I applied Smashbox Halo Powder blush “In Bloom” on my cheeks.
15. I added a little bit of The Balm “Mary-Lou Manizer” highlighter on top of my cheekbones, on the bridge of my nose and on my cupid’s bow.
16. For my lips, I lined and filled it using L’oreal Color Riche lip liner “Beyond Pink”. Then, I applied YSL Pop Water Glossy Stain “Eau de Coral (203)”

Products used
Eyes
- Primer – Urban Decay Primer Potion “Original”
- Base – MAC Skinfinish powder “Medium Plus”
- Transition – KVD Shade + Light Eye palette in “Ludwin”
- Crease – KVD Shade + Light eye palette in “Succubus”
- Lid/lower lash line – L’oreal Infallible eyeshadow “Bronze Divine”
- Inner corner – L’oreal Infallible eyeshadow “Sahara Treasure”
- Liner (upper and lower) – KVD Shade + Light Eye palette in “Shax”
- Waterline – L’oreal Voluminous Smoldering eyeliner
- Brows – Anastasia Beverly Hills Brow Pomade “Medium Brown”.
- Mascara – Dior Backstage
- Lashes – Gwiyomi Boutique False lashes #3
Face
- Foundation – NARS Luminous Weightless Foundation
- Concealer – NARS Radiant concealer in “Custard”
- Setting powder – CoverFX translucent powder
Cheeks
- Contour – Smashbox contour kit.
- Blush – Smashbox Halo Powder blush “In Bloom”
- Highlight – The Balm “Mary-Lou Manizer”
Lips
- Lip liner – L’oreal Color Riche lip liner “Beyond Pink”
- Lip stain – YSL Pop Water Glossy Stain “Eau de Coral (203)”
UD Naked Smoky Tutorial “Iconic Smoky Eye”
As you know from my Instagram, I recently purchased and received my UD Naked Smoky Palette. I was so excited when I got it yesterday, and couldn’t wait to play around with it, so I created this UD Naked Smoky Tutorial! I bought mine online from Sephora since the palette was an online exclusive. It arrived within 3 days of my order, pretty fast and I’m one happy gal!
Anyways, I’ll try to do a review of the palette pretty soon. For now, I just wanted to share with you this look that I re-create from their leaflet. The palette came with a leaflet that contained several different looks you can achieve, and I chose to do the Iconic UD Smoky Eye look. I replaced some of the products, like the eyeliner, blush, lipstick etc since I don’t own those. Nevertheless, I used all the shades mentioned in the leaflet accordingly.
Personally, for me, this kind of smoky eye look is supposed to be messy and worn in, I skipped wearing false lashes. False lashes tend to make everything look more glamorous. If you prefer, though, feel free to add the falsies.

The transition shade, Combust, doesn’t really show up on pictures below because it’s very similar to my skin color. However, this step is very important whether the color shows up or not because this transition shade will allow for a smooth edge on your smoky eyes. It will diffuse the grey eyeshadow on the crease into your skin seamlessly.
The brow bone shade, Thirteen, is a vanilla shade. It might look like there’s nothing on the brow bone at first (top middle row) in the pictorial, but as you add those darker colors on the lid, the highlight becomes more prominent. If you like a highlight on the brow bone, feel free to add more at the end of the look. If you have a hooded lid, I recommend not to add too much or any since it might create a hooded effect even more.
Products used
Eyes
- Primer – Urban Decay Primer Potion “Original”
- Base – MAC Mineralized SkinFinish “Medium Plus”
- Transition – UD Naked Smoky “Combust”
- Brow bone – UD Naked Smoky “Thirteen”
- Eyeliner/waterline – L’oreal “Voluminous Smoldering” Eyeliner
- Eyelid/lower lash line – UD Naked Smoky “Smolder”
- Crease/lower lid – UD Naked Smoky “Password”
- Inner Corner – UD Naked Smoky “High”
- Lashes – Dior “Diorshow” Mascara
- Brows – Anastasia Beverly Hills Brow Wiz “Medium Brown”
Face
- Foundation – Dior “Diorskin Star foundation 031”
- Concealer – Dior “Diorskin Star concealer 03”
- Setting powder – CoverFX translucent setting powder “light”
Cheeks
- Contour – Smashbox Contour Kit “contour”
- Blush – Smashbox Halo Powder Blush “In Passion”
- Highlight – The Balm “Mary-Lou Manizer”
Lips
- Lip pencil – UD lip pencil “Naked 2”
- Lip Balm – vaseline
Big Dolly Eye Makeup Tutorial
Today’s Big Dolly Eye Makeup tutorial is for those who’d like to make their eyes look enlarged and more doll-like! I think this type of makeup look is very popular in Asia, and I know personally in my home country, Indonesia, girls love this kind of look since it makes their eyes look bigger. For me, this look is already pretty heavy, and I would not wear this out for a day makeup. I’ll probably wear it if I go to party, but again, it’s up to your preference.
The key to this look is heavy eyeliner and lots of lashes. I could have done something a bit more extreme, and made it look even bigger, but I also wanted to make the look more wearable. If you want to make your eyes even bigger and more doll-like, feel free to substitute the black eyeliner on the waterline with a beige or white eyeliner. If you have monolids, you can use eyelid tape/glue/fiber to create a fold, it’ll help to open up the eyes more and make it look bigger.
Also, add more lashes, you can stack 2 lashes on the upper lashes and a bottom falsies. I don’t have bottom falsies, so I didn’t put any. The falsies I’m using is already thick and long, so I didn’t stack my falsies.
 I used my Dior Eye Reviver palette for this tutorial. I’ve used this palette on my other tutorial, so if you’d like to see the shades that correspond with the number I listed below, please check out my Summer Wedding Guest Makeup Tutorial post. I have a picture of the palette there with the shades’ numbers.
Products used
Eyes
- Primer – Urban Decay Primer Potion “Original”
- Base – Dior Eye Reviver palette “#1”
- Transition – Dior Eye Reviver palette “#3”
- Outer V/Crease – Dior Eye Reviver palette “#5”
- Eyelid – Dior Eye Reviver palette “#2”
- Outer half of lower lash line – Dior Eye Reviver palette “#5”; Kat Von D Eye Contour Shade + Light “Shax”
- Inner half of lower lash line – Dior Eye Reviver palette “#4”
- Winged liner – Kat Von D Tattoo Liner “Trooper”
- Waterline (outer half only) – L’oreal Paris Voluminous Smoldering eyeliner
- Falsies – Gwiyomi falsies “Putri”
- Brows – Anastasia Brow Wiz Taupe; Kat Von D Tattoo Brown “Medium Brown”

Face
- Primer – Kat Von D Lock-it Featherweight Primer
- Foundation – Diorskin Star Foundation “#31” (update: yes I bought #31, and its undertone matches me better than #30)
- Concealer – Dior Star Concealer “003”
- Setting powder – Diorskin Nude Air Healthy Glow Invisible Loose Powder “#30”
Cheeks
- Contour – Kat Von D Shade + Light “Shadowplay”
- Blush – Chanel “Blush de Horizon”
Lips
- Lipstain – YSL Pop Water Glossy Stain “203 (Eau de Corail)”
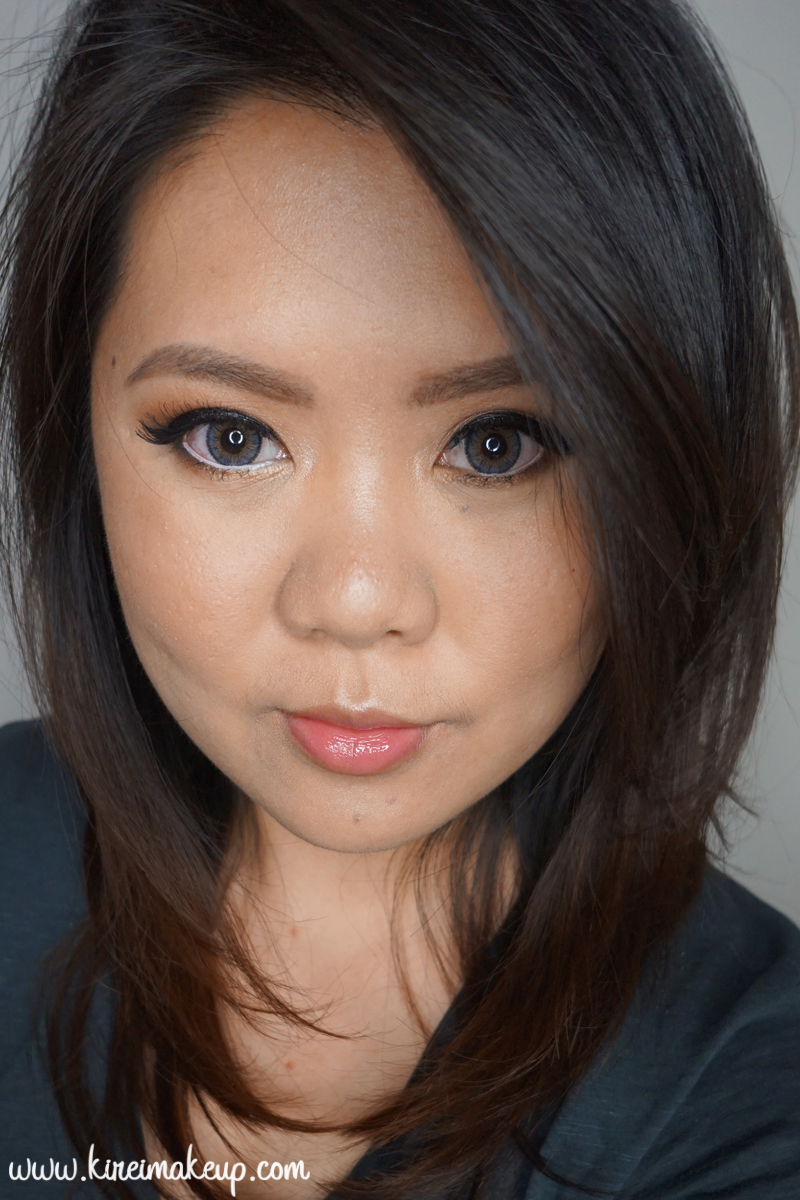
L’oreal La Palette Nude 1 Tutorial #1
I was thrilled to see L’oreal La Palette Nude 1 in Wal-Mart near my home. I had known L’oreal released this palette from their Instagram account, but didn’t have the chance to get one earlier since I was busy. Last week, I was just browsing through the makeup department in Wal-Mart while I was running errand, and I was excited to see it on the shelf. There were only 3 palettes left, so I had to grab it before it was gone.
If you have followed me on Instagram, you’d have seen half of my nude palette collection I posted last week. My obsession with nude palettes begun when I was in makeup school, where I realized on almost every single makeup jobs I had to do or assist for, most clients asked for a neutral-based makeup look whether it’s simple clean makeup or smoky eyes.
The L’oreal La Palette Nude 1 is a pretty good palette, if you’re looking for an affordable nude palette. It has a great range of shades from your highlight, medium to contour shade. The only 1 thing that’s missing from this palette is a black eyeshadow. This palette reminds me a lot of the Urban Decay Naked 1 palette.
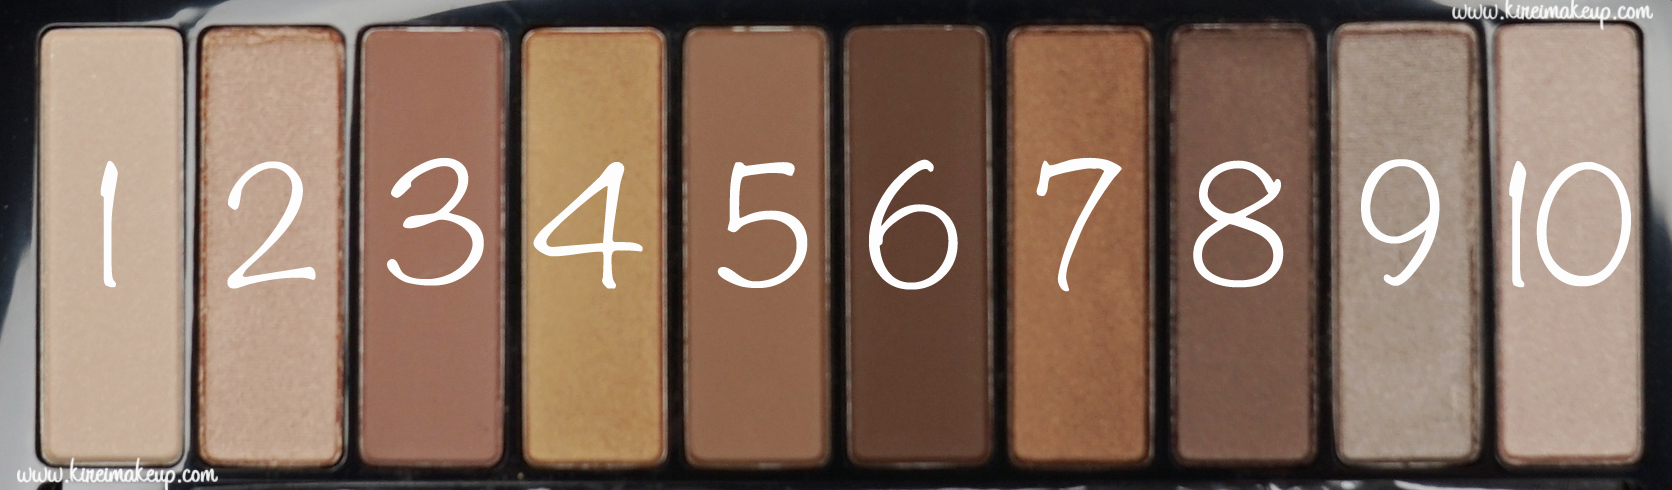
Since there’s no name of each individual shade, I’ve numbered them according to the way L’oreal numbered them. Please refer to the picture above as reference for the shades used in my pictorial below.
Products used
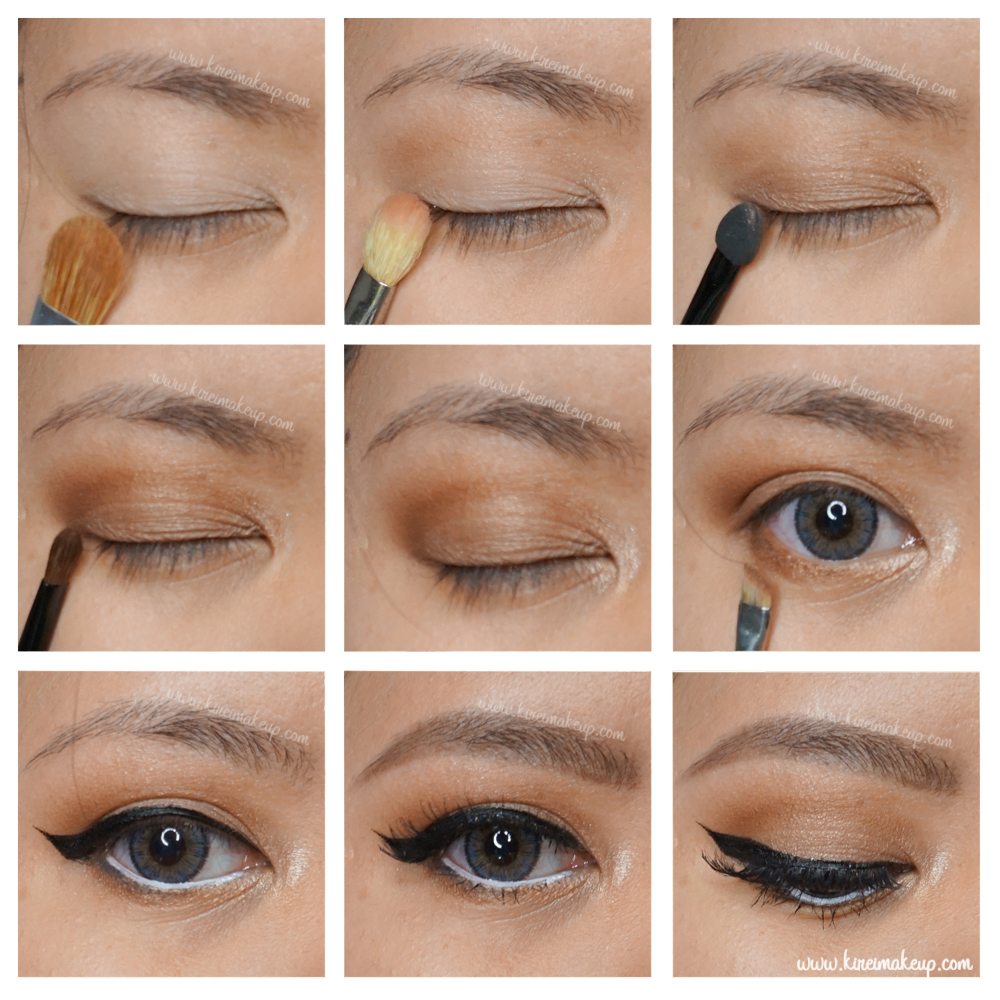
Eyes
- Primer – Urban Decay Primer Potion “Original”
- Base – L’oreal La Palette Nude 1 “#1”
- Transition – L’oreal La Palette Nude 1 “#3”
- Eyelid – L’oreal La Palette Nude 1 “#4”
- Crease/lower lid – L’oreal La Palette Nude 1 “#6”
- Inner corner – L’oreal La Palette Nude 1 “#10”
- Winged liner – Kat Von D Tattoo Ink Liner “Trooper”
- Lower lash line – Kat Von D Shade + Light Eye Contour Palette “Shax”
- Waterline – Annabelle Kohl Pencil liner “White”
- Brows – Stila All Day Waterproof Brow “Medium”; Anastasia Brow Wiz “Medium Brown”; L’oreal Brow Stylist Plumper “Light to Medium”
- Falsies – Gwiyomi Boutique no. 3 falsies
Face
- Primer – Body Shop Drops of Youth “Wonderblur” Face Primer
- Foundation – L’oreal Infallible Pro Matte Foundation “#104”
- Concealer – NARS Radiant Creamy concealer “Custard”
- Setting Powder – Coverfx setting powder “Light”
Cheeks
- Bronzer – MAC Mineralized Skinfinish “Medium Deep”
- Blush – Smashbox Halo Powder Blush “In Bloom”
Lips
- Lips – L’oreal Color Riche Extraordinaire “Blushing Harmony”