Simple Makeup using Smashbox Full Exposure Palette

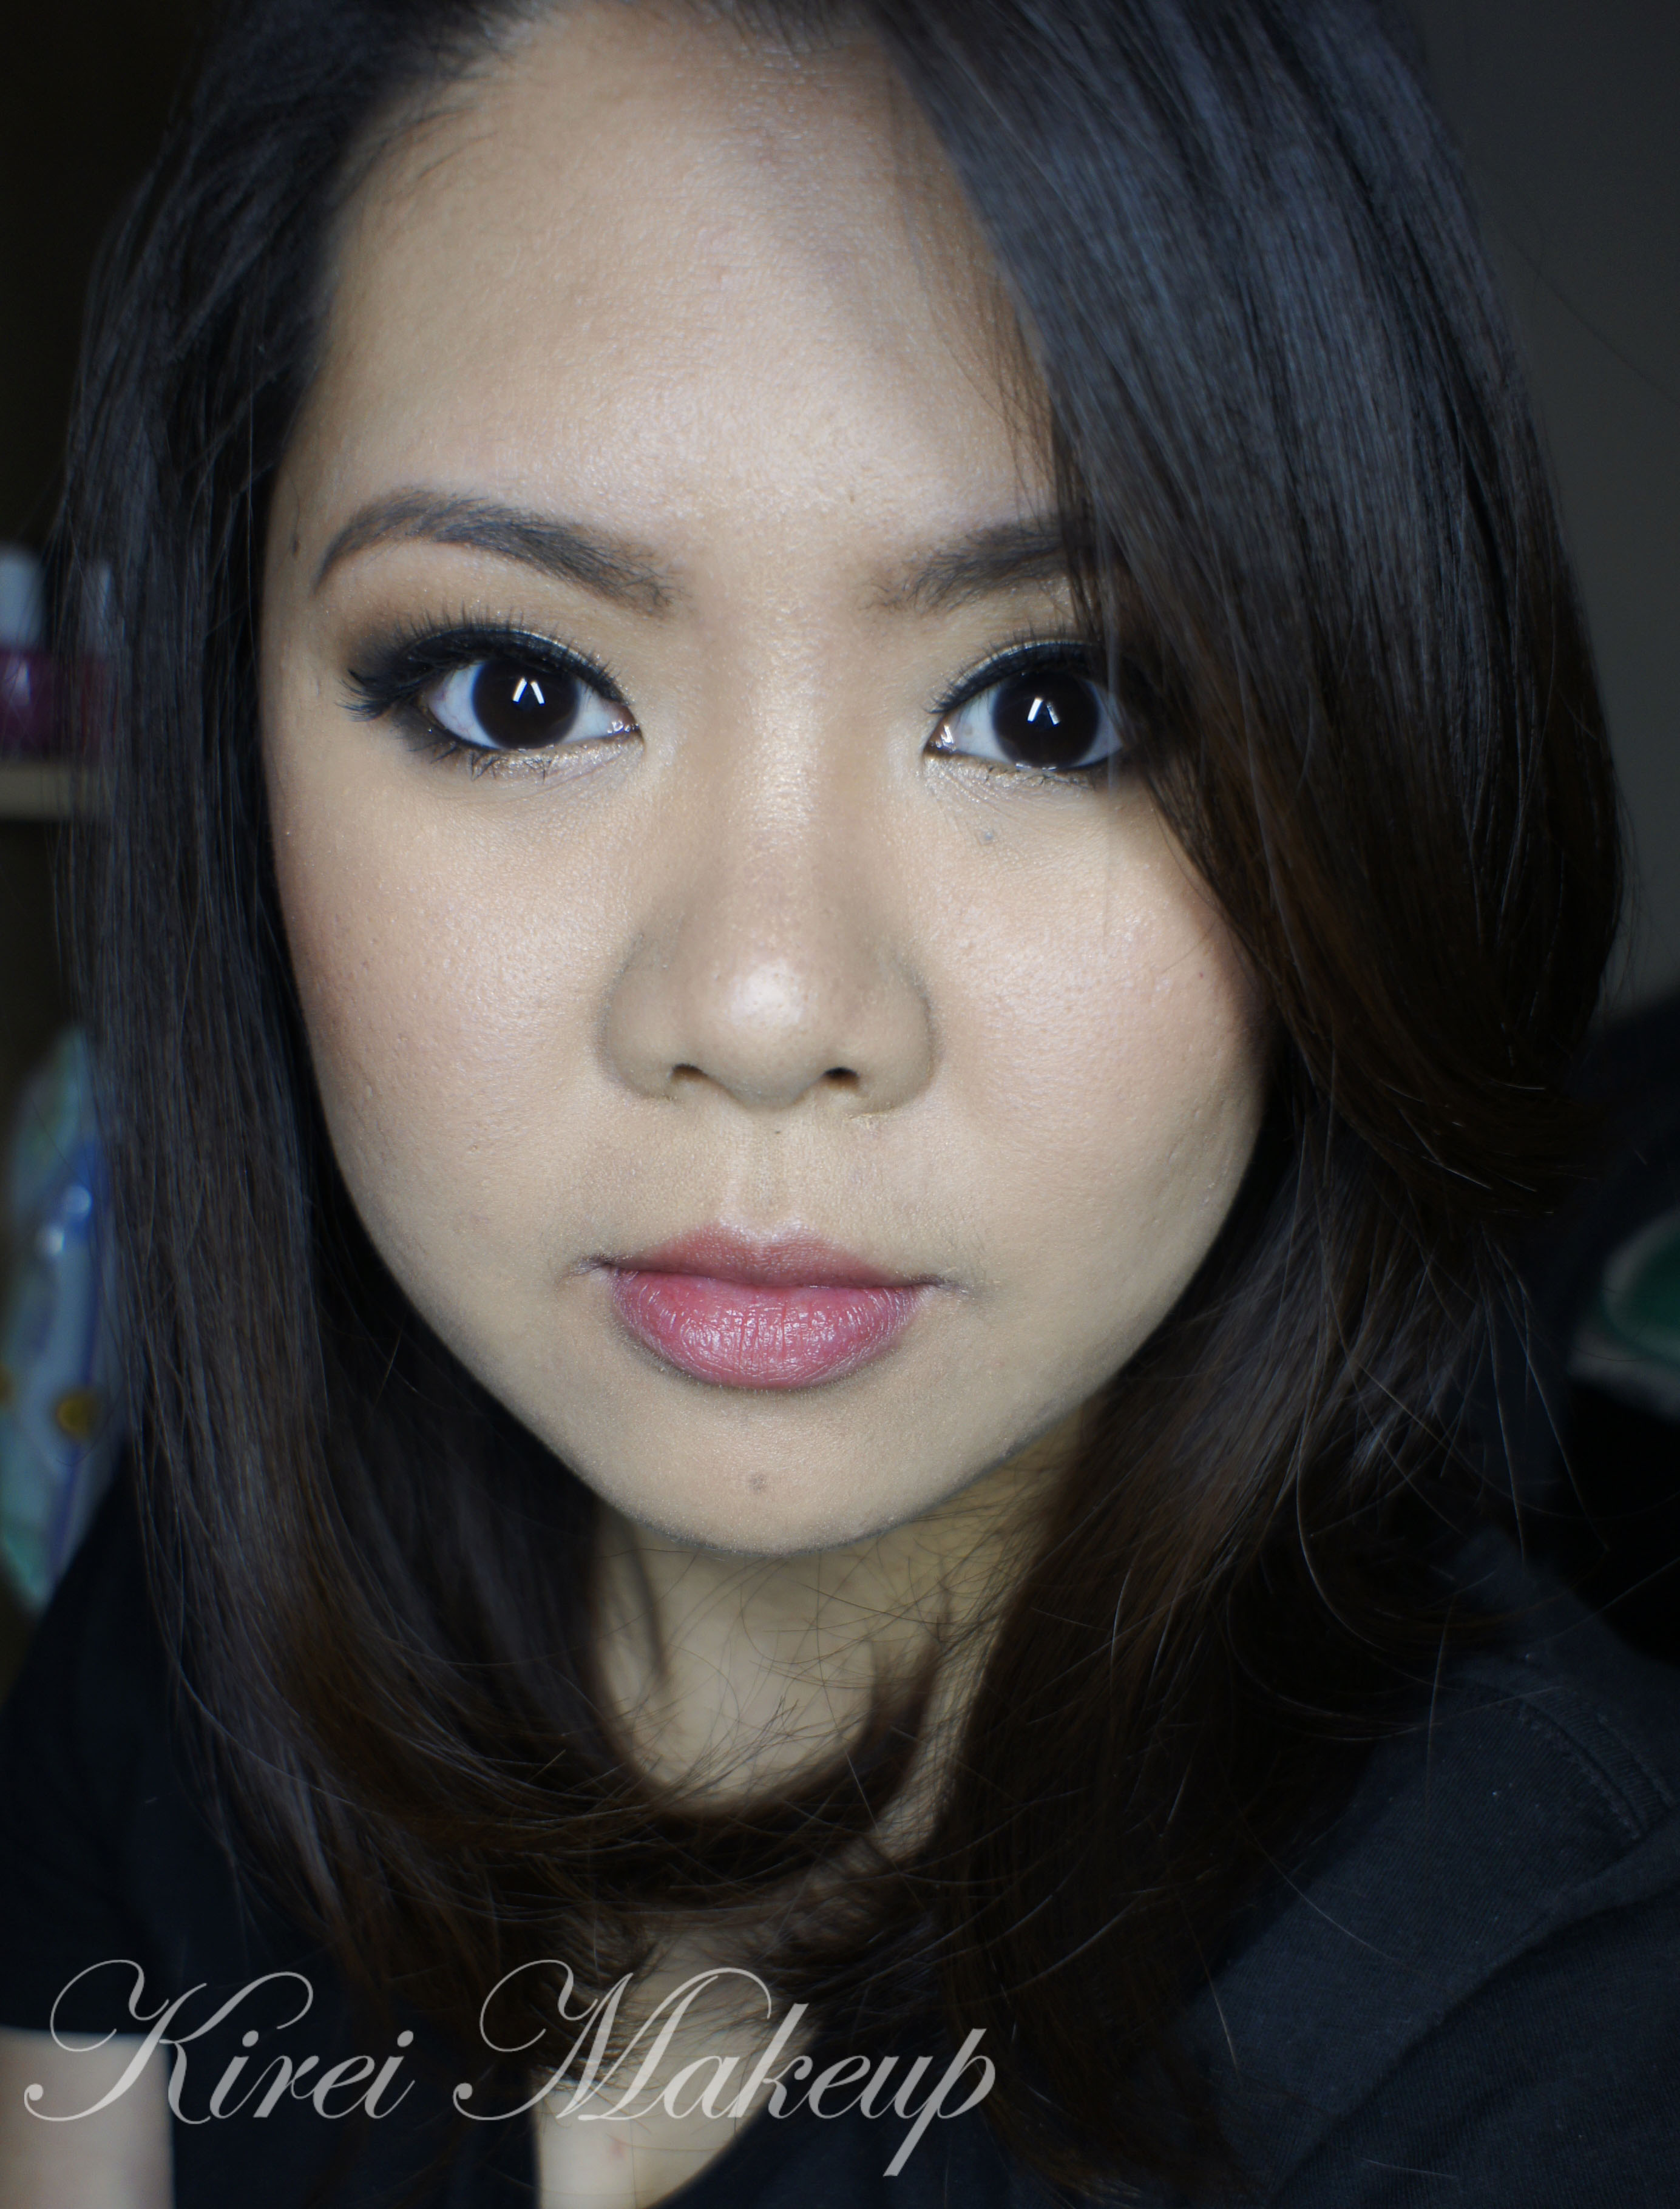
Today I wanted to share this oh-so simple makeup look. This is the look that I wore last night for a friend’s birthday dinner (check my instagram), and seemed to be wearing it almost quite often lately. The makeup itself is very easy, perfect for beginners if you want to do something different with your look. I think the only tricky part of this look is the eyeliner, but you can skip the winged eyeliner if you prefer. This is a very basic eyeshadow application technique, and you can obviously change the colors of the eyeshadow to whatever you like.

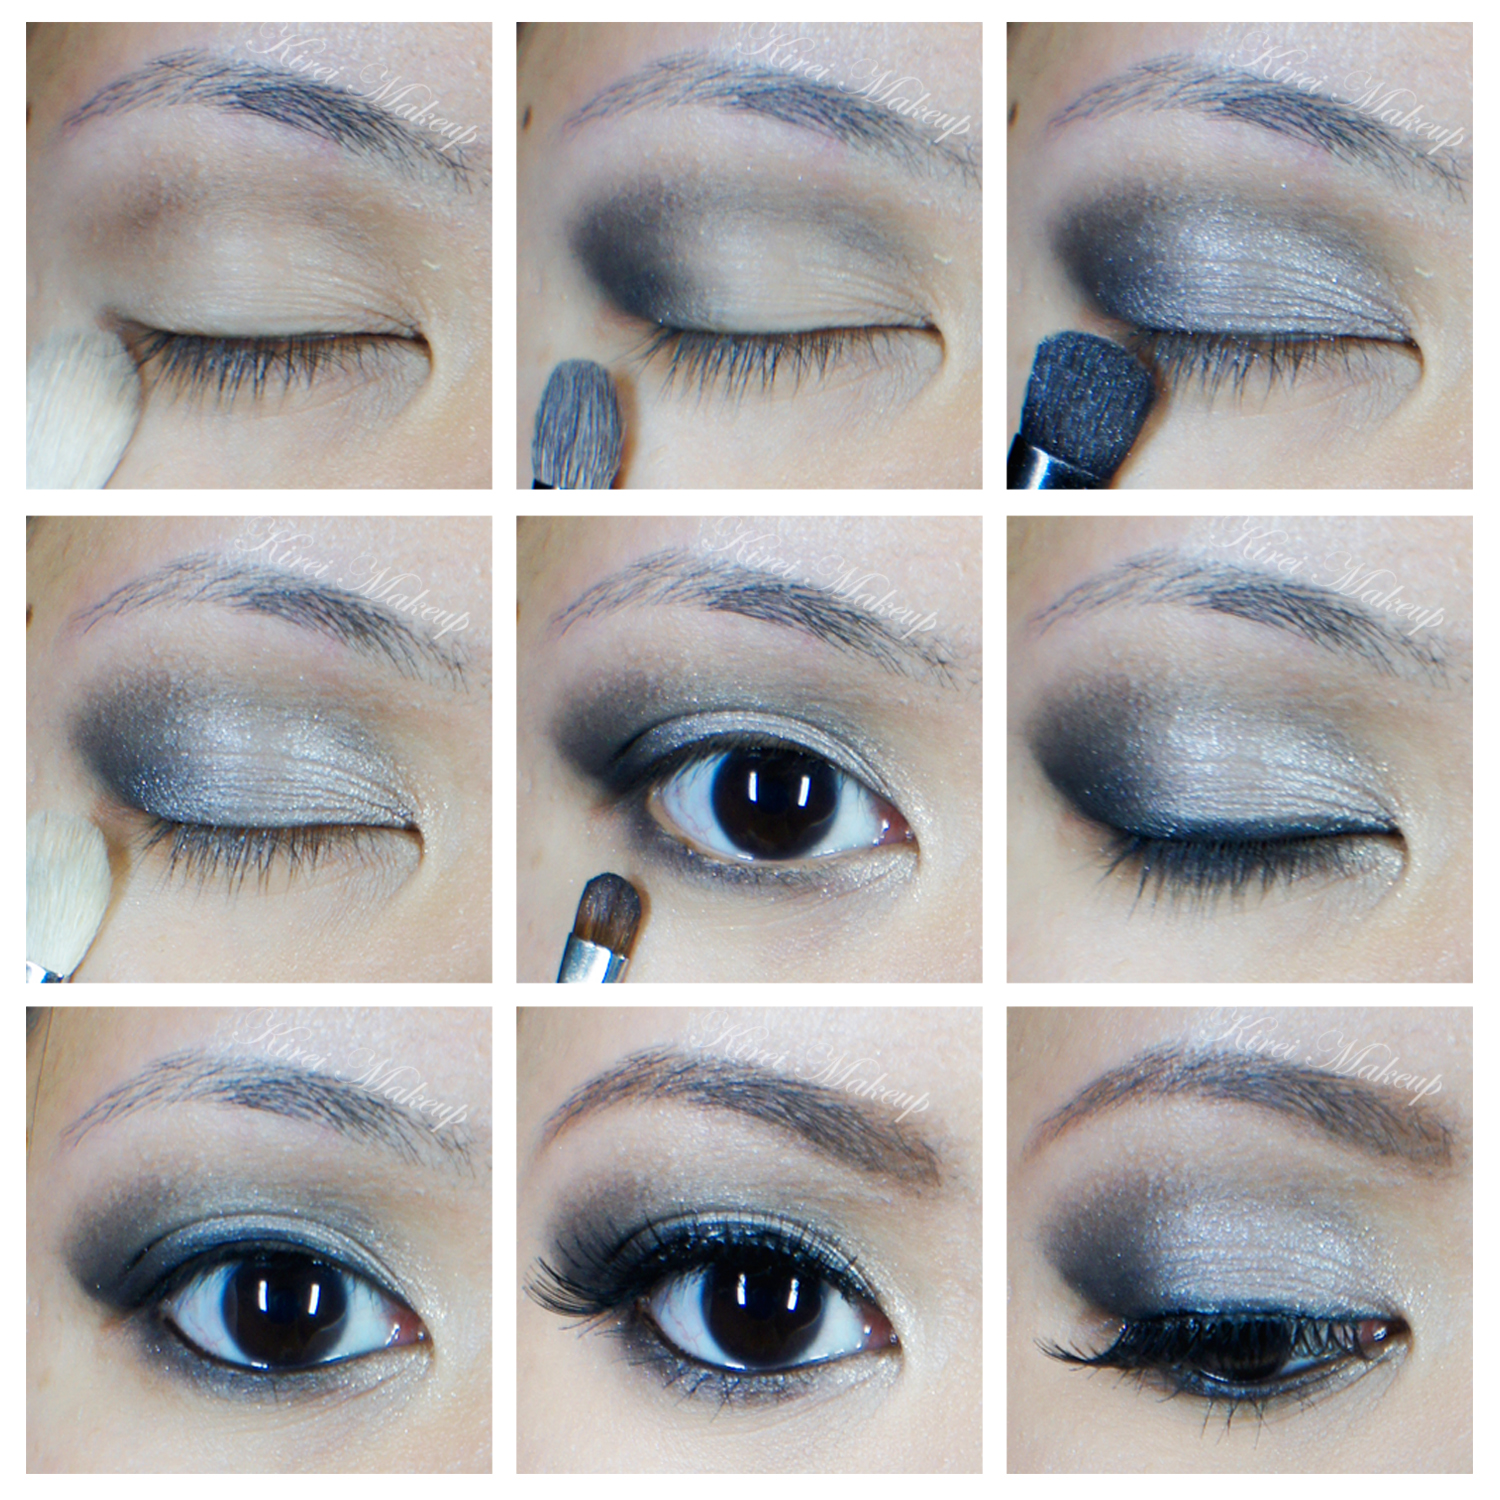
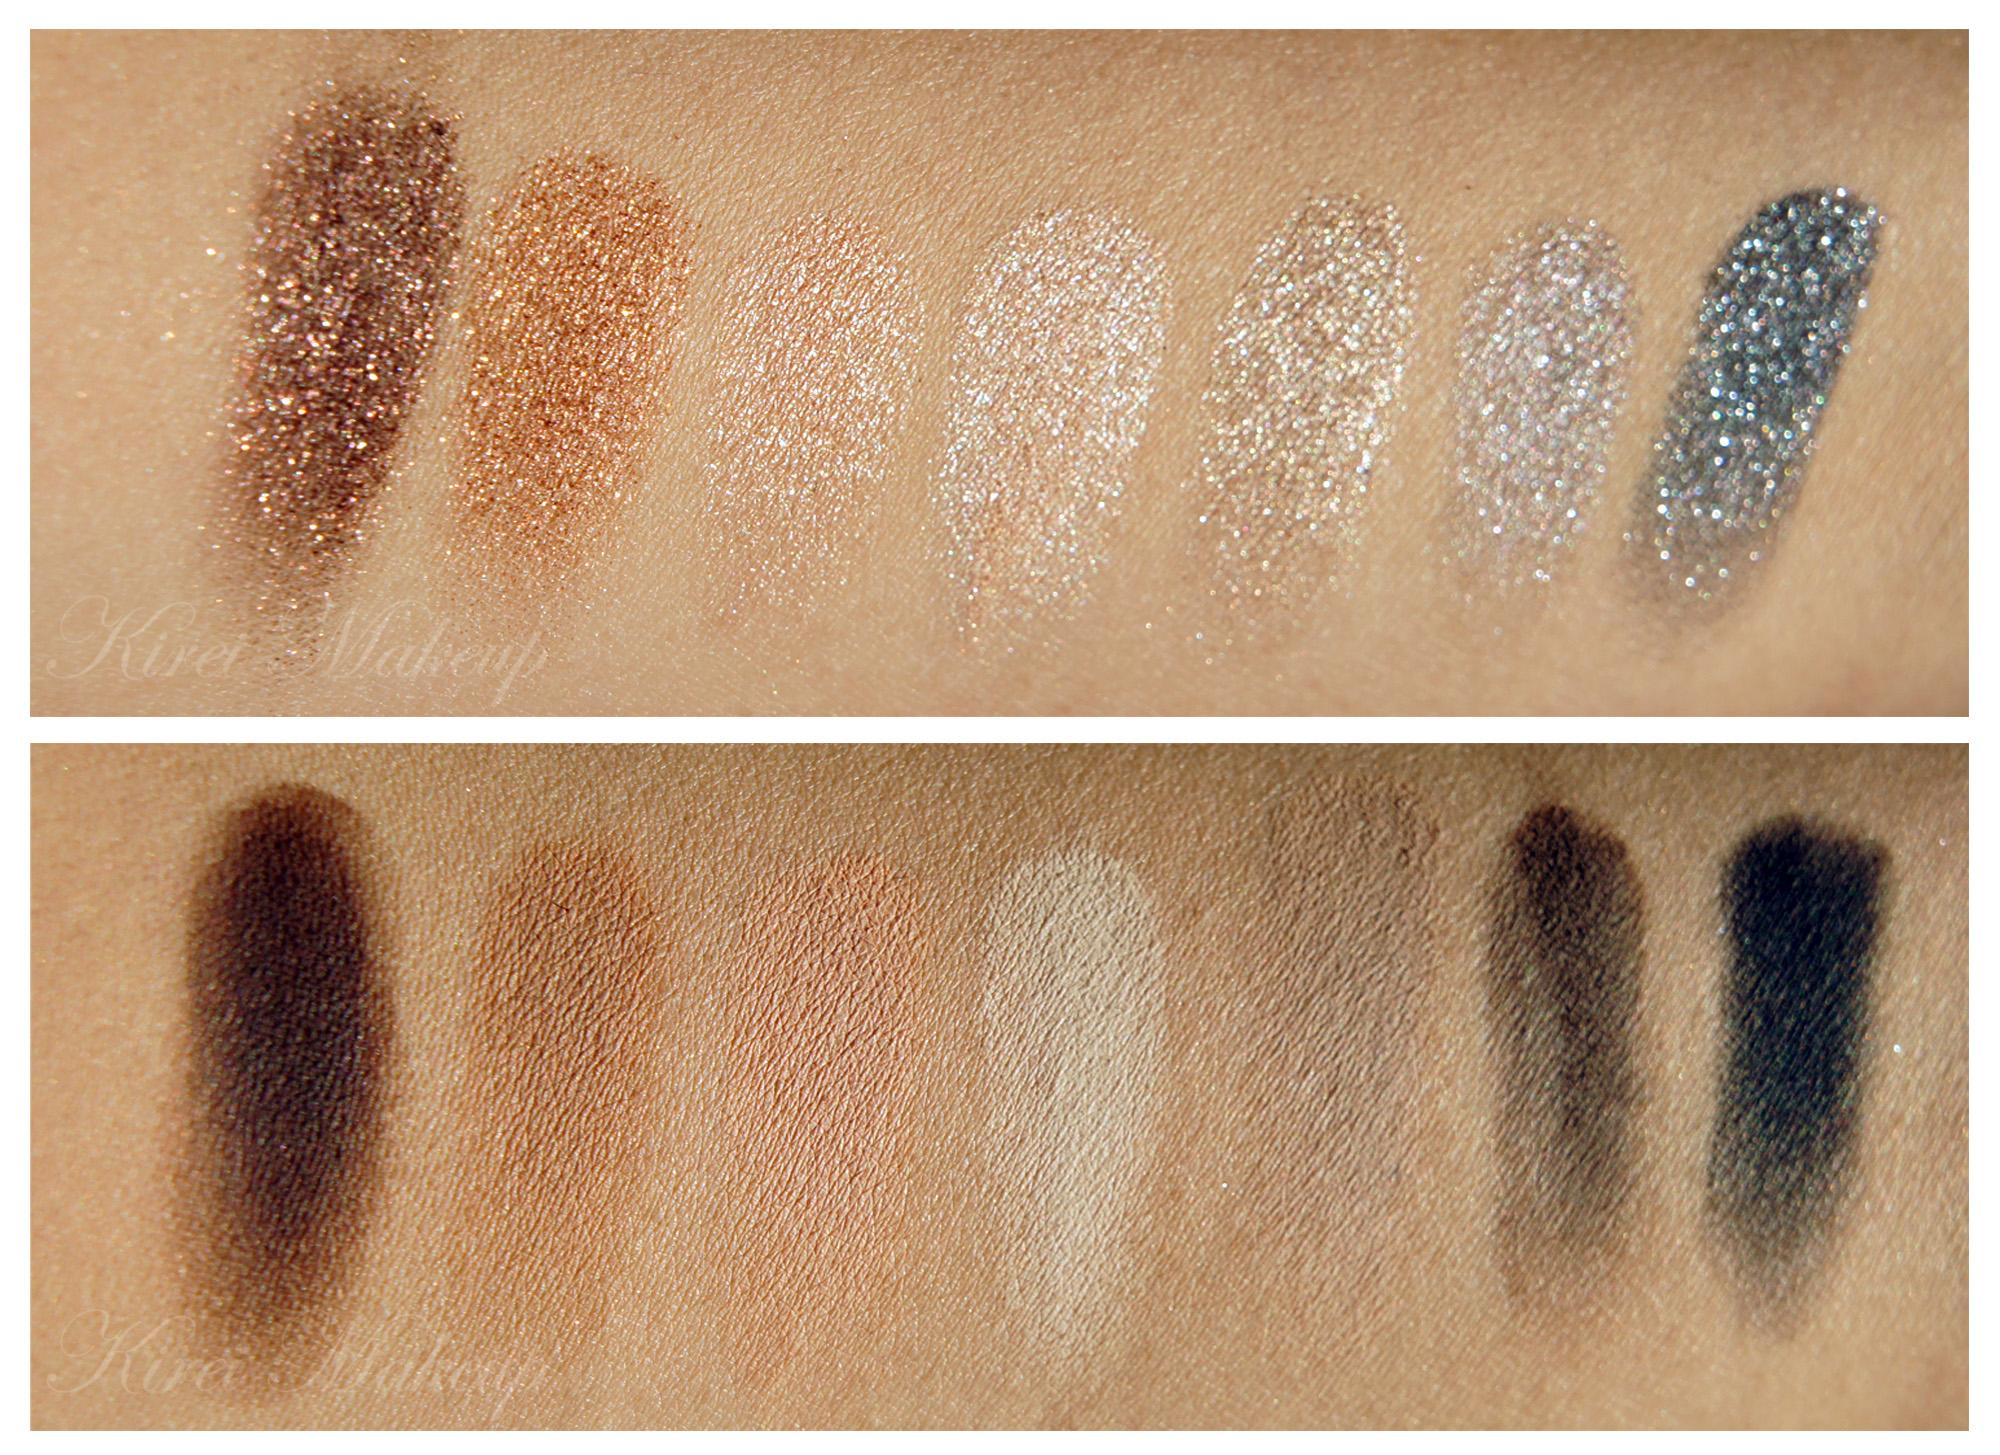
I’ve done something very similar to this look in my other Smashbox Full Exposure tutorial, but that one is more dramatic (with falsies and more liner, and slightly more smoky). If you prefer a smokier look, I’ve done 2 tutorials using this palette right here and here. I’ve also done swatches and a Smashbox Full Exposure palette review.

Scroll all the way down for complete product list.
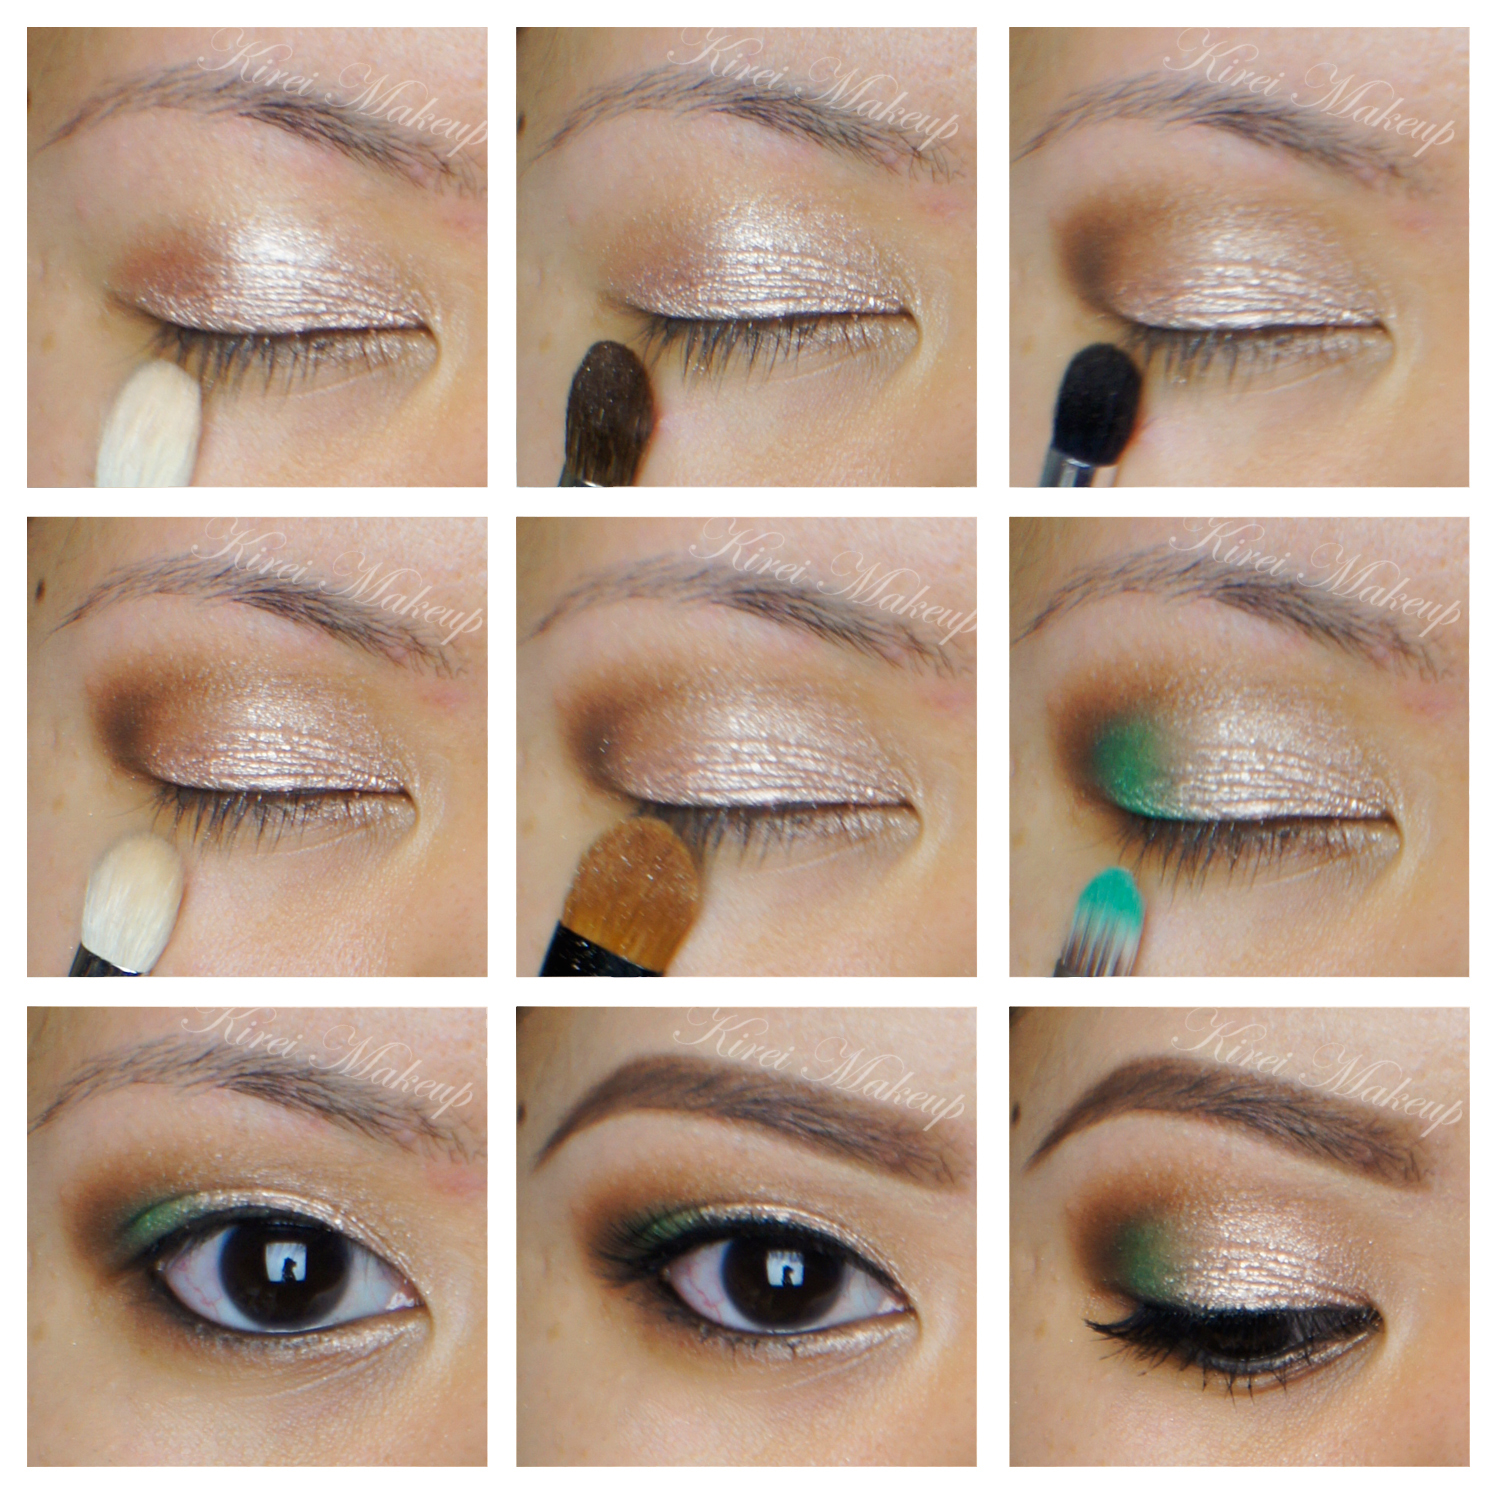
natural eyes for asian

How-to:

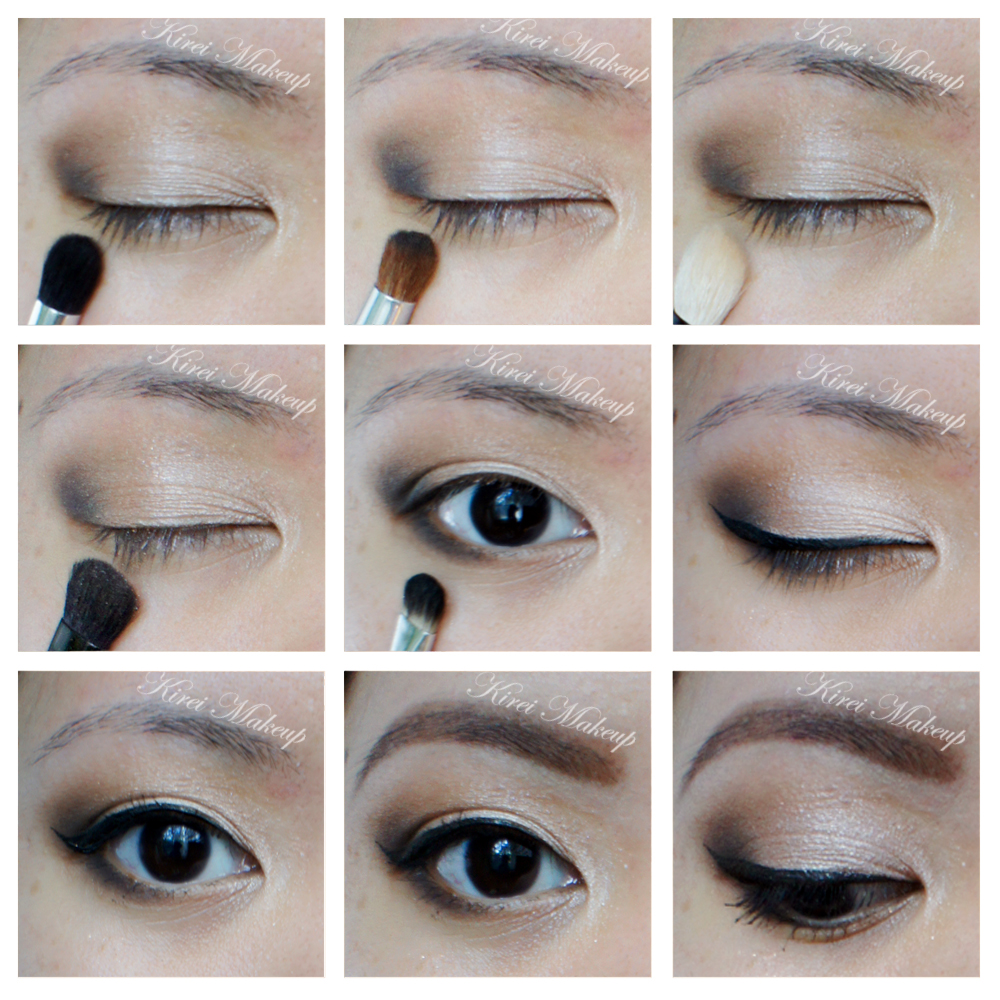
1. I prepped my lid using Urban Decay Primer Potion in Sin.

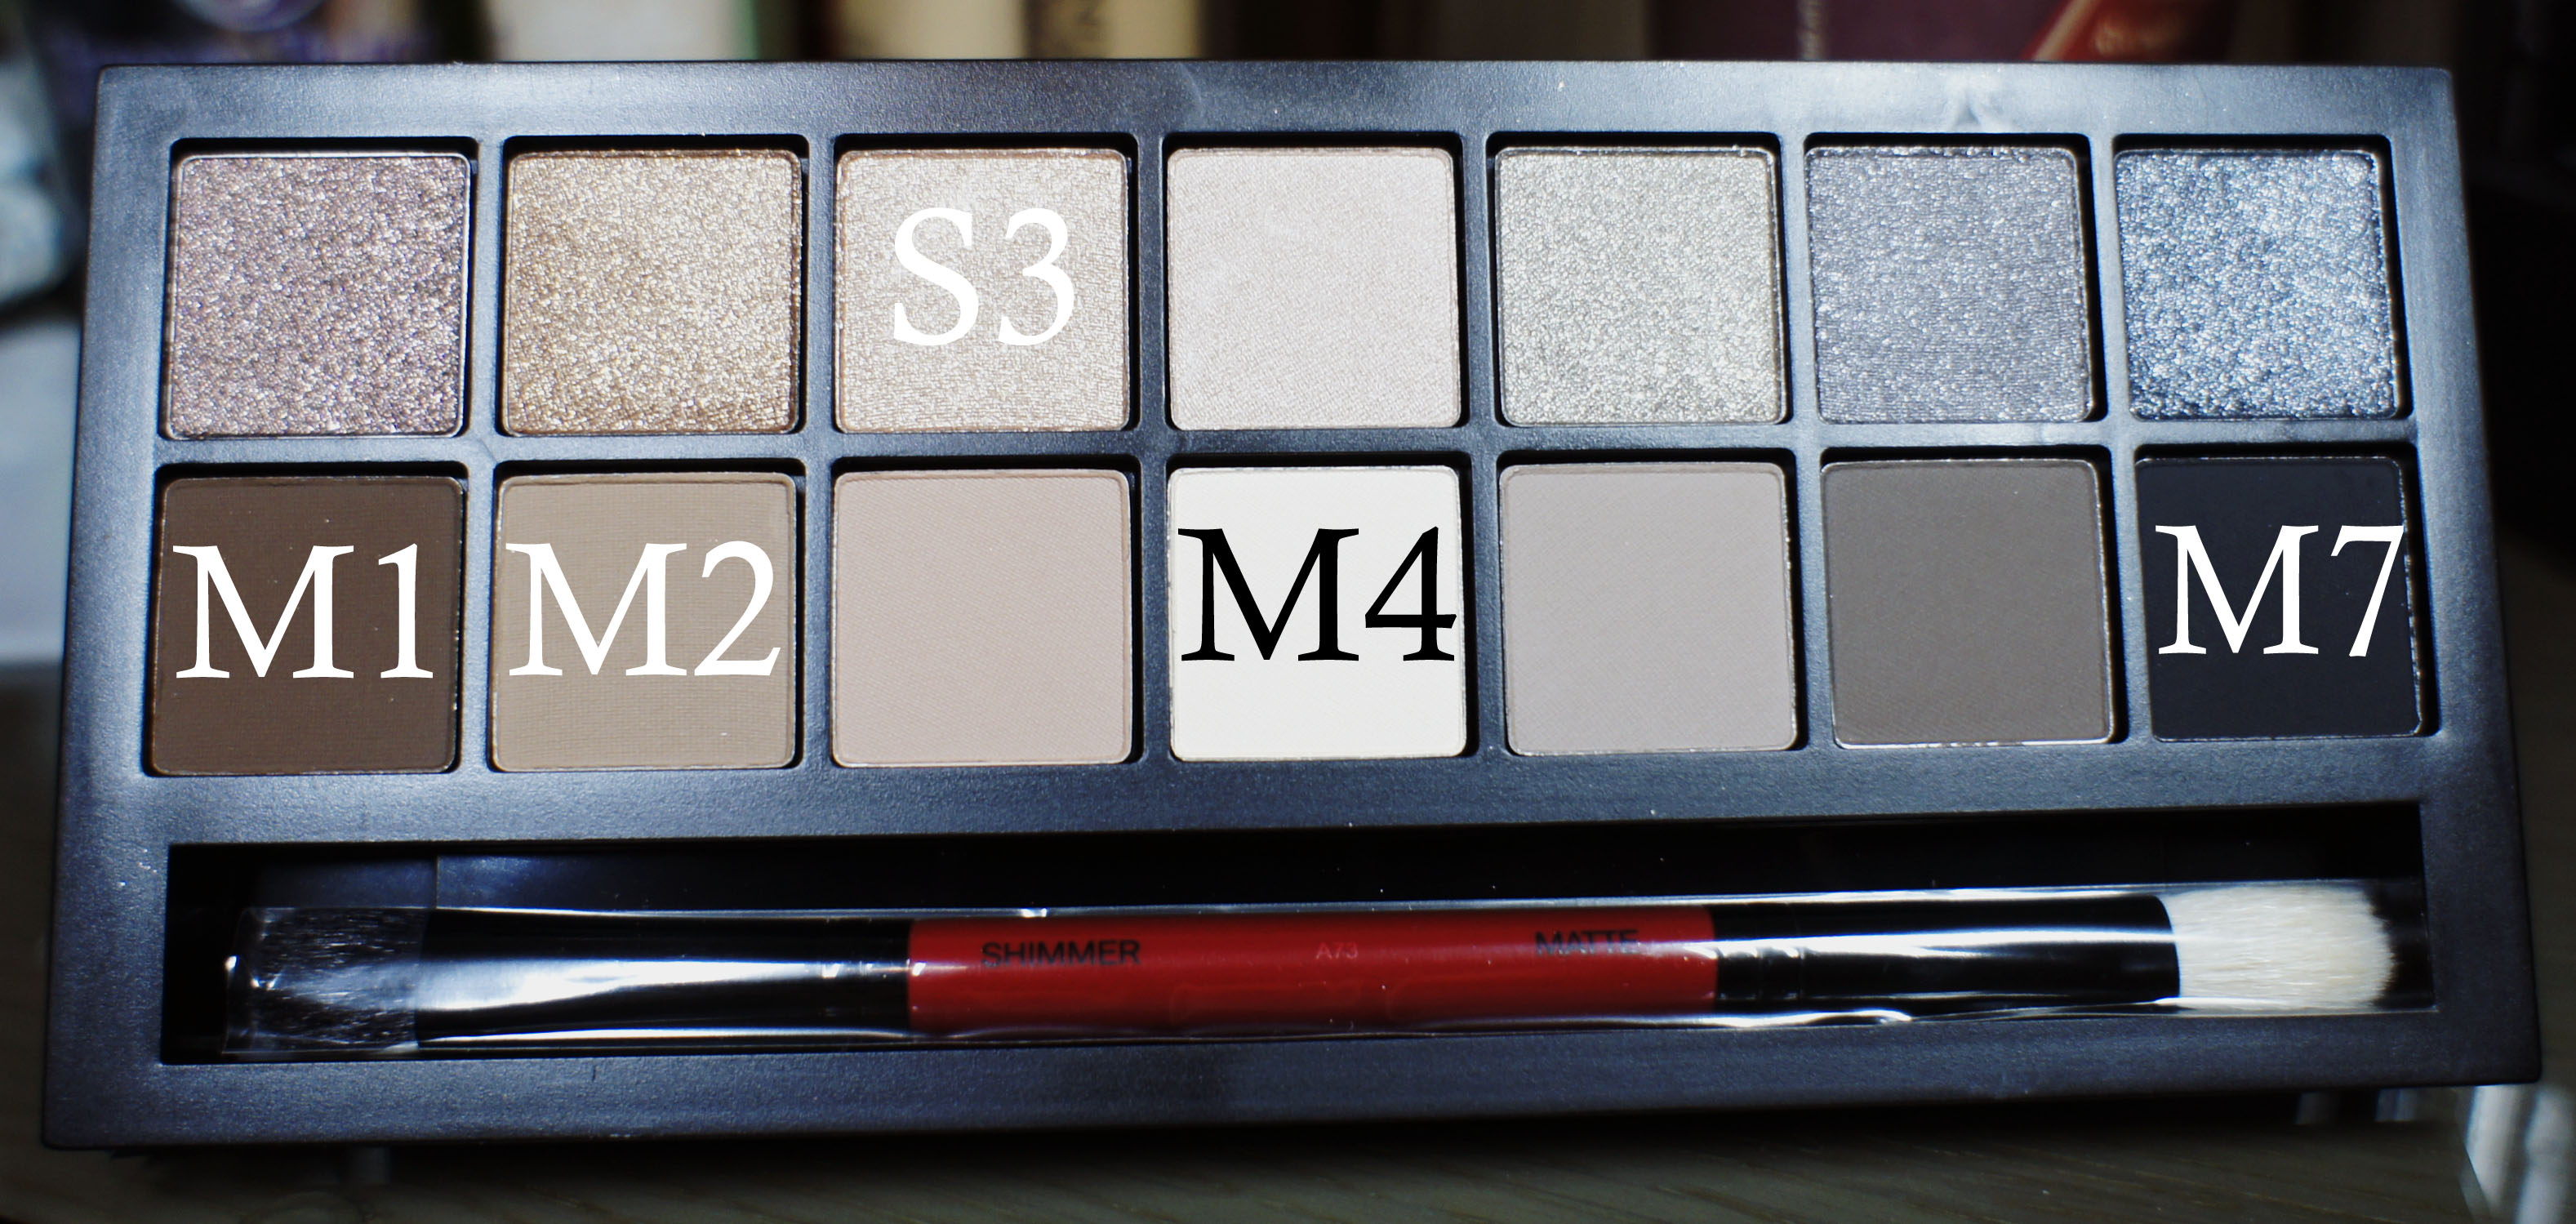
2. Using a Sephora bullet crease brush, I applied M1 on the outer V of my eyelid, blending the color to my crease.

3. Using a clean bullet crease brush, I applied M7 on just the outer part of the eye.

4. Using a clean Smashbox fluffy blending brush (from the palette itself), I applied a mixture of M2 and M3 on the crease (the picture doesn’t seem to catch those colors since it’s very close to my skin color).

5. Using the flat-end of the Smashbox brush, I applied S3 on my eyelid.

6. Using a small shader brush, I applied M7 on the outer half of my lower lid.

7. I created a winged eyeliner using Kanebo Kate Super Sharp eyeliner.

8. I curled my lashes and applied Cover Girl Lash Blast mascara.

9. I filled my brows using Anastasia Duo Brow Powder in Brunette.makeup for brown eyes

10. For my face, I applied Urban Decay Naked Skin foundation using a damped sponge.

11. I applied Smashbox contour powder (from the contour/highlight trio kit) under my cheeks.

12. I applied MAC Dainty on my cheeks.

13. For the lips, I applied MAC Please Me lipstick and a little bit of lip balm.

Product used

Eyes – Urban Decay Primer Potion Sin; Smashbox Full Exposure palette; Kanebo Kate Super Sharp eyeliner; Cover Girl lash blast mascara; Anastasia Duo Brow Powder

Face – Urban Decay Naked Skin foundation; Smashbox trio contour kit; MAC Dainty blush

Lips – MAC Please Me lipstick; L’occitane lip balm

Adding Color to Eye Makeup

Hello, everyone! I hoped you guys had a great Valentine’s and Family day weekend, yes? I had quite a blast this weekend, so I do wish that all of you had an awesome time too! I just want to let you guys know that I might not be able to update my blog this week. I’ll be traveling again, and if you want to find out where’s my next destination, follow me on Instagram!

For today’s post, I want to show you how you can add color to your eye makeup. I’ve done a “pop of color” tutorials throughout my blog – using eyeliner, on the inner corner, or on the lower lid. This time, I added the color on the outer part of my eyelid. I think it’s cute, and different, totally  unexpected! This look would be great for those who would like to try out colored eyeshadow, but doesn’t want to go full on colors with it.

For the neutral shades, I used my Smashbox Full Exposure palette, but obviously you can use any palettes you’d like. In addition, for the face makeup, I actually used it to do my Highlight, Blush, Contour (bacon) post. So, head over there to find out how I contour my face.

Scroll all the way to the bottom to find out which products I’ve used for this post – this is a new thing I’m trying to do, so you don’t have to read the step-by-step list to figure out what I’m using.

neutral smoky eyes with color

How-to:

1. I applied MUFE Aqua Cream no. 13 on my eyelid using my finger. Then I buffed the cream eyeshadow out using a clean fluffy blending brush.

2. I applied M3 eyeshadow from Smashbox Full Exposure palette on my crease using a crease blending brush.

3. Using Sephora bullet crease brush, I applied M1 from Smashbox Full Exposure palette on the outer V, dragging it ever so slightly towards the crease.

4. Using a clean blending brush, I blended out any harsh edge.

5. I applied S3 from Smashbox Full Exposure palette on my eyelid using a flat eyeshadow brush.

6. Using a clean flat eyeshadow brush (I used UD eyeshadow brush), I applied Dragon Fly from Sleek Makeup Ultra Mattes V1 Brights next to M1. I patted this eyeshadow on the outer corner, carefully blending it towards S3.

7. I lined my waterline and tightline using L’oreal Voluminous Smoldering eyeliner.

8. I applied M1 on the outer part of the lower lid, and S3 on the inner part.

9. I curled my lashes and applied Buxom Lash mascara on both upper and lower lashes.

10. I filled in my brows using Anastasia Brow Wiz.

day smoky eyes with color

11. I applied CoverFX Cream foundation in G40 as base, G20 as highlight, and N110 as contour.

12. On my cheeks, I applied Maybelline Master Glaze in Make a Mauve.

13. I set my face using CoverFX Translucent Loose powder.

14. On my lips, I applied Clinique Chubby Stick lip pencil in Bountiful Blush.

Products used:

Eyes – Smashbox Full Exposure Palette in M3 (crease), M1 (outer V), S3 (eyelid); Sleek Makeup Ultra Mattes V1 Bright (Dragonfly); L’oreal Voluminous Smoldering eyeliner; Buxom Lash Mascara; Anastasia Brow Wiz in Brunette and Ash Blonde.

Face – Cover FX Cream foundation in G20, G40, N110; Maybelline Master Glaze in Make a Mauve; Cover FX Translucent Loose Powder; Clinique Chubby Stick Lip Pencil in Bountiful Blush.

Smokey Eyes using Smashbox Full Exposure Palette

Another look using Smashbox Full Exposure Palette! I’ve created a natural warm-toned look using this palette in Smashbox Full Exposure Look #1, and I’ve also created a more glam look in Holiday Makeup using MAC Diva.

This time, I wanted to create a smokey eyes makeup with the palette, and so, I created this look! This look is a mixed of both the matte and shimmer eyeshadows from the Full Exposure palette.

Since it is smokey eyes look, you might want to do your eye makeup first before the rest of your face in case of fall-out.

How-to:

1. My eyelids were prep using Urban Decay Primer Potion.

2. Using a fluffy brush, I applied Smashbox Full Exposure eyeshadow in S6 slightly above the crease of my eyes.

3. Using a Smashbox bullet brush, I applied Smashbox Full Exposure eyeshadow in S7 on the outer V and on the crease.

4. Using the black side of the split-fiber brush from the palette, I applied Smashbox Full Exposure eyeshadow in M6.

5. Using a brush used in step 2, I blended the crease of my eyelid.

6. Using a small shader brush (MAC 228), I applied Smashbox Full Exposure eyeshadow in M5 on the inner corner of the eyes, and S7 on the rest of the lower lash line.

7. I lined my upper lash line, tightline and waterline using L’oreal Voluminous Smoldering eyeliner.

8. I applied Gwiyomi eyelashes in 8042 on the upper lashes. (Gwiyomi eyelashes are sold in Jakarta through my friend)

9. I filled my brows using Anastasia Brow Wiz in Medium Ash and Brunette.

silver smoky eyes

10. On the face, I applied Urban Decay Naked foundation using MAC Oval 6 brush.

11. I contoured my face using MAC Mineralized Skin Finish in Dark Deep.

12. On the cheeks, I applied Benefit Hervana blush.

13. I applied Chanel Lipgloss levres scintillantes glossimer (165).

Smashbox Full Exposure palette

Smashbox Full Exposure Palette Review

As promised, today I wanted to share my new favorite palette – the Smashbox Full Exposure palette. This palette would make a really great Christmas gift! I wanted to post this next week as my Product of The Week, but I really want to post this today because I’ve been teasing you all with tutorials using this palette. So, I’ll categorize this under Product of The Week even though I do not put it up on the title.

*Update (Feb. 23, 2015) – I have a Smashbox Double Exposure Palette review for you!*

What is Smashbox Full Exposure Palette?

“A set of universally awesome neutrals that’s essential, effortless, and enhanced for your eye shape. […] This totally versatile palette is organized with crease-resistant, long-wearing shimmers in the top row and velvety smooth mattes along the bottom. Fourteen essential neutral shades include a range of nudes, blacks, shimmers, and mattes. Use the brilliant eye shape chart, dual-ended brush, and Full Exposure Mascara to complete any look.

[…] Smashbox has taken the guesswork out of application with a cool, new dual-ended brush. There’s a fluffy end perfect for blending matte shades and a flat end to easily lay down the shimmer shades without sparkle overload. Plus, it’s double-sided with black bristles on one side and white on the other, so you’ll never accidentally dip a light shade into a dark shade.”

Sephora, 2013

Smashbox Full Exposure Palette ReviewAt first look, I was attracted to the huge flecks of glitters in the top row of the Smashbox Full Exposure palette. They did say it’s actually shimmer, but I feel that the light-reflecting particles are definitely too big to be considered as shimmer. I was, also, quite skeptical regarding how well the glitters would stay on the lid when being used dry since I’ve negative experience with other brands.

When I swatched the eyeshadows on my hand in Sephora, I was very surprised and happy that the glitters stayed really well at the back of my hand. That sealed the deal for me! I took the beautiful palette and paid for it.

I know quite a few reviews in Sephora website said that they hated this palette because the glitters couldn’t stick well to the skin. Well, I didn’t have this issue at all, perhaps because I applied the glitters in a different way. First of all I applied eyeshadow primer on my eyelid. Then, I used a dense flat eyeshadow brush to apply it.

If you want to see samples on how I applied the “shimmer” eyeshadow from the Smashbox Full Exposure palette, please check my posts in Smashbox Full Exposure Look #1 and Holiday Look using MAC Diva.

Smashbox Full Exposure Palette

Packaging

A black sleek carton packaging. 14 eyeshadows  in a square (yay) pan. The Smashbox Full Exposure Palette also contains 1 sample-size Full Exposure mascara tube, a double-ended split-fiber eyeshadow and fluffy blending brush, as well as a large sheet (folded in the picture) of eye makeup tutorial.

The eye chart sheet shows information on how to create several looks based on your eye shape.

Longevity

I’ve yet to wear this palette without a primer underneath. With Urban Decay Primer Potion, the Smashbox Full Exposure palette proves to be quite resilient. It lasted for 8hrs without creasing.

Smashbox Full Exposure Palette Review

Finish

Top row: shimmer (S1-S7); Bottom row: matte (M1-M7)

  • S1 – Chocolate Brown with Golden Pearl
  • S2 – Deep Golden Brown with Gold Pearl
  • S3 – Soft Gold with Gold and Silver Pearl
  • S4 – Light Tan with Gold and Silver Pearl
  • S5 – Golden Wheat with Gold Pearl
  • S6 – Midtone Slate with Silver Pearl
  • S7 – Rich Grey with Multicolor and Silver Pearl
  • M1 – Matte Warm Chocolate Brown
  • M2 – Matte Midtone Brown
  • M3 – Soft Matte Midtone Tan
  • M4 – Creamy Matte Beige
  • M5 – Soft Light Taupe
  • M6 – Ashy Dark Brown
  • M7 – Suede Black

Price

CA$58 (before tax) for 0.035oz x 14 eyeshadows, double-ended makeup brush, mascara and eye chart.

Smashbox Full Exposure Palette Swatches

Pros:

  • Excellent colors – browns, nudes, and greys.
  • You get 2 different textures – shimmer and matte.
  • Great pigment pay-off.
  • Glitters stick well to the skin if you pack the eyeshadow with a flat and dense eyeshadow brush.
  • Matte eyeshadows are not chalky, it has quite a velvet finish to it.
  • You can mix the matte eyeshadows to be used for the brows.
  • Palette have a great range of colors, which is great for different skin tones.
  • Great eye chart for inspiration.
  • Awesome brush and mascara.
  • Not too pricy – considering it’s around $5/eyeshadow when you break it down individually.
  • Makes for a great bridal palette!

Cons:

  • The flat split-fiber eyeshadow brush does not pack the glitter on the eyelid that well. You might have to use another brush for the glitters.
  • Quite a fall-out from the “shimmer” rows, so watch out! Try to do your eye makeup first before your base.

Holiday Makeup using MAC Diva

I’m on a mission to use my new Smashbox Full Exposure palette as much as I can, and in as many tutorials as possible. I will mention that I’ll be doing Smashbox Full Exposure palette review and swatches in my next post!

I’ve recently bought MAC Diva lipstick, which is a retro matte dark red lipstick. So, I wanted to start creating a holiday makeup tutorial that has a little bit of a classic look, with a modern twist. I decided to do this tutorial, which consisted of dark red lips and shimmery cat eyeliner.

Keep in mind that the glitters from Smashbox Full Exposure palette S7 eyeshadow might create a lot of fall-out. You might want to do your eye makeup first before doing the rest of the face.

If you want to see a tutorial using the Smashbox Full Exposure palette, please check my Smashbox Full Exposure Look #1 post. If you want to find out how to apply red lipstick, please check my How-To Apply [red] Lipstick post.

cat eyeliner

How-to:

1. I applied Urban Decay Primer Potion all over my eyelid using my ring finger.

2. Using Smashbox Full Exposure palette M5 eyeshadow, I applied it all over my lid using a flat eyeshadow brush.

3. I created a cat-eyeliner along the upper lash line using MAC 266 brush and Smashbox Full Exposure palette S7 eyeshadow.

4. Using the same brush and eyeshadow from Step 3, I applied the eyeshadow on my lower lash line.

5. I used L’oreal Voluminous Smoldering eyeliner on my waterline and tightline.

6. I filled my brows using MUFE Aqua Brow gel and a clean MAC 266 brush.

7. I curled my lashes and applied Physician’s Formula Organic mascara on both upper and lower lashes.

8. Then, I applied Eyeme false eyelashes on the upper lashes.

Holiday Makeup Tutorial

9. I applied MAC Pro Longwear foundation in NC30 all over my face.

10. I applied Benefit Erase Paste under my eyes.

11. I set the base using Cover FX Translucent powder.

12. Using Diorskin Shimmer Star Amber Diamond as highlighter.

13. I used MAC Shadowy as contour, and NARS Mata Hari on the cheeks.

14. On the lips, I applied MAC Brick lip liner and then applied MAC Diva on top of it.


Smashbox Full Exposure Look #1

I’ve recently bought Smashbox Full Exposure palette using my 20% discount from Sephora (yippie!). I’m pretty sure if you guys follow me on Instagram or Twitter, you would’ve seen the picture of the palette there.

Anyways, I’ll talk more about the palette in depth later on. I just have to say, this is an amazing palette! The shimmer side of this Smashbox Full Exposure Palette has beautiful glitters, which surprisingly stayed on the lid really well. Not to mention, the palette consists of nudes, greys, blacks and browns! Both in shimmer and matte! So much love!

This look is perfect for everything! If you want to wear it out on a date, skip the false lashes. It’s so perfect for the upcoming holiday (too early?), brides and any type of parties. It’s warm, not too smoky, not too light. Just enough shimmer, and I love the combination of different textures.

The rest of the face is kept quite minimal, with a tad more highlight to compensate for this winter weather. I used L’oreal Color Caresse Shine Stain to keep my lips moist.

smashbox full expsoure palette

How-to:

1. I prepped my eyelid using Urban Decay Primer Potion.

2. Using a fluffy blending brush (Crown Brush Pro Blending Fluff C433), I applied Smashbox Full Exposure palette M2 eyeshadow slightly above my crease.

3. Then, using Sephora Bullet Crease 221 brush, I applied M1 on the outer V and on the crease.

4. I applied Smashbox Full Exposure palette M7 on the outer quarter of the lid using Crown Brush Round Crease.

5. I used the tip of the Round Crease Crown brush to apply Smashbox Full Exposure palette M1 eyeshadow on the lower lid. Then, I applied M7 just on the outer half of the lower lid.

6. Using  Firm Shadow 157 Crown Brush, I applied S3 on the eyelid.

7. I created a winged liner along the upper lashline using Kanebo Kate Super Sharp Liner.

8. I lined the outer half of my tightline using the black side of Revlon PhotoReady Kajal Intense Eye Liner + Brightener in Carbon Cleopatra.

9. I applied Tarte Light, Camera and Lashes mascara, and also Eyeme false eyelashes (sample from a friend) on the upper lashes.

10. Using Red Sable Oval Crown Brush, I applied Smashbox Full Exposure palette M4 under the brows.

11. I filled my brows using Anastasia Brow Wiz in Medium Ash and Brunette.

smashbox full expsoure palette

12. I applied MUFE HD Elixir to prep my face.

13. Then, I applied MAC Pro Longwear foundation in NC30 all over my face.

14. Under the eyes, I applied Giorgio Armani Master Corrector no. 2.

15. Then, I applied MAC Pro Conceal/Corrector in Medium under my eyes, and on my blemishes.

16. I powdered my face using CoverFX Translucent loose powder.

17. I applied MAC Shadowy as contour, MAC Cubic as blush, and Diorskin Shimmer Star Amber Diamond as highlighter.

18. On the lips, I applied L’oreal Colour Caresse Shine Stain in Eternally Nude.

smashbox full expsoure palette