Holiday Makeup 2016 – Purple Smoky Eyes

Today I’m doing another Holiday Makeup 2016 look, and for this post I’m doing a really dark purple smoky eyes. I actually intended to create a matte purple smoky eyes but I couldn’t resist adding a little bit of shimmer in the middle of my eyelid.

Anyways, as always, watch the tutorial & read more below for further info!

 * Marc Jacobs Style Eye-Con no. 20 Gold Smoky Eyes *

https://youtu.be/jII6d39qWv0

Read More

Purple Smoky Eyes ft. Shu Uemura Blushing Beige

Another glitter look but today I’m doing a Purple Smoky eyes with Glitter liner! Seems like I’m on a glitter roll lately, eh? Anyways, today I’m going back to Shu Uemura Blushing Beige palette since I feel that this palette is under appreciated. A viewer on my Youtube channel also requested more looks using this palette, and so I’ll try to create more tutorials using the Blushing Beige palette. Read more below!

Read More

MAC Beautiful Iris

I recently fell in love with MAC Beautiful Iris eyeshadow, and had used it in my previous tutorial. Anyways, I just think this eyeshadow is so pretty for Spring/Summer makeup, especially for those who are not afraid of colors. If you’re on the conservative side, please take a look at Neutral Eyes with a Pop of Color on how to add a bit of color to your makeup wardrobe.

Anyhow, I decided to pair this purple eyeshadow with very soft warm brown colors, this way the makeup stays pretty soft and not too much. I used my Kat Von D Shade + Light eye contour palette for the rest of the eyes. I will try to do a review on that palette soon update: Review is up! I have so much review to do, not enough time. I’m still busy with the move, so I haven’t settle down yet. It’s kind of hard for me to do tutorials and getting back into my posting routine with all the stuff lying everywhere. *sigh*

purple eye makeup

Products used

Eyes

  • Primer – Urban Decay Primer Potion “Original”
  • Base – Kat Von D Shade + Light eye contour palette “Laetus”
  • Transition – Kat Von D Shade + Light eye contour palette “Ludwin”
  • Outer V/Crease/lower lashline – Kat Von D Shade + Light eye contour palette “Sytry”
  • Eyelid – MAC eyeshadow “Beautiful Iris”
  • Winged liner – Kanebo Kate Super Sharp eyeliner
  • Waterline – MAC Chromagraphic eyeliner “NC15”; Kat Von D Shade + Light eye contour palette “Liberatus”
  • Mascara – Lancome “Hypnose”
  • Eyebrows – Anastasia Brow Wiz “Taupe”; L’oreal Brow stylist
  • Falsies – Gwiyomi Boutique no. 3

mac beautiful iris

Face

  • Primer – Becca “Ever Matte Poreless Priming Perfector”
  • Foundation – L’oreal Infallible Pro-Matte Foundation “104 – Golden Beige”
  • Concealer – NARS Radian Creamy concealer “Custard”
  • Setting powder – CoverFX translucent powder

Cheeks

  • Contour – Kat Von D Shade + Light Contour Palette “Shadowplay”
  • Highlight – Kat Von D Shade + Light Contour Palette “Lyric”
  • Blush – NARS blush “Mata Hari”

Lips

  • Lipstick – Revlon Colorstay Ultimate Suede “Flashing Lights”
  • Lip gloss – Make Up For Ever Artist Plexi-Gloss “202 (sweet pink)”

mac beautiful iris

Smashbox Double Exposure Tutorial #2

Happy Lunar New Year, everyone! May this year of Goat brings you lots of luck, prosperity, and great health! I’m sorry I’ve been missing this week, has been quite a busy week with personal life. Things are settling down soon hopefully. Anyways, today’s Smashbox Double Exposure tutorial is a little bit smoky and with some colors! This is my second look (check out my first one) with this palette, and I have to say, I’m loving it!

I’ll try to do a review for this palette soon, hopefully by the end of the week or beginning of next week. Since I have yet to do the review, I just want to let you guys know a little spoiler – the eyeshadows in this palette can be applied dry or wet! For this look, I only used the lid color wet, while the rest was applied dry. I’ll do swatches of the eyeshadows applied dry and wet to see if there’s any difference for my review, so keep checking back or subscribe to my blog so I can notify you when the post is up!

halo smoky eyes

Eyes

  • Base – Urban Decay Primer Potion
  • Eyeshadows – Smashbox Double Exposure palette
    • Transition (or above crease) – Espresso
    • Inner/Outer V/lower lash line – Temper
    • Middle lid – Flushed (applied wet)
    • Crease/outer lower lid – Noir
    • Inner lower lid – Blanc
  • Eyeliner
    • Winged liner – Kat Von D Trooper Tattoo Liner
    • Waterline – L’oreal Voluminous Smoldering eyeliner
  • Eyebrow – Anastasia Brow Wiz in Taupe and Brunette
  • Mascara – Smashbox Full Exposure Mascara
  • False lashes – Gwiyomi False lashes #3

(continue below)

asian soft smoky eyes

Face

  • Foundation – Kat Von D Lock-it Tattoo Foundation
  • Powder – Hourglass Ambient Lighting Powder

Cheeks

  • Contour – Smashbox contour kit
  • Blush – Smashbox In Bloom Halo blush

Lips

  • Lipstain – Clinique Chubby Lip Stick in Bountiful Blush

smashbox double exposure tutorial


Sleek Makeup Showstoppers – Smoky Purple Tutorial

I’ve bought several Sleek Makeup iDivine palettes back when I was in Jakarta from Luxola website. I love the iDivine palettes, and have used some of the palettes regularly for my makeup job. Today, I want to showcase the Sleek Makeup Showstoppers palette since I haven’t do a tutorial using this palette yet.

I’ll try to do a review and swatches of the Sleek Makeup Showstoppers next time. I love the combination of sparkles, matte and shimmers in this palette. For today’s tutorial, I wanted to use some colors since I’ve been doing quite an earthy, brown, neutrals on my previous tutorials.

I’ve done a similar tutorial like this one using a more wearable color in my Pearlescent post. I love having the highlight in the center of the lid. It looks so gorgeous when you blink. You can obviously do this tutorial with any colors you like. I’ll try to do another tutorial using another color, something more wearable.

Anyways, let’s get to the tutorial!

Sleek Makeup iDivine ShowstopperHow-to:

1. I applied Sparkle from Sleek Makeup Showstoppers palette on the outer corner, and the inner corner of my eyelid using a flat eyeshadow brush. I also applied the eyeshadow on the crease as well. Leave the center of the lid empty.

2. Using a clean flat eyeshadow brush, I applied Bad Girl eyeshadow from Sleek Makeup Showstoppers on the center of my eyelid.

3. Using a fluffy blending brush, I picked Oh So Special from the Showstoppers palette and applied it to the crease. Do it very lightly at first, and add more color if needed.

4. Using the flat eyeshadow from step 2, I blended out Bad Girl eyeshadow. Do not add anymore eyeshadow at this time. Just use whatever is left on the brush.

5. Using a small angled eyebrow brush, I applied Sparkle on the lower lid.

6. I created a cat eyeliner on the upper lash line using Kanebo Kate Super Sharp eyeliner.

7. I lined my waterline and tightline using L’oreal Voluminous Smoldering eyeliner.

8. I filled in my eyebrows using Anastasia Duo Brow Powder, and an angled eyeliner brush.

9. I applied L’oreal Carbon black mascara on both upper and lower lashes, then I applied false eyelashes (haphazardly because I was rushing…sorry).

Sleek Makeup Showstopper

10. I applied MUFE HD Foundation in 118 all over my face.

11. I applied Blush Horizon de Chanel on my cheeks.

12. On the lips, I applied MAC Whirl lip liner and then Revlon Socialite lipstick on top.

Sleek Makeup iDivine Showstopper

Sweet Plums

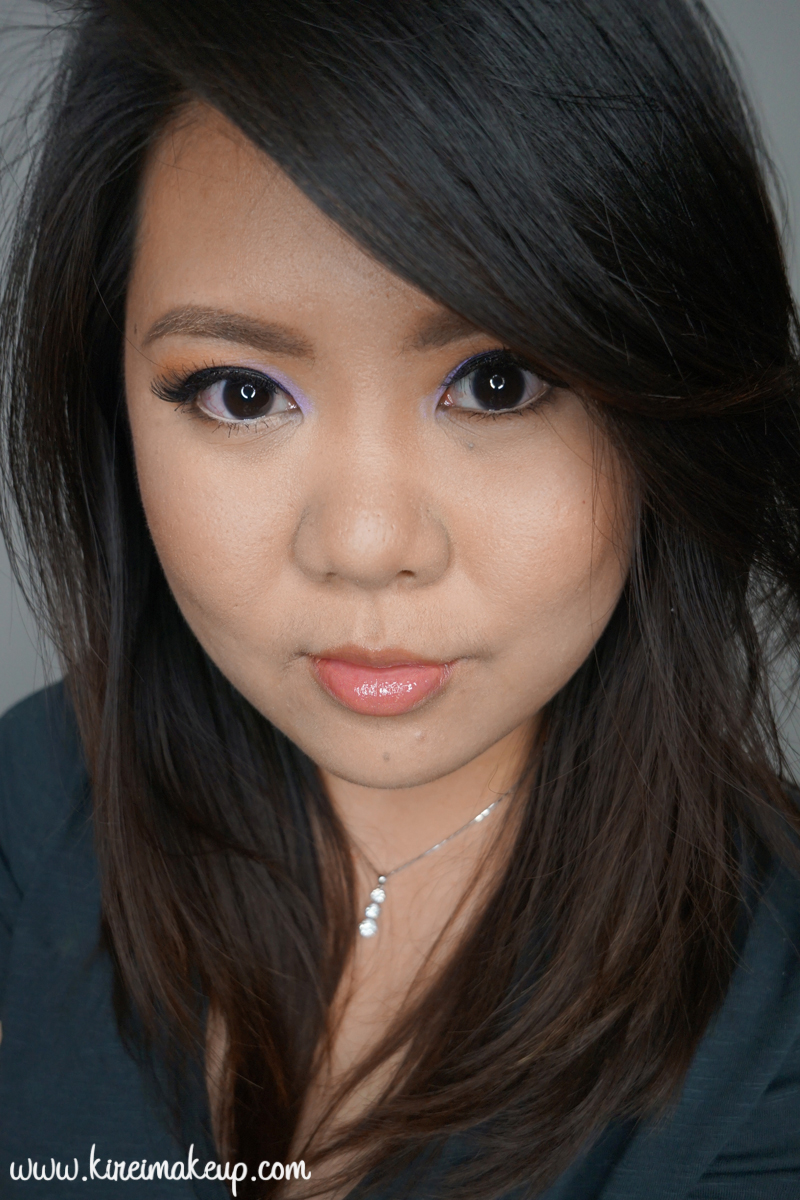
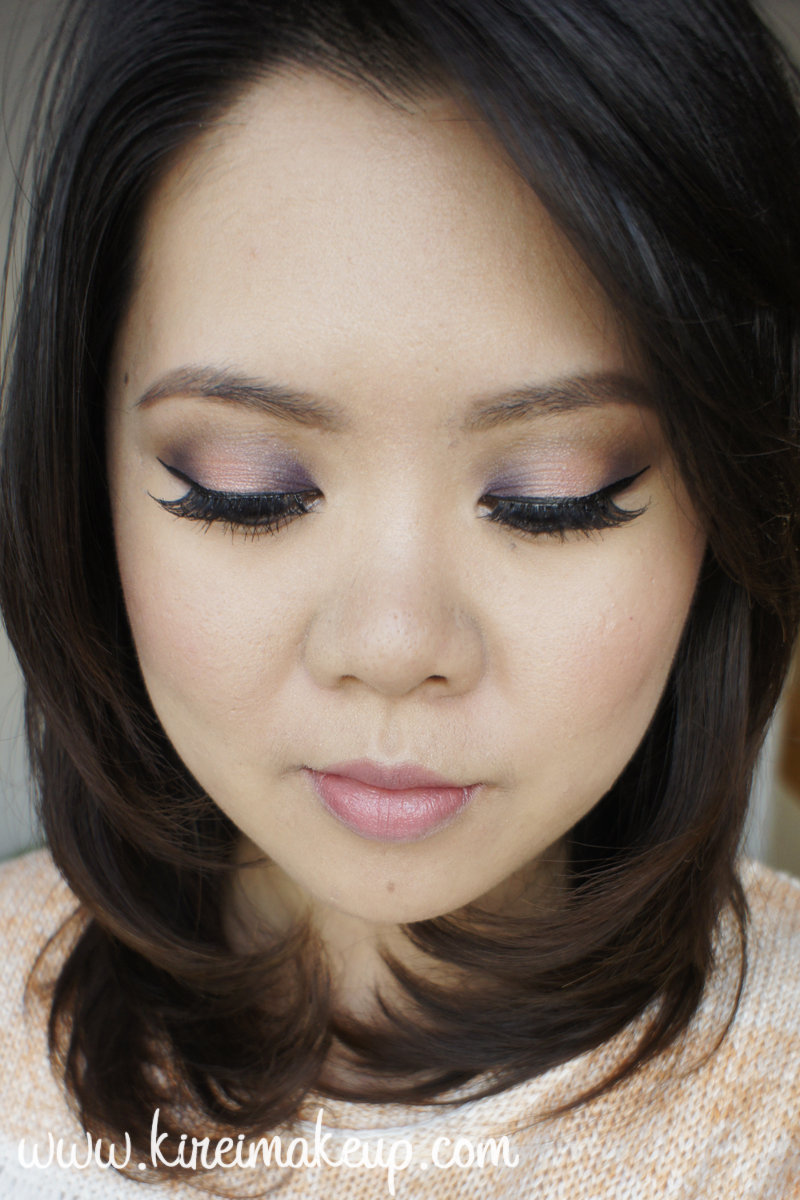
Valentine’s day is 11 days away, and here’s another Valentine’s day inspired look. I probably won’t wear this on a Valentine’s day, but I just pick colors that I feel is valentine-ish. The look has plums, purple and pink in it. I feel that the colors look better on real life, probably because my camera isn’t picking up the colors since I changed my lights (grrrr)..Hopefully once I’m back home I’ll be able to take better pictures…

Anyhoow, enough of me complaining…This look is more on the smokier side. May be on the next tutorial I’ll post a look that’s more wearable for Valentine’s day.
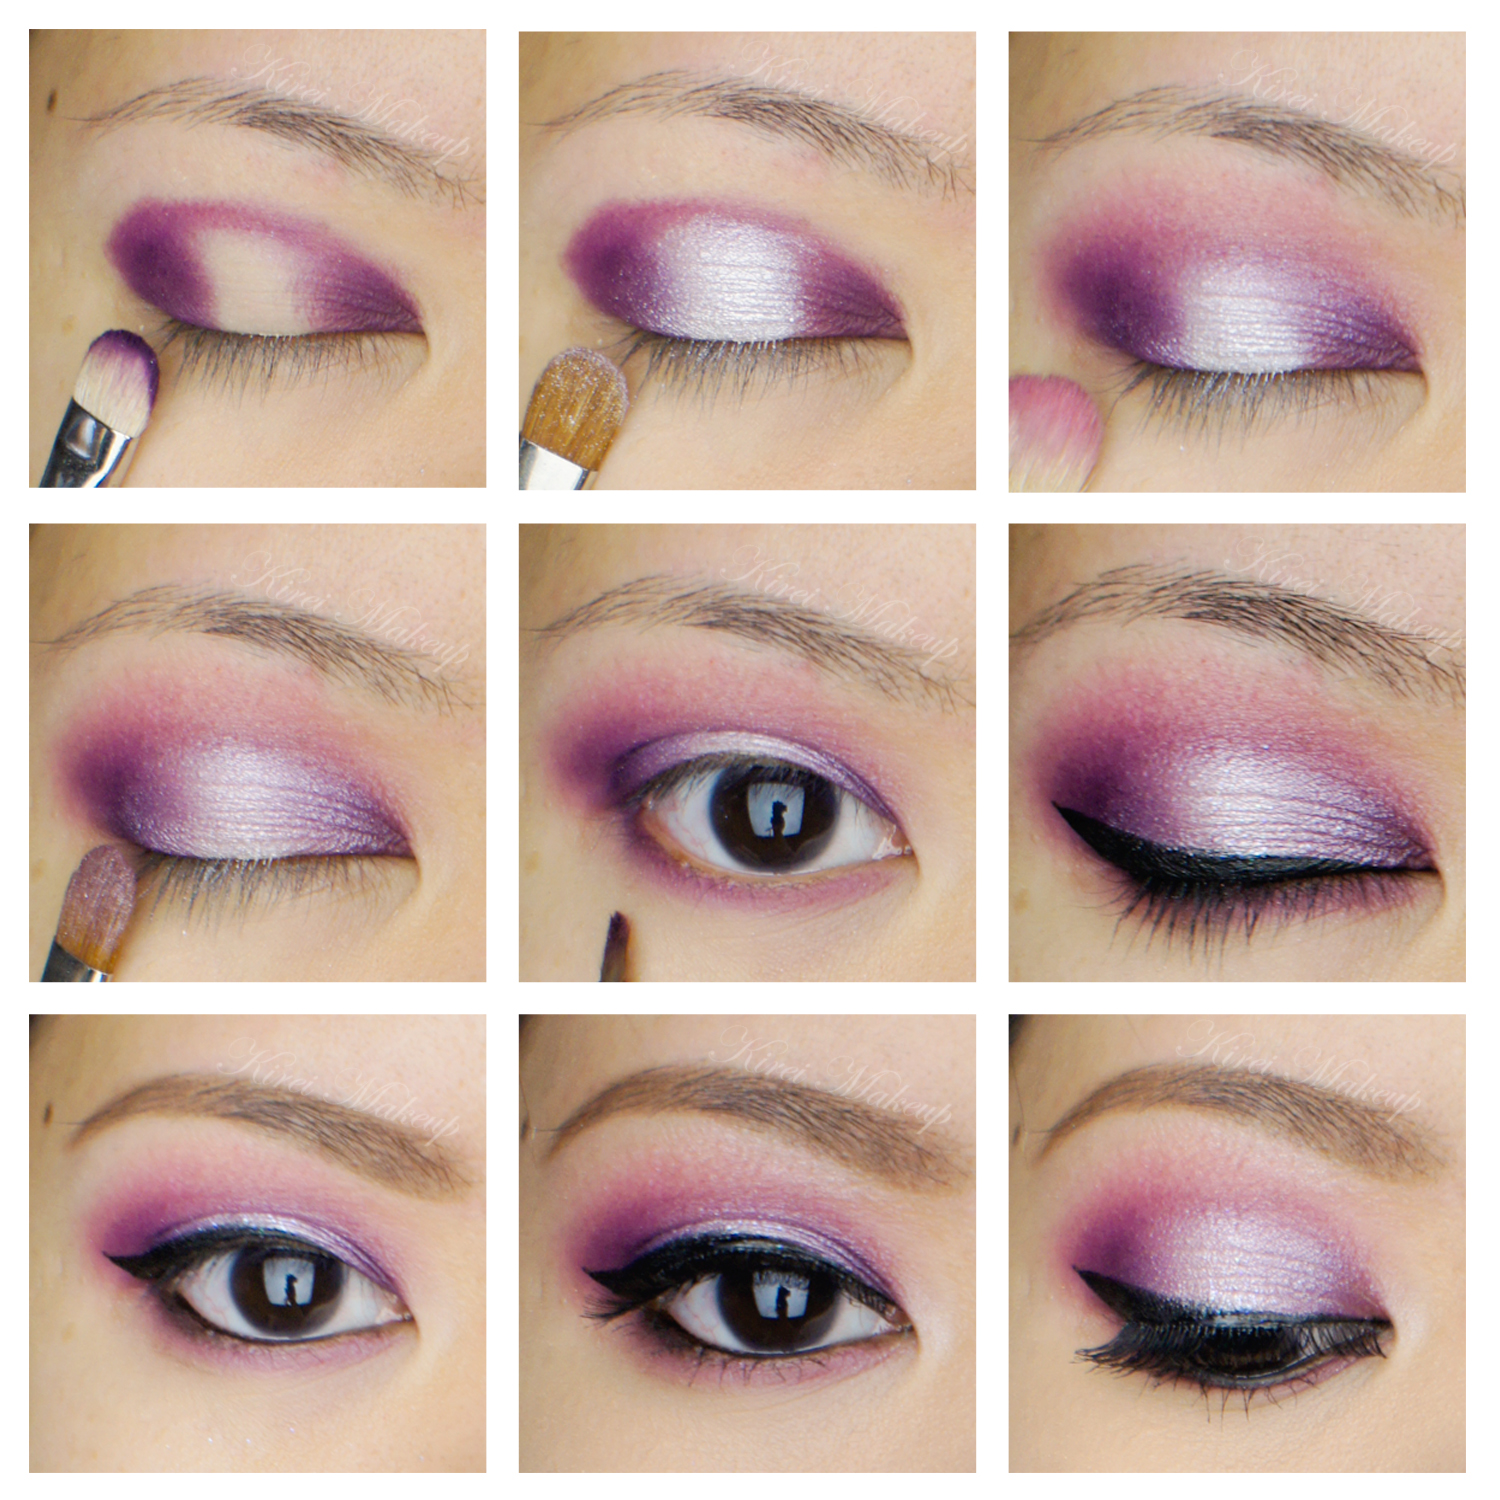
How-to:

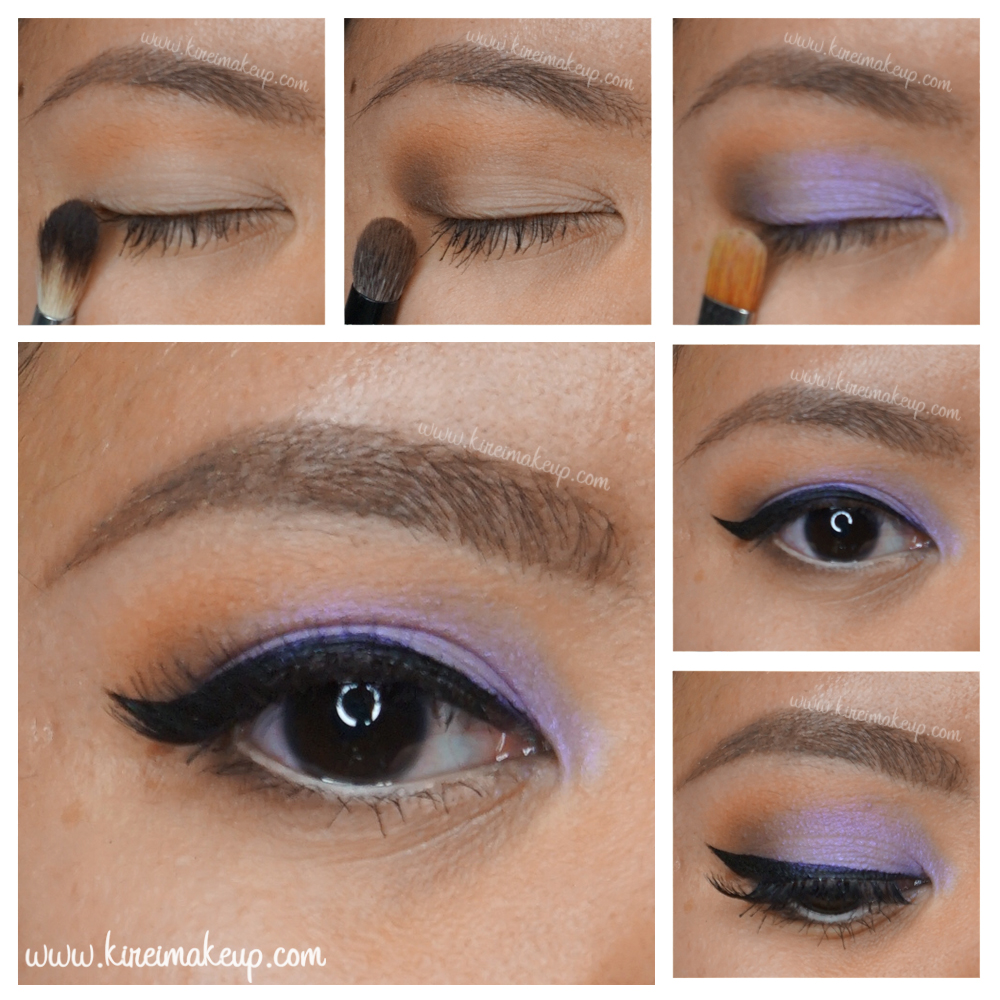
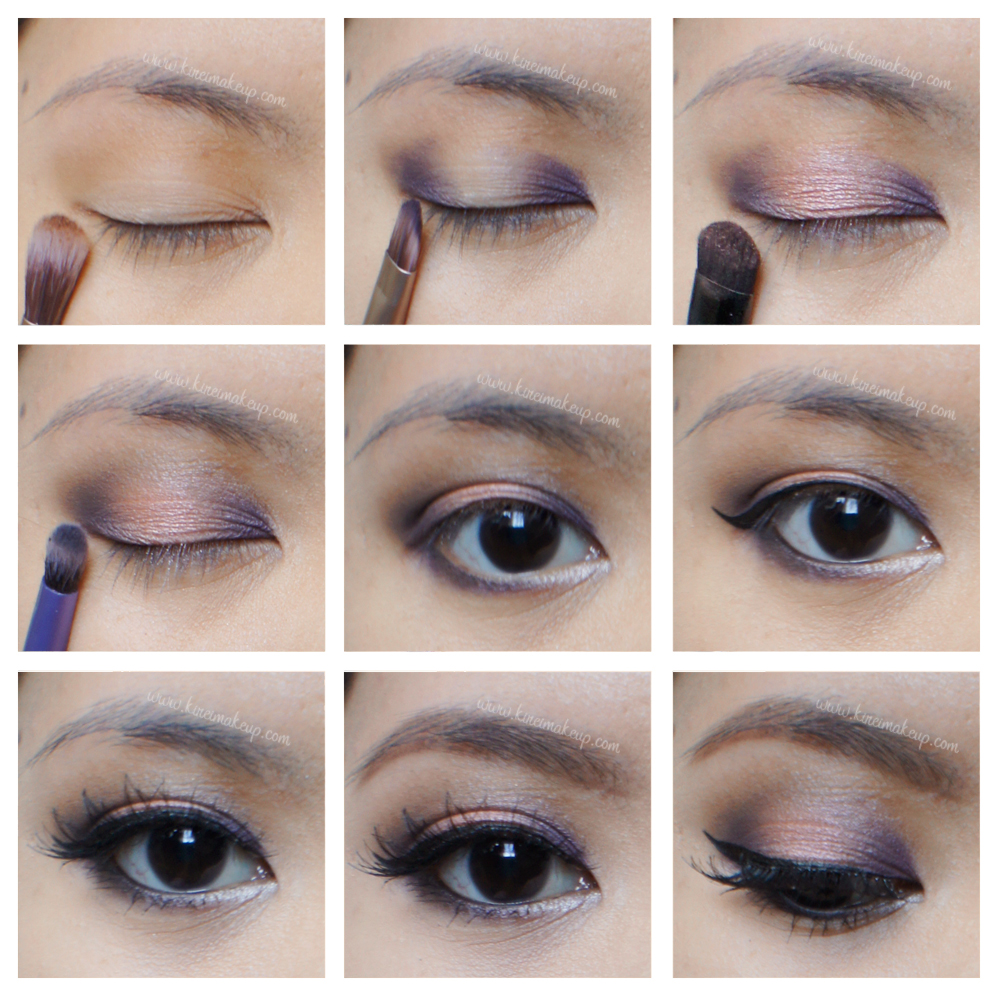
1. I applied Maybelline Color Tattoo in Inked in Pink all over my lid using my ring finger.

2. I used a large eye angled brush and applied a berry-burgundy eyeshadow from Lancome (discontinued) on the outer V and just above the crease. I wanted to add some warmth to the look.

3. I used a blending brush and blended it.

4. Using a flat eyeshadow brush, I applied L’oreal Purple Obsession  Infallible eyeshadow right on the crease (or in my case, where the fold of my eyelid is). It’s ok if some of the shadow fall on the lid area (like mine)

5. Using a clean blending brush, I blended the purple until there’s no harsh line. I used small circular motion to blend the shadow.

6. Using a flat eyeshadow brush, I applied L’oreal Sweet Strawberry Infallible eyeshadow on the inner to the center of the lid using a patting motion.

7. I applied a vanilla eyeshadow on the inner corner, but I think a peachy or champagne highlighter will work better. Oh well.

8. I lined my waterline and lower lashline using Make Up For Ever eyeliner (4L).

9. I applied Galeano eyeshadow from Kat Von D Beethoven palette on the lower lid.

10. I lined my upper lashline using Kat Von D Trooper liquid liner to create a winged liner.

11. I curled my lashes and applied L’oreal Voluminous Carbon Black mascara on both top and bottom lashes.

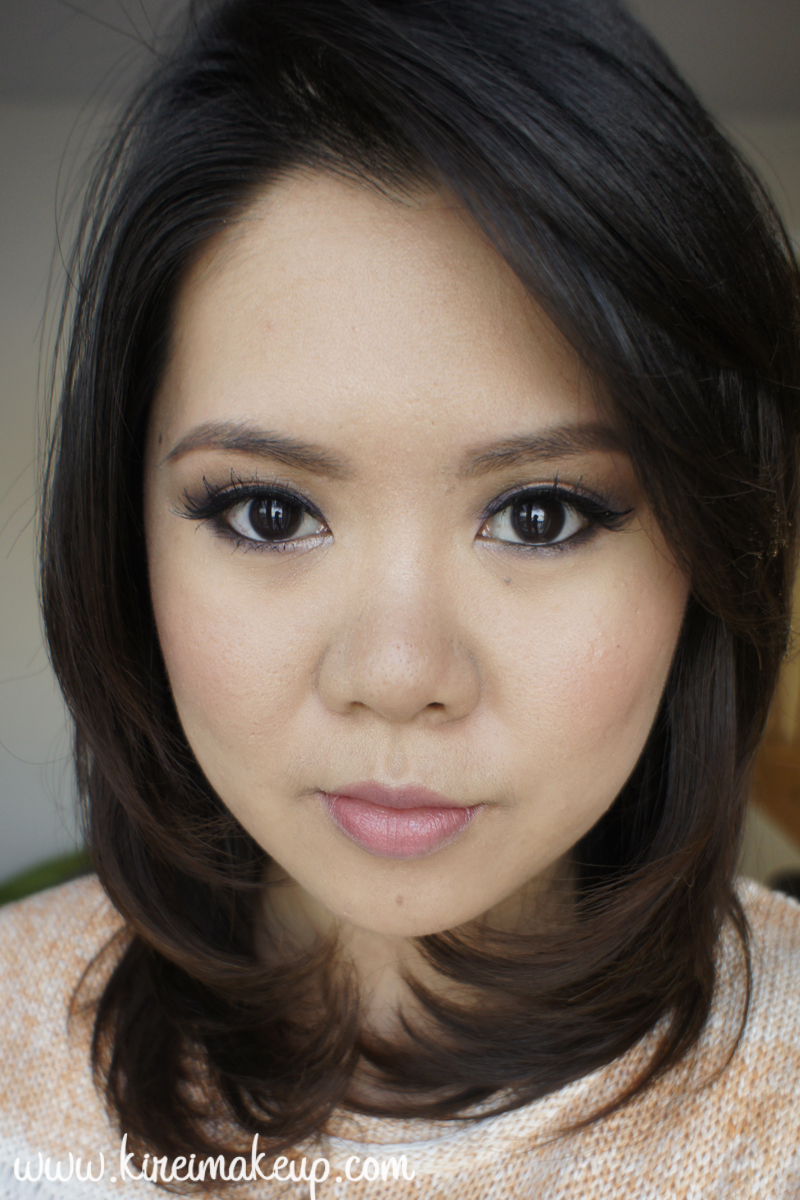
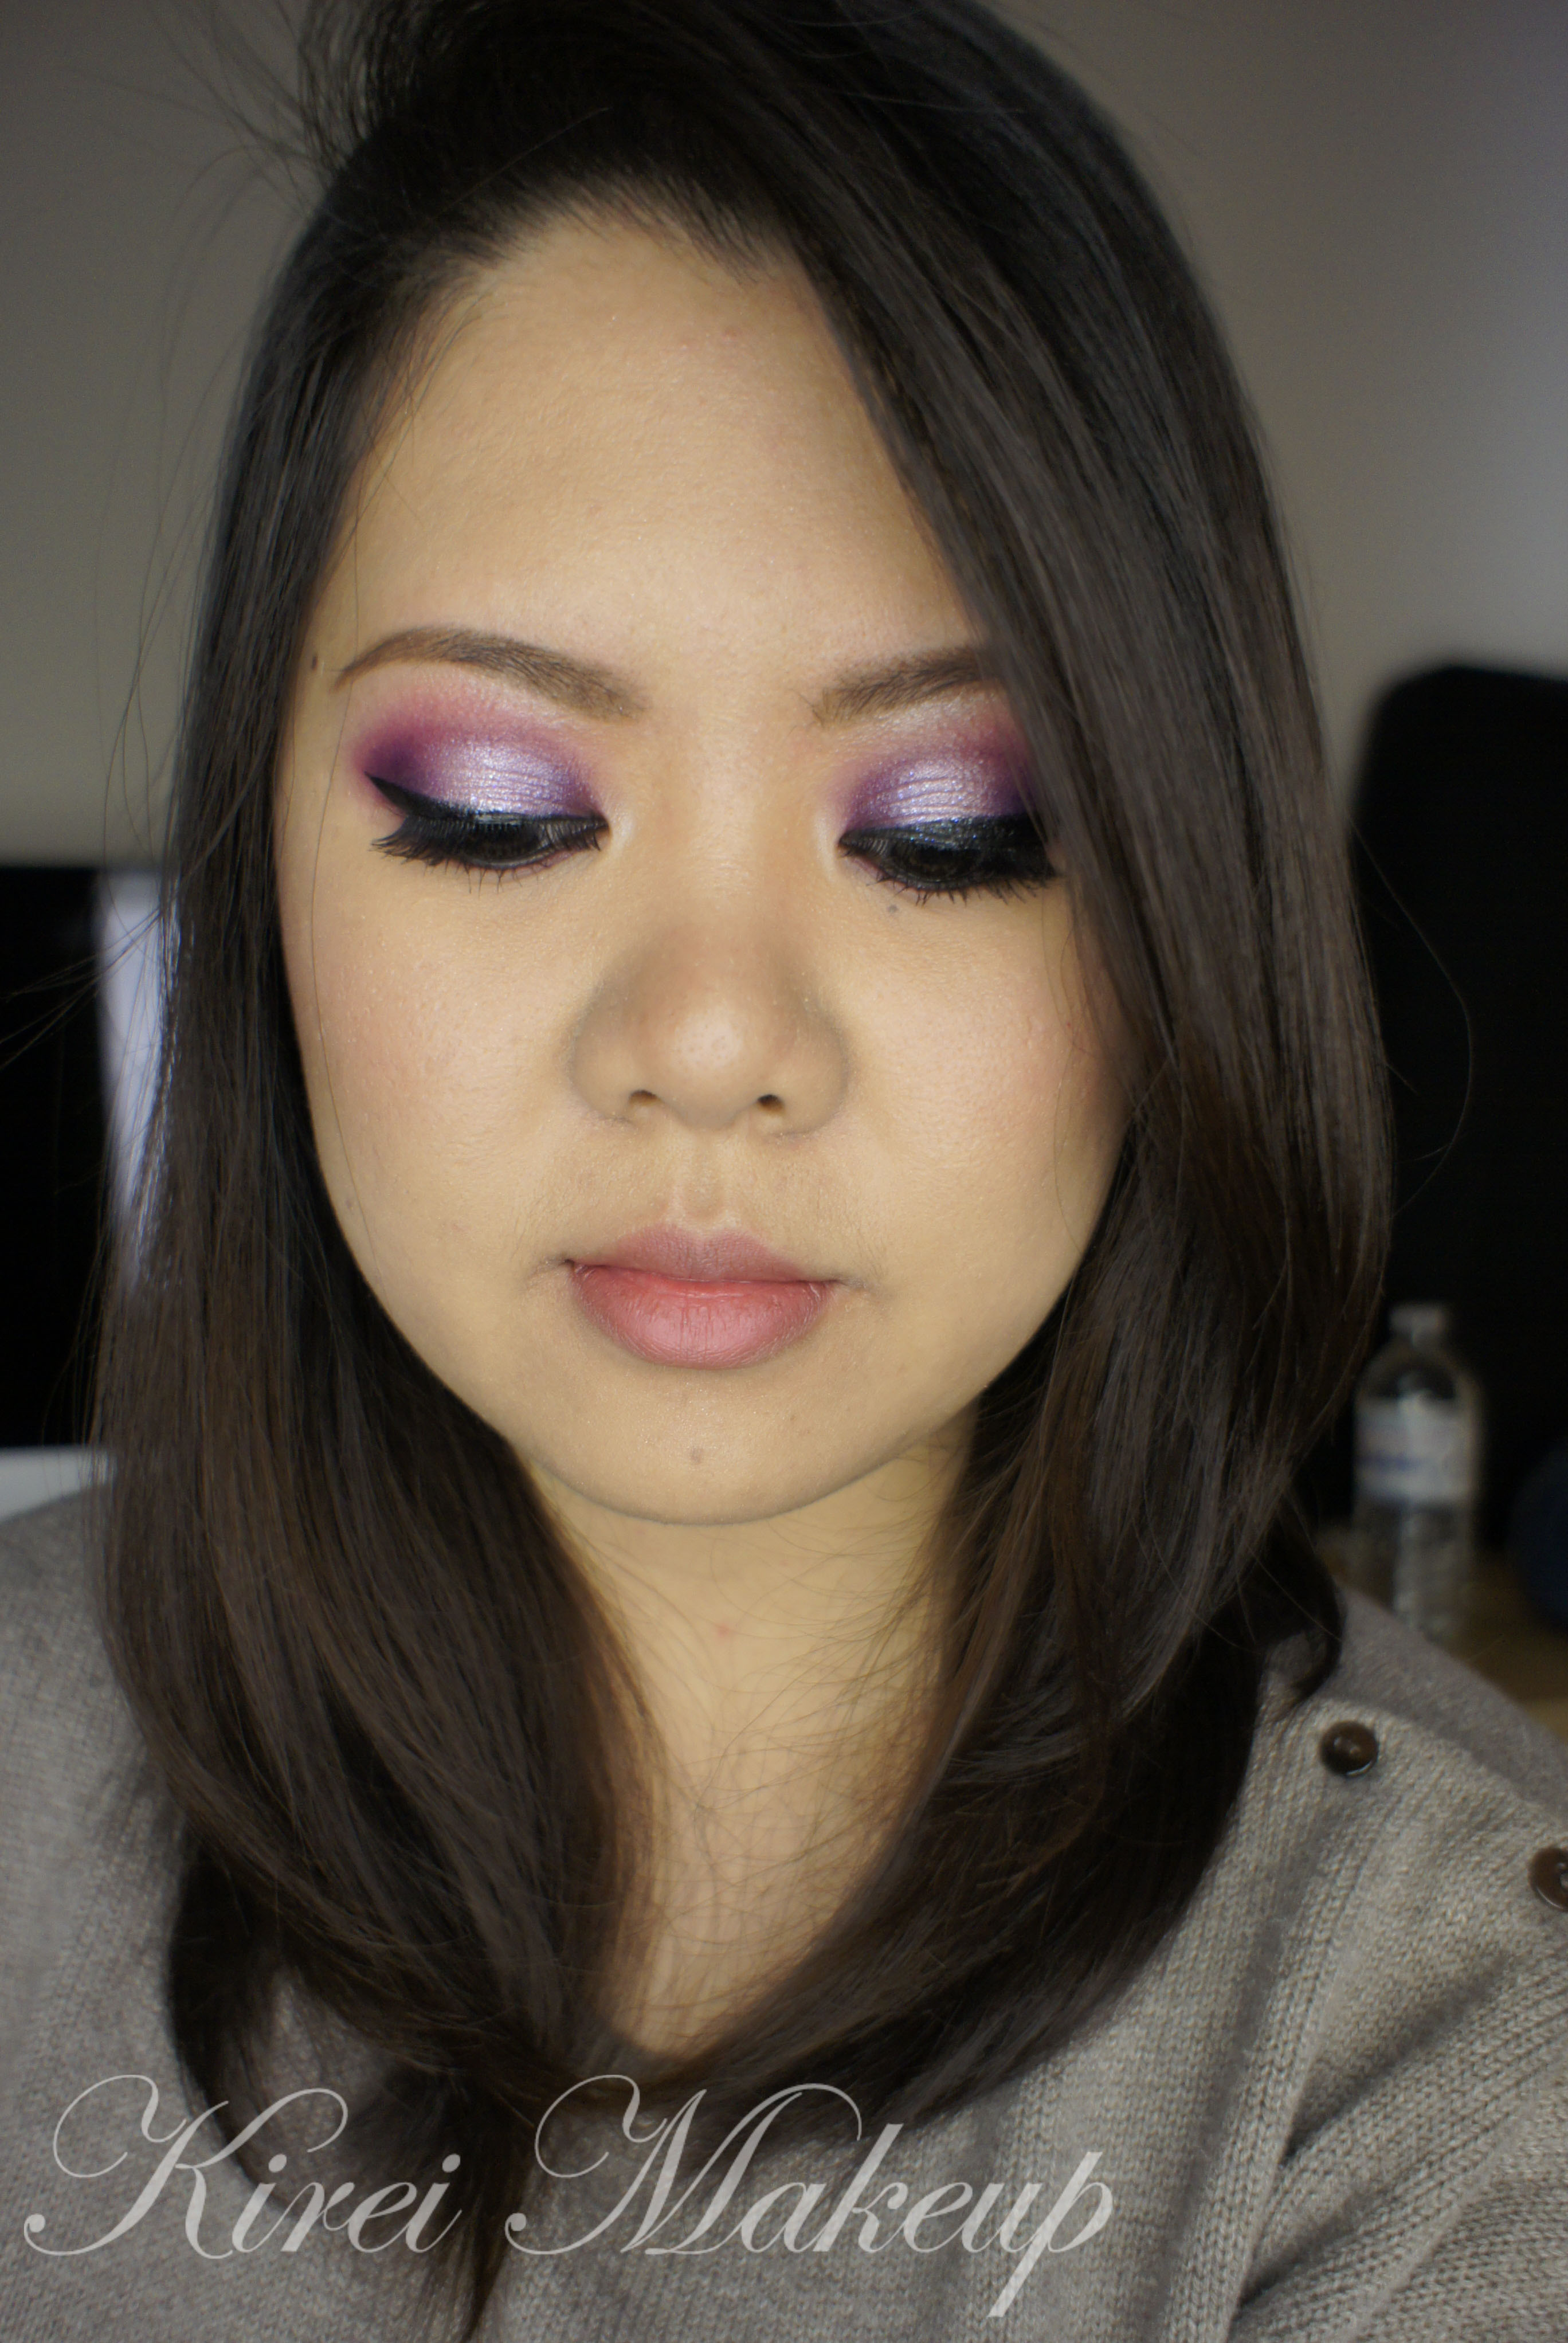
12. Using MAC Brule, I applied it under the brow bone.

13. I filled my brows using a mix of MAC Omega + MAC Brun using an angled brush.

14. Using a very clean blending brush, I blended the crease a little bit more.

Purple Smoky eyes

15. On the face, I applied MAC Moisture Cover on NW 15 under my eyes.

16. Then, I applied L’oreal Magic Lumi foundation all over my face using Sigma Kabuki Round brush.

17. I applied MAC Warmth of Coral mineralized blush on the cheeks.

18. For the lips, I filled in my lips using L’oreal Beyond Pink lip liner and applied Revlon Mauve It Over on top of it.

Pink and Purple smoky eyes

Purple Haze

So, I’m having a difficulty taking the close up pictures since the lights aren’t ready for use yet, which explains why the pictures are of different colours. I tried my best to adjust the colours without affecting the eyeshadow colours.

Anyways, I actually wasn’t quite sure how this look would turn out since I mixed warm purple with cool purple. But, the final result turns out to be quite pretty don’t you think? It’s wearable too. 🙂

Eyes:

1. I prepped my eyes by applying MAC Beige-ing paint stick all over my eyelid.

2. Using a flat eyeshadow brush, I applied NYX Frosted Lilac on the inner corner of my lid.

3. Next, I added NYX Deep Purple lightly in the middle lid.

4. Using a clean blending brush, I applied Makeup Forever #92 on the outer corner and crease lightly.

5. I applied a purple eyeliner from Makeup Forever on my lower lid.

6. Using a clean small shader brush (or you can use a pencil brush), I smudged the liner slightly.

7. Using the same brush as step 6, I applied MAC Stars ‘n Rockets on my lower lid.

8. Then, I decided to deepen the crease shade by applying MUFE #92 using the same brush as step 6 and 7.

9. Using an angled eyeliner brush, I applied winged liners using a black gel liner from MUFE.

10. I lined my waterline using whatever is left on the eyeliner brush, and applied mascara on both top and lower lashes.

Makeup For Ever purple eyeshadow

Face:

1. I applied MAC Studio Tech foundation all over my face using Sigma Round Kabuki brush.

2. Then, I applied MAC Cubic blush on my cheeks.

3. I completed the look by applying a sheer lip balm.


Purple smoky eyes with MUFE 92