Priyanka Chopra Golden Globes makeup is absolutely stunning. She looks drop-dead gorgeous in her golden dress, her makeup and hair were on pointe, I just loved how she looked at the award show. I love it so much I knew I had to do a Priyanka Chopra Golden Globes Makeup Inspired Look. I talked more below regarding what her makeup artist used, and of course there’s a step-by-step pictorial accompanied this look below. So, read more below for more!
Tag: party makeup
Gold New Year Party Makeup Tutorial
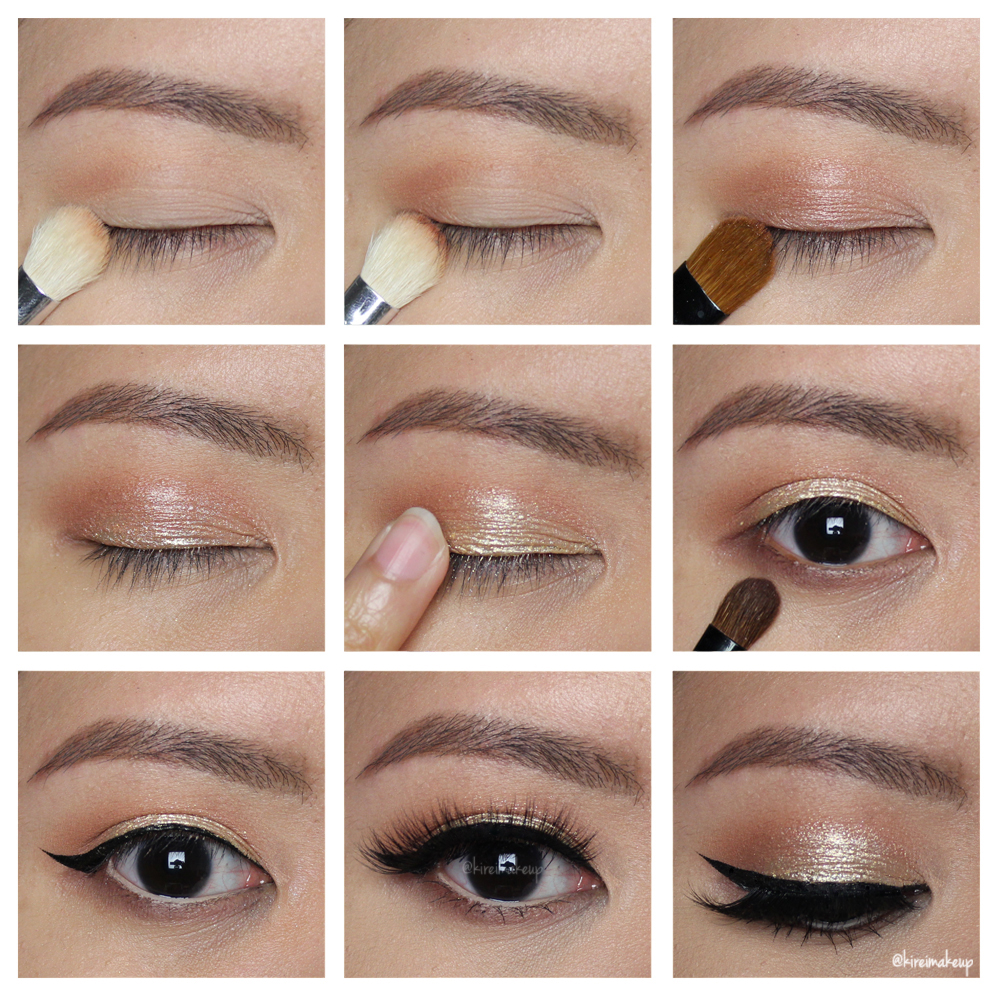 Today’s Gold New Year Party Makeup tutorial would by my last post for 2015. Almost time for 2016, and so I shall end 2015 with a gold sparkly makeup. This look is super simple, and it doesn’t require much. It’s sparkly, it’s light, it’s super pretty for the New Year. I, myself, prefer this kind of look to attend parties and such.
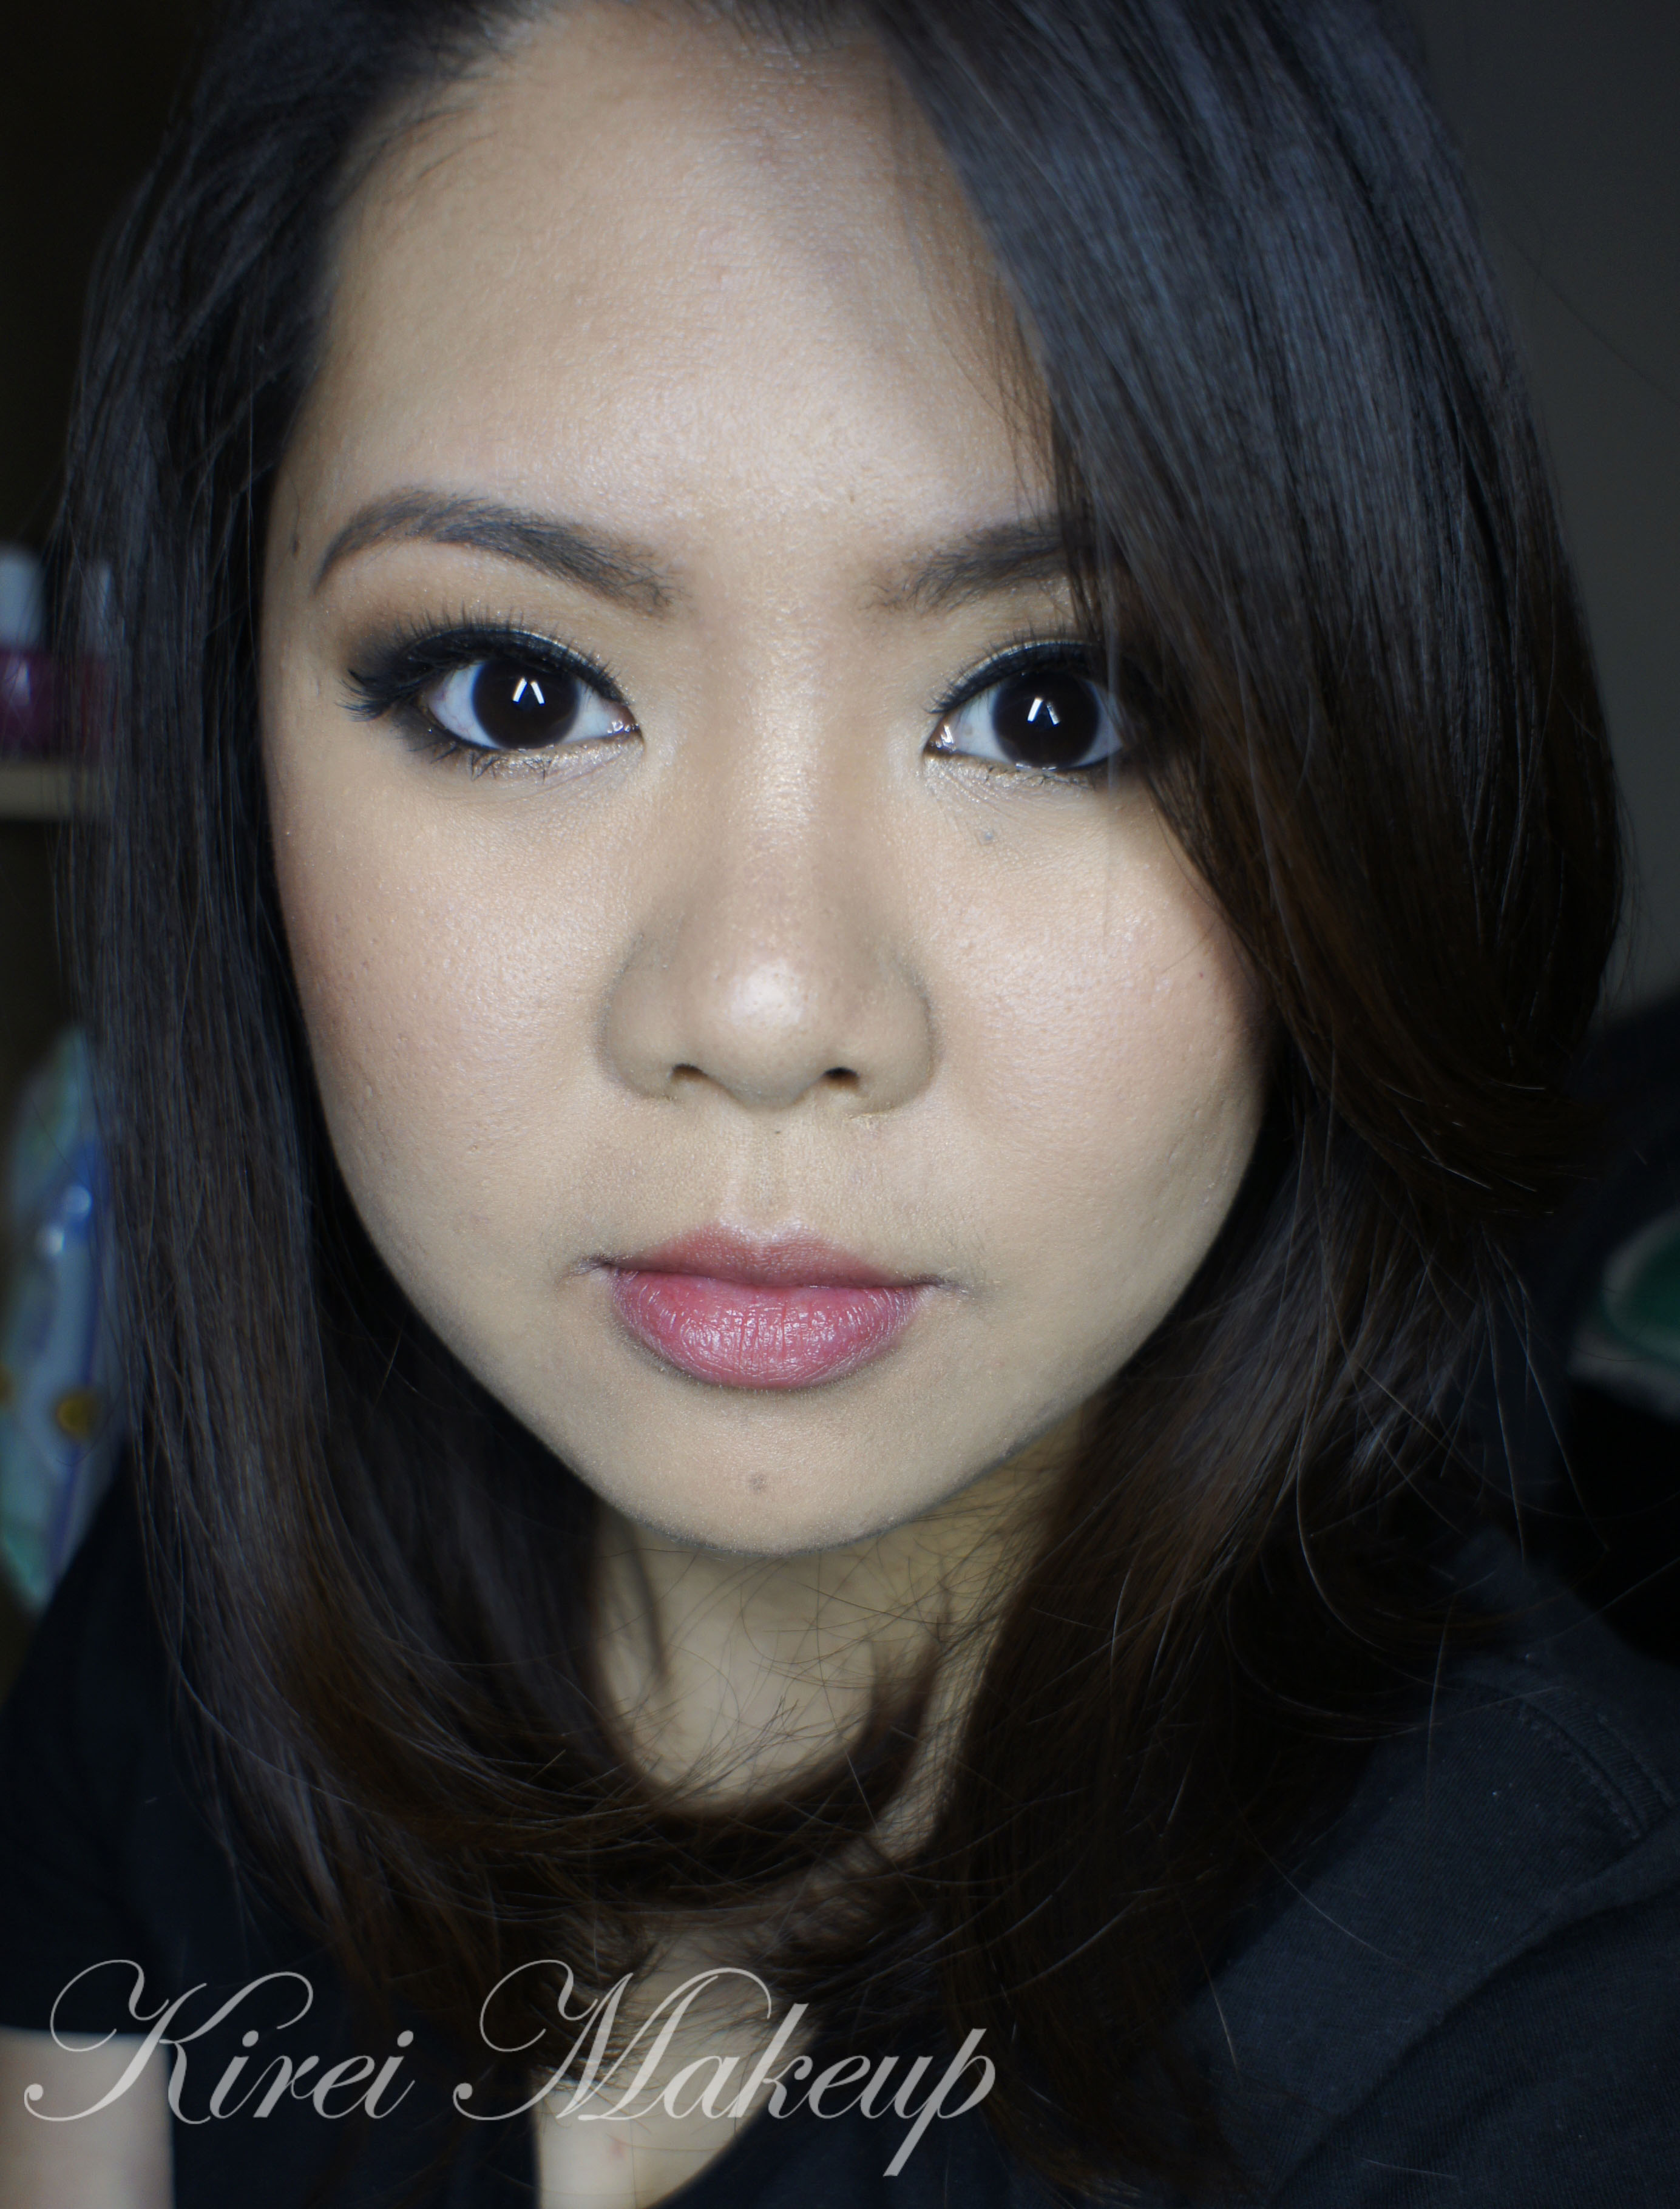
Party Makeup Tutorial [ABH Self Made]
Another Party Makeup tutorial for you guys, since you know Christmas is in 2 weeks! Anyways, for this tutorial I used Anastasia Beverly Hills (ABH) Self Made palette, which I completely forgotten about. It was sitting at the back of my drawer, and I was so busy that I didn’t remember I actually bought the palette.
For this look, my focus is on a very strong eyes. I didn’t make this too smoky since I knew I was going to create a winged liner, but if you prefer a smokier look, omit the winged liner, and use a matte black eyeshadow along the lash line for a smokier lash line.
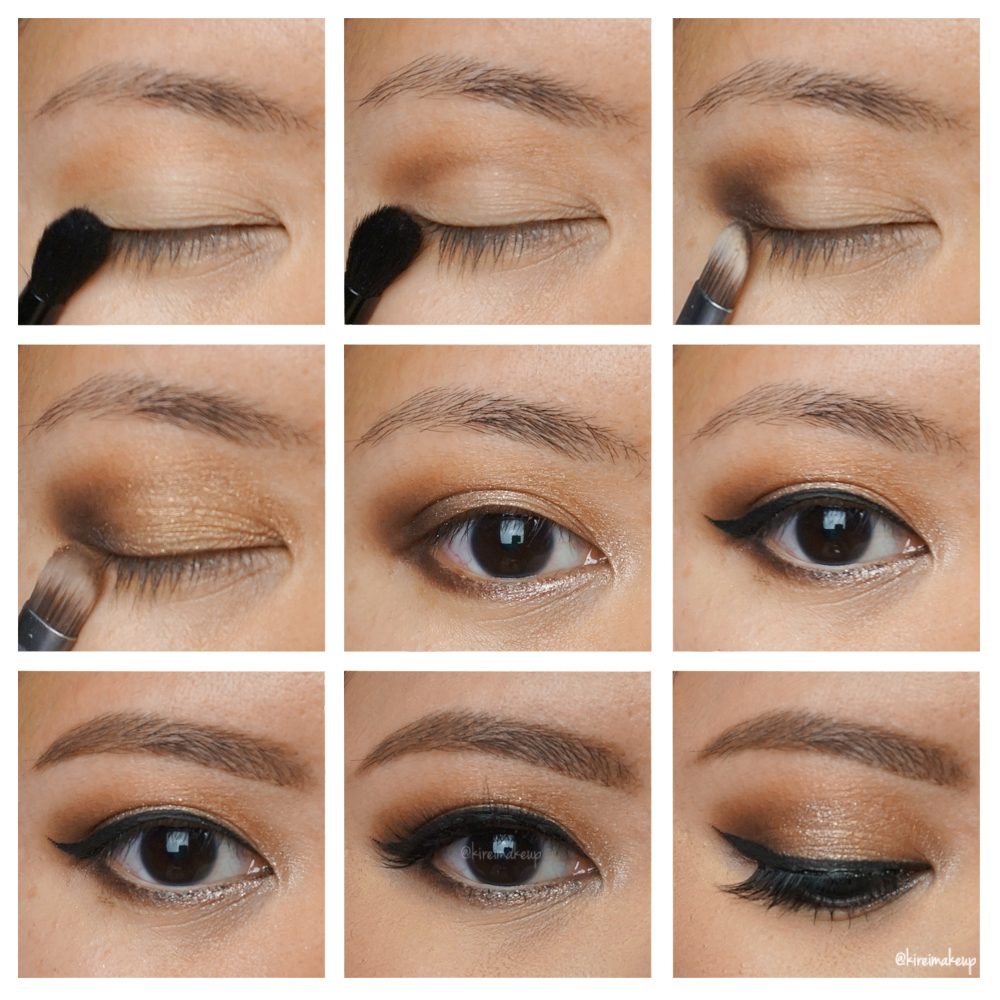
Products used
Eyes
- Primer – Urban Decay Primer Potion “Anti-Aging”
- Transition – ABH Self Made Palette “Sherbet”
- Crease – ABH Self Made Palette “Hot Chocolate”
- Outer V – ABH Self Made Palette “Hot Chocolate”
- Eyelid – ABH Self Made Palette “Self-Made”
- Lower lash line – ABH Self Made Palette “Hot & Cold” (outer); ABH Self Made Palette “Pink Champagne” (inner)
- Winged liner – Maybelline Gel Liner “Black”
- Waterline – MAC Chromagraphic pencil liner “NW25/NC30”
- Brows – ABH Dip Brow Pomade “Medium Brown”
- Falsies – Esqido Mink lashes “Oh So Sweet”

Face
- Primer – Bobbi Brown “Vitamin Enriched Face Base”; The BodyShop Drops of Youth “Wonderblur”
- Foundation – MAC Pro Longwear Foundation
- Concealer – MAC Pro Longwear concealer
- Powder – Laura Mercier “Invisible Loose powder”
Cheeks
- Blush – Hourglass Ambient Lighting Blush “Vibrant Poppy”
Lips
- Lipstick – YSL Glossy Stain “Peche Cerra-Cola (27)”

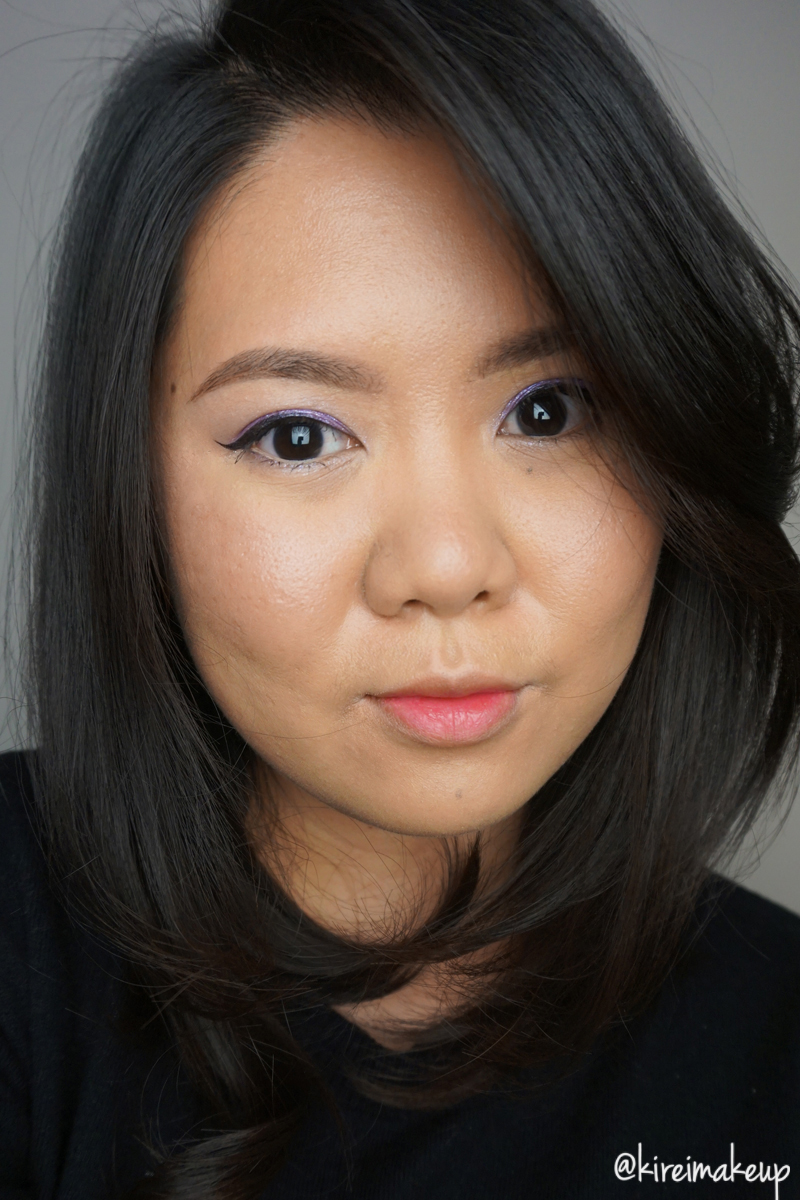
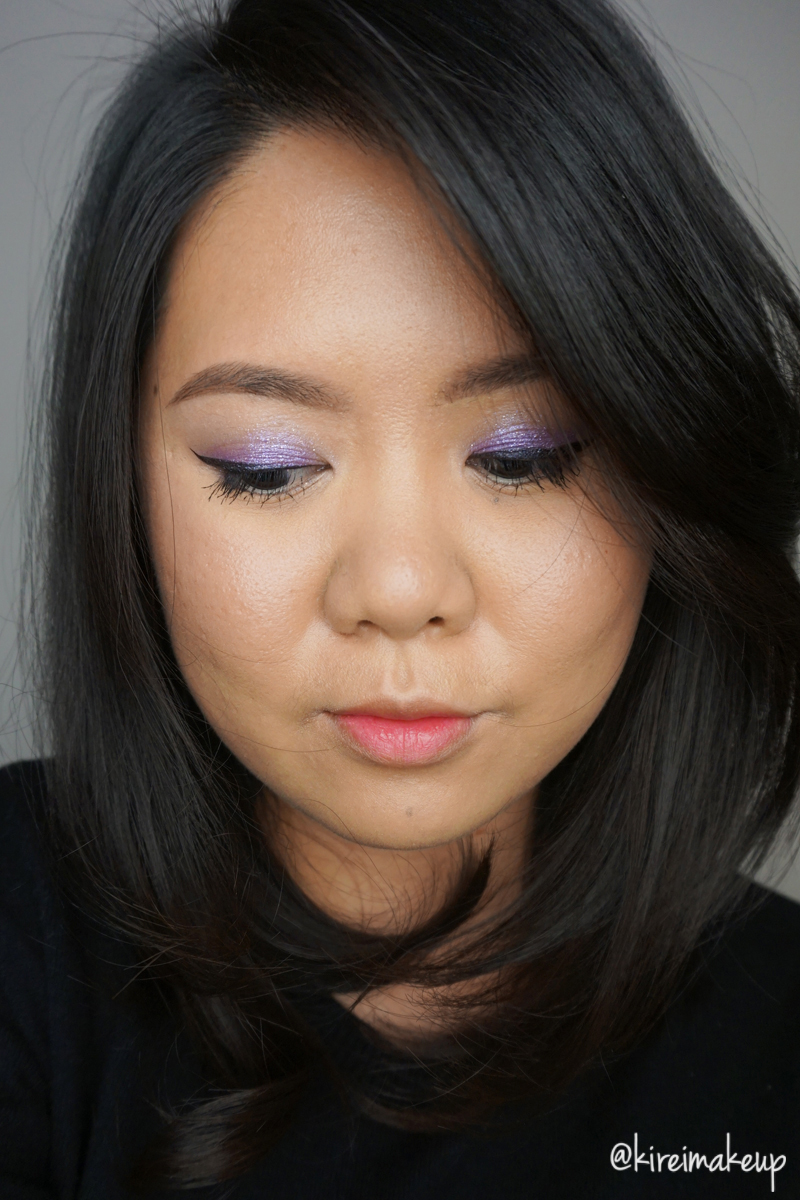
Lavender Glitter Party Makeup THEFACESHOP Canada
I can’t believe it’s almost December! Are you guys ready for the Holiday season? If you are ready to attend parties and eat great food, then you should be prepared with great makeup looks! For this post, I want to share with this Lavender Glitter party makeup. One tip I want to share is that I applied it dry first as a base, then dipped my brush in water and re-apply the eyeshadow wet to get more shine from the glitters!
Just beginning of this week, I received a PR package from THEFACESHOP Canada. I was thrilled when I saw all the products they sent me, thus why I created this look! AThis year, break out of your earthy tones, and neutrals. Come join me in this world of sparkles and pastels. You have to give this look a try! It’s not too out there, but at the same time it has just enough color to make you stand out from the rest.
What is your favorite Holiday look? Let me know in the comment below!

This post is very much inspired by the Korean makeup trends (K-Pop makeup) – luminous dewy skin, simple eyes, and gradient lip (or ombre). This look is very simple, and in a lot of way very cute and girly. The Koreans, they don’t really wear much contouring on the face or eyes. They focus mostly on a very youthful-looking skin which looks very dewy, and Popsicle lips. I skipped the falsies because most of the Korean actresses and singers don’t wear them. It’s not a big part of their makeup ritual, unlike the Japanese who are huge fans of falsies.
The reason why I used 2 blushes for this tutorial is because the blush from THEFACESHOP Canada is a bit too light for my skin. Since it does not show up on my skin, I used my Chanel blush, and then used the one from THEFACESHOP Canada on top of the Chanel one to soften the color, and highlight my cheeks.
I’ll be posting a review of THEFACESHOP Canada products I used on this tutorial next week! So, don’t forget to subscribe so you can get my latest post in your inbox (subscribe button is located on the top right side bar).
Products used
Eyes
- Primer – Urban Decay Primer Potion “Original”
- Lid/lower lash line – THEFACESHOP Canada “Lavender Glitter”
- Winged liner – THEFACESHOP Canada Color Proof eyeliner “Purple Violet”
- Waterline – MAC Chromagraphic eyeliner NC30
- Eyebrows – Anastasia Brow Pomade “Medium Brown”
- Mascara – THEFACESHOP Canada “Freshian Big Mascara (01 Curling)”
Face
- Foundation – Shu Uemura Lightbulb foundation
- Concealer – NARS Radiant Creamy concealer “Custard”
- Powder – Laura Mercier Invisible loose powder
Cheeks
- Blush – THEFACESHOP “Candy Violet” single blush; Chanel Blush de Horizon
Lips
- Lip stain – THEFACESHOP Ink Lipquid “Pink Scarf Rose”
Simple Everyday Makeup
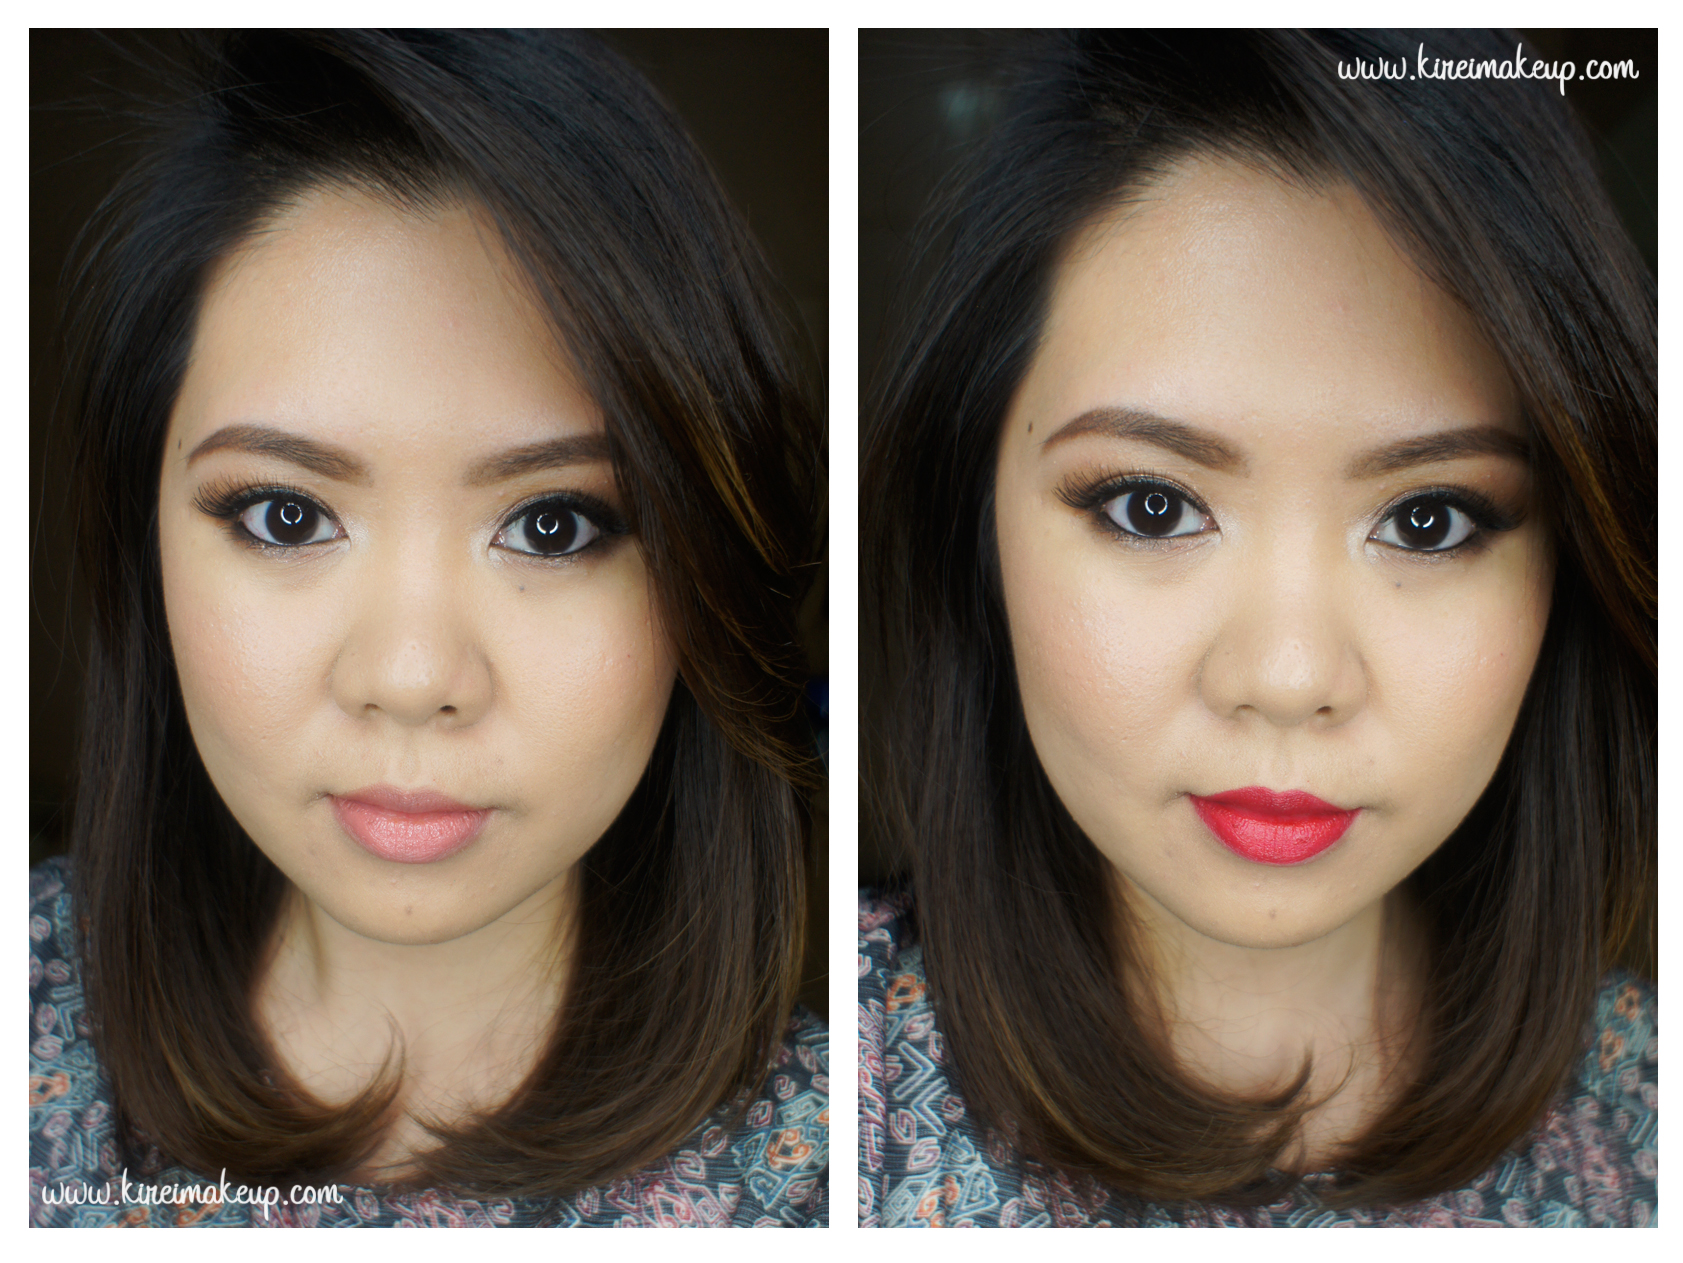
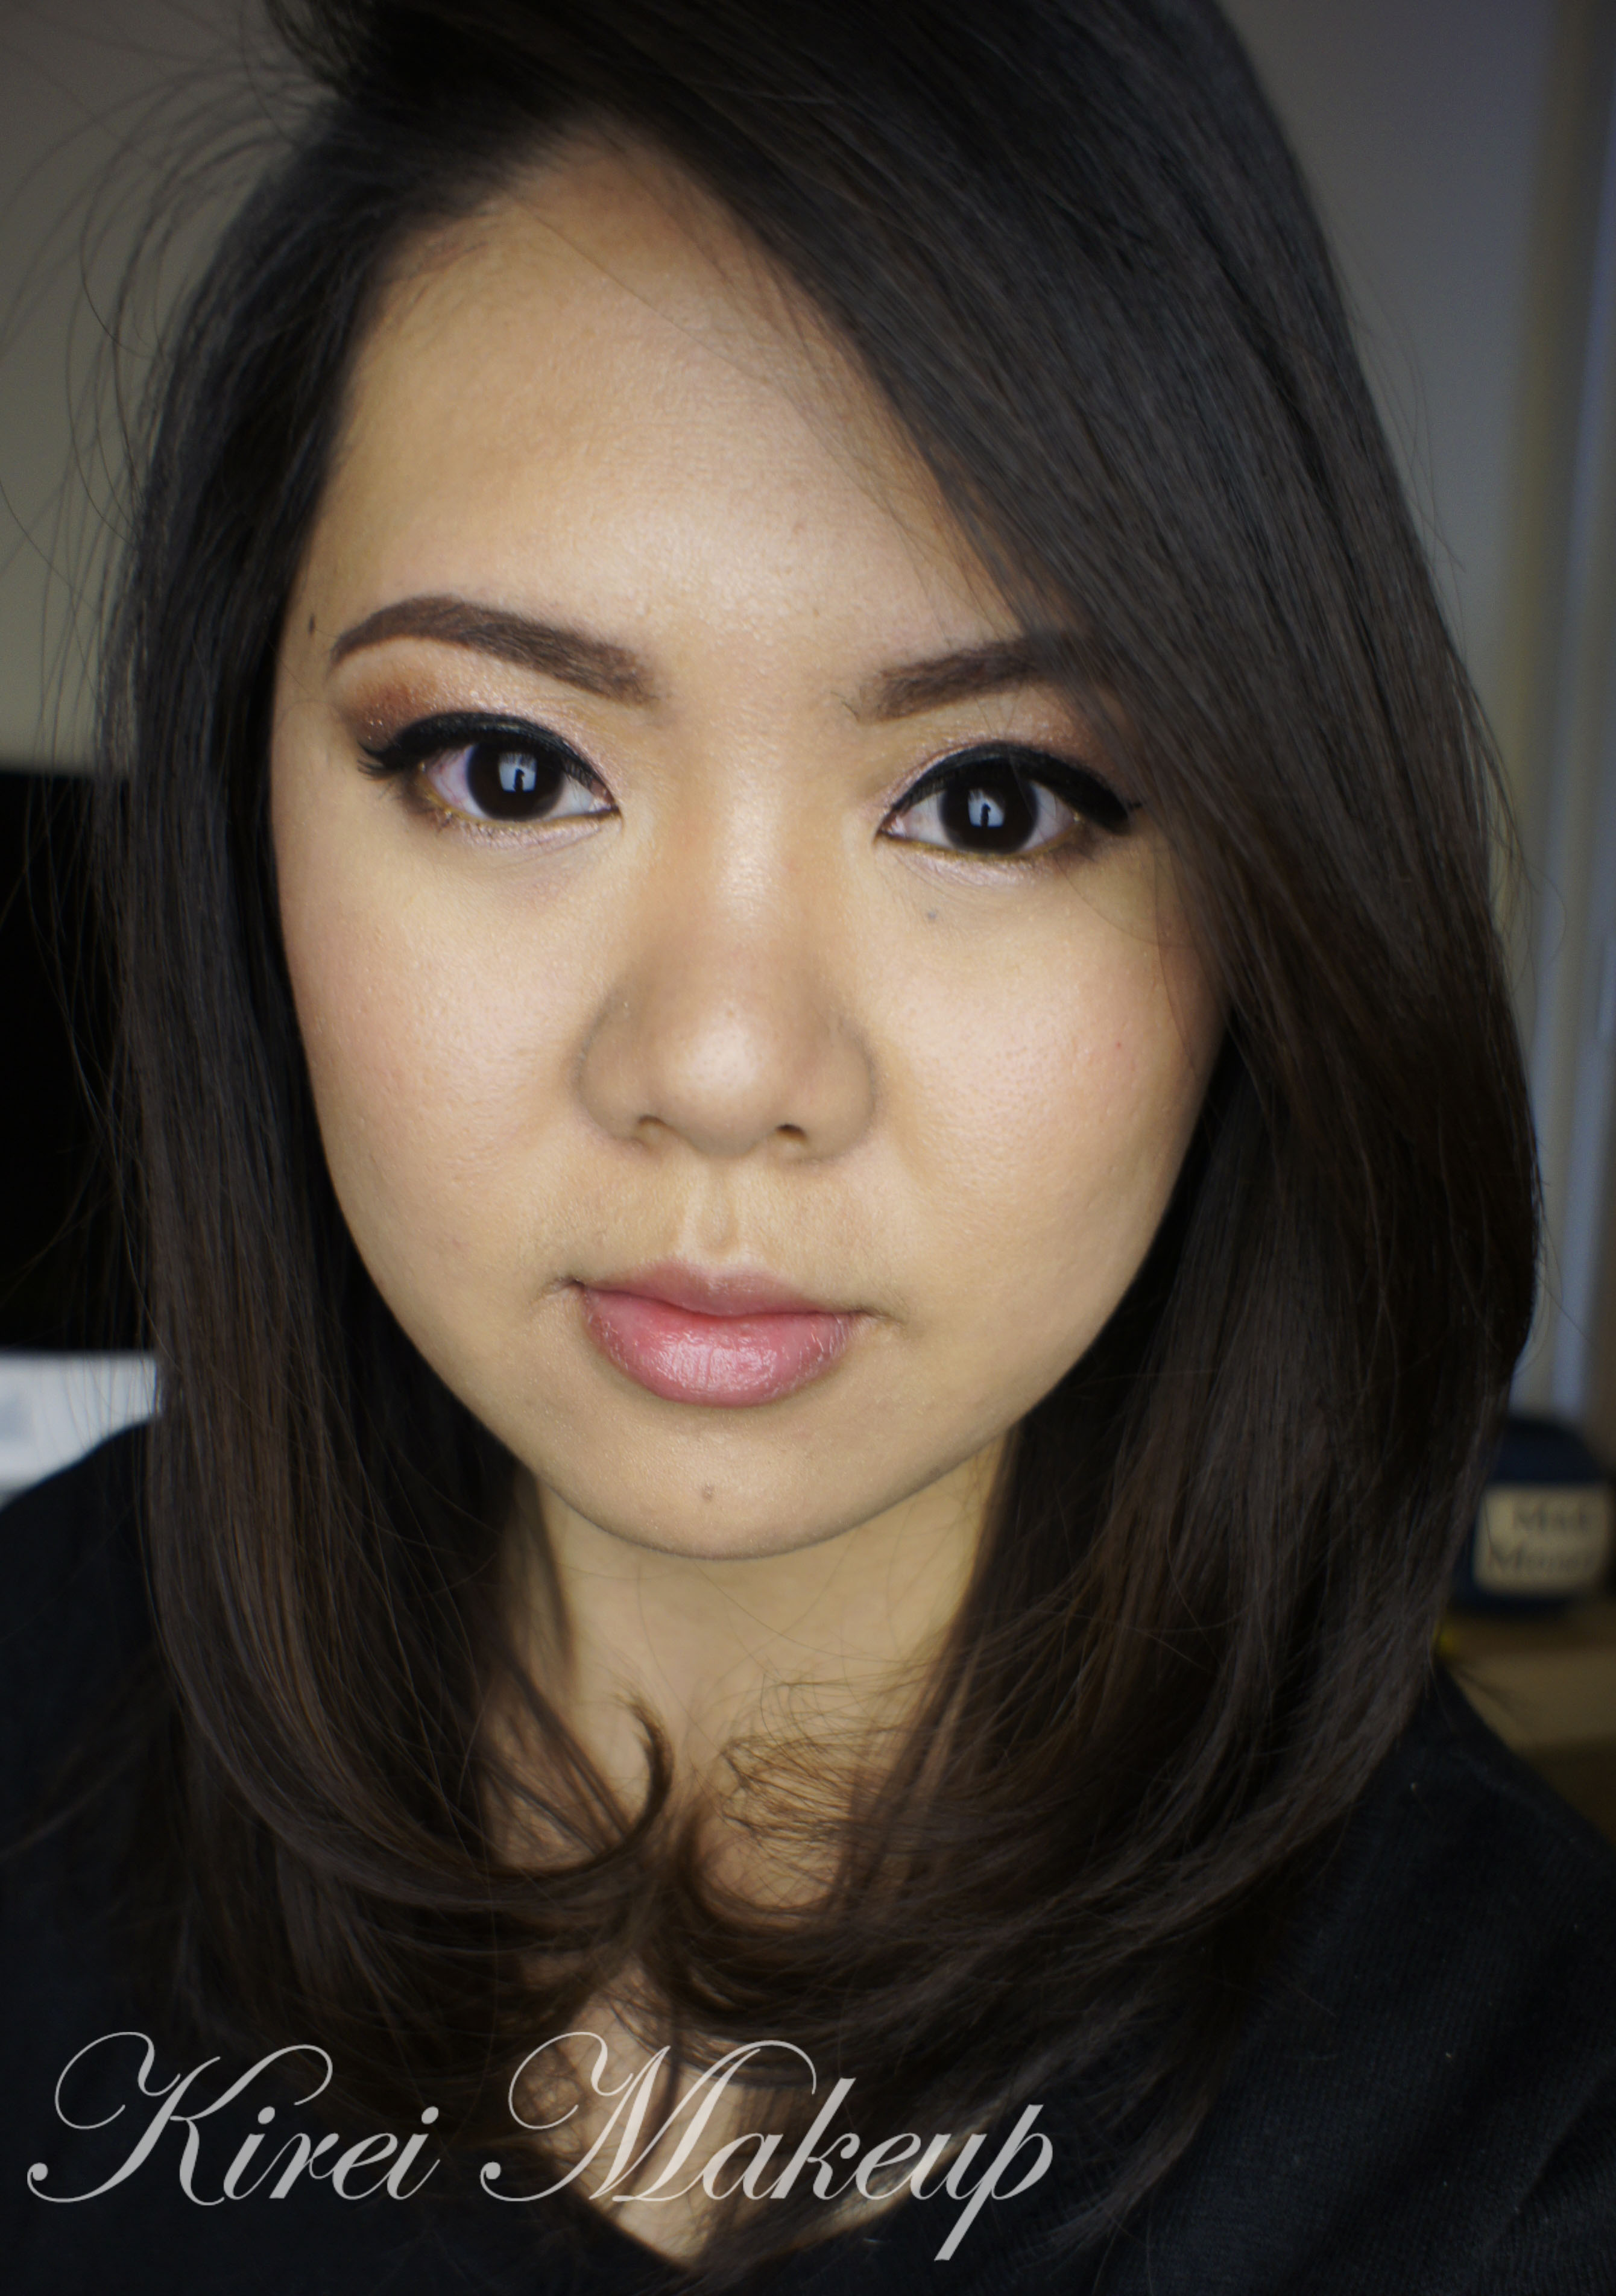
How is everyone’s Monday going? The Holiday is approaching real soon, eh?! I wanted to share with you guys this super easy and simple everyday makeup tutorial which can be worn by everyone, especially those who don’t usually wear much makeup. I did 2 version – one with a simple peachy lips, and another with red lips.
I think this look is great for those who prefer a simple no-fuss makeup. Nothing too dark, nothing too bright, but with a bit of colors. This is also a look for those who prefer earthy brown tones over black. I probably would wear this for a brunch (with peachy lips), or even a dinner party (with red lips).
Eyeshadows used in this tutorial are from the Smashbox Full Exposure Palette.
*You can find other tutorials using this palette right HERE!*

How-to:
1. I applied MAC Groundwork paint pot on my eyelids using my ring finger.
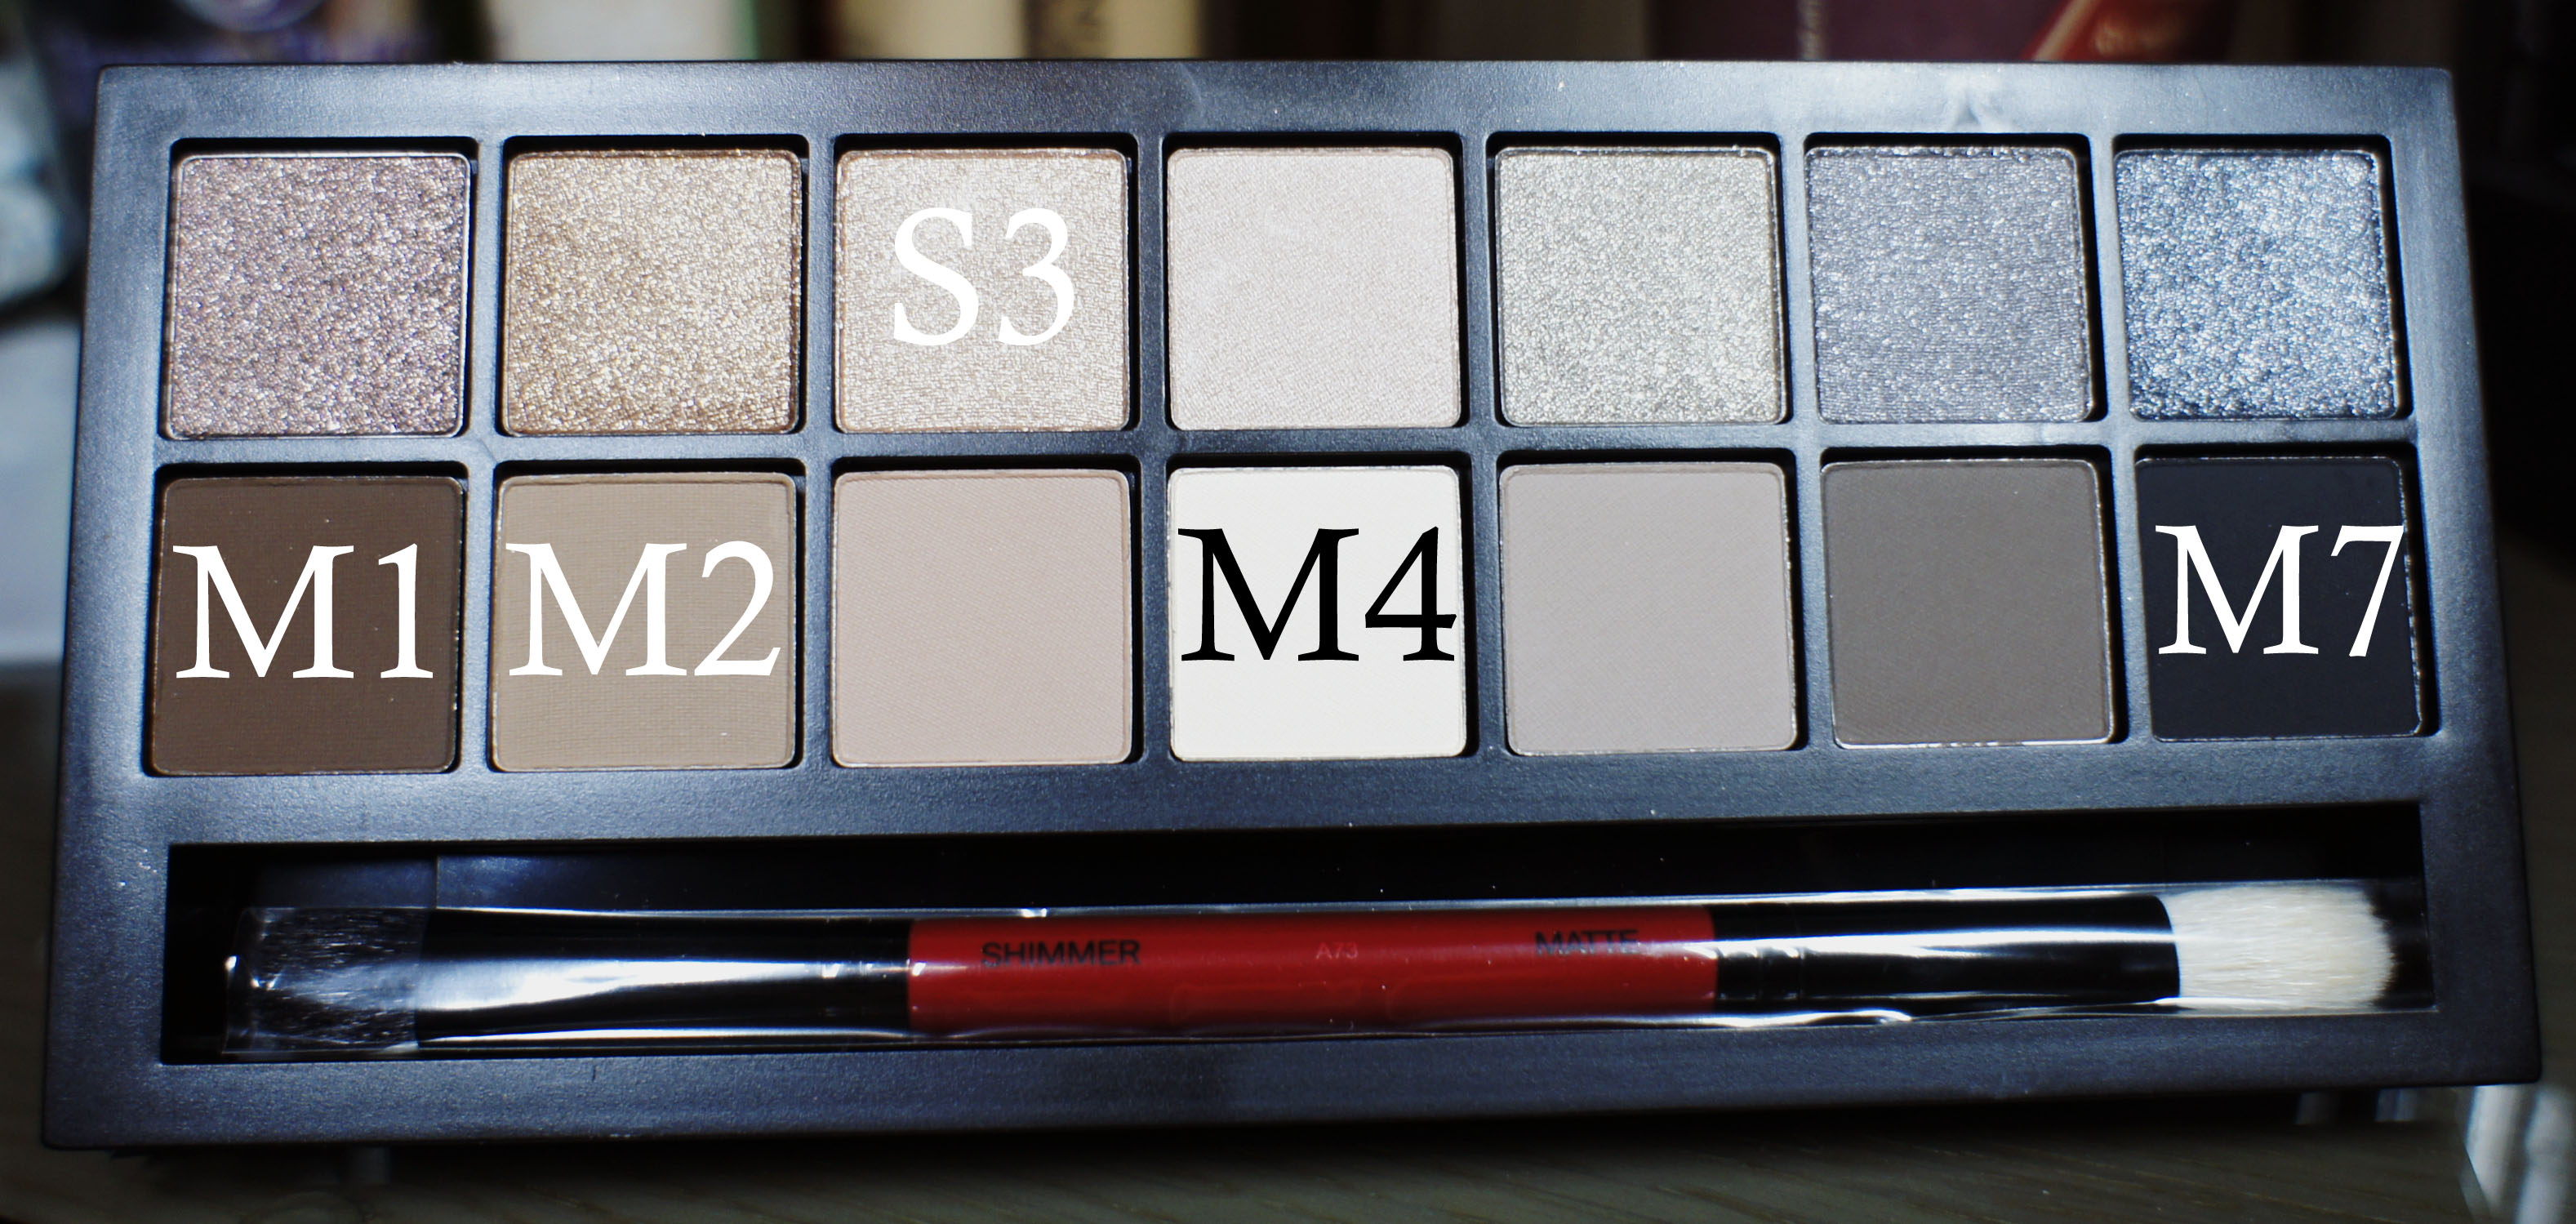
2. Using a fluffy blending brush, I applied Smashbox Full Exposure palette in M2 above my crease.
3. Using Smashbox bullet crease brush, I applied Smashbox Full Exposure palette in M1 on the outer half of my eyelid.
4. Using a flat eyeshadow brush, I applied S1 on the inner half of the eyelid, blending it towards the outer half.
5. I applied S4 on the inner corner of my eyes using Real Technique shading brush (skip this step if you have wide-set eyes).
6. I lined my waterline and tightline using L’oreal Voluminous Smoldering eyeliner.
7. I also applied M7 along my upper lash line using an angled eyeliner brush. I applied this along the outer half of my lower lash line as well.
8. I curled my lashes and applied Maybelline Express Turbo Boost mascara on my lashes.
9. I filled my brows using Anastasia Beverly Hills Brow Duo Powder.
10. I also applied Mata Nona no. 15 falsies.
11. On my face, I applied MAC Pro Long-Wear foundation using Real Technique Expert Face brush.
12. Under my eyes and on my blemishes, I applied MAC Pro Long-Wear concealer. I set my face using CoverFX Translucent powder.
13. On my cheeks, I applied Chanel Blush de Horizon.
14a. (left) For the peachy lips, I filled my lips using MAC Spice lip liner. Then I applied YSL Glossy Stain in Peche Cerra-Colla (27).
14b. (right) I removed the previous lip color, and then applied NYX Monte Carlo on my lips.
Products used
Eyes – MAC Groundwork paintpot; Smashbox Full Exposure Palette (crease – M2, outer lid – M1, lid – S1, inner corner – S4, liner – M7); L’oreal Voluminous Smoldering eyeliner; Maybelline Expres Turbo Volume mascara; Anastasia Beverly Hills duo brow powder; Mata Nona falsies no. 15.
Face – MAC Pro Long-Wear foundation NC30; MAC Pro Long-Wear concealer NC25; CoverFX translucent powder.
Cheeks – Chanel Blush de Horizon.
Lips – MAC Spice Lip pencil; YSL Glossy Stain no. 27; NYX Monte Carlo
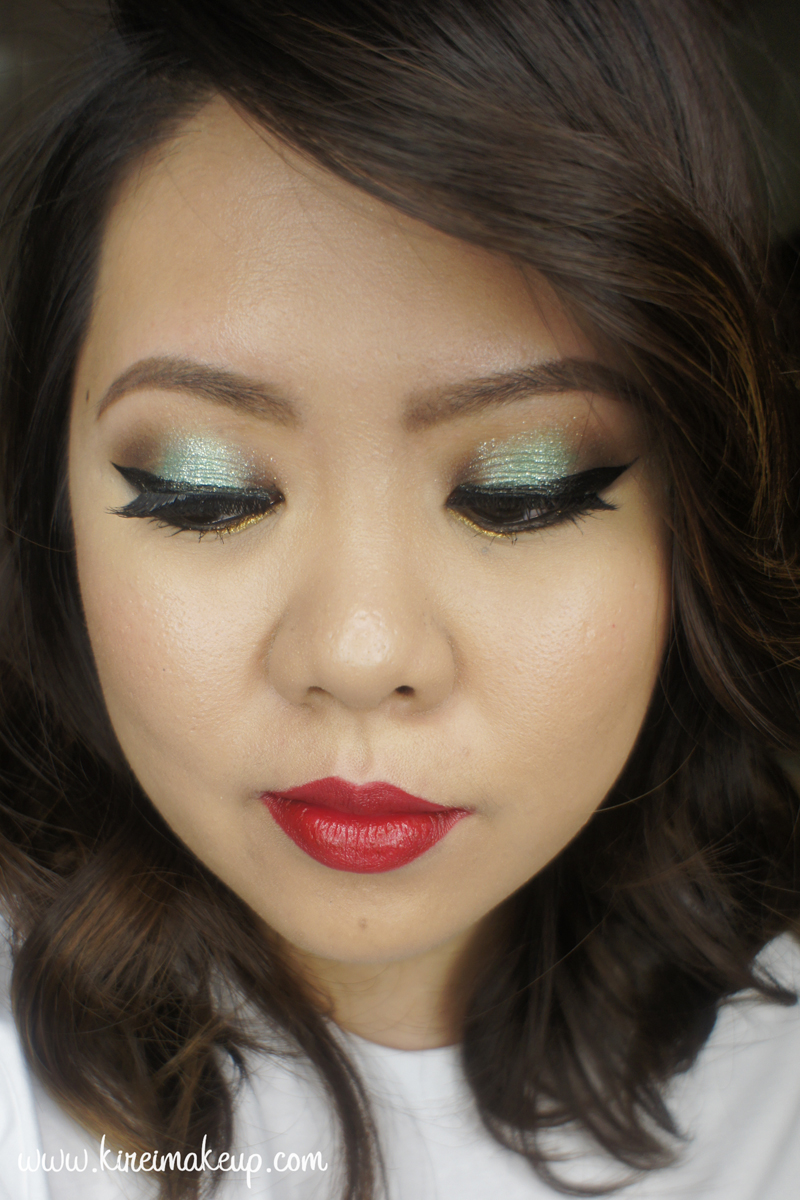
Christmas Makeup Tutorial
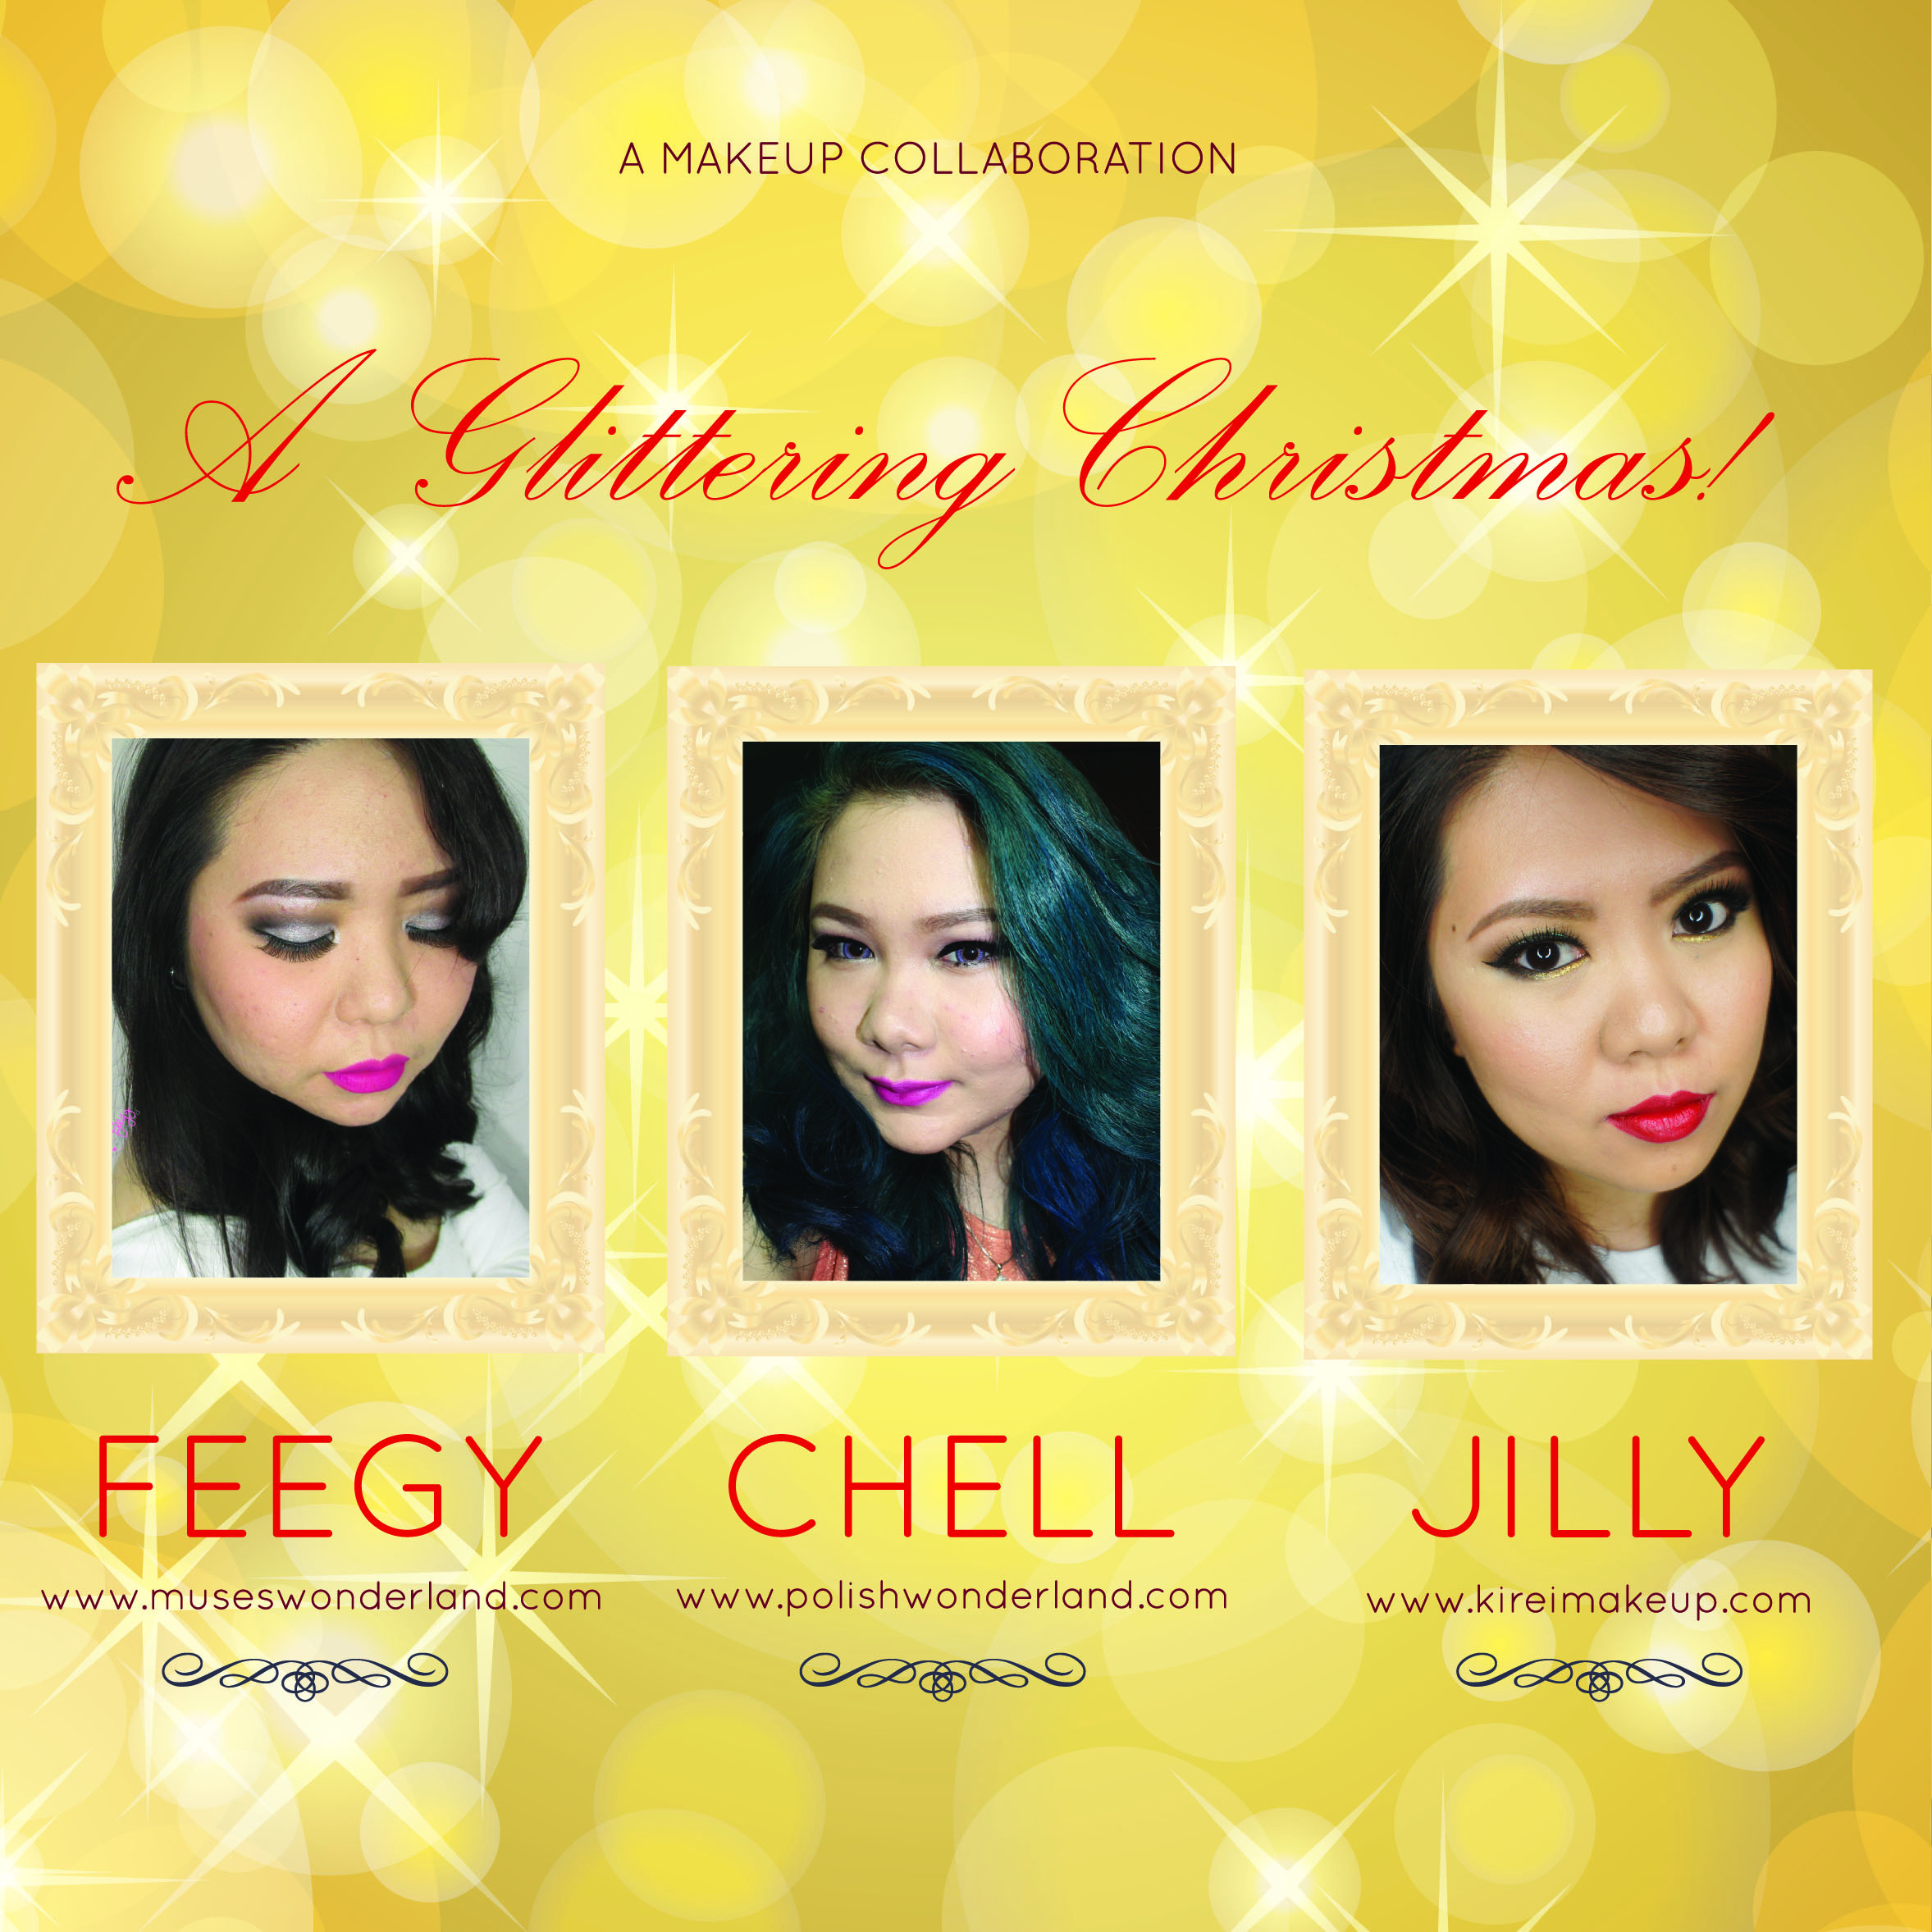
Are you guys ready for the Holiday season?! For those of you who are celebrating Christmas, I hope you’ll enjoy this Christmas Makeup tutorial! This is a makeup collaboration with fellow Indonesian Beauty Bloggers – Feegy from Muses Wonderland, Chell from Polish Wonderland, and myself (not from any wonderland *wink* hahaha). So, don’t forget to check their tutorial out!
We collaborated in creating a Christmas look with a little bit of glitter ya’know, because it’s Christmas! We need glitters, hon! Sparkles everywhere! Feegy created a silver glitter smoky eyes, and Chell went on the nude glitter eyes. For me, I went all out with green, gold and glitters! Hey, it’s Christmas, I might as well make full use of all the Christmas colors!
For my look, even though it’s pretty bold and colorful, it is still wearable if you aren’t afraid of colors. The placement of the colors are quite important so you don’t go looking all crazy, you get what I’m saying? Instead of green, gold and glitter everywhere, I focused these 3 products on specific location on my eyes. This way, the colors work well together, and you don’t look like a glittery mess.
The green is located on the center of the eyelids only so that when you blink, that gorgeous color will pop along with a teensy bit of crushed metallic pigment. You can use glitter if you don’t have the crushed pigment. The gold glitter is on the inner half of the lower lid, this will brighten and open up your eyes.
The key is to apply the bright color and glitter lightly. Notice I used my finger to apply the green shade, I also use my finger just to press the crushed pigment very lightly all over my lid. This way, the colors and glitters aren’t all over the place. By combining bright colors with neutrals, your whole look will be pulled together.
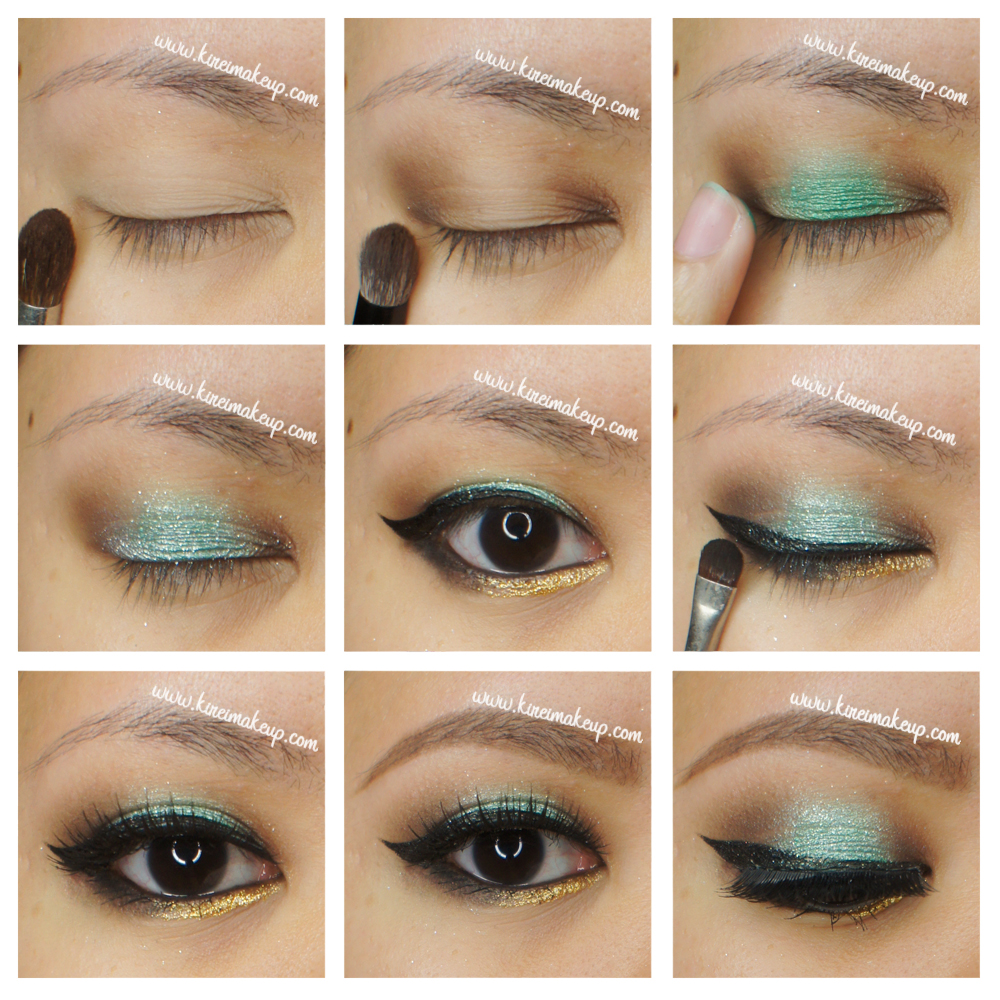
My eyelids are prepped using Urban Decay Primer Potion.
How-to:
1. I applied Urban Decay Buck eyeshadow above my crease, as my transition color, using a crease blending brush.
2. Using Smashbox bullet crease brush, I applied Kat Von D Shadow Box (Monarch palette) on the outer and inner V of the eyes.
3. I applied MUFE Aqua Cream no. 52 on the center of my eyelid using my ring finger.
4. Using the same ring finger, I VERY lightly tapped MAC Metallic Crushed Pigment in Moss Garden all over my lid. I just want a little bit of the crushed metallic pigment for shine, not for the color.
5. I lined my upper lash line using Kat Von D Trooper eyeliner. On the waterline, I applied MAC Smolder kohl eyeliner.
6. On the lower lash line, I applied PAC eyeliner liquid in Bazaar Gold on the inner half. On the outer half, I applied Kat Von D Deadhead eyeshadow (Monarch palette) using a smudger brush.
7. Using the same smudger brush as step no. 5, I applied whatever was left on that brush on the outer and inner V of my eyes (on top of Shadow Box), just to add a bit of depth.
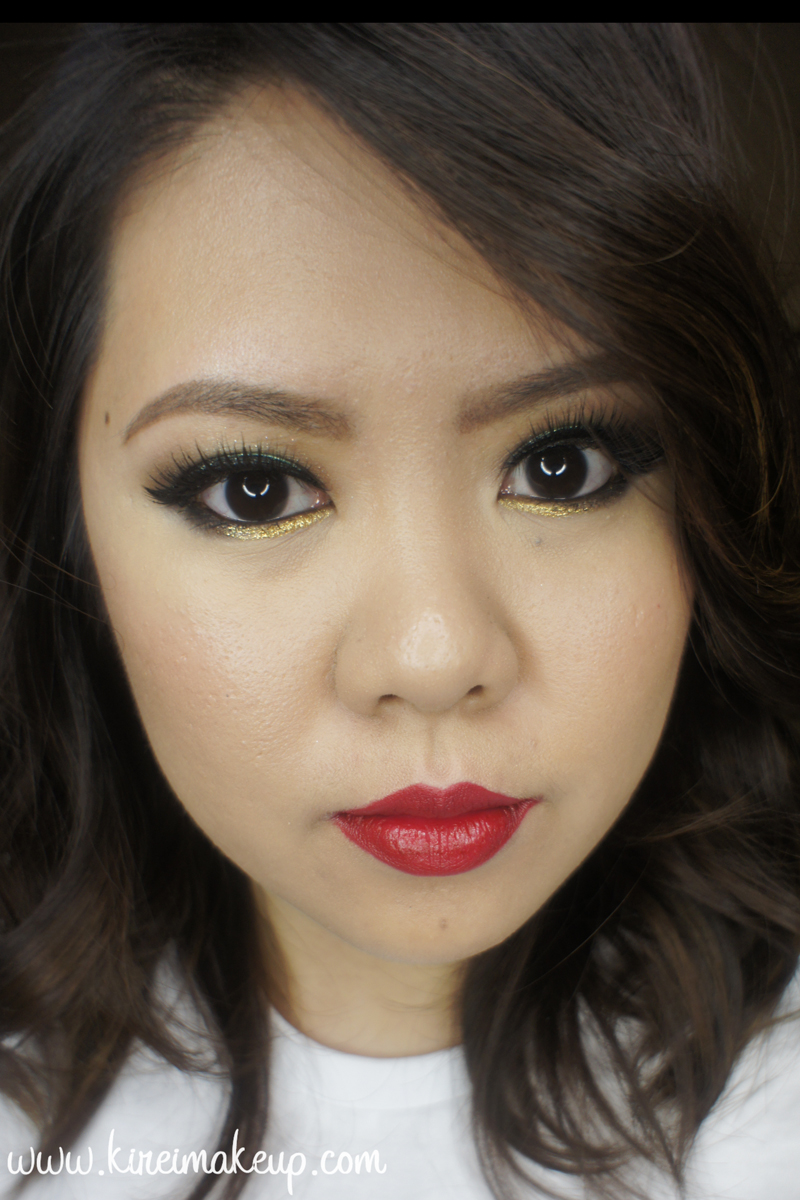
8. I applied Gwiyomi Annabelle lashes for extra drama.
9. I filled my brows using Anastasia Beverly Hills Brow Wiz in Taupe and Brunette.
10. On my face, I applied Diorskin Star foundation using Real Technique foundation brush.
11. I also applied MAC Pro Long-Wear concealer under my eyes, and any areas I need to cover.
12. I set my face using CoverFX Translucent powder.
13. I applied Smashbox bronzing powder from the contour kit to warm my face up slightly. Then, I applied Chanel Blush de Horizon on my cheeks.
14. On my lips, I lined and filled it with MAC Brick lip pencil. Then, I applied OCC Vintage lip tar on top of it.
Products used
Eyes – Urban Decay Primer Potion; Kat Von D Monarch Palette (Shadow Box, Deadhead), Make Up For Ever Aqua Cream no. 52; Kat Von D Trooper eyeliner; PAC eyeliner liquid in Bazaar Gold; Gwiyomi falsies in Annabelle; Anastasia Beverly Hills Brow Wiz in Taupe and Brunette.
Face – Diorskin Star Foundation 030; MAC Pro Long-Wear concealer NC25; CoverFX translucent powder.
Cheeks – Smashbox contour kit (bronzer); Chanel Blush de Horizon.
Lips – MAC Brick lip pencil; OCC Vintage lip tar.
Rose Gold Holiday Makeup
I’ve done gold/brown makeup, a silver smoky eyes makeup, natural looking makeup, as well as bold lips holiday makeup. Today, I wanted to do another more wearable, soft and easy holiday makeup. I used Rose Gold since I think it’s fun and feminine. This tutorial is for those of you who are girly, and want to look more on the natural low-key for the holiday. I also feel that this look will be good for those with deep set eyes.
The idea is similar to the Fresh Dewy makeup tutorial post couple days a go. The eyes are simple and high in shimmer, the face is semi-matte and natural finish. This look suits those who don’t like to wear heavy makeup. Everything is very simple and light. You can skip the eyeliner altogether, and just wear mascara. I just like the look of a cat/winged eyeliner to frame my eyes. 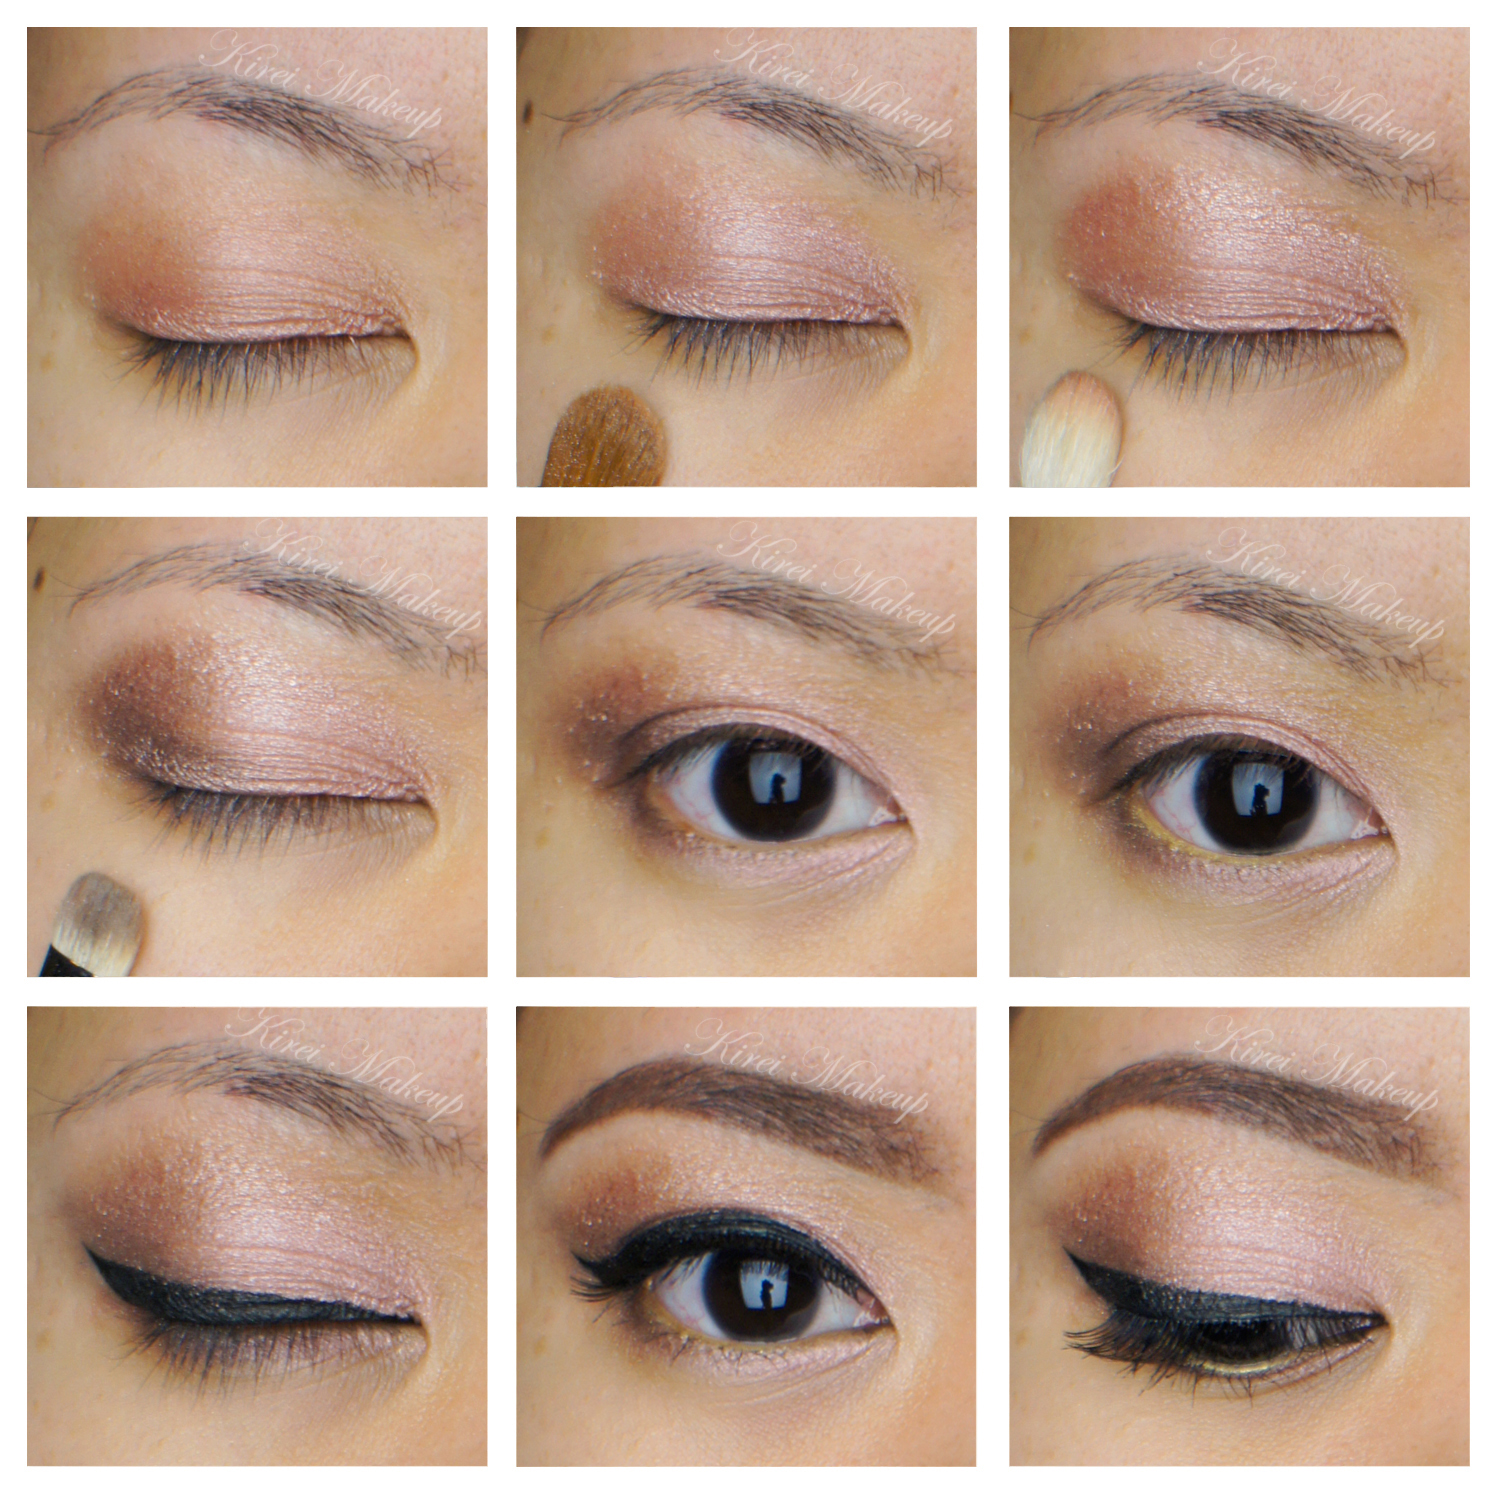
How-to:
1. I applied Bobbi Brown Rose Gold long wearing cream eyeshadow on my eyelid using my ring finger.
2. Using a flat eyeshadow, I applied the middle color from the Bobbi Brown Shimmer Brick in Rose Gold on my eyelid to add extra shimmer.
3. Using a fluffy blending brush, I applied the darkest rose gold shimmer from the Bobbi Brown Shimmer Brick in Rose Gold on the crease.
4. Using a small shader brush, I applied L’oreal Infallible eyeshadow in Bronzed Taupe on the outer V.
5. I applied the same rose color on step no. 2 on the lower lid, and then L’oreal Bronzed Taupe on the outer half of the lower lid.
6. Using MUFE aqua cream shadow no. 11 on the waterline just to add the extra gold in it. Of course you do not have to use gold for this. You can use black, beige, white, or anything you want!
7. I created a winged eyeliner using Kanebo Kate Super Sharp eyeliner on the upper lash line.
8. I filled my brows using Anastasia brow wiz in Brunette.
9. I curled my lashes and applied mascara, as well as Ardell no. 109 false eyelashes on the upper lashes. I also applied mascara on the lower lashes.
10. For the face, I applied L’oreal Lumi Magique foundation in W4 all over my face using CoverFX foundation brush.
11. Under my eyes, I applied concealer in MAC Pro Conceal/Correct palette in Medium.
12. I powdered under my eyes using CoverFX translucent loose powder.
13. I applied MAC Dainty mineralized blush on my cheeks.
14. I also applied Diorskin Shimmer Star Amber Diamond on the bridge of my nose and on my cheekbones.
15. On the lips, I applied Revlon Colorstay Ultimate Suede in Socialite, and added a little bit of L’occitane Lip Balm (the one with olive in it).
Smashbox Full Exposure Look #1
I’ve recently bought Smashbox Full Exposure palette using my 20% discount from Sephora (yippie!). I’m pretty sure if you guys follow me on Instagram or Twitter, you would’ve seen the picture of the palette there.
Anyways, I’ll talk more about the palette in depth later on. I just have to say, this is an amazing palette! The shimmer side of this Smashbox Full Exposure Palette has beautiful glitters, which surprisingly stayed on the lid really well. Not to mention, the palette consists of nudes, greys, blacks and browns! Both in shimmer and matte! So much love!
This look is perfect for everything! If you want to wear it out on a date, skip the false lashes. It’s so perfect for the upcoming holiday (too early?), brides and any type of parties. It’s warm, not too smoky, not too light. Just enough shimmer, and I love the combination of different textures.
The rest of the face is kept quite minimal, with a tad more highlight to compensate for this winter weather. I used L’oreal Color Caresse Shine Stain to keep my lips moist.

How-to:
1. I prepped my eyelid using Urban Decay Primer Potion.
2. Using a fluffy blending brush (Crown Brush Pro Blending Fluff C433), I applied Smashbox Full Exposure palette M2 eyeshadow slightly above my crease.
3. Then, using Sephora Bullet Crease 221 brush, I applied M1 on the outer V and on the crease.
4. I applied Smashbox Full Exposure palette M7 on the outer quarter of the lid using Crown Brush Round Crease.
5. I used the tip of the Round Crease Crown brush to apply Smashbox Full Exposure palette M1 eyeshadow on the lower lid. Then, I applied M7 just on the outer half of the lower lid.
6. Using Firm Shadow 157 Crown Brush, I applied S3 on the eyelid.
7. I created a winged liner along the upper lashline using Kanebo Kate Super Sharp Liner.
8. I lined the outer half of my tightline using the black side of Revlon PhotoReady Kajal Intense Eye Liner + Brightener in Carbon Cleopatra.
9. I applied Tarte Light, Camera and Lashes mascara, and also Eyeme false eyelashes (sample from a friend) on the upper lashes.
10. Using Red Sable Oval Crown Brush, I applied Smashbox Full Exposure palette M4 under the brows.
11. I filled my brows using Anastasia Brow Wiz in Medium Ash and Brunette.
12. I applied MUFE HD Elixir to prep my face.
13. Then, I applied MAC Pro Longwear foundation in NC30 all over my face.
14. Under the eyes, I applied Giorgio Armani Master Corrector no. 2.
15. Then, I applied MAC Pro Conceal/Corrector in Medium under my eyes, and on my blemishes.
16. I powdered my face using CoverFX Translucent loose powder.
17. I applied MAC Shadowy as contour, MAC Cubic as blush, and Diorskin Shimmer Star Amber Diamond as highlighter.
18. On the lips, I applied L’oreal Colour Caresse Shine Stain in Eternally Nude.
Engagement Party Makeup
Last night, I have the pleasure of attending one of my closest friends’ engagement party. For the party, since I was planning to wear my Fuschia print dress, I decided to go for an earthy-coloured eye makeup to complement the dress. I think this look will work well for brides-to-be who like a more natural looking makeup.
So, here’s the tutorial! 🙂
How-to:
1. I applied NARS Pro Primer all over my face to prep my skin. Then, using a damped Beauty Blender Sponge, I applied Giorgio Armani Silk Foundation all over my face.
2. I applied L’oreal Touche Magique concealer under my eyes (I had to! I didn’t get a good sleep the night before due to my strained neck!).
3. I applied Urban Decay Primer Potion in Sin to ensure that my eyeshadows won’t crease and will last all night long.
4. Next, using MAC Powersurge pencil eyeliner, I applied a thick line on my eyelid. Using MAC 239 brush, I blended the liner upwards towards my crease.
5. After checking that the liner is completely blended, I applied the gold-beige colour from Chanel Kaska Beige quad to my eyelid using the flat end of the Urban Decay shadow/crease brush duo (this brush comes with the NAKED 2 palette).
6. Using the same brush and I applied the plum-brown shadow from Chanel Kaska beige on the outer corner of my eyes. I used the crease brush end to blend the shadow to the crease.
7. Using a clean MAC 239 brush, I applied the darkest purple shadow from Chanel Kaska Beige quad along my upper lash line, blending it upwards.
8. Using a MAC 208 brush, I applied the darkest purple shadow along my lower lashline. I used a pencil brush and run the gold-beige colour on my lower lid to blend out the purple.
9. I used a flat eyeshadow brush to apply the vanilla shadow from the Kaska Beige quad to the inner corner of my lid and under my brows.
10. I lined my waterline and tightline using Urban Decay 24-7 glide-on eyeliner in Perversion.
11. I curled my lashes and applied 2 coats of Revlon Voluminous mascara in Carbon Black on my upper lashes and 1 coat on the lower lashes.

12. I filled in my brows lightly using Anastasia Brow Wiz in Brunette.
13. I powder my face lightly using CoverFX transparent loose powder.
14. I applied MAC Dainty blush on my cheeks and Benefit Hoola as a contour.
15. Lastly I applied Tarte Lipsurgence in Exposed to complete the look.
