As mentioned on my last video, today I’ll be sharing with you guys my Bold Brows routine using Tweezerman products. Last week, I shared with you how I do my brows to look a little bit more defined yet still natural looking. This week, I’m going for a bit more of a bolder brows look. This bolder brows look, I think, gives a bit more of a youthful vibe to the overall look. Anyways, check out the video below and read more to see how I achieve this look.
Tag: how to fill in eyebrows
#BackToBrows with Tweezerman
For today’s post, I’ll be sharing with you guys products that were sent to me by Tweezerman and for the tutorial, I’m showing you guys how you can achieve a natural yet defined looking eyebrows. Read more below to find out all the products I used, and don’t forget to check out the video tutorial to see how I fill my brows!
[Updated] Brow Tutorial Video
I actually wanted to post this Brow Tutorial video tomorrow, since I do have another post lining up to be published. However, I got excited since this is my first video ever using my own face. It took me a lot of years to actually pluck the courage to do a video. Anyways, the quality might not be as good as other great youtube gurus, but please take it easy with me. I’ll try to improve slowly, and I look forward to read comments from you. I did not talk or do a voice-over since I’m not comfortable doing that just yet. However, again, in the future when I get more comfortable in front of a camera, I’ll start talking or doing voice-over.
So, I asked on Instagram, what kind of tutorials would you guys like to see me do. The majority of the comments said to do a brow tutorial. I have done a brow pictorial before on my How-to Fill in Brows post, but I guess seeing picture and seeing me doing it is quite different. Just keep in mind that this is how I DO my brows.
I cannot emphasize enough how each person has different shape and this might not work for you. However, what you can take from this tutorial is how I draw each hair individually. This is the most important part of filling in your brows. Light feathery stroke is the key! Try not to press too hard on your eyebrows to avoid making it look too thick.
For this tutorial, I assumed you already know or have gotten your brows shaped (waxed/tweezed/threaded). If you have not gotten your eyebrows shaped before, take a look at my Brows 101 post. If you are not allowed to shape your eyebrows, the best thing I can suggest is to trim your eyebrows using a clean spooly and a cuticle scissors. This way, you can see the brows’ shape, and fill it in lightly using brow powder, emphasize on LIGHTLY.
For a day makeup, I usually do something similar to my Shu Uemura Brow Pencil post.
Enjoy the video, and comments are welcome!
How to Fill in Eyebrows
Today’s post is a requested tutorial on how to fill in eyebrows. I was asked to do a tutorial on how I do my eyebrows for my tutorials, and how I get my edges sharp. So, here’s a tutorial on how to do it. I know I’ve done a few brows tutorial before with different products – pencil, eyebrow gel, and powder. However, in this tutorial, I’m using my all-time favorite, Anastasia Brow Wiz.
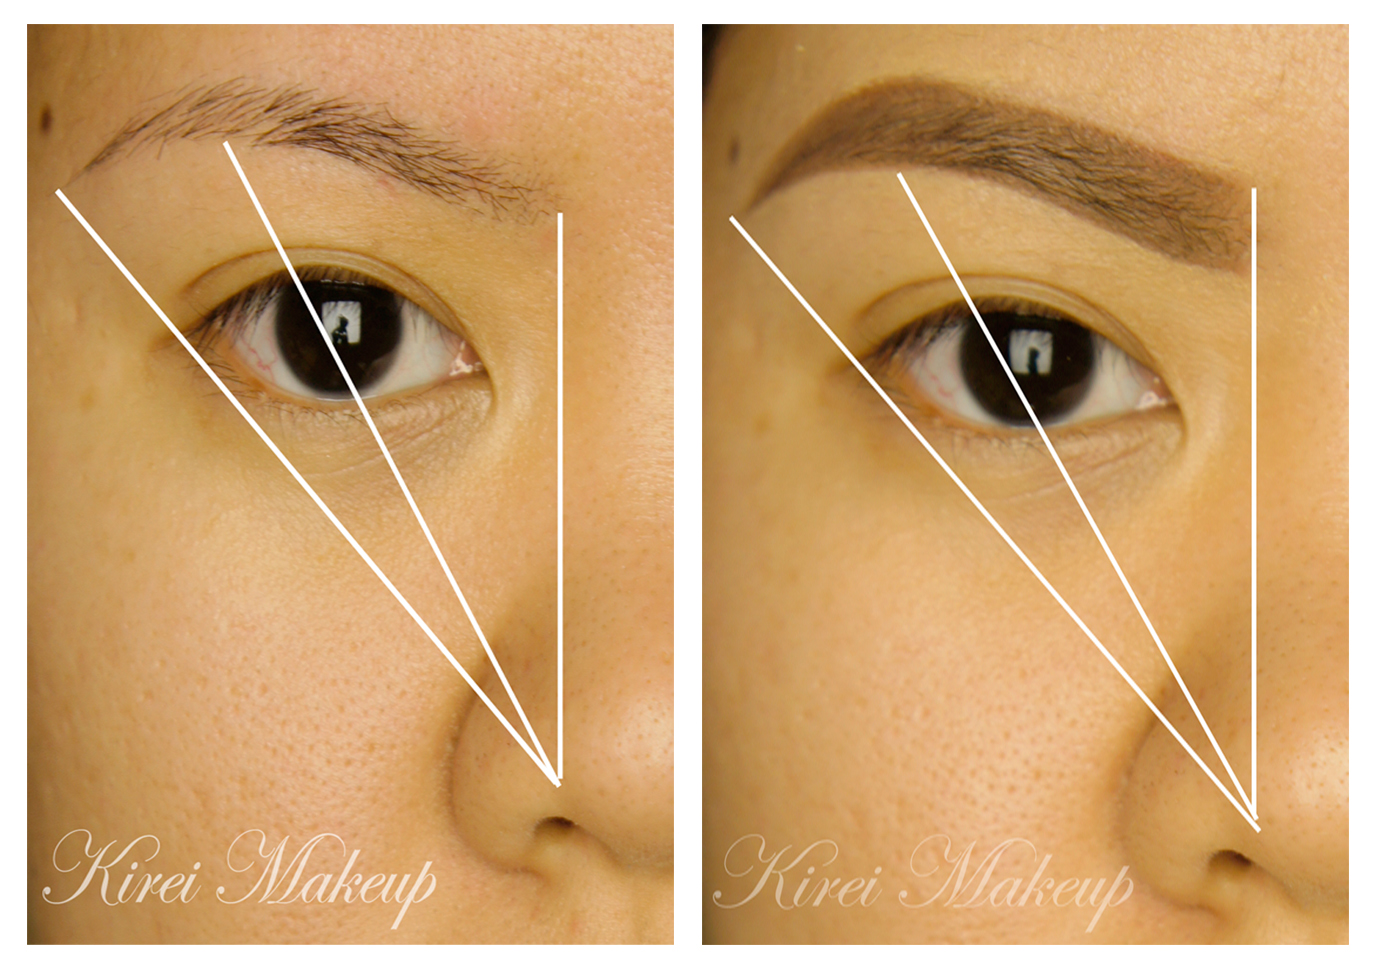
Let’s take a look at my before and after picture before we proceed to the how-to. The white lines in the pictures below is a guide on the location of the eyebrow’s head, arch, and tail.
Before:
- Sparse eyebrow, esp. on the tail area.
- Head of eyebrow is far from the side of my nose – this cause the bridge of my nose to look wider and bigger.
- There’s no definite shape, thus not framing my eyes
- Tail of eyebrows is thin, even though it ends at the right area.
After:
- Head of eyebrow begins at the side of my nose – bridge of my nose will look slimmer. However, keep in mind that if the head of the eyebrows are too far into the center of the face, your face will look funny. Make sure it’s not too far out, nor too far it when drawing your eyebrows.
- Eyebrows look fuller and thicker – helps with a youthful appearance.
- Tail of eyebrow looks thicker and arch of eyebrows is more visible.
- Eyebrow frames the eye nicely.
For this look, I used:
1. Anastasia Brow Wiz – Ash Blonde and Brunette.
The reason as to why I used 2 different shade is because Ash Blonde is a perfect match to my eyebrow hair, but a tad too greyish and light for my hair. Brunette, on the other hand, is too warm (i.e. red) for my hair. Thus, I used 2 shades to create the perfect color for myself. Feel free to use just 1 shade. And yes, I do match my eyebrows to my hair color.
2. A flat edge eye brush from MAC – MAC 212.
3. Concealer – MAC Pro Correct/Conceal palette in Medium (you can use the yellow corrector to highlight under the brows, or your foundation instead).

I assumed that everyone knows how to shape their brows, or get them professionally done. If you are a beginner, and you want to do your own eyebrows, please check my Brows 101 to see how it’s done. Remember not to overpluck! If you aren’t comfortable doing it yourself, please get them done professionally. .
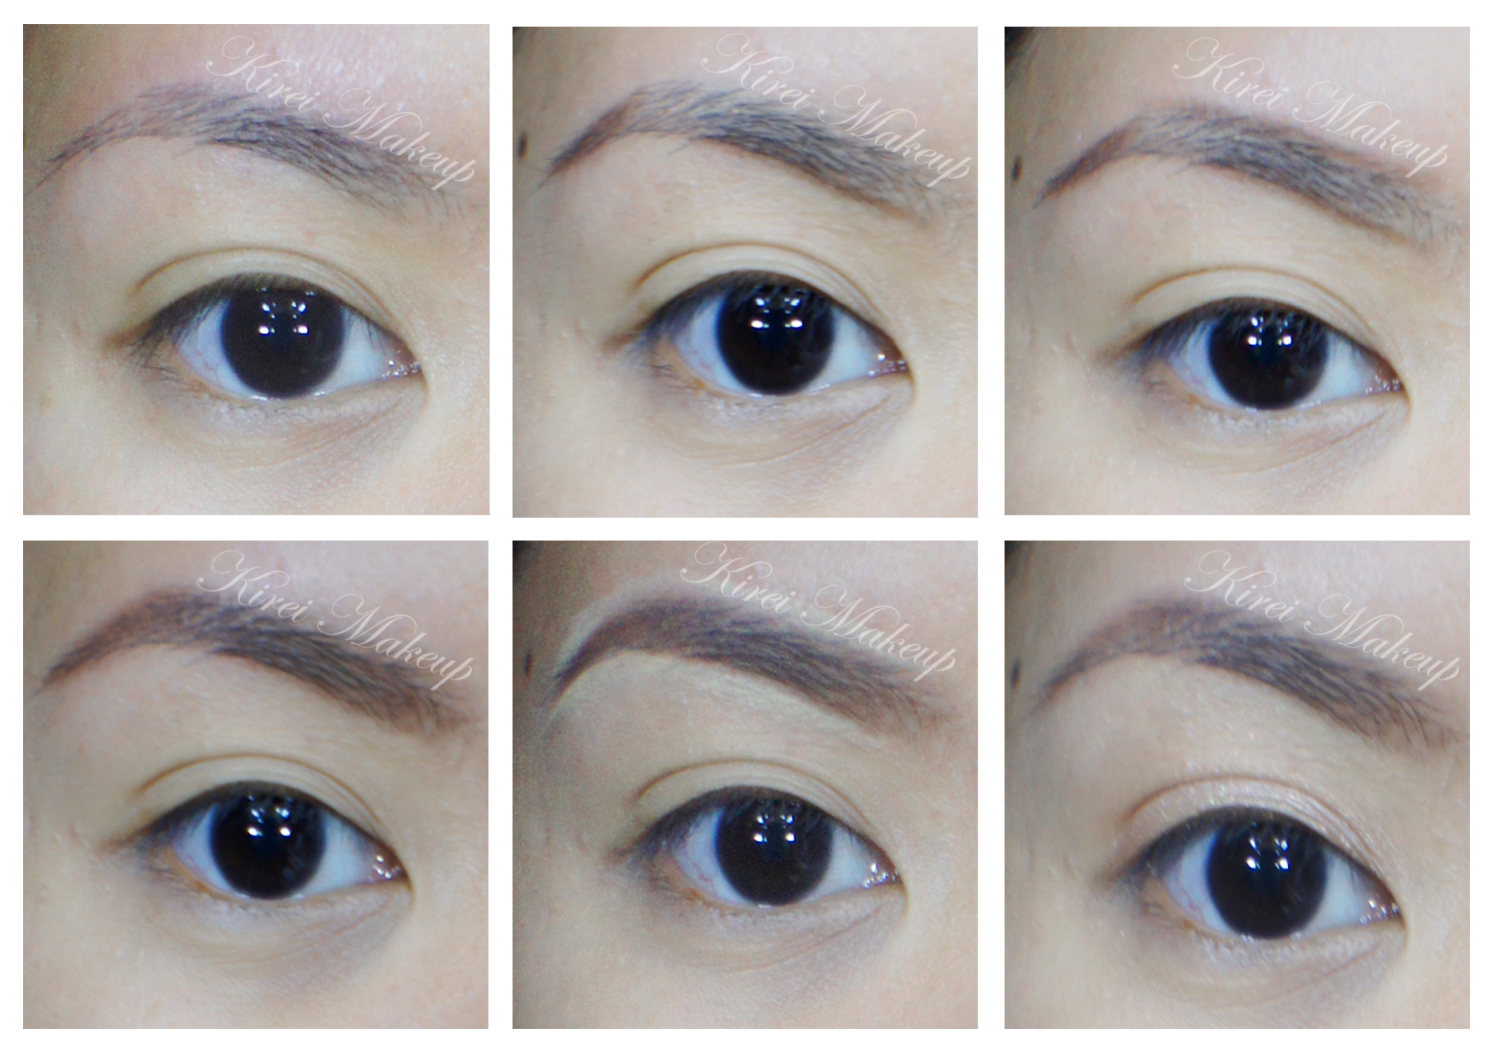
How-to:
1. Brush your brows upwards using a spooly (clean mascara wand).
2. Using Anastasia Brow Wiz Ash Blonde, I framed my brows by creating parallel lines on the bottom and top of my eyebrows.
3. I continued my brow’s frame using Ash Blonde.
4. I filled my brows in using Ash Blonde.
5. Using Anastasia Brow Wiz in Brunette, I filled in my brows in the sparse area. I lightly drew each hair in to make the brows look thicker.
6. Using MAC 212 and concealer, I very lightly lined the line on the lower part of my eyebrow. Note how I used the straight edge part to create a clean line.
7. Using MAC 212 and concealer, I lined the upper part of my eyebrow. Note how I placed the brush flat against my skin.
8. Once I’m happy with how the concealer looked like, I blended the bottom part down towards my eyelid, and blended the upper part upwards toward my forehead.
9. Use a clean spooly/mascara wand, and brush your eyebrows lightly upwards.
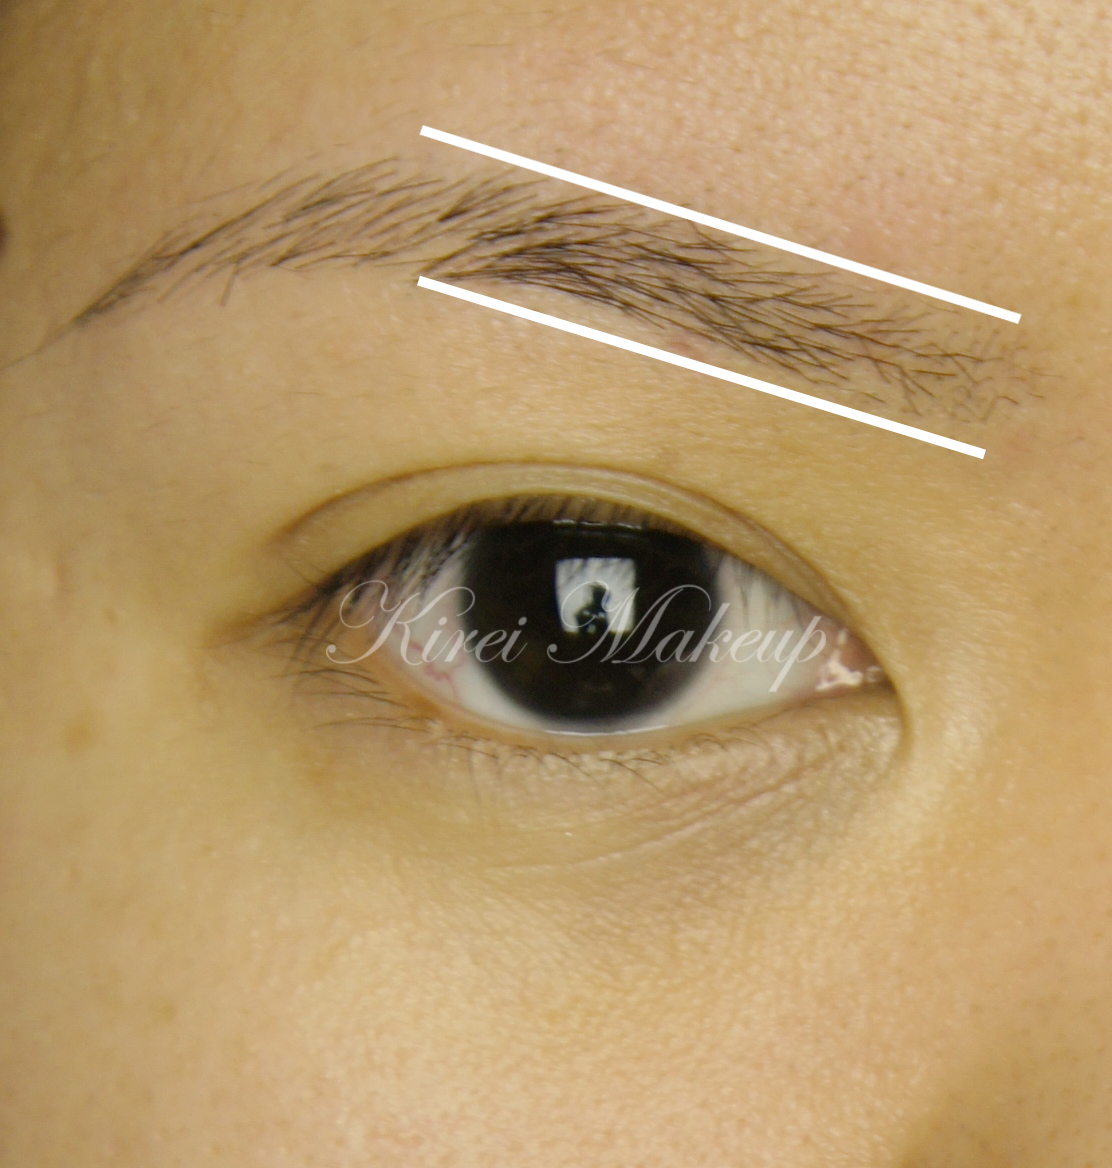
If you are confused as to what I was trying to say on Step 2, please take a look at the picture below. I created the 2 lines on the bottom and upper part of my eyebrows, just like how it’s indicated by the white lines. This way, you can get a sharp clean edge at the beginning of your eyebrows, if that’s what you prefer.
Product of The Week: MUFE Aqua Brow
As promised, I’ll be talking about MUFE Aqua Brow gel in this week’s installment of Product of The Week. I bought this a few weeks a go out of the blue. I actually didn’t look it up online or even read any reviews about it. I wanted to buy it just because I simply have never used a gel product for my brows. Usually it’s either pencil or powder since I really like a natural finish for the brows. If you want to get a natural finish, please visit my Shu Uemura Hard Formula post.
Let me just start by saying that this is not a beginner’s product. If you are not comfortable using pencil or powder for your brows, stay away from the gel! If you don’t use this properly, you might end up with crazy brows that are too thick. If you have a heavy-hand, stay away from this product!
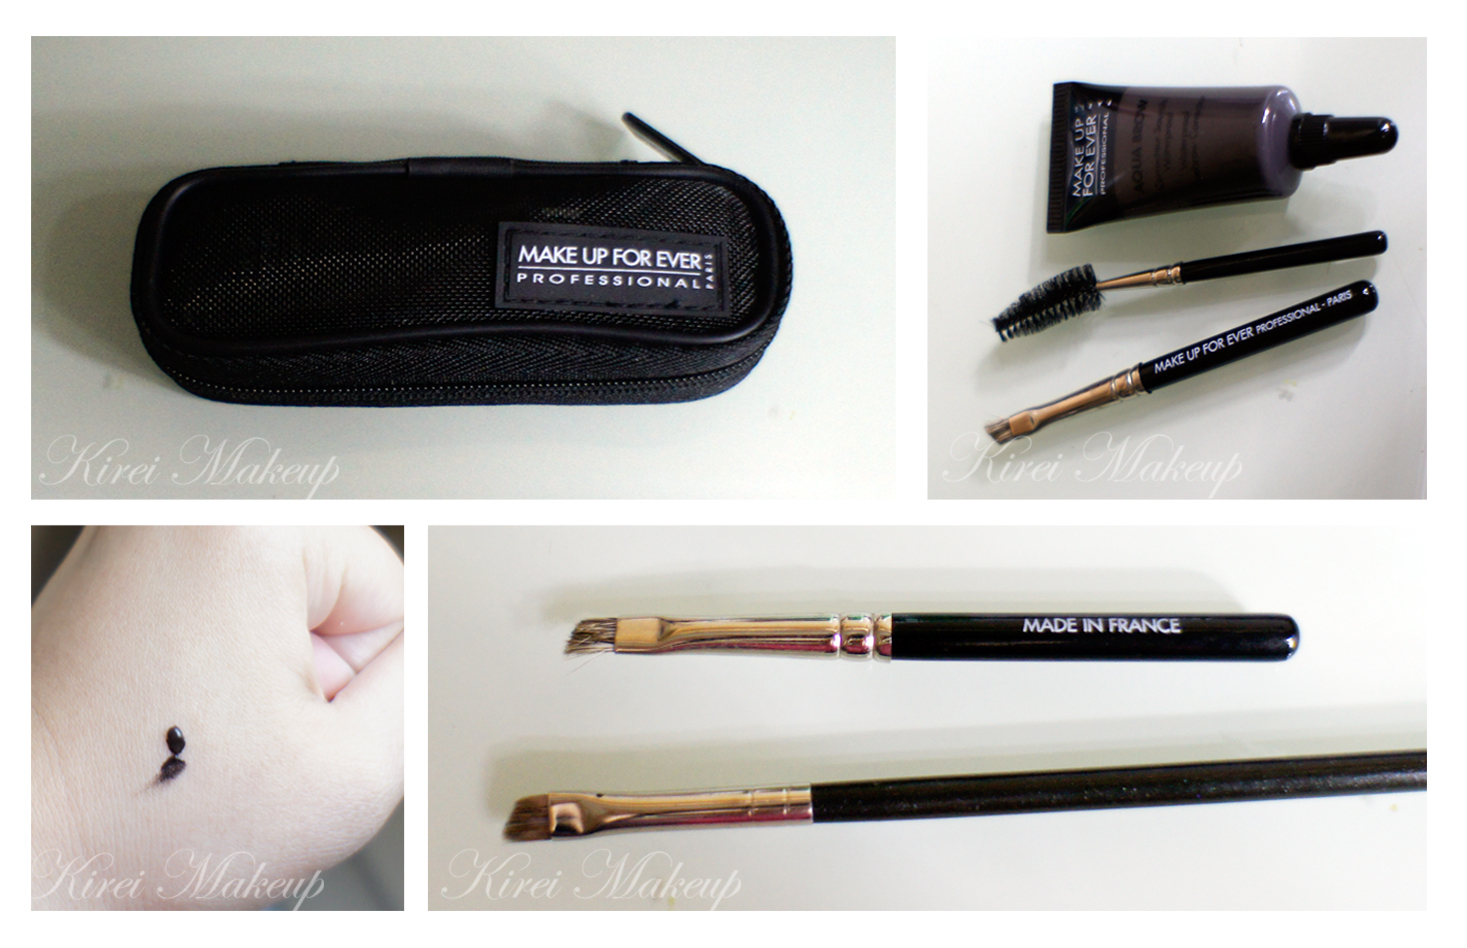
Ok, so the brow set comes in a little MUFE pouch, which I find it to be very convenient! Inside the pouch, you’ll get 1 MUFE Aqua Brow, 1 spooly and 1 angled brush. I don’t use that brush, instead I used my MAC 266 brush. It gives a more define and precise brows.
Remember, a little product goes a long way! See that tiny teensy dot on my hand. That will do 1 of my brows. It’s better to use a little then add more, than to use too much and try to take it off.
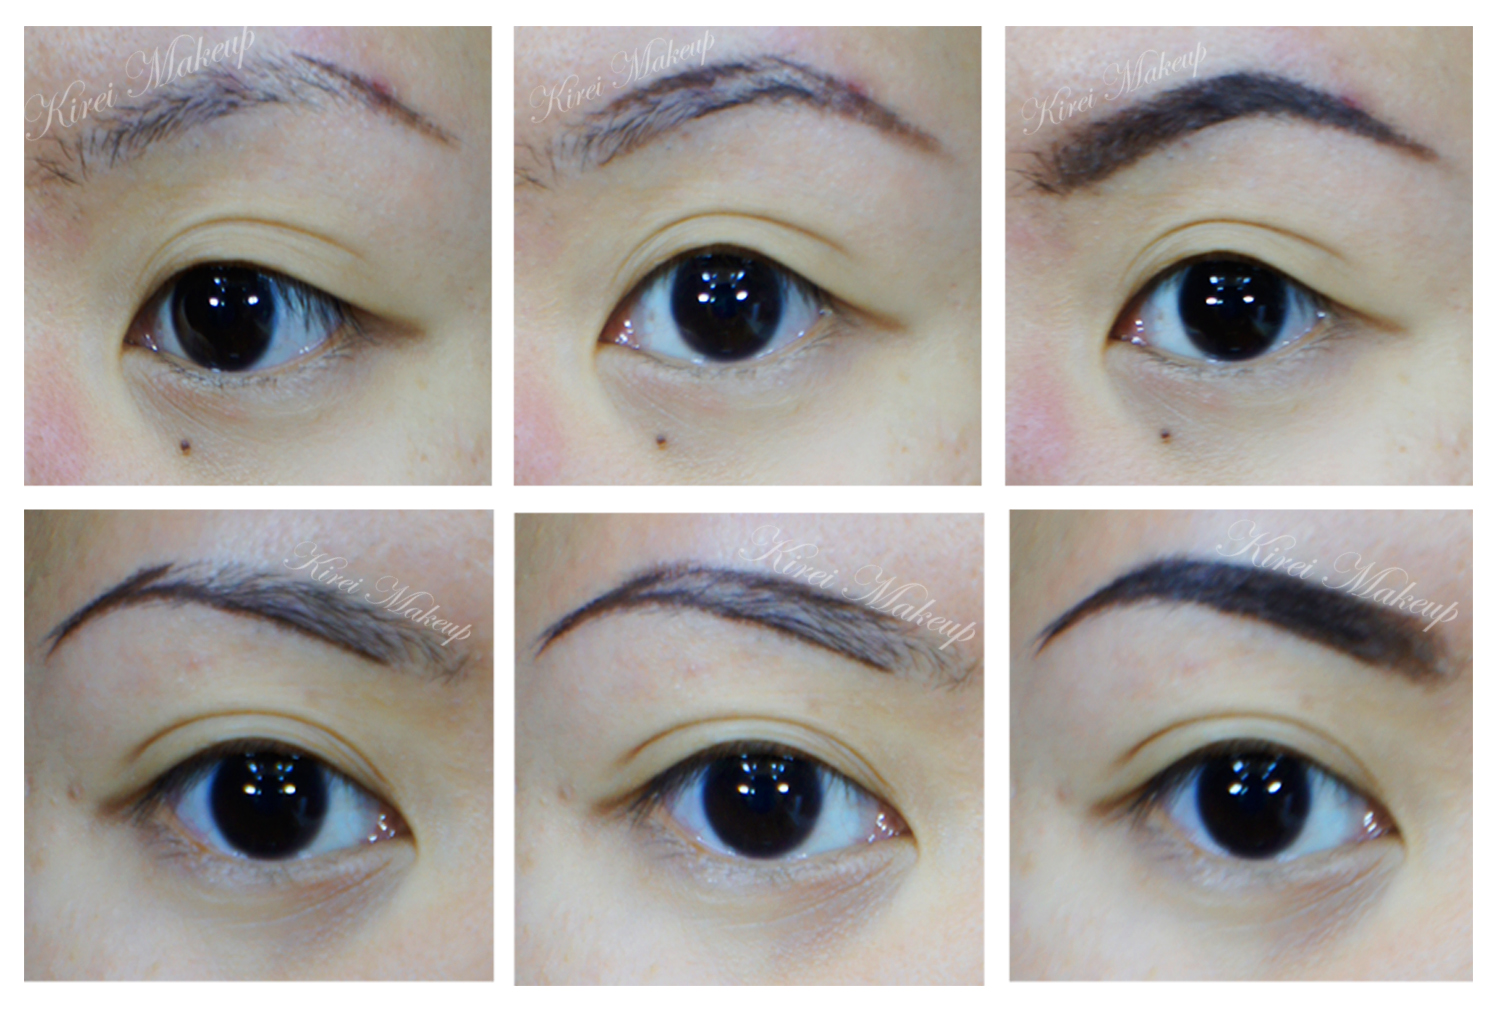
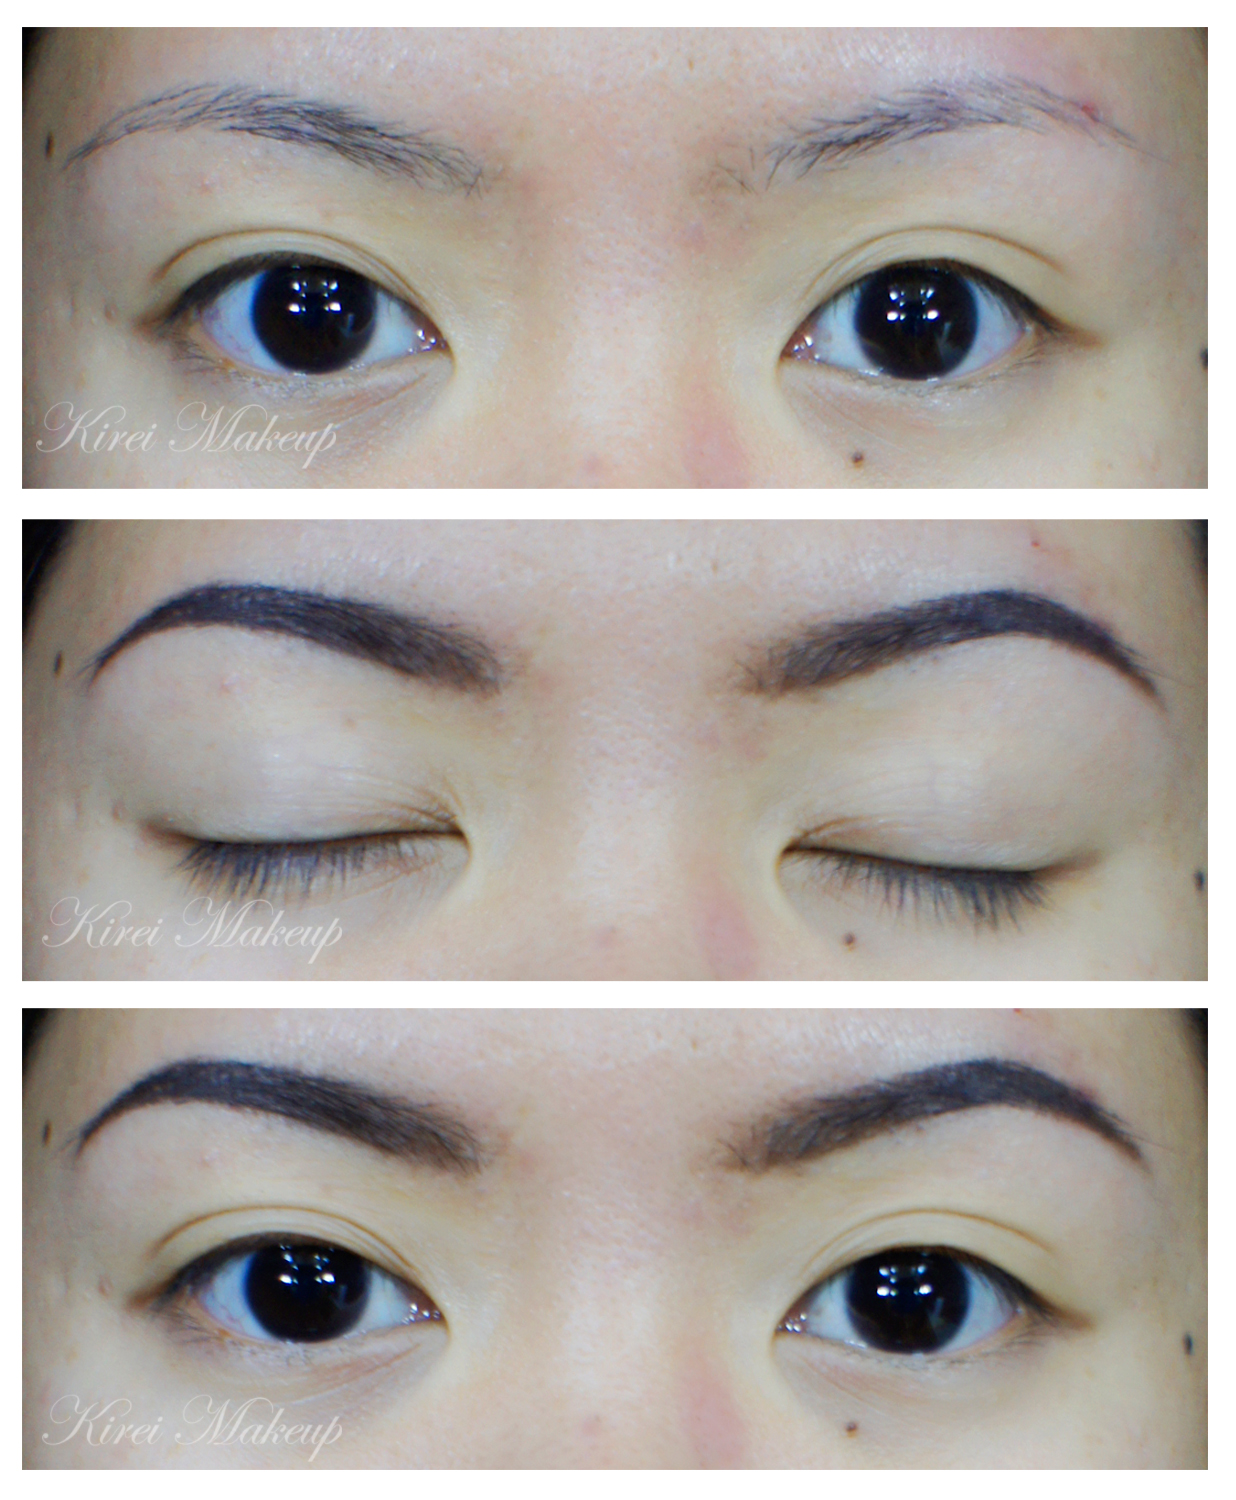
I tweezed and trimmed the brows myself. If you want to find out an easy way to shape your own brows, please check this post Brow 101. My own eyebrows have quite a lot of hair, but the hair has a very unflattering greyish shade to it. Not to mention, my left eyebrow (right in the picture) has a sparse eyebrow “head”. Filling my brows this way really frame my face and eyes nicely.
The pictures below showed how I filled my brows in. I think it’s pretty self explanatory. Oh, at the end of it, I also brushed out my eyebrows using the spooly that came with the set. This will remove some of the products, making it less harsh-looking.
Please comment below if you have any questions or if you want to see me do a video on how to fill in the brows.
Back to the product itself!
What is MUFE Aqua Brow?
Aqua Brow is a waterproof eyebrow corrector that fills, defines and lengthens brows. Formulated with volatile oil and carnauba wax, its creamy gel texture gives an even, natural result with a long lasting hold. The result remains flawless throughout the day and holds up under all conditions (water, heat, etc).
Formula:
Volatile oil
Carnauba wax
Hydrophobic treated, concentrated pigments
Xanthan gum
(credit: Make Up For Ever, 2013)
Shades
Comes in 7 available shades – 10 Light Blonde, 15 Blonde, 20 Light Brown, 25 Ash, 30 Dark Brown, 35 Taupe and 40 Brown Black.
I was recommended by the MUFE Artist in the counter to buy no. 40, which is slightly too dark for me I think. I didn’t actually mind it at all since my ombre hair has quite a dark roots. It’s also a great addition to my makeup kit in case I’ve to do dark brows. However, I might get no. 10, 20 and 35 in the near future to be added to my kit.
If you are of medium-dark skin, no. 40 might be a good color for you. It’s a very cool brown.
Longevity
This product is waterproof, smudge-proof, and sweat-proof since it’s from the Aqua range. If you want to go swimming in this, go ahead, it’s completely waterproof. I’ve never worn this product for more than 4-6hrs, so I can’t really say if it stayed on the whole day. But, pretty much when it dries, it will not move until you remove it with makeup remover.
Price
CAD$24 in Sephora. Not sure how much it is in Jakarta. I did buy it in Jakarta, but I bought other stuffs with it and didn’t really pay much attention to it. I think it’s on the Rp. 300,000 range.
Pros:
- 7 shades that cover every skin-tones.
- Waterproof, smudge-proof and sweat-proof.
- The set comes with brush and spooly which makes it very convenient for traveling.
- Squeeze tube packaging makes it ideal for the kit. I don’t have to worry about it breaking or anything.
- You can use the product to create a natural look or you can use it for a more precise application.
- Can be used to darken any stubble or beard or side burns for men, or in creating character makeup.
Cons:
- Might be too pricy than powder or pencil brow products.
- If you are not used to working with gel/cream brow products, this might be hard to do.
- If you apply too much, you might end up with harsh brows.
- Difficult to remove once you make a mistake. Make sure you have waterproof makeup remover handy.
If you want to see a complete makeup look using MUFE Aqua Brow, please see my previous post “Neutral”.
MUFE Aqua Brow Gel gets a 4.5 out of 5. It loses 0.5 point because of the difficulty level for beginners.
Product of the Week: Shu Uemura Hard Formula Brow Pencil
Brows, brows, brows! I’ve been asked to do a brow tutorial, but been putting it on hold for the longest time. Let me first of all, introduce this brow pencil to you guys. Whether you are a beginner or a makeup artist, I think everyone should own the Shu Uemura Hard Formula brow pencil! This pencil is currently my favorite brow product, ever since I ran out of my Anastasia Brow Wiz.
Anyhow, so what is Shu Uemura Hard Formula Brow pencil?
Natural finish and shape. This unique eyebrow pencil only releases color pigment when it interacts with the oils in the brow hairs. The result is natural, defined brows. Smudge-proof and long-lasting. (Shu Uemura, 2013)
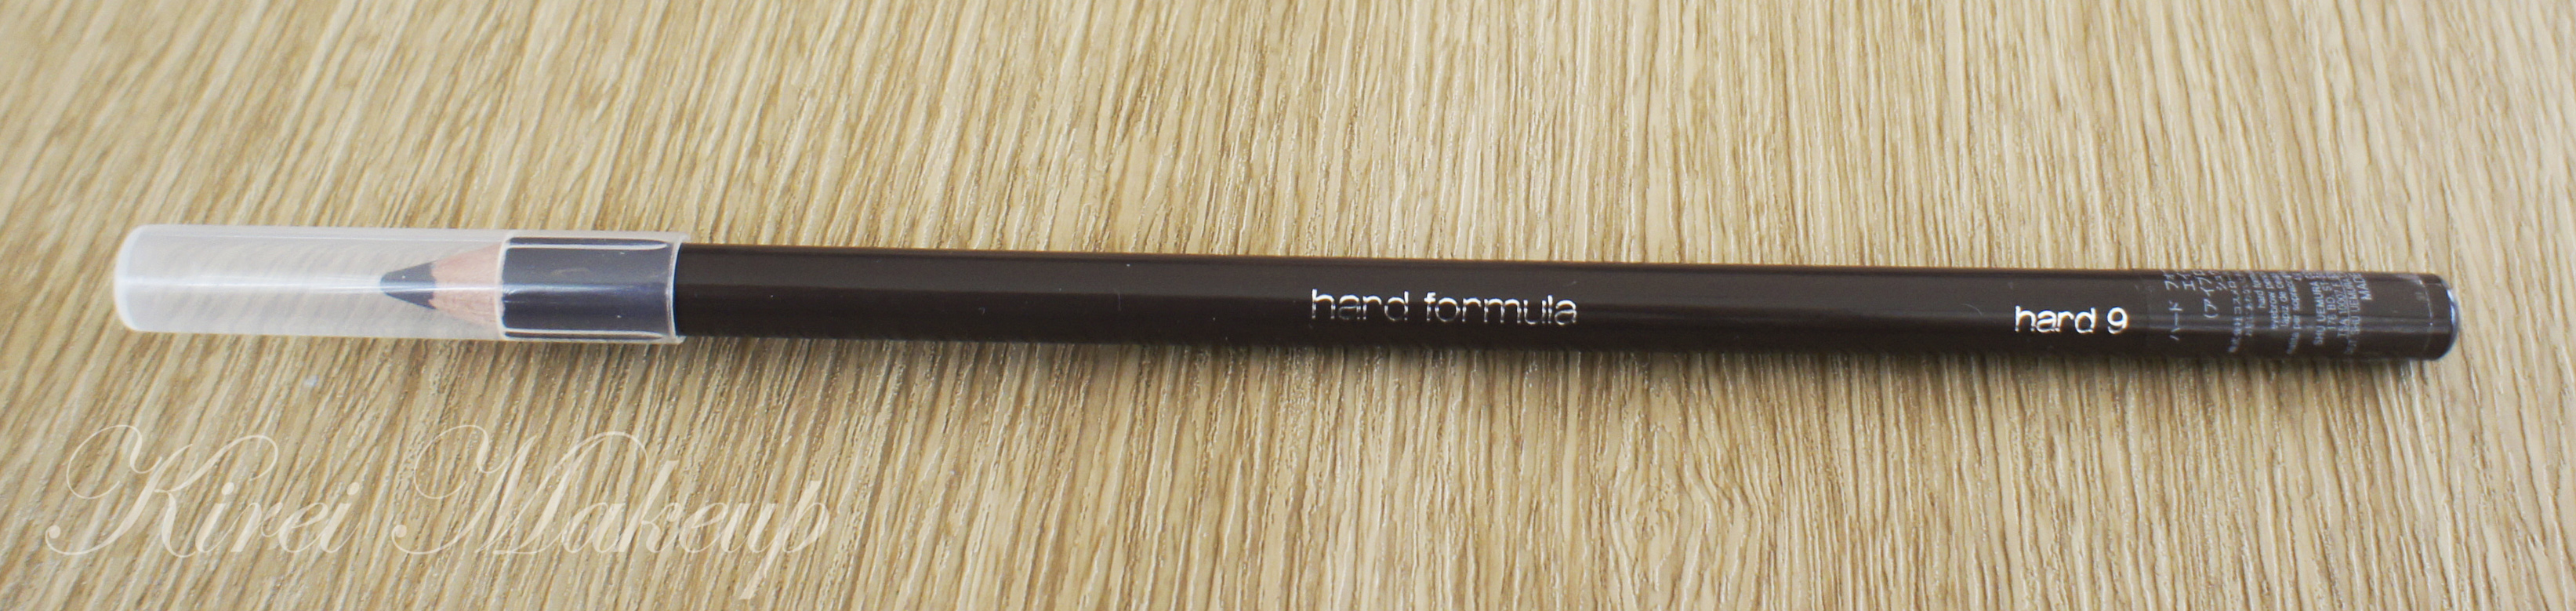
If you happen to go to a Shu Uemura counter or their website, you might realized that the shape of their eyebrow pencil is not exactly like my photo. That’s because their pencil is shaped using a cutter in a Naginata shaped. I knew about the shape because I went to a Shu Uemura counter in Canada and they explained it to me back then. However, I purchased this pencil from Shu Uemura counter in Grand Indonesia mall, and they did not cut it for me in Naginata style, instead they handed me in this form. I don’t really care, Naginata or not, this brow pencil still rocks!
Anyways, I might drop by the Shu Uemura counter again just to ask them to re-shape my brow pencil.
Pros
- The color is perfect. Mine is Hard 9 (Acorn), and I think it has just enough warm undertone for my warm undertone hair. It’s not too red, and at the same time not too ashy.
- It brings a certain warmness to the face and it works for a lot of people. I’ve used this pencil on several people and for bridal makeup as well.
- Since its hard formula is very waxy, when you draw this pencil in, it mimicked your brow hair. You can get the most natural finish with this product.
Longevity
I’ve worn this pencil for a good 8-10 hours without any smudging whatsoever in a very warm and humid climate (a.k.a Bali).
Price
I don’t quite recall how much it cost in Jakarta since I’ve bought it quite a while back. I will let you guys know once Shu Uemura Indonesia answers my tweet 😉
Anyways, I know this pencil costs CAD$29 in Canada and USD$23 in USA.
Cons
- Since it’s a hard formula and very waxy, you might not be able to swatch this on your hand. I managed to do it after going at it several times the back of my hand.
- They carry 2 more colors in Asia than in North America, namely Acorn and Walnut Brown.

Keep in mind, even if your hair is black, you might want to use brown instead so your brows don’t look harsh.
Also, if you want to know how I shaped my brows, please visit my tutorial in Brows 101.
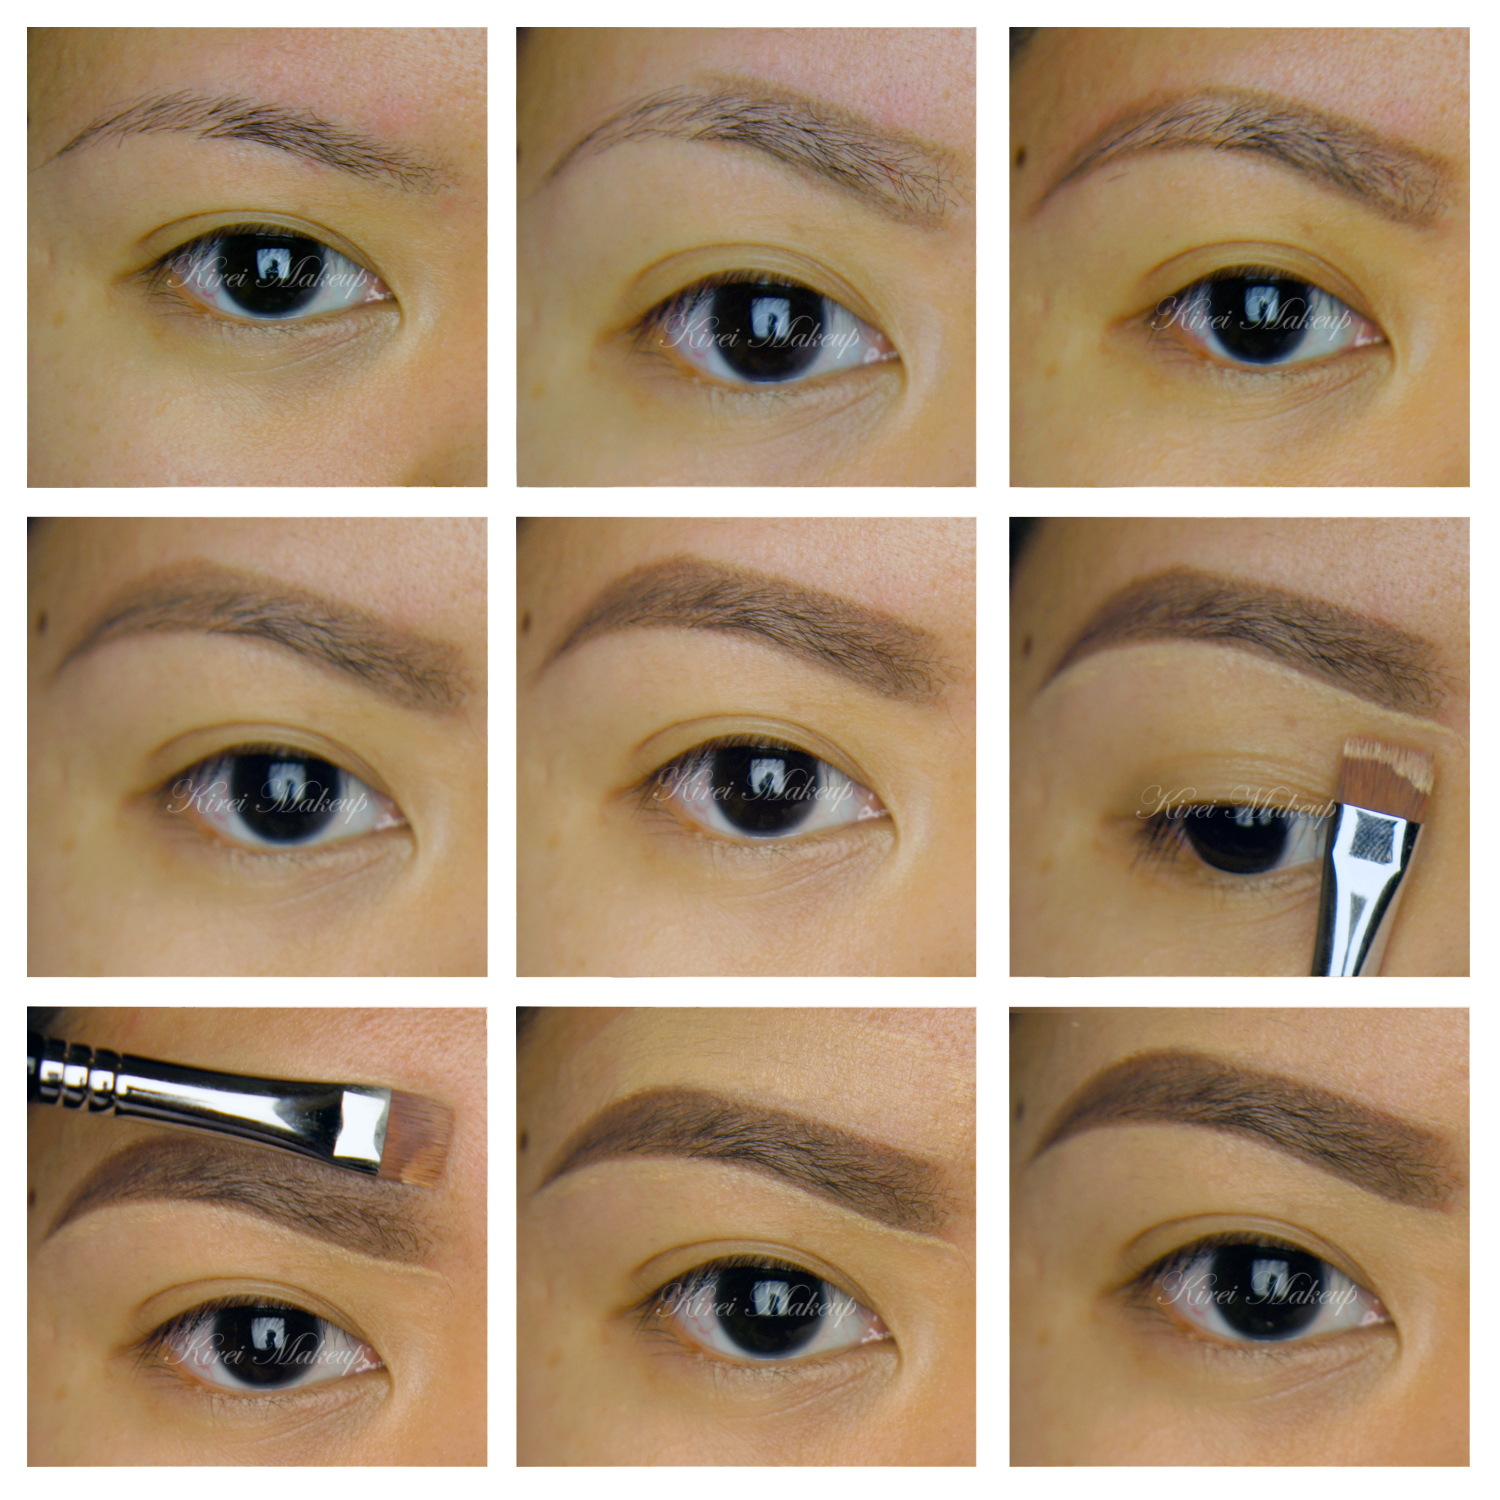
How-to:
1. Starting with a clean brow, use a clean spooly (or mascara brush) to brush the brow hair upwards. Trim any excess with a cuticle scissors if needed.
2. I like to start with the tail of brow. Just filling it in and extend it slightly.
3. I created a diagonal line on the lower part of my brow from the head to just below the arch (hard to explain, please look at photo below…bahahaha).
4. Next I drew a diagonal line along the top of the brow to the highest point of the brow (i.e. arch).
5. I filled it the rest of the brow using the pencil. (I purposely drew a lot in so you can see the difference between my non-filled brow with the filled-in brow).
6. This step is optional, but works wonder if you want an extra shape or an extra lift. So, using a flat sturdy brush, I applied M.A.C pro conceal/correct palette in yellow corrector along the bottom and top part of the brow. I blended it out using a clean flat brush.
7. At this stage, I brushed my brow hair upwards again using a clean spooly (or mascara brush) for a natural finish look.
Pretty much, lots of my tutorials prior to this post used the Shu Uemura Hard Formula Brow Pencil.