Today’s tutorial will be using mostly Tarte Light of the Party palette for my eyes and cheeks. This tutorial is a very simple day makeup look, nothing too fancy. It was a requested look from one of my good friends. Also, this tutorial is my first video tutorial for the year!
Tag: day makeup
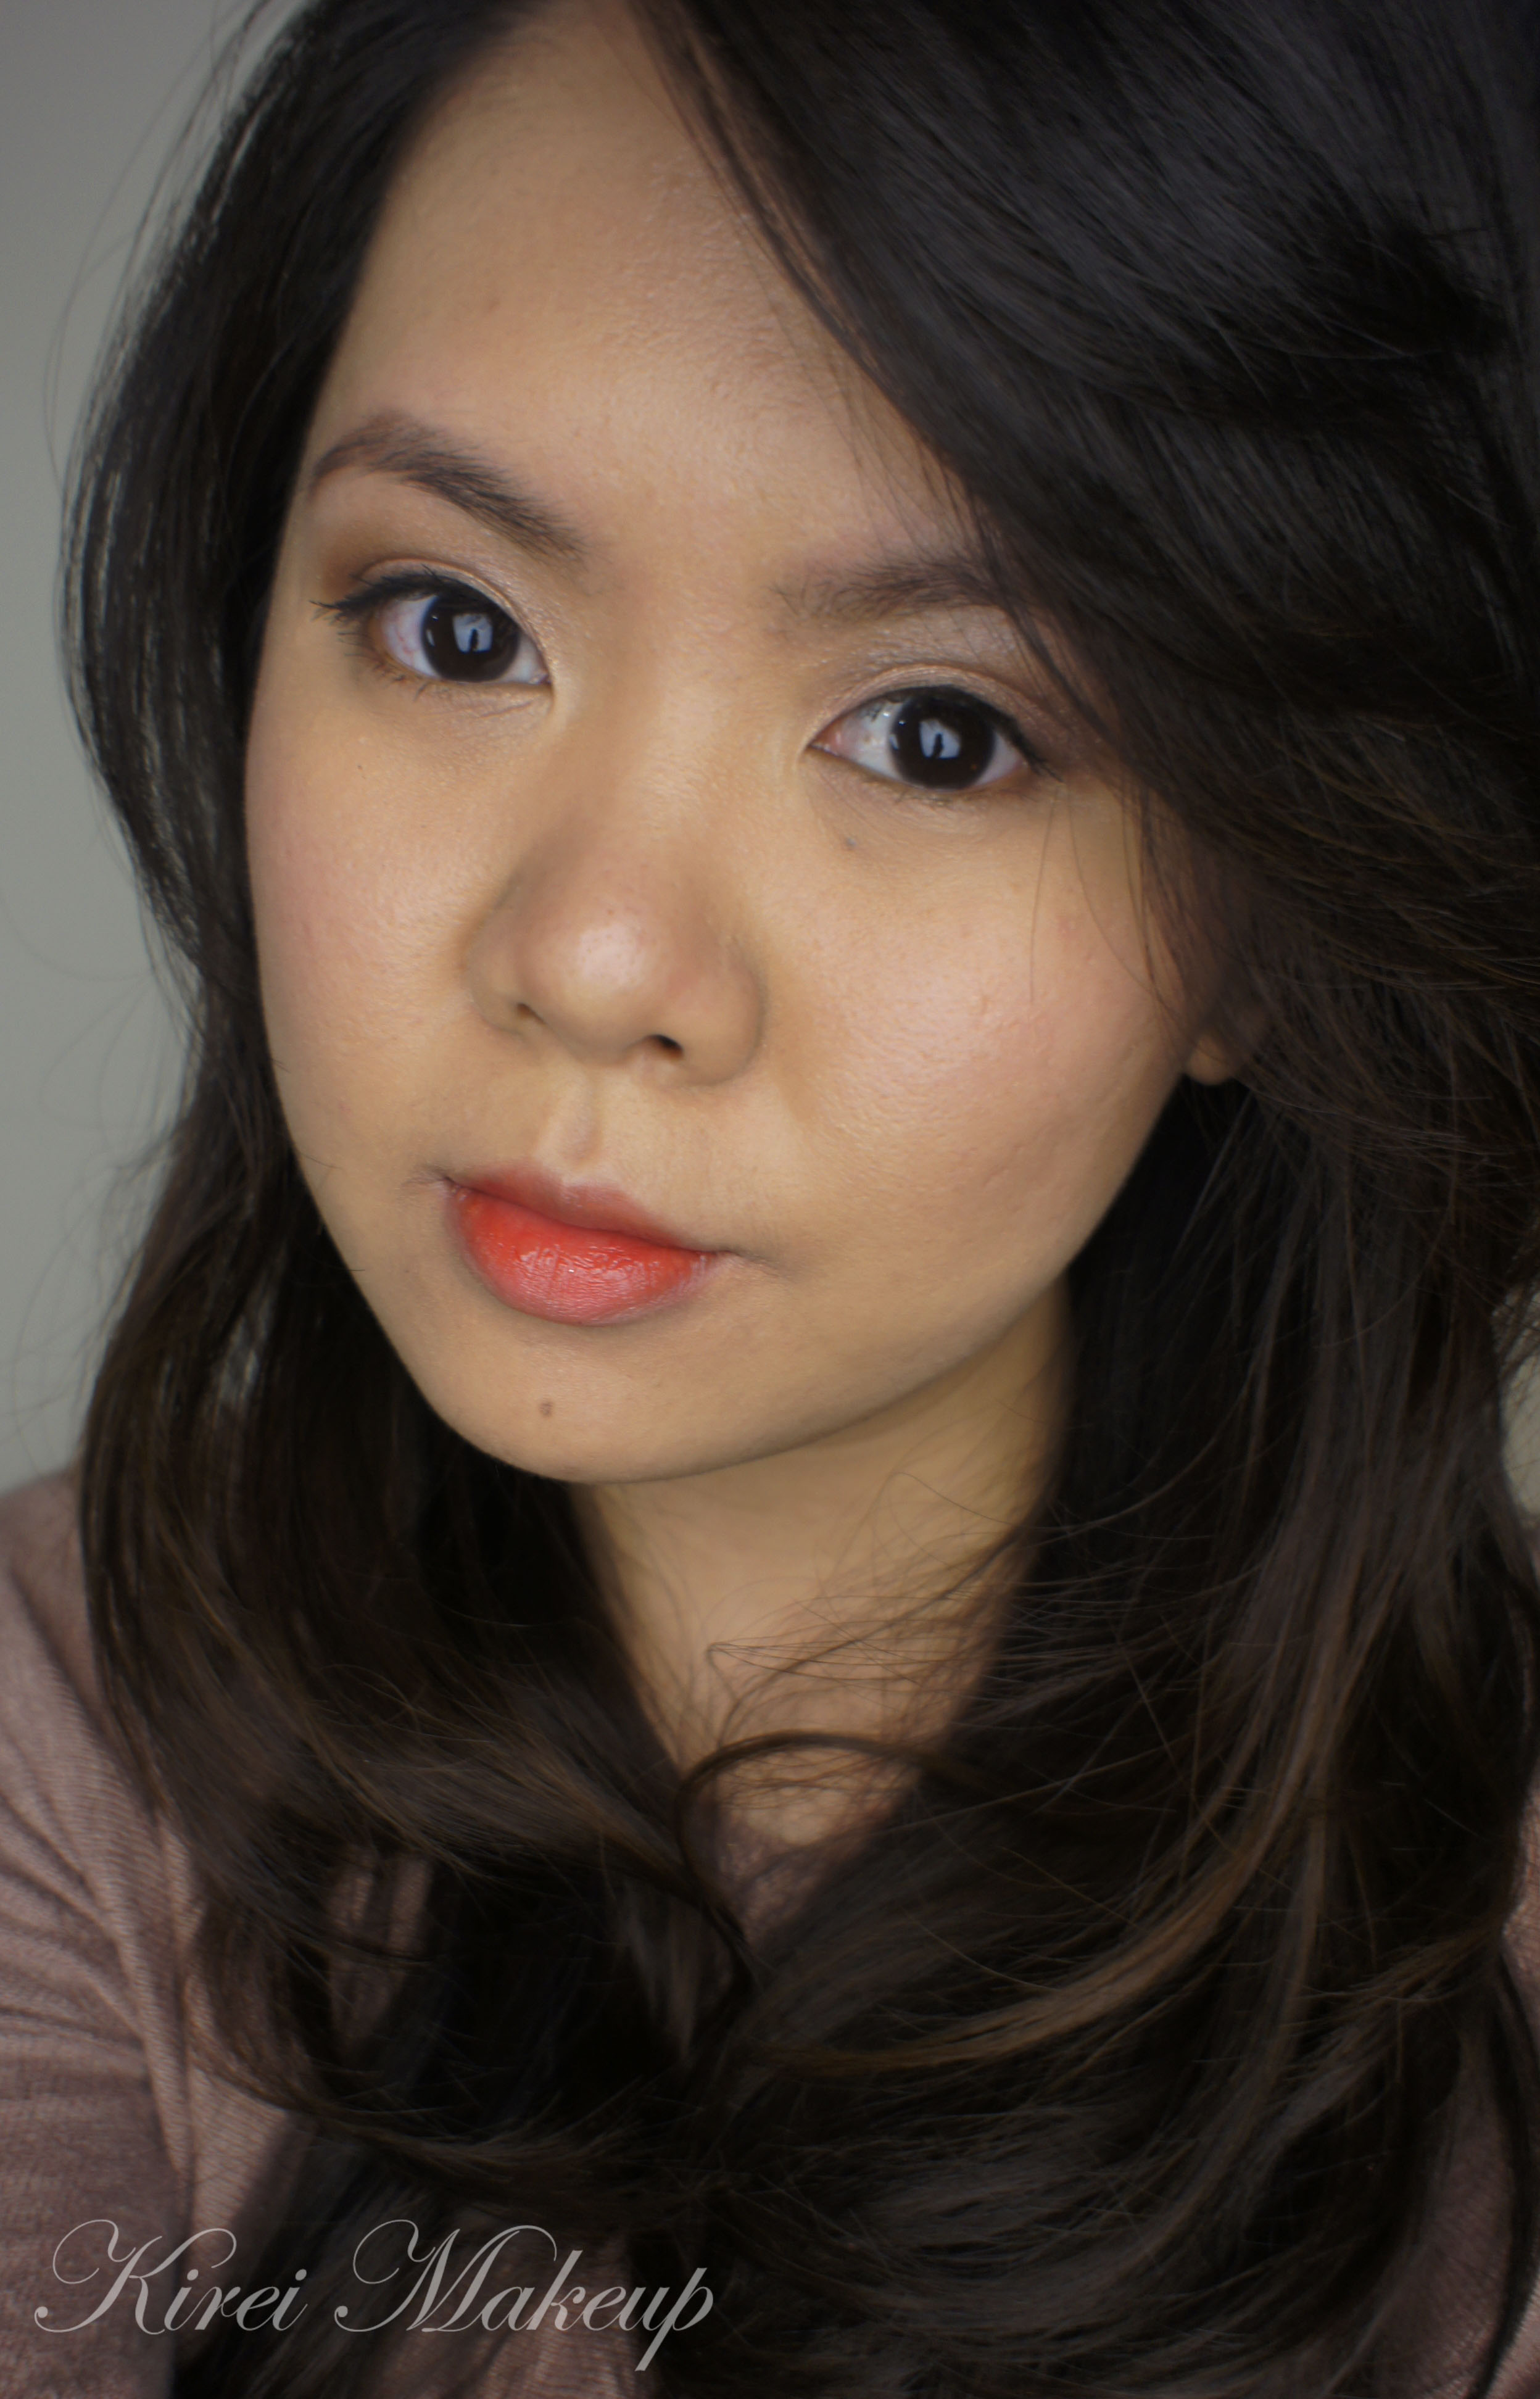
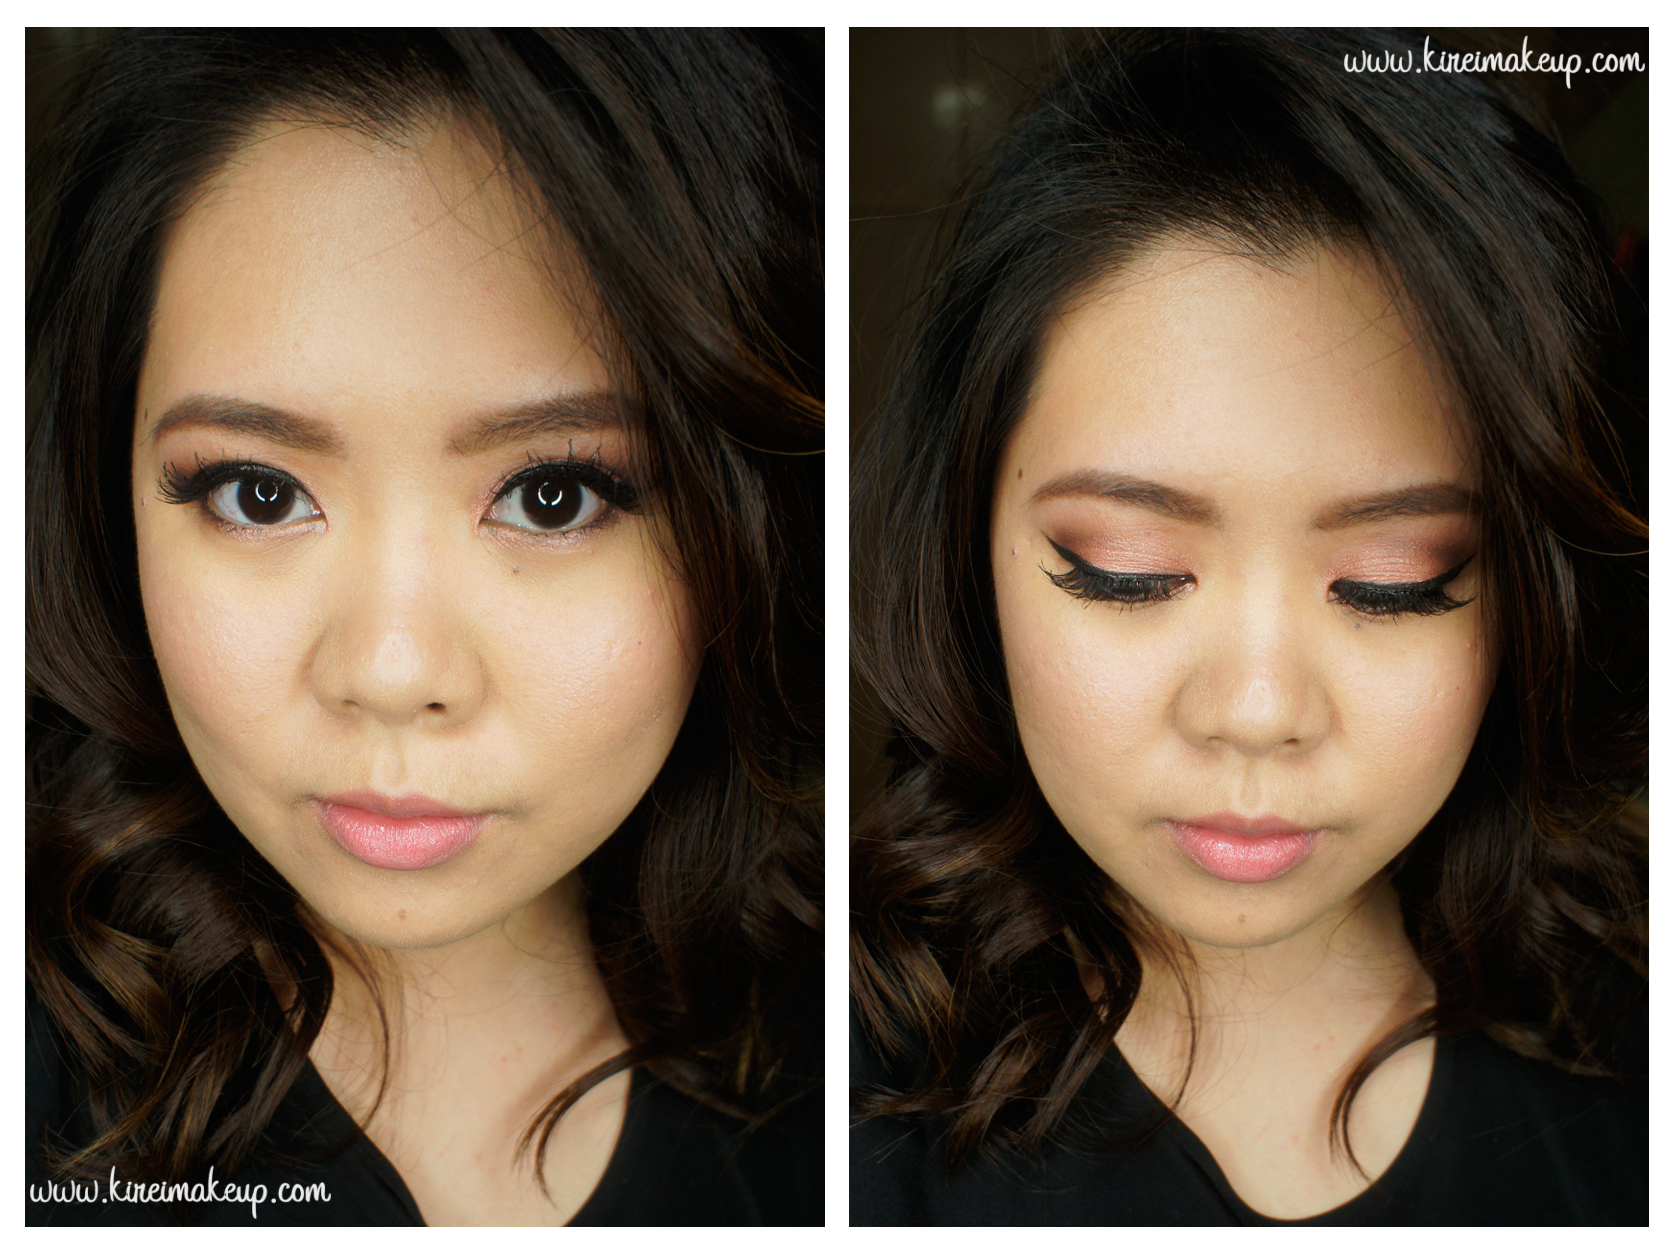
Day to Night Party Makeup Tutorial
We are almost in mid-December, already?! Anyways, most of you must have a lot of parties and events to attend to, so today’s post is a Day to Night Party Makeup Tutorial! This is one way of changing your day makeup to night makeup quickly, and all you need is a lipstick. You can also add a black eyeliner if you prefer, just like what I did for this post, but if you don’t it’s not a big deal.
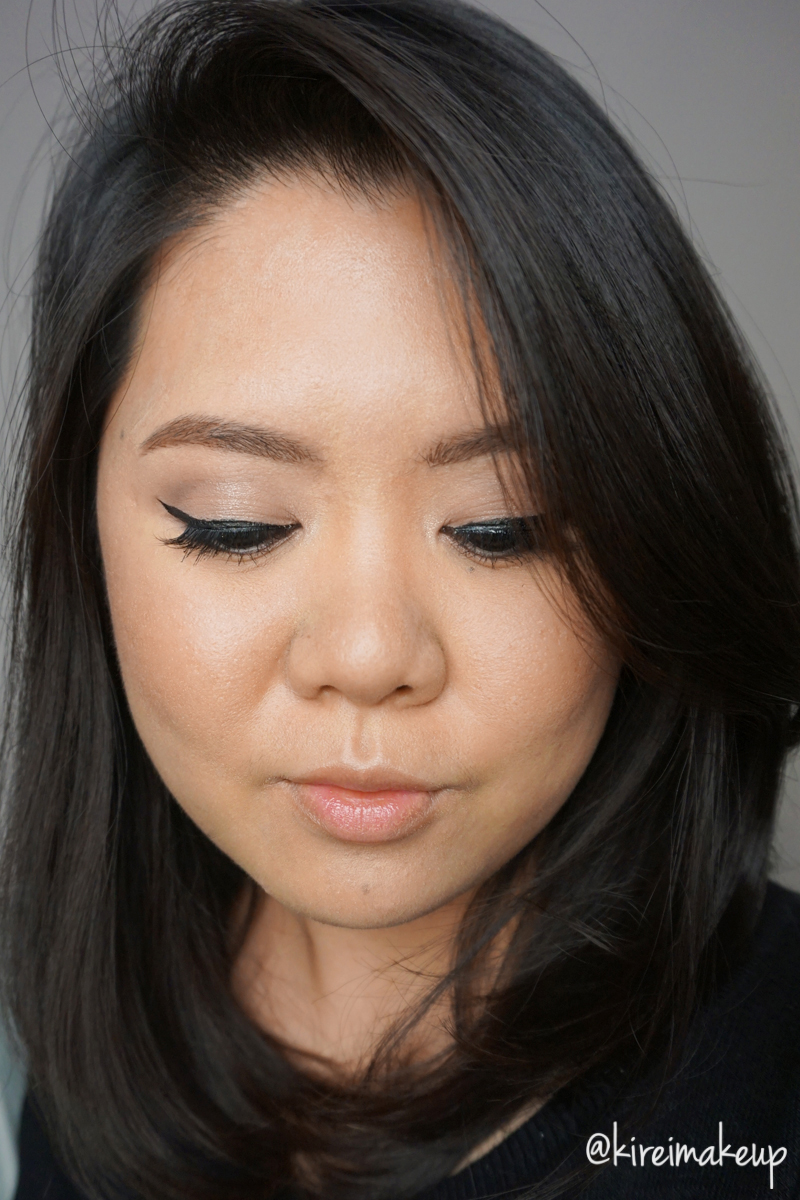
For this look, I applied falsies just because my real lashes are not that full. You can skip the falsies altogether, I just do it because it looks better in pictures since my real lashes are not full in volume and not curly.
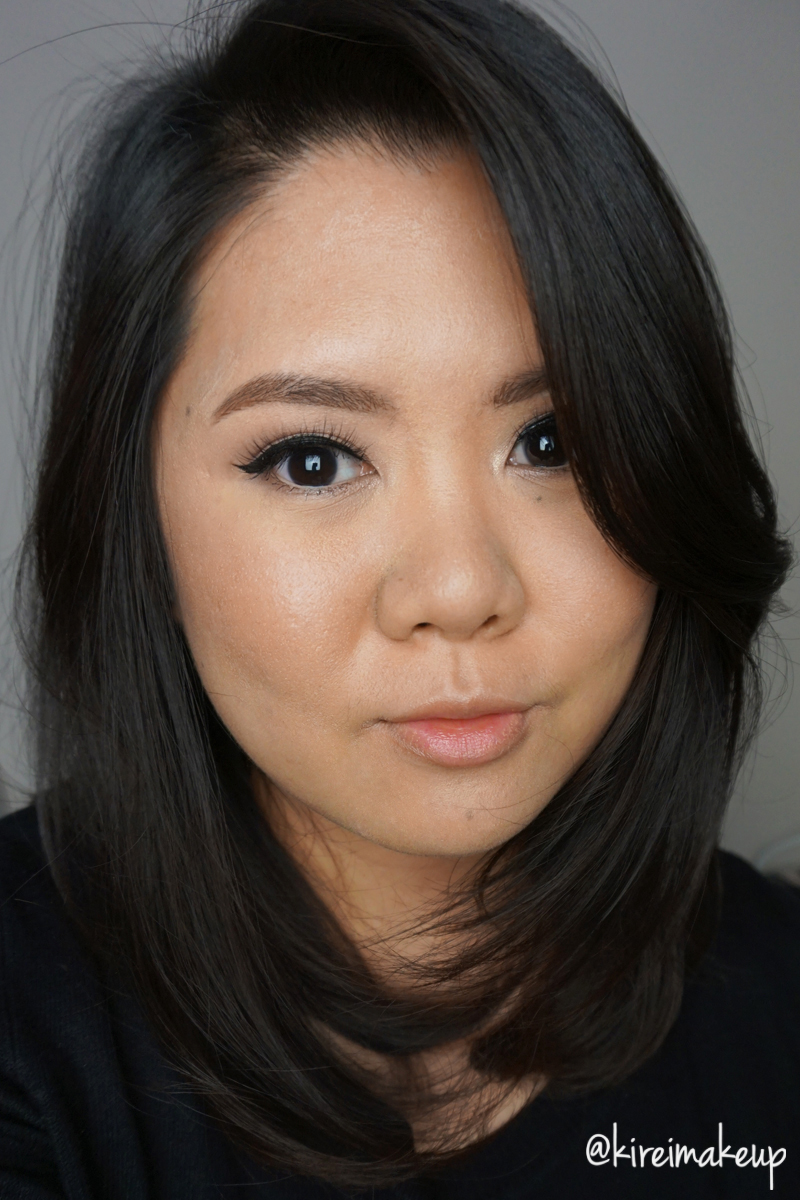
This Day to Night party makeup tutorial is all about creating a strobed-looking skin, nothing too contoured. The eyes are very muted and simple. For the Day look, the eyes are very open and brightened. For the Night look, the focus in on the lips, not too dark but not too bright either.
For the eyes and cheeks, I used my new Tarte Light of the Party palette, and can I just say that I’m loving it?! One of the best neutral palette, in my opinion. The colors are very muted and soft, a lot of matte colors too! Absolutely gorgeous. I’ll do the review for this palette soon!
Also, how you liking my luminous/strobed skin? I just bought Becca Backlight Filter primer, and tested it today. Such a gorgeous primer for strobing. I feel like my skin just glow all over! I applied this primer under my eyes, on top of my cheekbones, on the bridge of my nose, & cupid’s bow. I also applied this primer under my NARS foundation so it doesn’t look too dewy.
Products used
Eyes
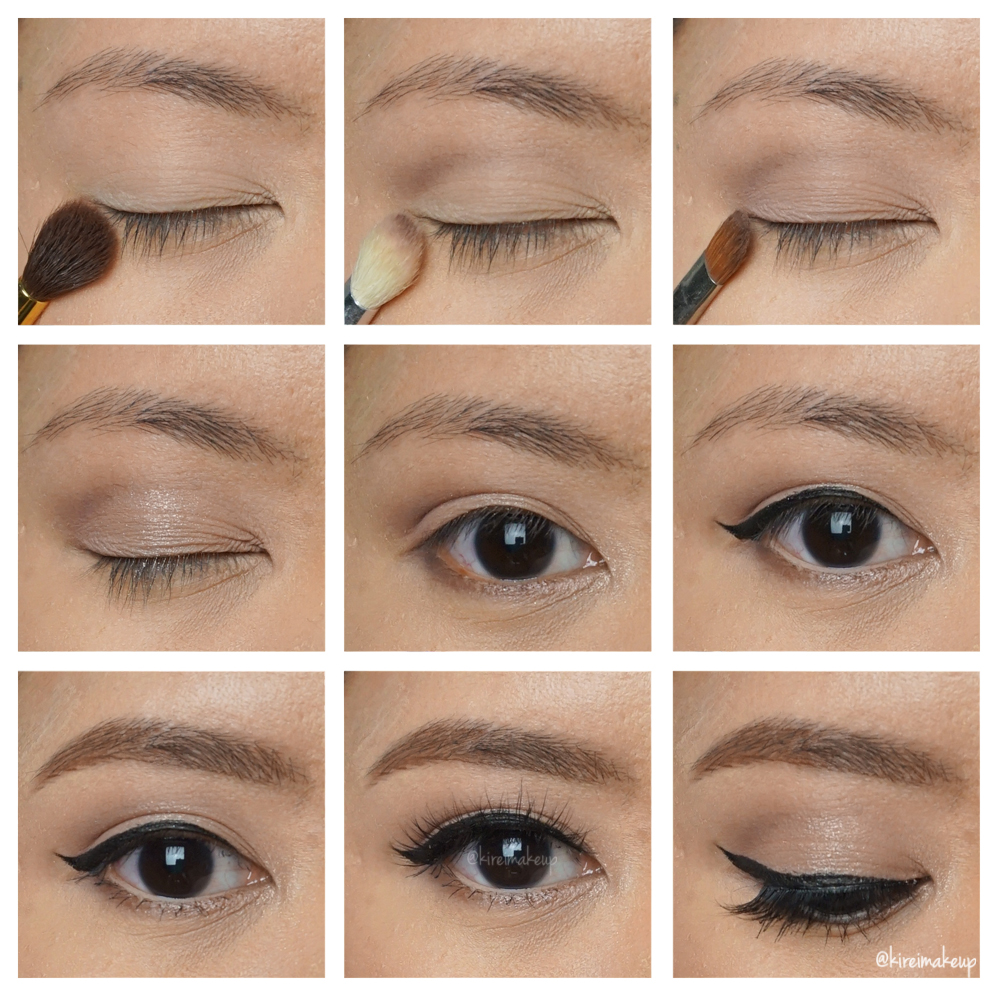
- Primer – Urban Decay Primer Potion “Original”
- Base – Tarte Light of the Party “Eggnog”
- Crease – Tarte Light of the Party “Mulled Wine”
- Eyelid – Tarte Light of the Party “Rum Pum Plum”
- Center of lid – Tarte Light of the Party “Fizz the Season” (I applied this using my ring finger)
- Inner lower lash line – Tarte Light of the Party “Ring-a-Ling”
- Outer lower lash line – Tarte Light of the Party “Cocoa What Fun”
- Winged liner – Kanebo “Kate Super Sharp eyeliner”
- Waterline – [Day] MAC Chromagraphic eyeliner “NW25/NC30”; [Night] MAC “Smolder” kohl liner
- Mascara – Tarte “Light, Camera and Lashes” mascara
- Brows – Kat Von D Tattoo Brow “Medium Brown”
- Falsies – Esqido Mink Lashes “Oh So Sweet”
Face
- Primer – Becca “Backlight Priming Filter”
- Foundation – NARS Luminous Weightless Foundation “Punjab”
- Concealer – NARS Radiant Creamy concealer “Custard”
- Powder – Laura Mercier “Invisible Loose Powder”
Cheeks – I used Eve Pearl fan brush only for the cheeks, starting with the Bronzer then Blush & lastly the Highlighter.
- Bronzer – Tarte Light of the Party “Social Butterfly”
- Blush – Tarte Light of the Party “Amazed”
- Highlighter – Tarte Light of the Party “Pink Champagne”
Lips
- Day look
- Lipstick – Sephora Collection Oil Infusion Color & Care “Pink Granita”
- Night look
- Lip pencil – MAC “Nightmoth” lip pencil
- Lipstick – MAC “Media” lipstick

Soft Romantic Makeup (Revisited)
I’ve done a lot of UD Naked 3 makeup tutorials, and though most of them are smoky eyes, I do have a few non-smoky eyes tutorials. I was looking back on those tutorials, and I’ve decided to revisit this Soft Romantic Makeup post. I actually liked how I did my makeup in that post, but I felt that I wanted to redo it, and added more intensity to the shadows. Which one do you prefer? This tutorial or the original one? Let me know on the comments below!
I’d also like to mention that I’ve changed the way I filled my brows for this tutorial – it’s thicker, and more natural looking. I think I prefer this brow, even though it might look “less polished” than the “carved out” brows (aka concealer on top and bottom of my brows), I do like how it looks more organic. What do you guys think?
I apologize if the photos are slightly too warm, I didn’t realize my camera’s white balance setting was on the “warming filter” option. I tried to neutralize it using photoshop, but this is all I can do for now (besides trying to neutralize the yellow shade, I did not do anything else – no airbrushing whatsoever). I’ll be more careful next time.
*Check out my other UD NAKED 3 TUTORIALS*

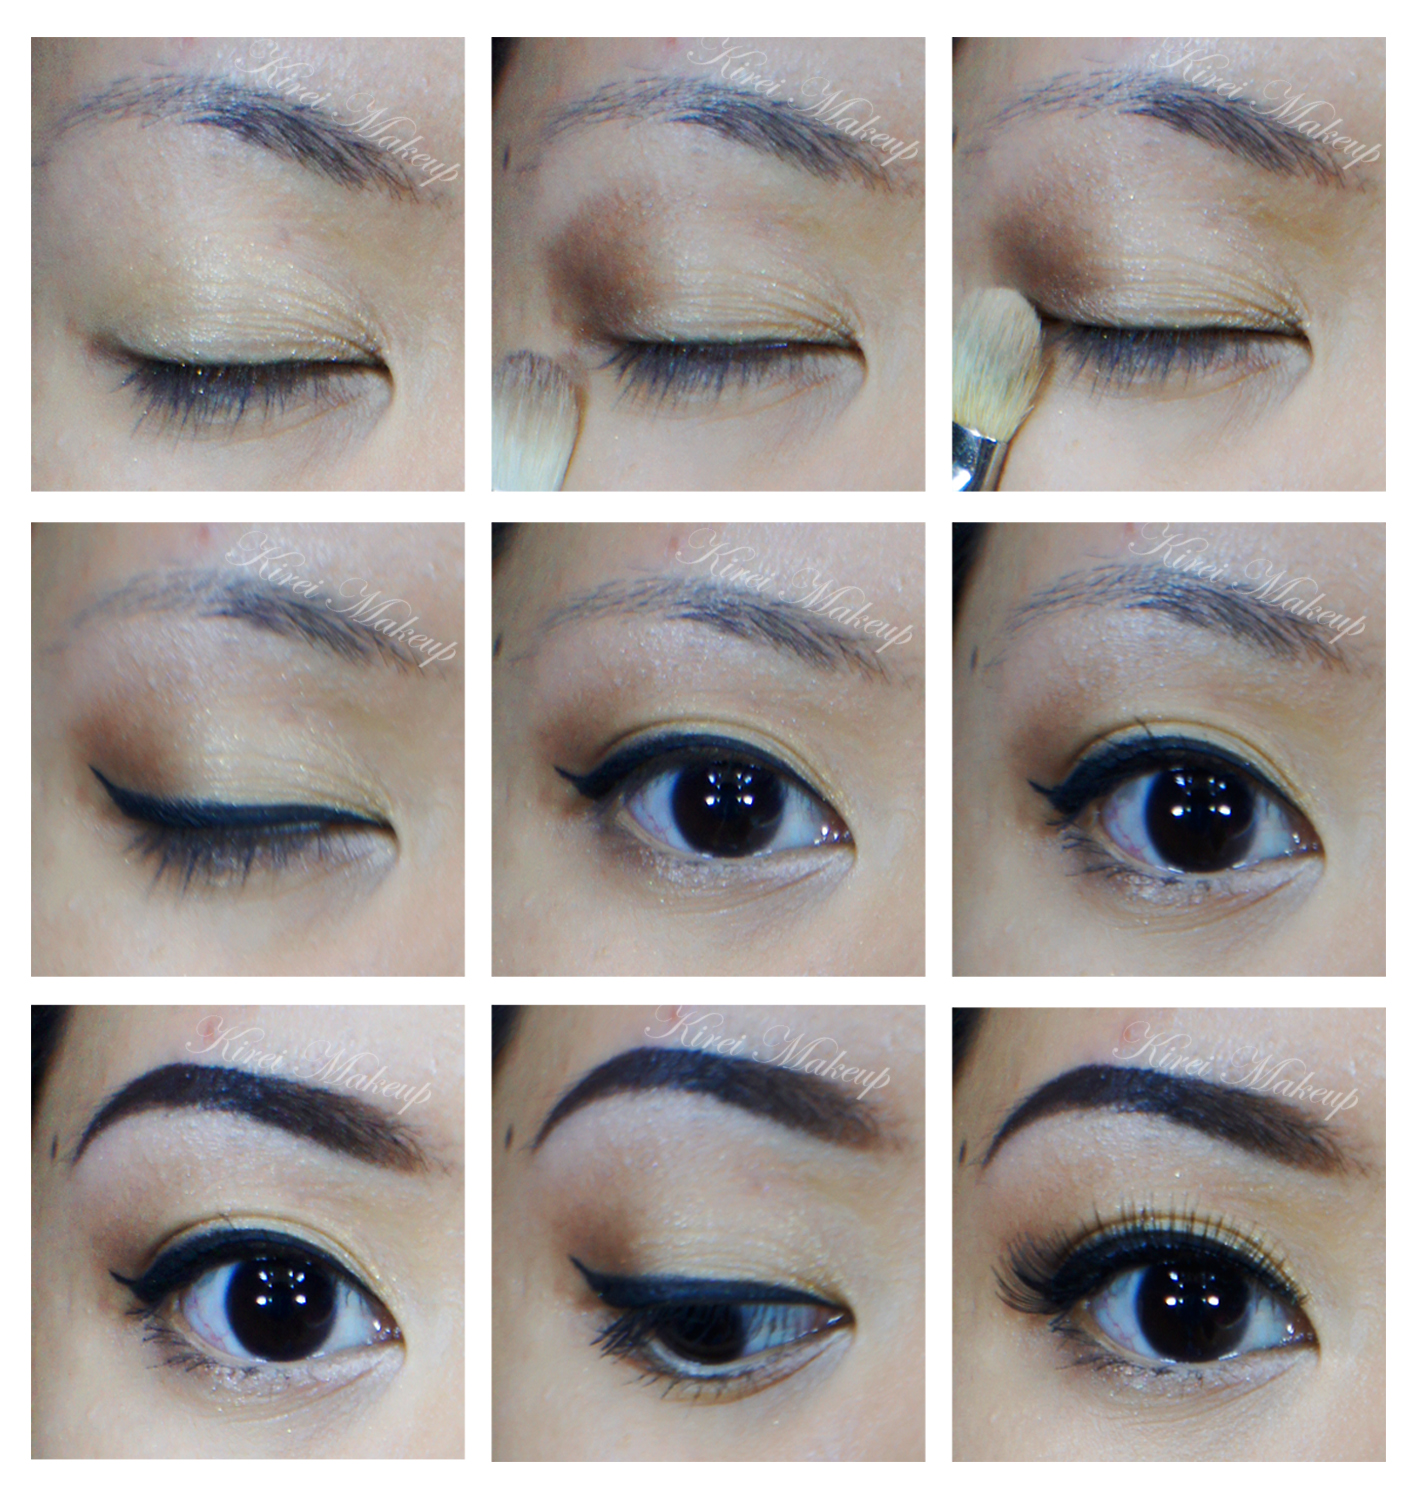
How-to:
1. I applied MAC Perky paint pot all over my (mobile) eyelid using my ring finger.
2. Using a small blending brush, I applied UD Naked 3 Darkside on the outer V.
3. Using the blending brush that came with the palette, I applied Nooner on the crease. I used this shade to blend out the edge of Darkside.
4. I applied Trick on the eyelid, using the flat eyeshadow brush that came with the palette.
5. Using a small shader brush, I applied Burnout on the inner corner of the lower lid, and Darkside on the outer half.
6. I, very lightly, applied a teeeensy bit of Blackheart right on the roots of the lower lashes (just the outer half).
7. I lined my waterline using MAC Chromagraphic eyeliner in NW25/NC30. Along the upper lash line, I created a winged liner using L’oreal 24H Lacquer Liner and an angled eyeliner brush.
8. I filled my brows using Anastasia Brow Wiz in Taupe and Brunette.
9. Curled my lashes, and applied Gwiyomi False lashes no. 3.
10. I applied Benefit Porefessional primer all over my face.
11. While letting the primer set, I applied Bobbi Brown Peach Corrector underneath my eyes (my dark circles are getting prominent lately!)
11. Then, I applied MUFE HD Foundation in 120 using Real Technique Expert Face brush.
12. I applied MAC Pro Longwear Concealer under my eyes, as well as on the bridge of my nose (just between the brows).
13. I also applied L’oreal Visible Lift blush in Rose Gold on my cheeks.
14. I set my face using NARS Setting Powder.
15. On my lips, I applied MAC Please Me lipstick and a few dabs of clear gloss.
Products used
Eyes – MAC Perky paint pot; Urban Decay Naked 3 palette (eyelid: Trick, outer V/lower lashline: Darkside, inner corner of lower lid: Burnout; roots of lashes: Blackheart); MAC Chromagraphic liner NW25/NC30; L’oreal 24H Lacquer Liner in Blackest Black; Anastasia Beverly Hills Brow Wiz in Taupe and Brunette; Gwiyomi False lashes no. 3
Face – Benefit Porefessional primer; MUFE HD Foundation in 120; Bobbi Brown Peach Corrector; MAC Pro Longwear concealer; NARS Setting Powder.
Cheeks – L’oreal Visible Lift Blush in Rose Gold.
Lips – MAC Please Me lipstick; L’occitane clear lip balm.
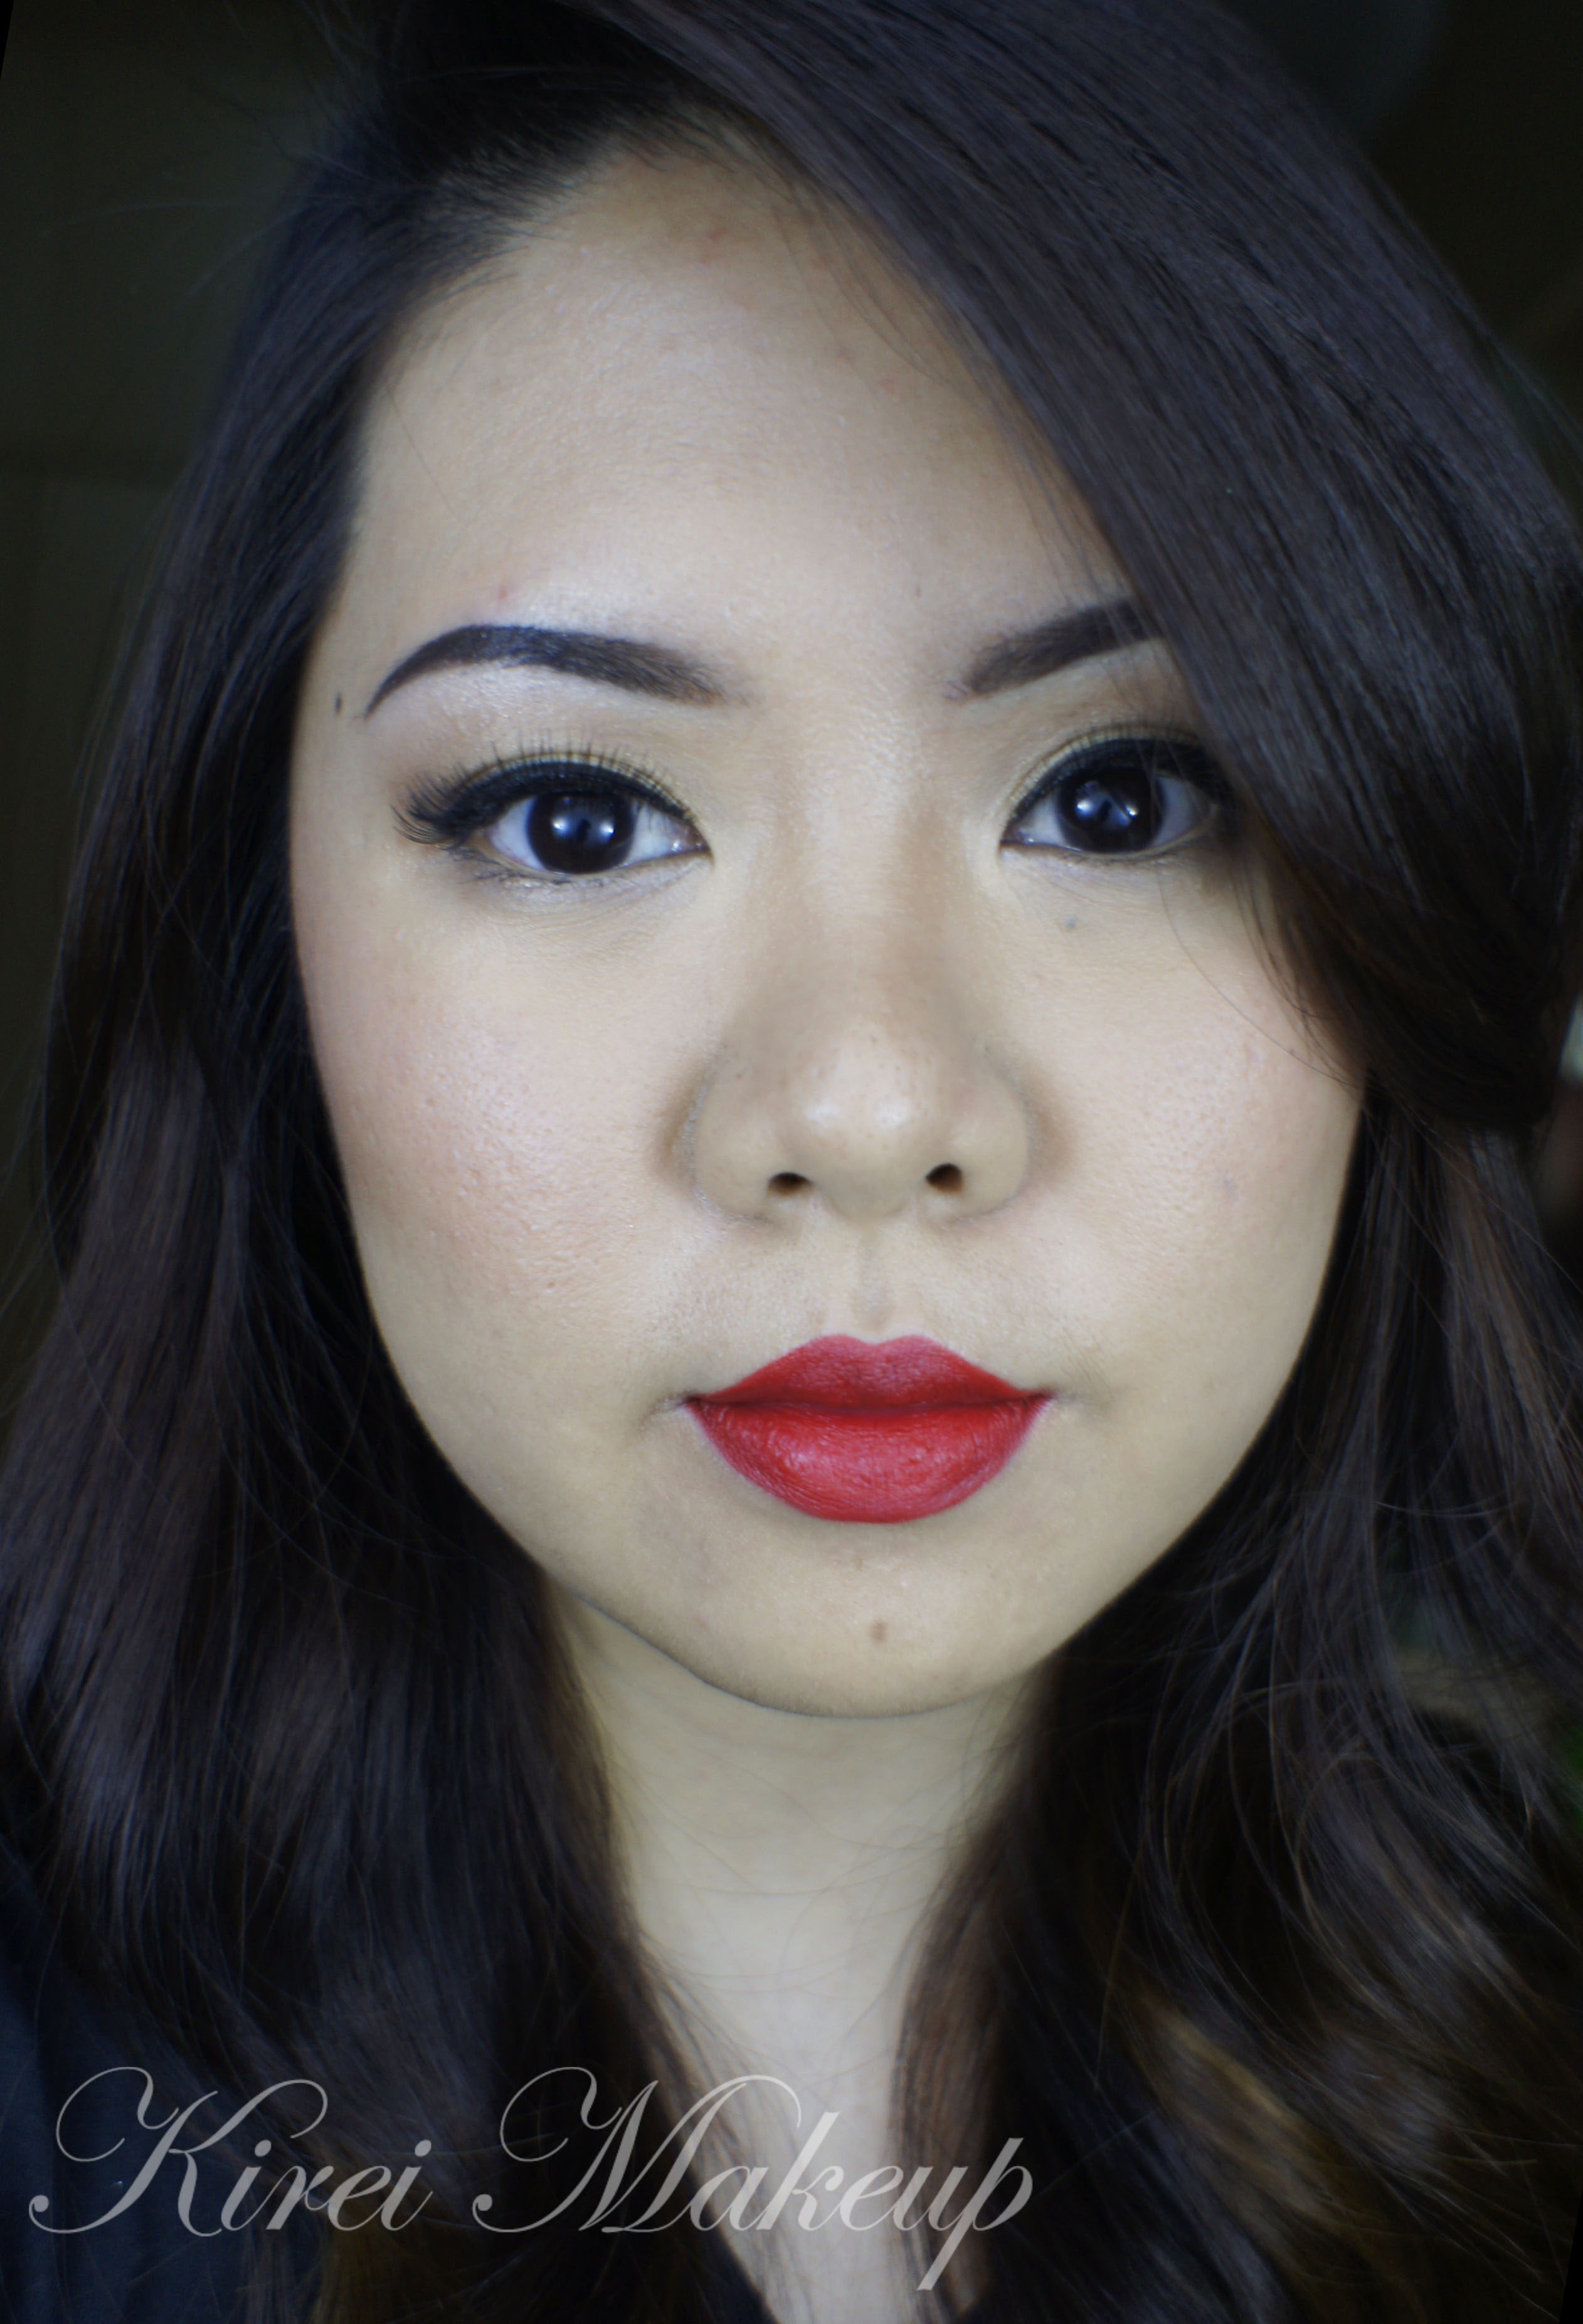
MAC Russian Red
As you all know from my Twitter, I’ve been looking forward to use my M.A.C Russian Red lipstick again. I know, I know, it seems like this week is a MAC week. Well, can’t be helped, I’m trying to fall in love with MAC again! Afterall, MAC was one of the reasons why I went into makeup in the first place.
So, talking about MAC Russian Red, this is the best true-red lipstick. If you want a cooler red, you can try MAC Ruby Woo instead. I also love how this lipstick has a matte finish to it. I’m not a big fan of shiny or glossy lips, so I love how even though this lipstick has a matte finish, it is not drying. It also helps if you prep your lips before application to ensure your lips aren’t chapped.
I purchased this Chanel quads in Intuition in February and didn’t have the chance to play with it, so I had to use it for this look. I love how soft and pretty the eyes look. If you are looking for a neutral, day makeup, do try the eye-look and you can skip the red lipstick.
I’ve done a similar look in Battle of the Classics.
How-to:
1. Using a flat eyeshadow brush, I applied the gold eyeshadow from the Chanel Intuition quad.
2. Using a fluffy blending brush, I applied the deep brown shade from the same quad on my outer V and on the crease. I used whatever was left on the brush and swept it along the lower lash line.
3. I blended out the crease using a clean fluffy brush.
4. Using an angled eyeliner brush, I created a winged liner along the upper lashline.
5. I applied MAC Chromagraphic liner in NC30 on my tightline.
6. Using a small flat shader brush, I applied the pink highlighter shade from Chanel Intuition quad on the inner corner of the lower lid and under the brow.
7. I curled my lashes and applied Maybelline Volume Express mascara on both upper and lower lashes.
8. I filled my brows in using MUFE Aqua Brow Gel.
9. For extra drama, I applied Quo false eyelashes.
10. For the face, I applied MUFE HD Foundation using a foundation brush.
11. Using whatever was left on the brush, I swept it across my lips.
12. I lined and filled my lips using MAC Redd lip pencil.
13. Using a lip brush, I applied MAC Russian Red on my lips.
14. I powdered my face using a loose translucent powder.
15. I contoured my face using MAC Shadowy and applied MAC Fleur Power on the cheeks as blush.
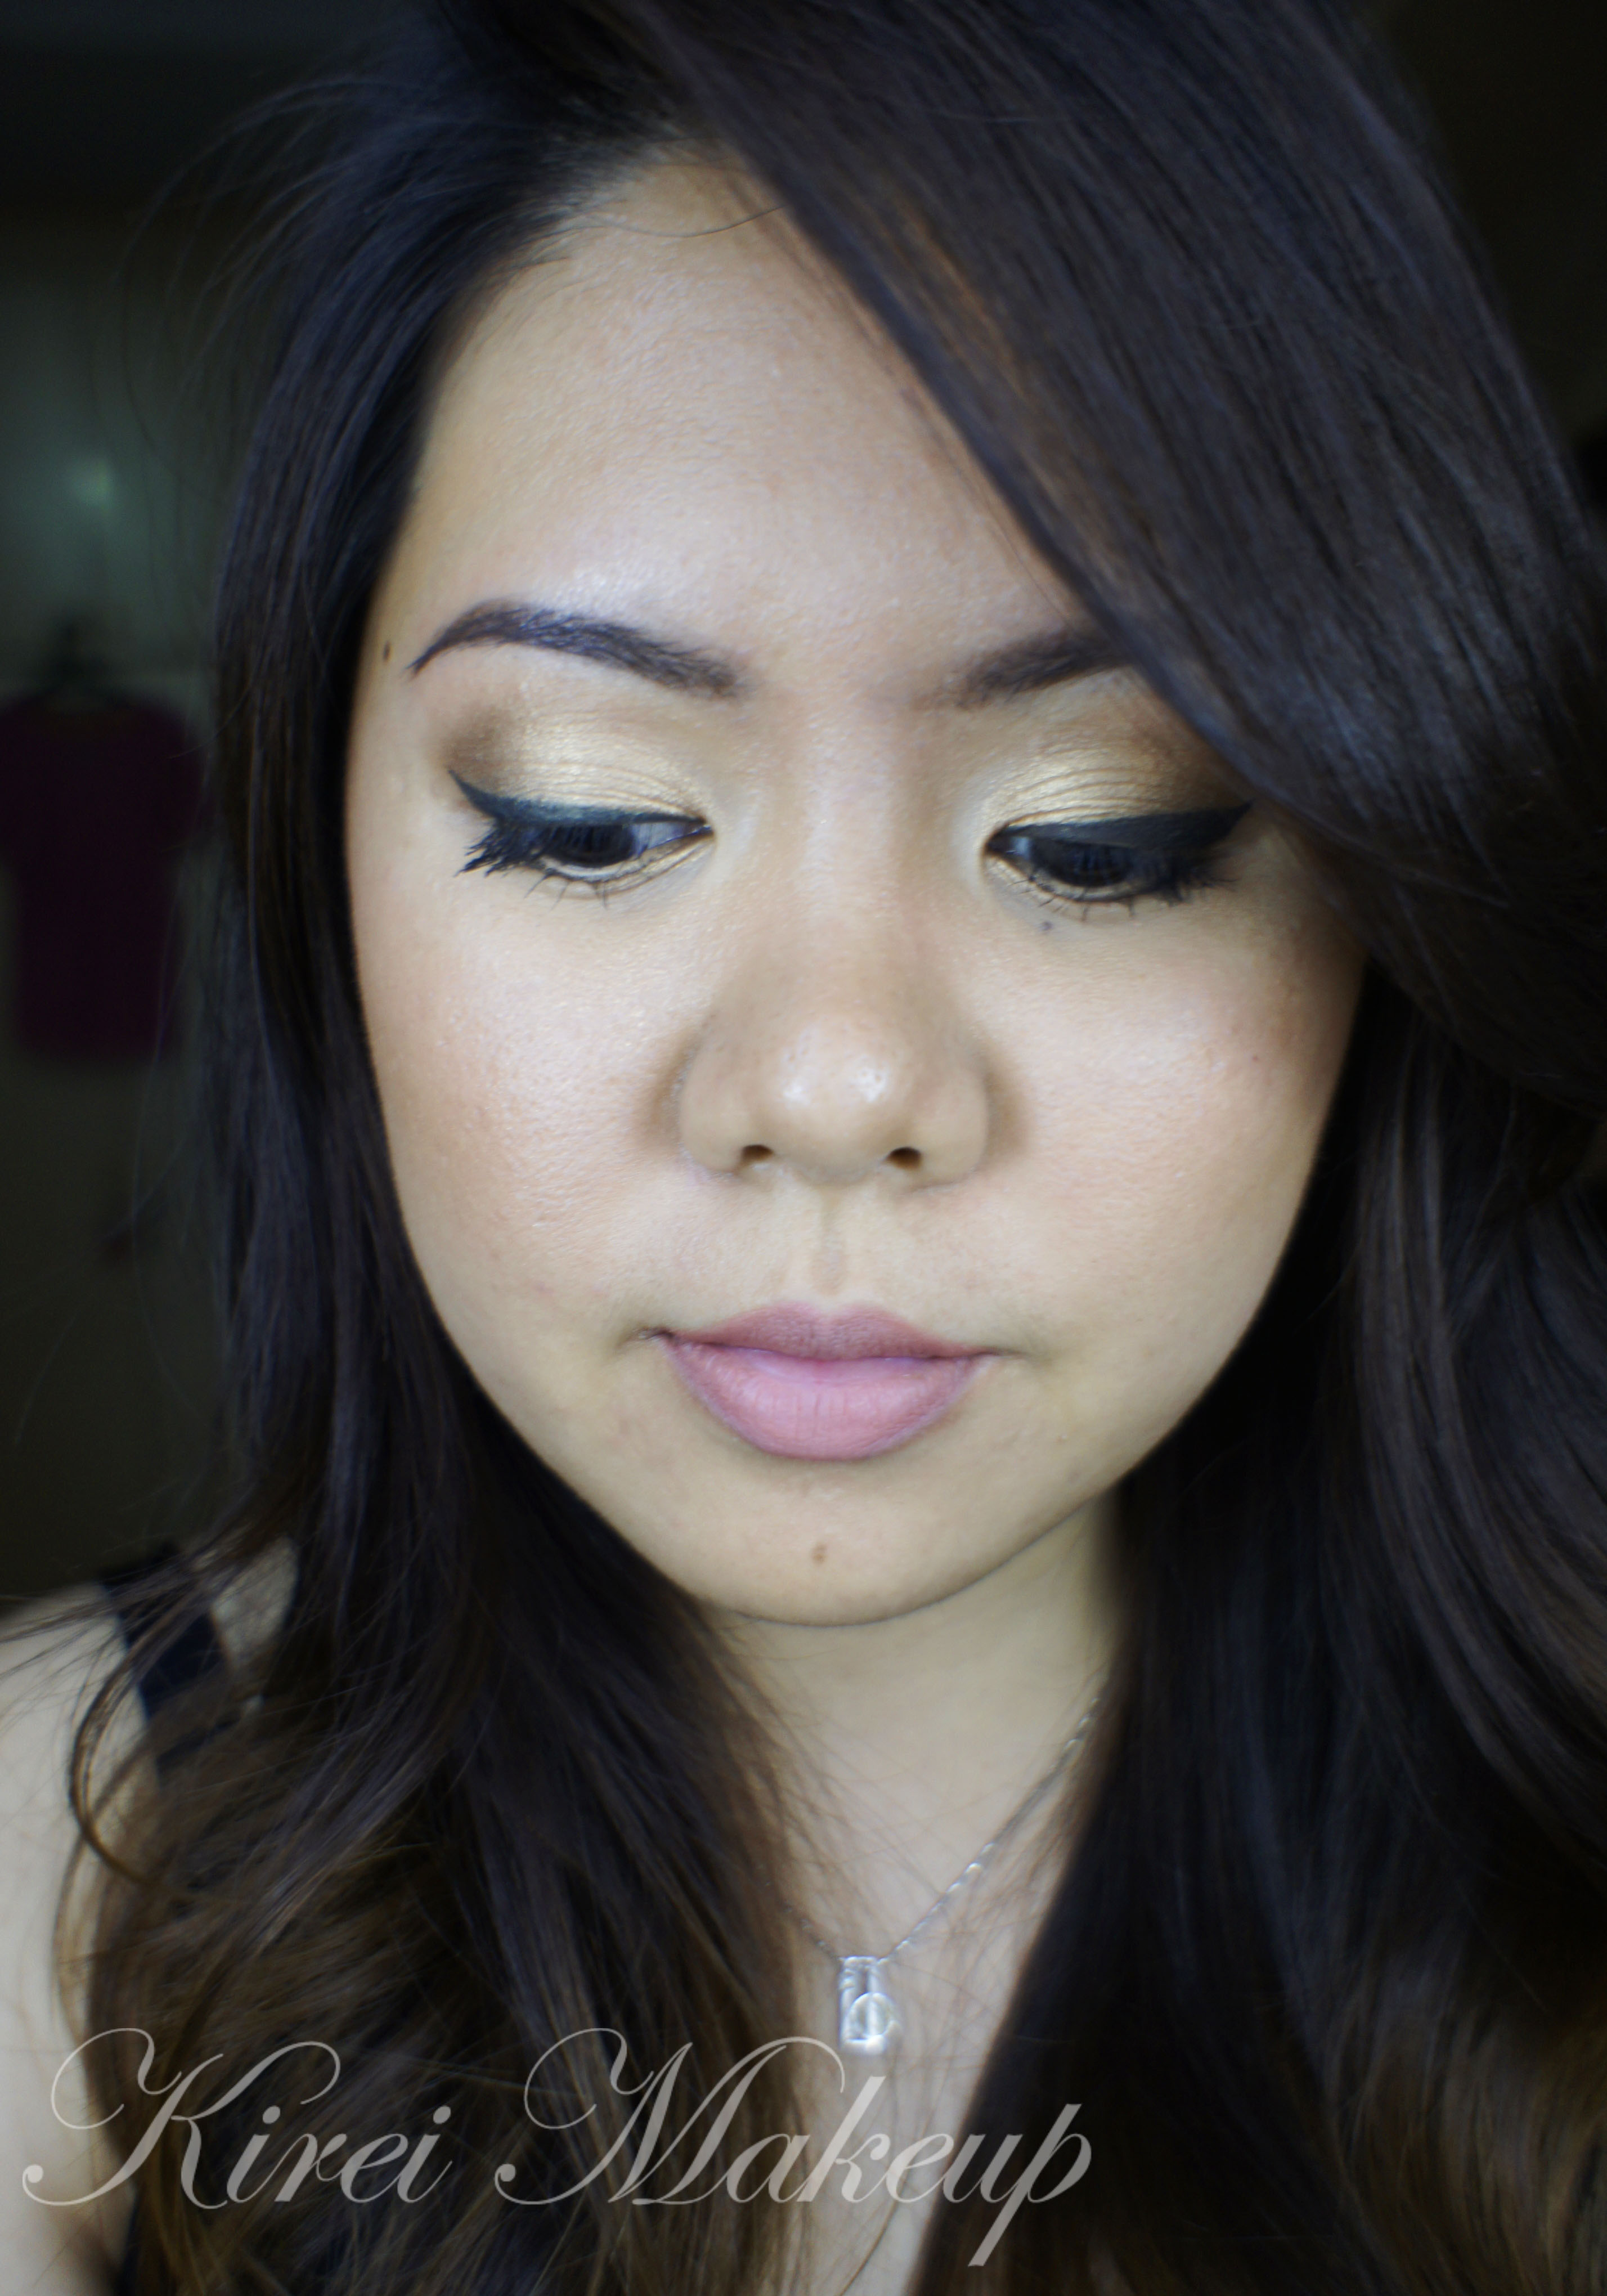
Golden Bronze
This week is like my non-colorful week! Today’s look used Urban Decay Naked Palette, and it’s perfect for daytime and bridal makeup. It’s packed with bronze goodness. The colors are perfect for every eye-colors and skintones. Very flattering, very warm and it’s really easy to achieve this look.
I love wearing this look for the summer. It might look like it’s a lot, but once you complete the face, the eyes look pretty natural looking. It really do brighten up the face too. This is my fav. way of wearing bronze eyeshadow. You can immediately turn this makeup to a night look just by adding black liner along the upper lashline and waterline, turning it into a smoky look.
For tutorial on how to fill-in brows, please visit “Product of The Week: MUFE Aqua Brow“. For a smokier version of this look please visit “Baked It Up!”

How-to:
1. Using a flat eyeshadow brush, I applied UD Half-Baked all over the lid.
2. Using a flat fluffy brush, I applied UD Buck lightly on the crease and the outer V.
3. Using a fluffy blending brush, I applied a mixture of UD Smog + Snakebite on the outer half of the lid, blending in towards Half-Baked.
4. I applied UD Half-Baked on the inner corner of the lower lid, and UD Smog + Snakebite on the outer half using a small shader brush.
5. I created a winged liner along my upper lashline using Bobbi Brown Caviar Ink cream liner.
6. Using whatever is left on the brush, I applied the liner along the outer corner of the lower lid.
7. I curled my lashes and applied MUFE Smoky Lash mascara on both upper and lower lashes.
8. I filled my brows in using MUFE Aqua Brow.
9. For my face, I applied Tarte Amazonian Clay BB Tinted Moisturizer.
10. I applied Benefit Dallas on my temples, the tip of my nose, my chin and my cheeks.
11. I also applied MAC Peaches on the cheeks.
12. For the lips, I applied L’oreal Colour Riche Lip Liner in Beyond Pink.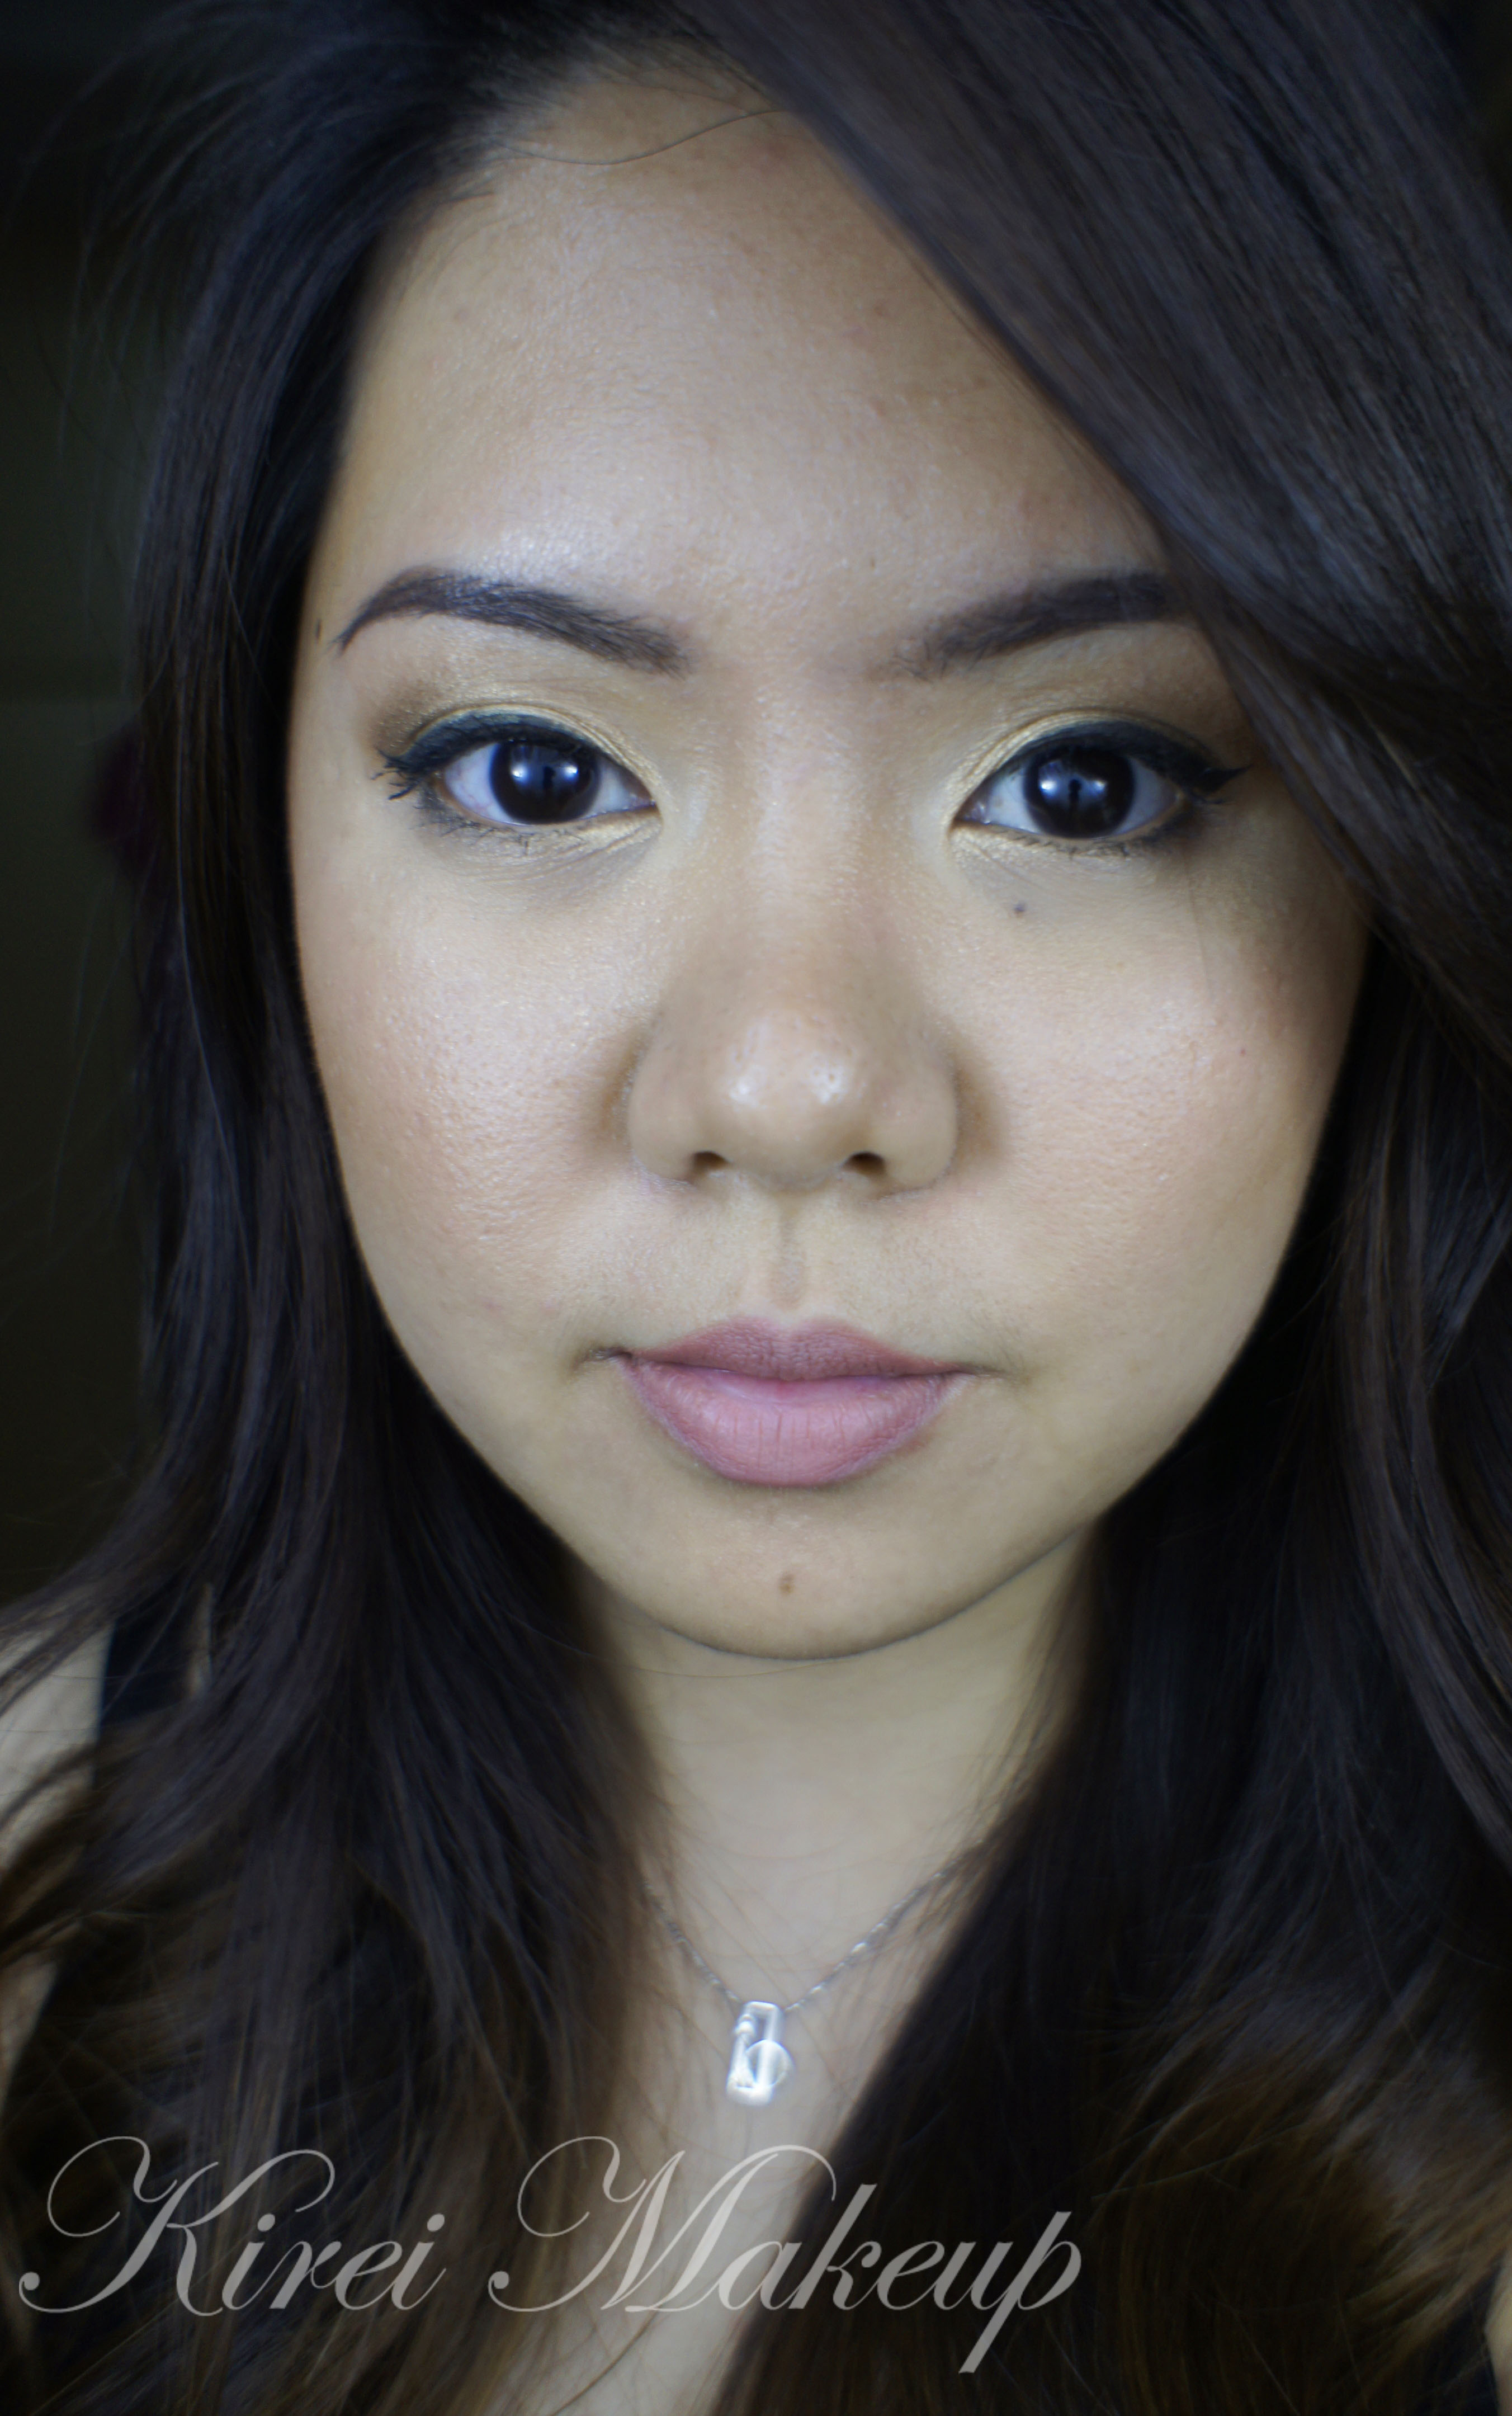
L’oreal Paris Good Luck Charm
Sprained neck is no fun! I could barely move for several days and my shoulder was so sore. Anyways, to cheer myself and put me out of misery I decided to go grab a makeup product (bahahahaha). I bought myself a Maybelline Colour Tattoo in Inked in Pink. I love it!
As you guys know, I received this L’oreal Paris Good Luck Charm eyeshadow from the L’oreal Paris Canada event’s goodie bag. As mentioned, I felt that the pink shadow doesn’t really show up on my skin-tone, so I decided to layer the Maybelline Colour Tattoo Think in Pink underneath L’oreal Good Luck Charm.
I’m usually quite wary about pink eyeshadow since it can make one look sickly, but the gold in the shadow quad makes it workable, usable and wearable.
How-to:
1. I applied Maybelline Inked in Pink all over the eyelid using my ring finger.
2. Using a flat eyeshadow brush, I applied the pink eyeshadow from L’oreal Good Luck Charm quad.
3. Using a blending brush, I applied the light brown eyeshadow from L’oreal Good Luck Charm quad on the crease.
4. Using a small shader brush, I applied the darkest brown eyeshadow from Good Luck Charm quad on the outer corner and on the crease.
5. Using a clean blending brush, I blended the brown eyeshadow to the light brown eyeshadow.
6. Using a clean flat eyeshadow brush, I applied the highlighter color from the quad under my brows.
7. I filled my brows using Anastasia Brow Wiz in Brunette, curled my lashes and applied mascara.

8. For the face, I applied Urban Decay Naked foundation all over my face using a foundation brush.
9. For the cheeks, I applied L’oreal Rose Gold blush using a clean foundation brush.
10. For the lips, I applied L’oreal Colour Riche Caresse Shine Stain Lipcolour in Extremely Nude.