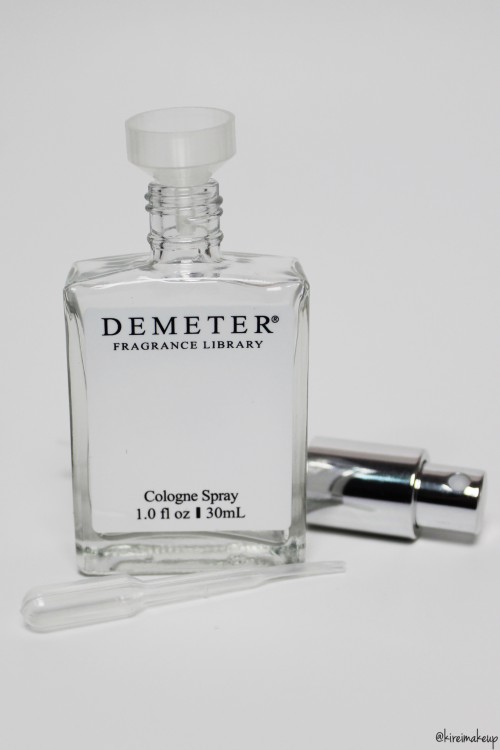
Have you always want to create your own custom perfume? Then you should definitely take a look at Demeter Fragrance! Demeter Fragrance carries over 300 scents that you can mix and match to create your own personal scent. How awesome is that??!!
Have you always want to create your own custom perfume? Then you should definitely take a look at Demeter Fragrance! Demeter Fragrance carries over 300 scents that you can mix and match to create your own personal scent. How awesome is that??!!
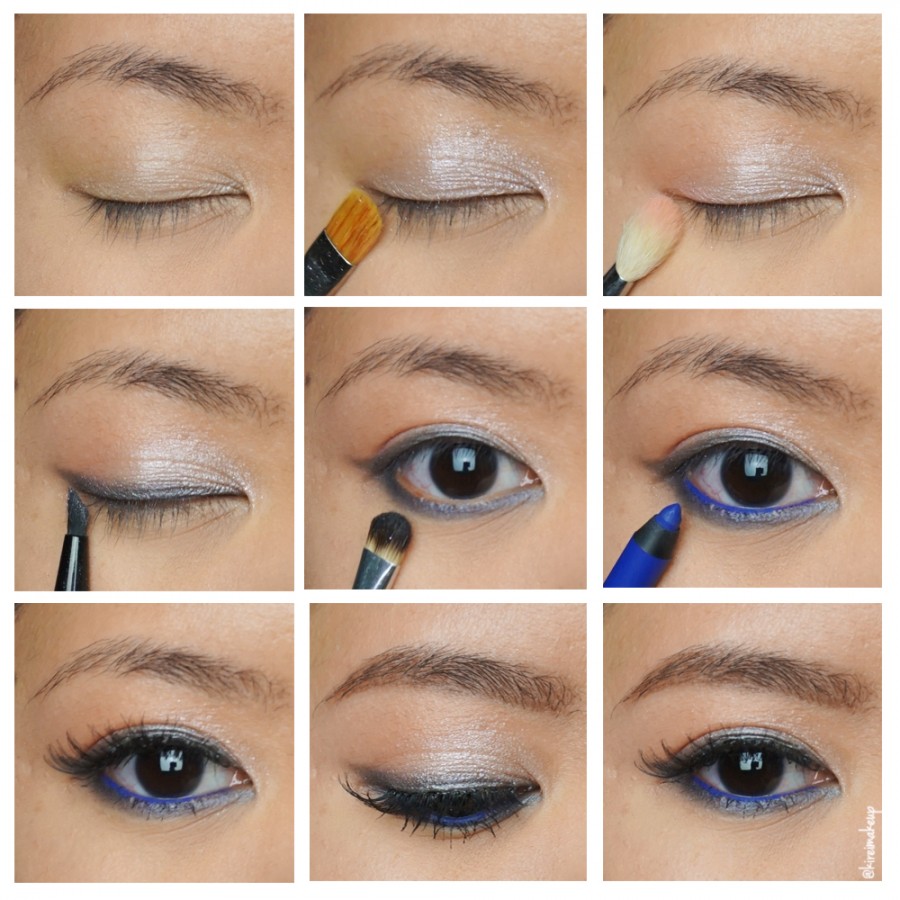
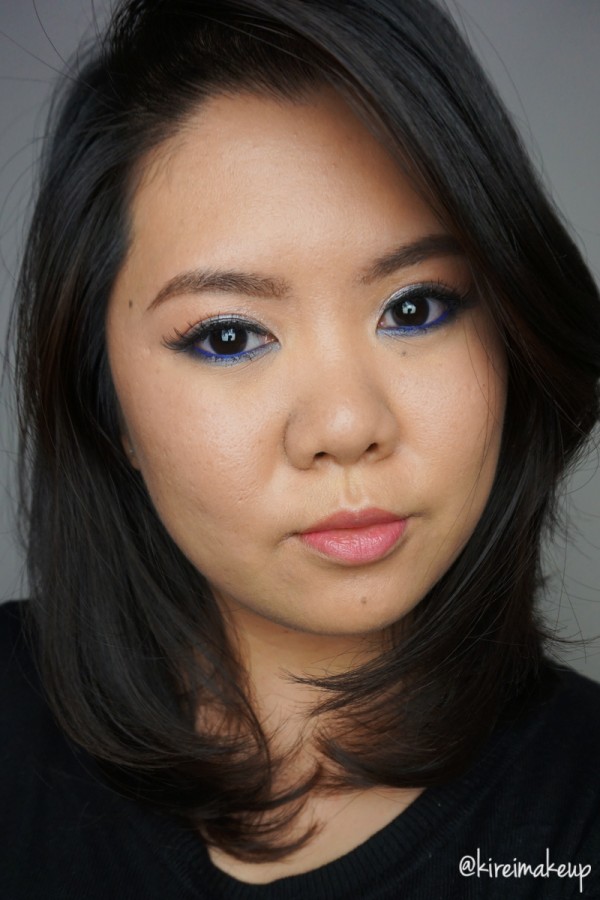
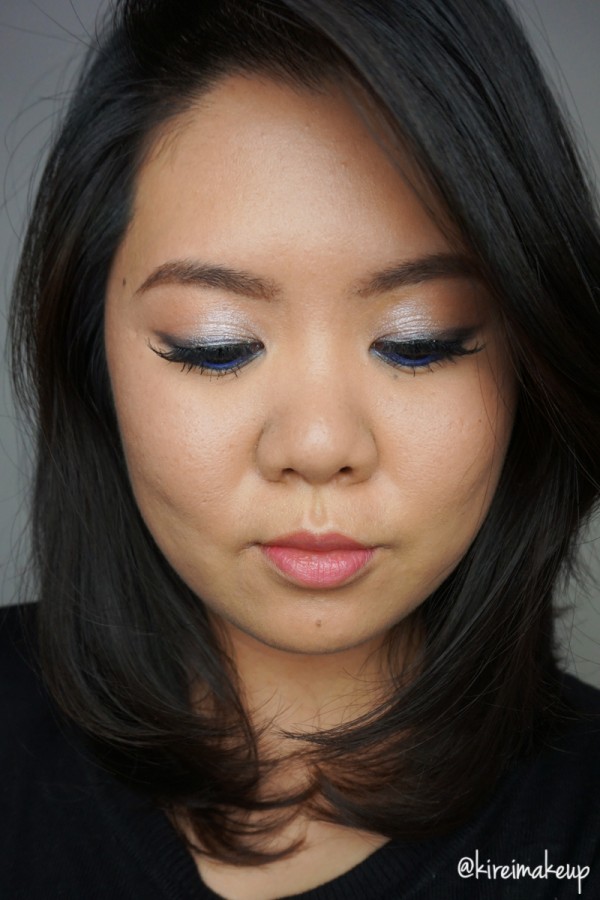
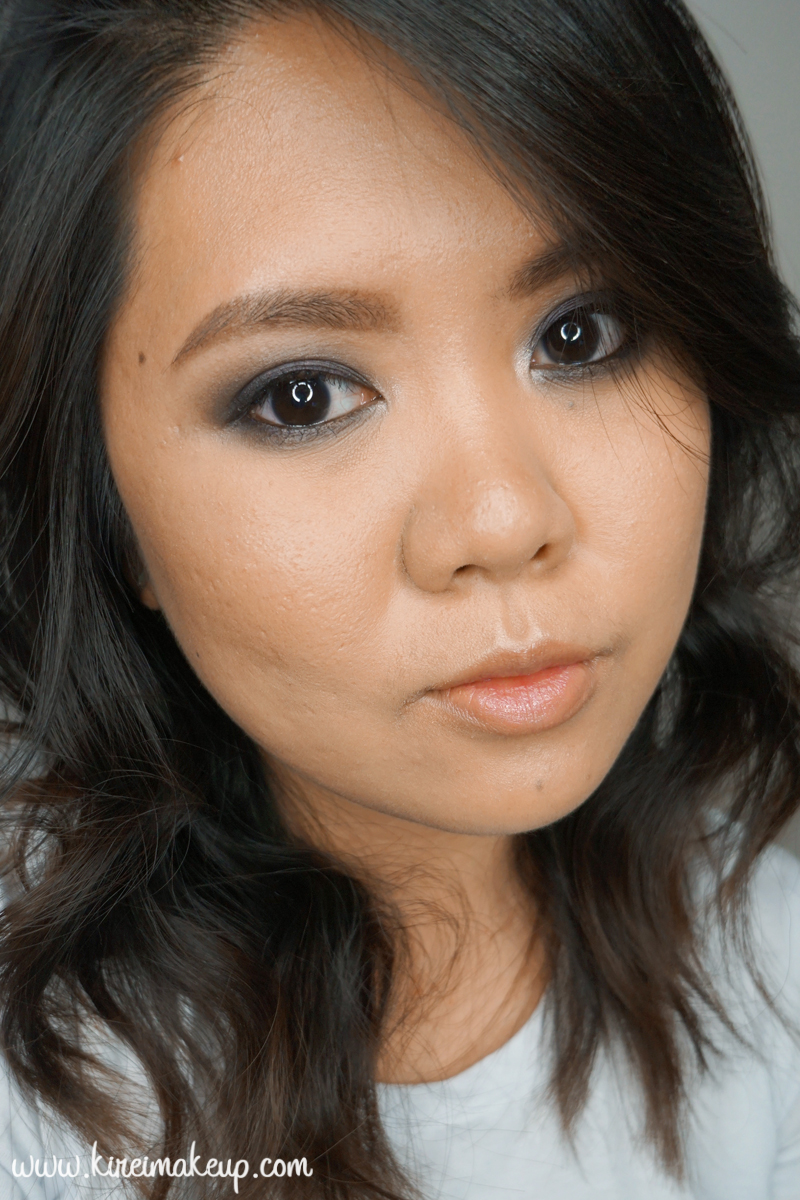
Another day, another look using Shu Uemura x Maison Kitsune Holiday collection 2015! I’ve done 2 smoky eyes using Shu Uemura x Maison Kitsune Indigo palette (Grey Smoky & Blue Smoky), and this will be my third look. I’ll try to do a review and swatches of the Indigo palette next week.
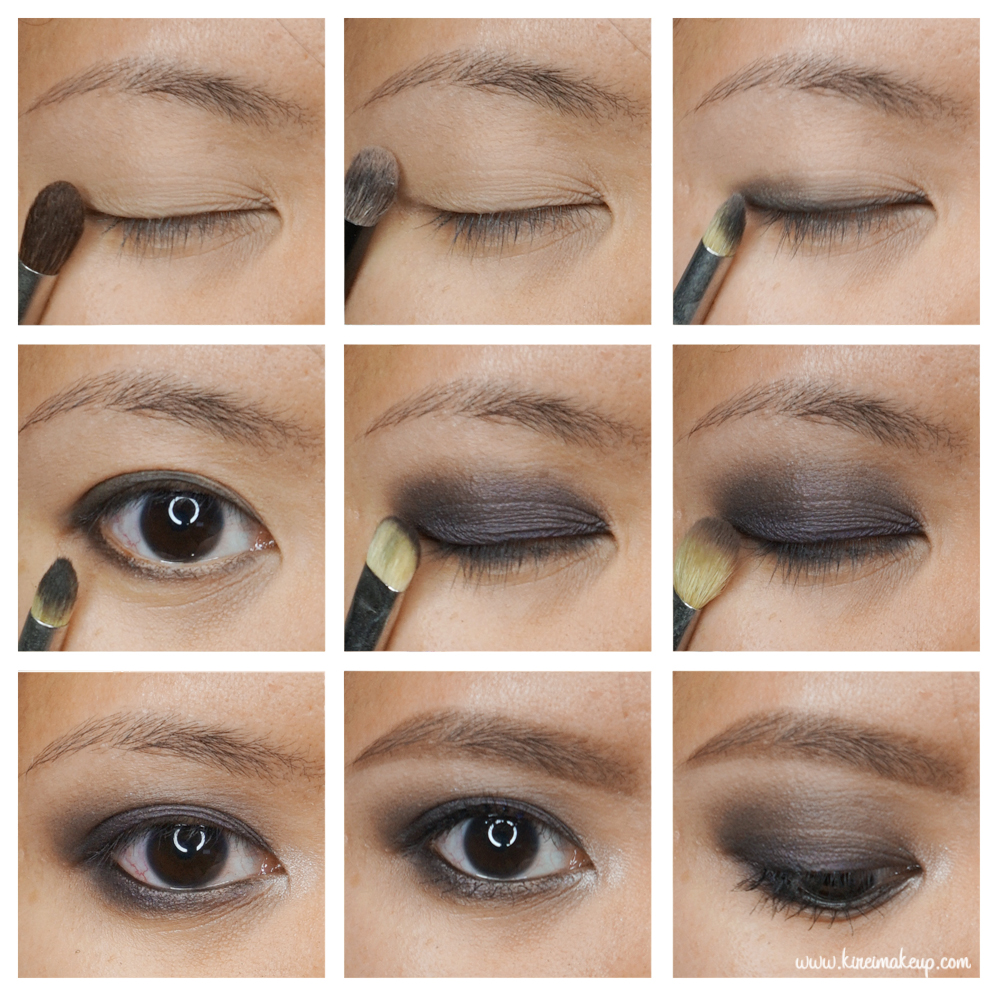
For this look, I wanted to create a simple soft smoky liner makeup, which is an alternative way to glam up your party makeup. If you are not comfortable doing smoky eyes, give this look a try. For the rest of my face, everything is simple, no contouring. Most of the products used are Shu Uemura products, which I’ve been loving lately. It’s a really great line, especially for Oriental skin. Anyways, please scroll down for more pictures and product details.
*Please check out my other Maison Kitsune for Shu Uemura tutorials*
Products used
Eyes
Face
Cheeks
Lips
As you know from my Instagram, I recently purchased and received my UD Naked Smoky Palette. I was so excited when I got it yesterday, and couldn’t wait to play around with it, so I created this UD Naked Smoky Tutorial! I bought mine online from Sephora since the palette was an online exclusive. It arrived within 3 days of my order, pretty fast and I’m one happy gal!
Anyways, I’ll try to do a review of the palette pretty soon. For now, I just wanted to share with you this look that I re-create from their leaflet. The palette came with a leaflet that contained several different looks you can achieve, and I chose to do the Iconic UD Smoky Eye look. I replaced some of the products, like the eyeliner, blush, lipstick etc since I don’t own those. Nevertheless, I used all the shades mentioned in the leaflet accordingly.
Personally, for me, this kind of smoky eye look is supposed to be messy and worn in, I skipped wearing false lashes. False lashes tend to make everything look more glamorous. If you prefer, though, feel free to add the falsies.

The transition shade, Combust, doesn’t really show up on pictures below because it’s very similar to my skin color. However, this step is very important whether the color shows up or not because this transition shade will allow for a smooth edge on your smoky eyes. It will diffuse the grey eyeshadow on the crease into your skin seamlessly.
The brow bone shade, Thirteen, is a vanilla shade. It might look like there’s nothing on the brow bone at first (top middle row) in the pictorial, but as you add those darker colors on the lid, the highlight becomes more prominent. If you like a highlight on the brow bone, feel free to add more at the end of the look. If you have a hooded lid, I recommend not to add too much or any since it might create a hooded effect even more.
Products used
Eyes
Face
Cheeks
Lips
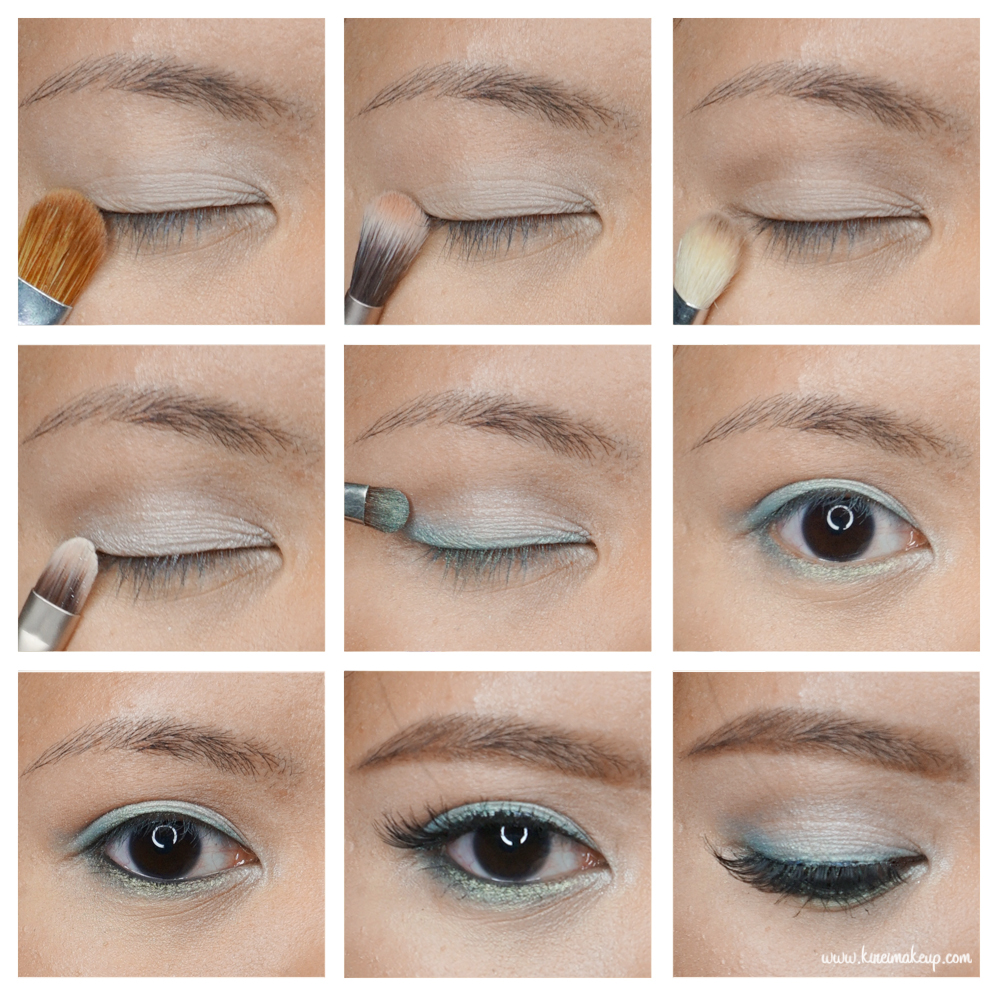
I bought this Balmsai palette back when I was in Jakarta, but I didn’t get a chance to play with it because I thought the palette was too pretty, and I don’t have the heart to touch it! However, all good things must come to an end, and I finally decided it’s time I used this palette. This The Balm Balmsai makeup tutorial is a really fun and summery look. I think a touch of color along the lash line really perk up this whole look. Feel free to omit the falsies, I used it just to make my eyelashes look longer, and open up my eyes a bit more.
Most of the products used for this tutorial are all by The Balm, mostly of the eyes and cheeks. Even though I know The Balm Indonesia’s brand manager, I am in not paid, nor sponsored to do this post.
I actually had a full face picture for this tutorial, but I realized the foundation I was using was too light for my face, and created a white cast, so I decided to remove the portrait. I didn’t realized I’ve gotten darker since I had to work on an outdoor shoot for the past couple days.
Products used
Eyes
NailPolishCanada.com is close to being named the best e-commerce company in Canada as part of Canada Post’s E-Commerce Awards and needs your help.
NailPolishCanada.com was selected as a finalist for best e-tailers in Canada by a panel of judges including executives at Facebook and Google (So yes Dad, nail polish is a “thing”!).
As for who will be crowned the Consumer Champion it now comes down to a vote
“It’s been thrilling to work with so many great customers and bloggers over the past few years. So thank-you all for building NailPolishCanada.com into a company worthy of such an honor. Sam even teared up a little bit as he wrote this sentence pretending to be me.” – Nikki, VP Glitter.
To encourage everybody to show their support and vote, NailPolishCanada.com is offering up to $2000 in prizes!
How it works:
Vote for NPC
You can vote every day. Voting runs from August 28th to September 20th 12:00PM.
You must record your vote to enter & win at Nail Polish Canada’s vote page here.
Voting & prizes are open to Canadian and U.S. residents.
Daily Draw
There is a daily thank-you draw for everybody who voted that day for awesome prizes!
Bonus: If Nail Polish Canada Wins the Vote
This is the kicker, if NailPolishCanada.com wins Consumer Champion then we’re having a huge giveaway with two winners!
Grand Prize #1: 24 bottles of Enchanted Nail Polish
Grand Prize #2: $1000 shopping spree at Nail Polish Canada
Both prizes are awarded separately and every day you voted for us as Consumer Champion is one entry to win.
Prizes are only open to Canadian and U.S. residents. See http://www.nailpolishcanada.com/vote for full details.
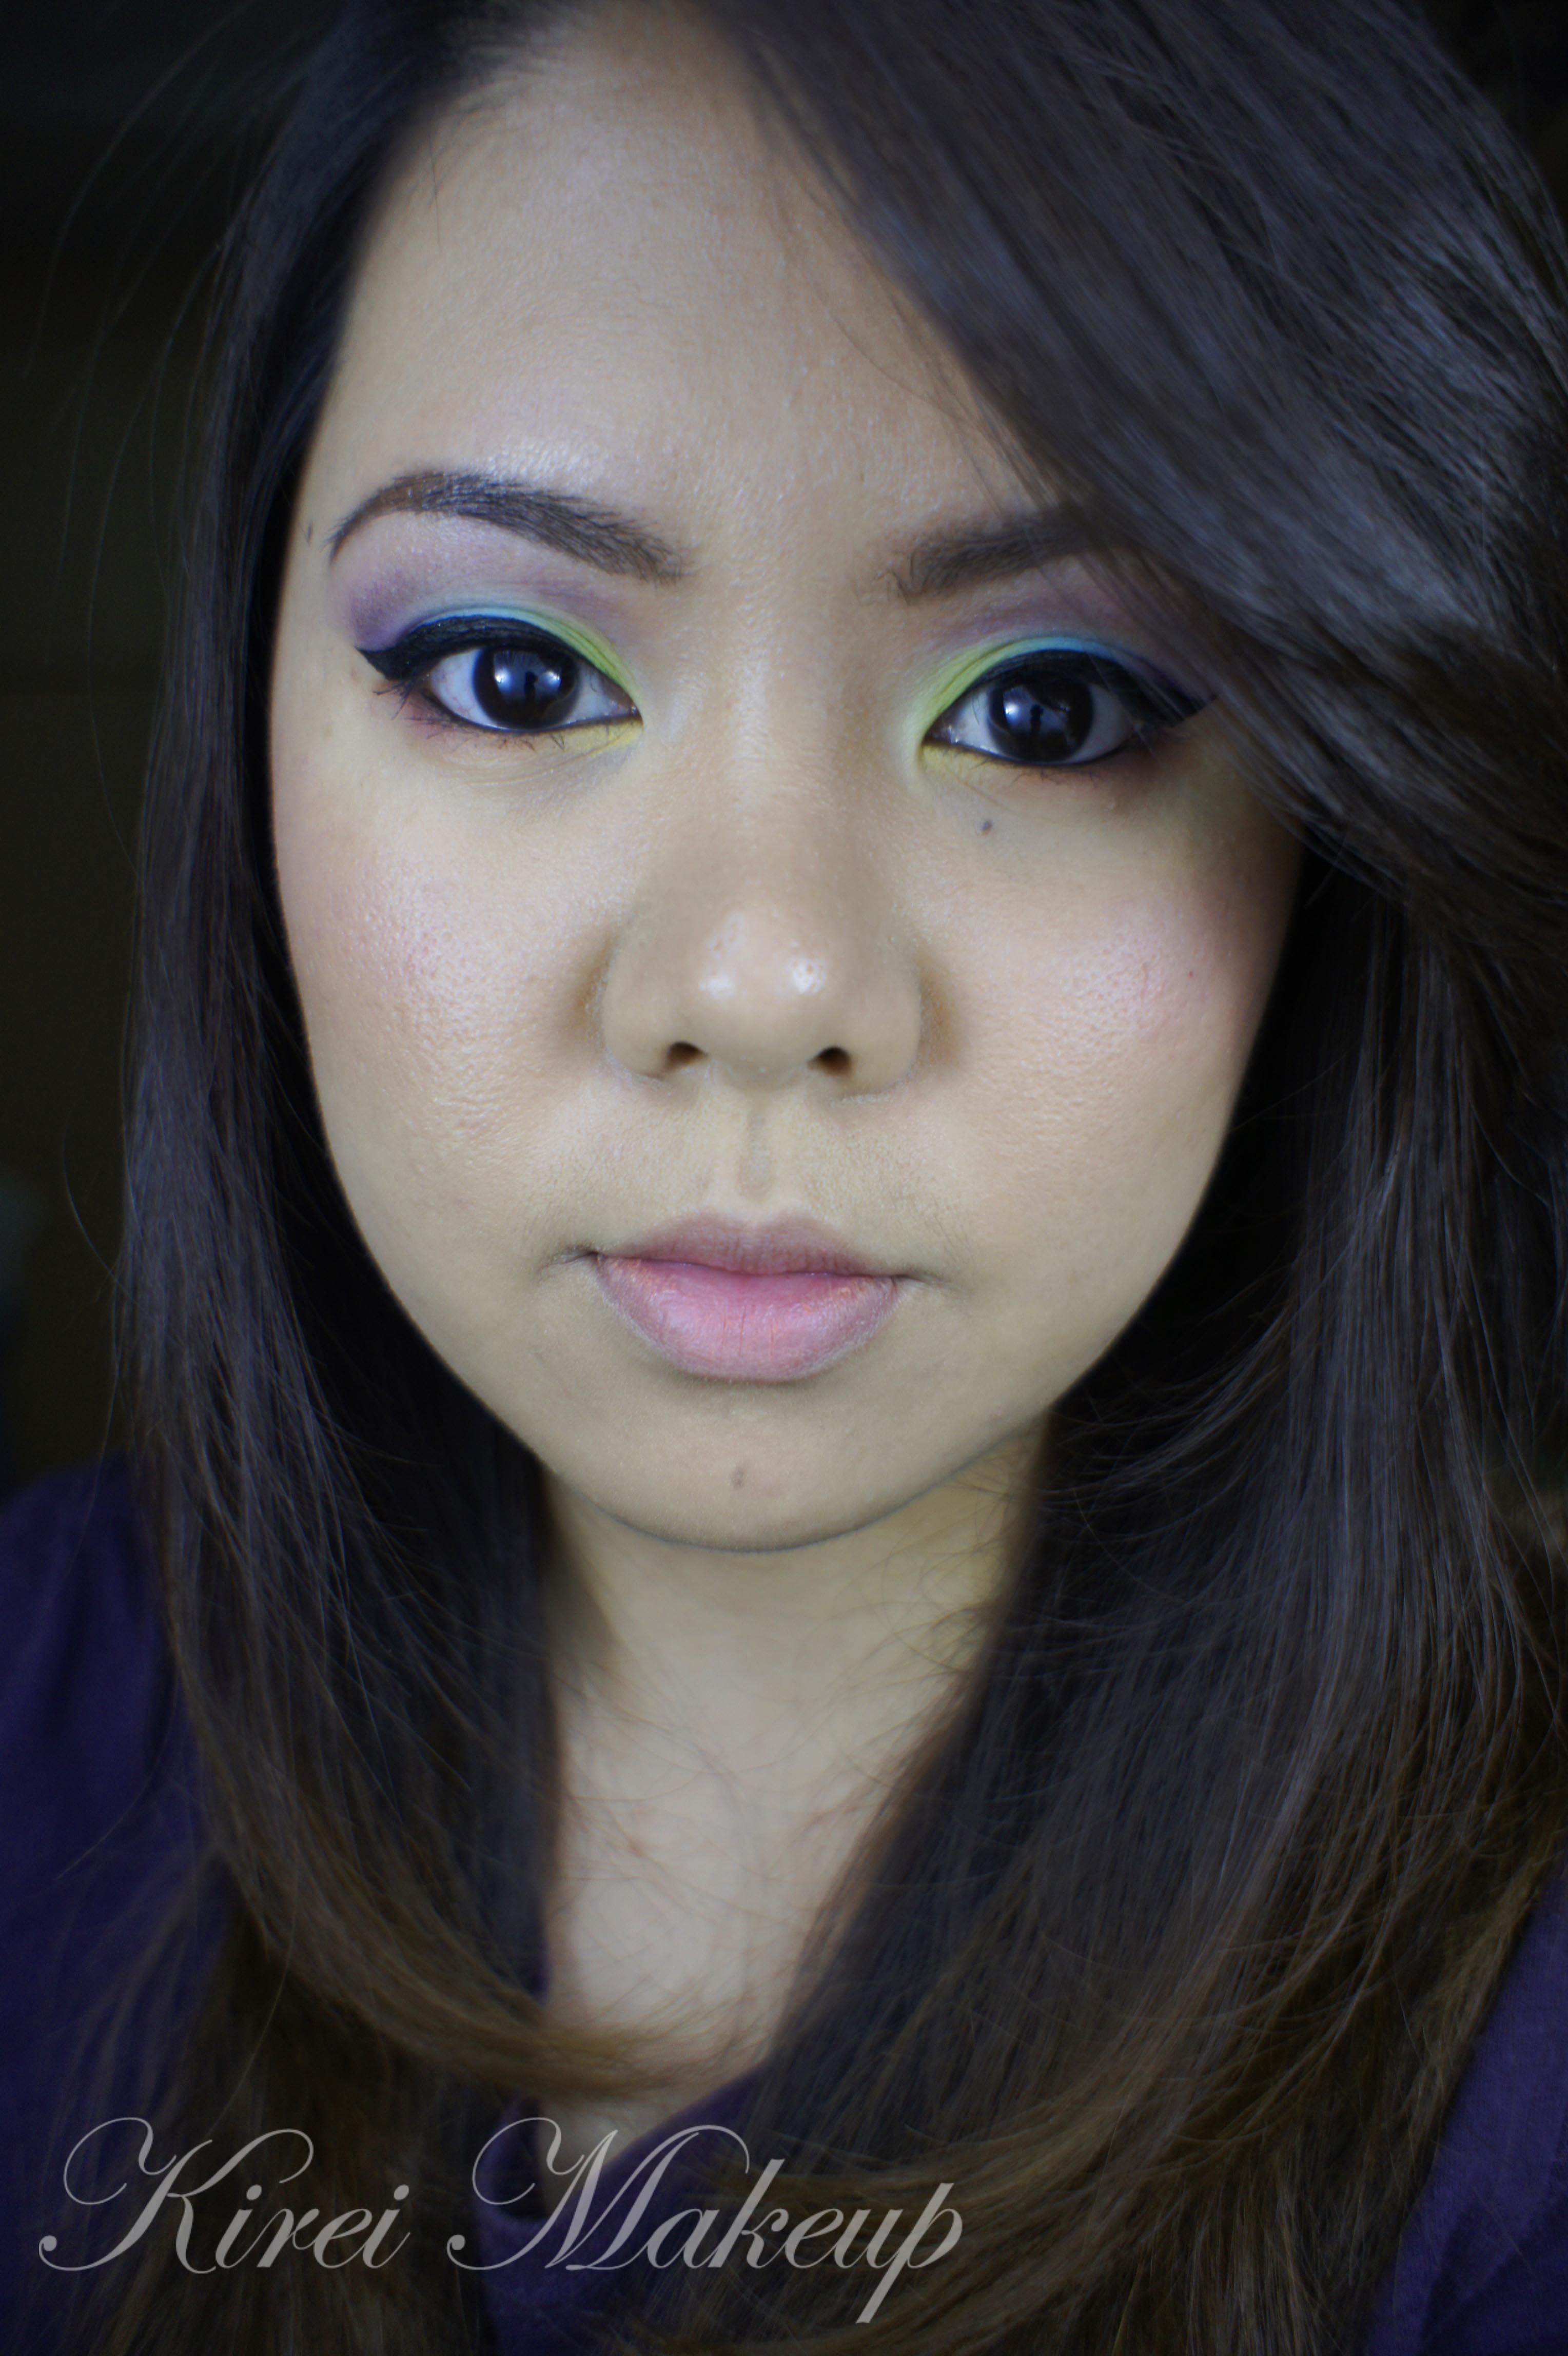
Hi all! I apologize for missing 2 days of tutorials. To be honest, I had 1 tutorial but I wasn’t too happy with how it turned out. So, I rather postponed the post than posting a not-so-great tutorial.
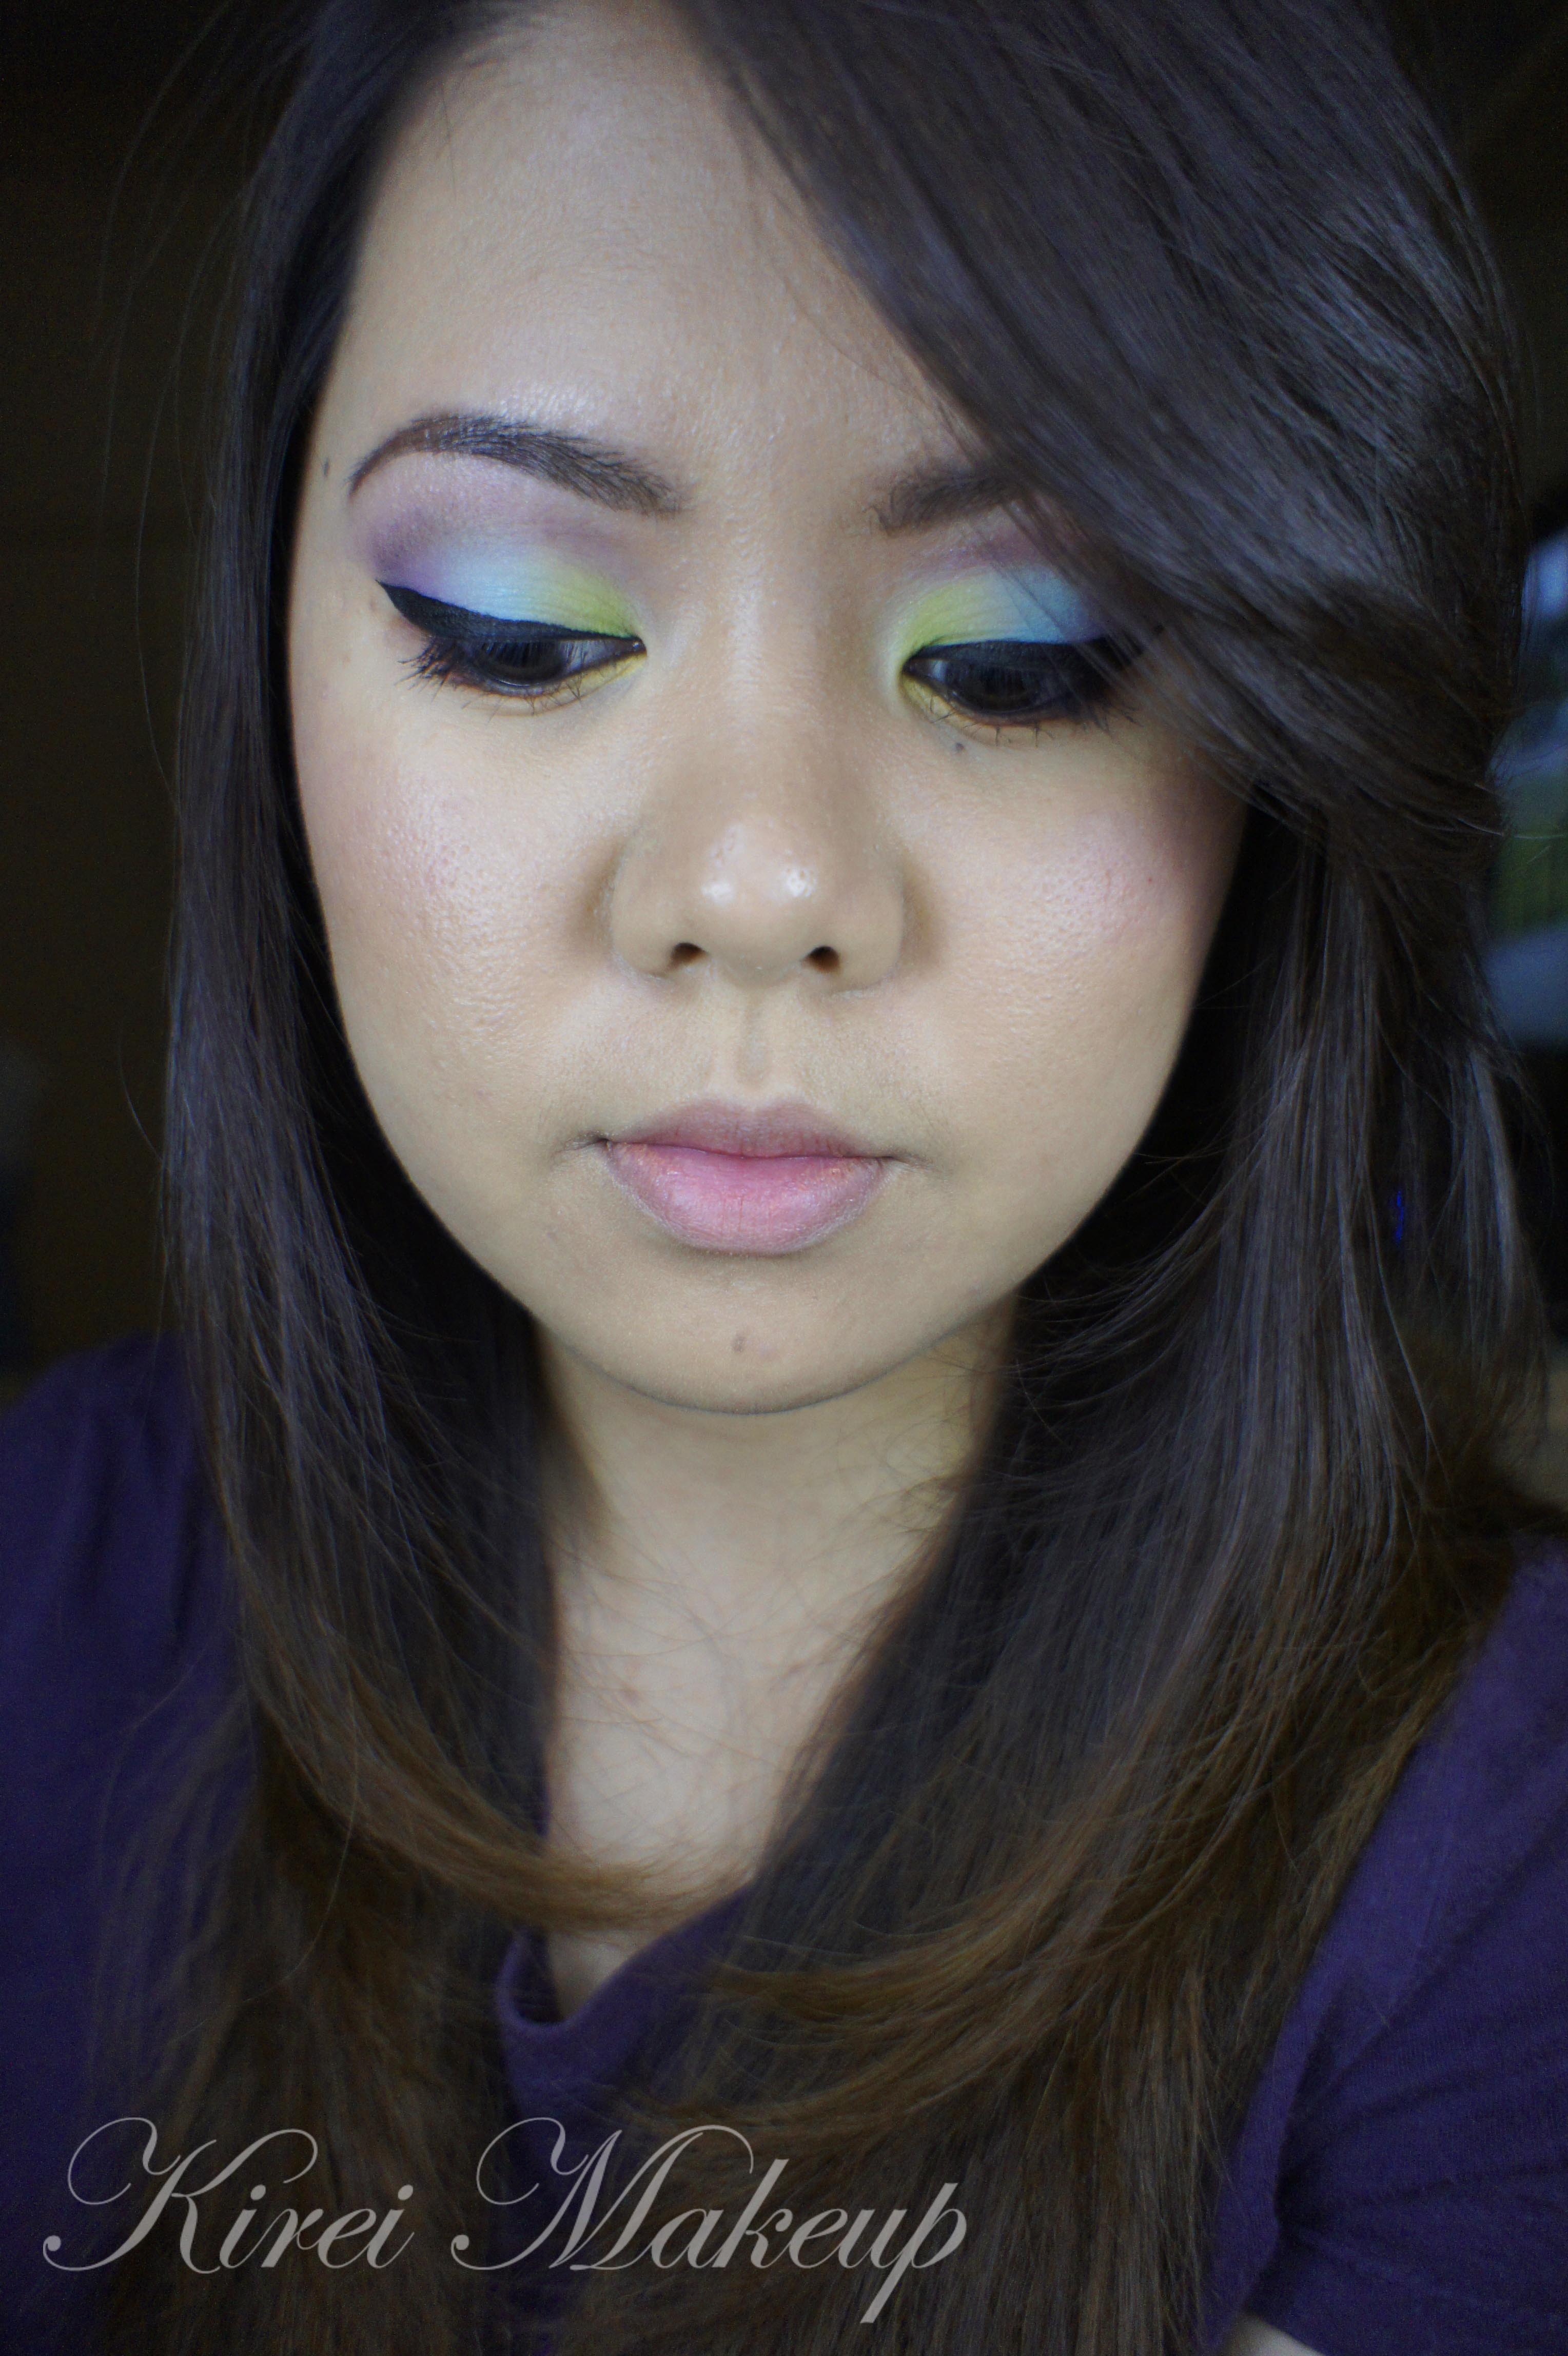
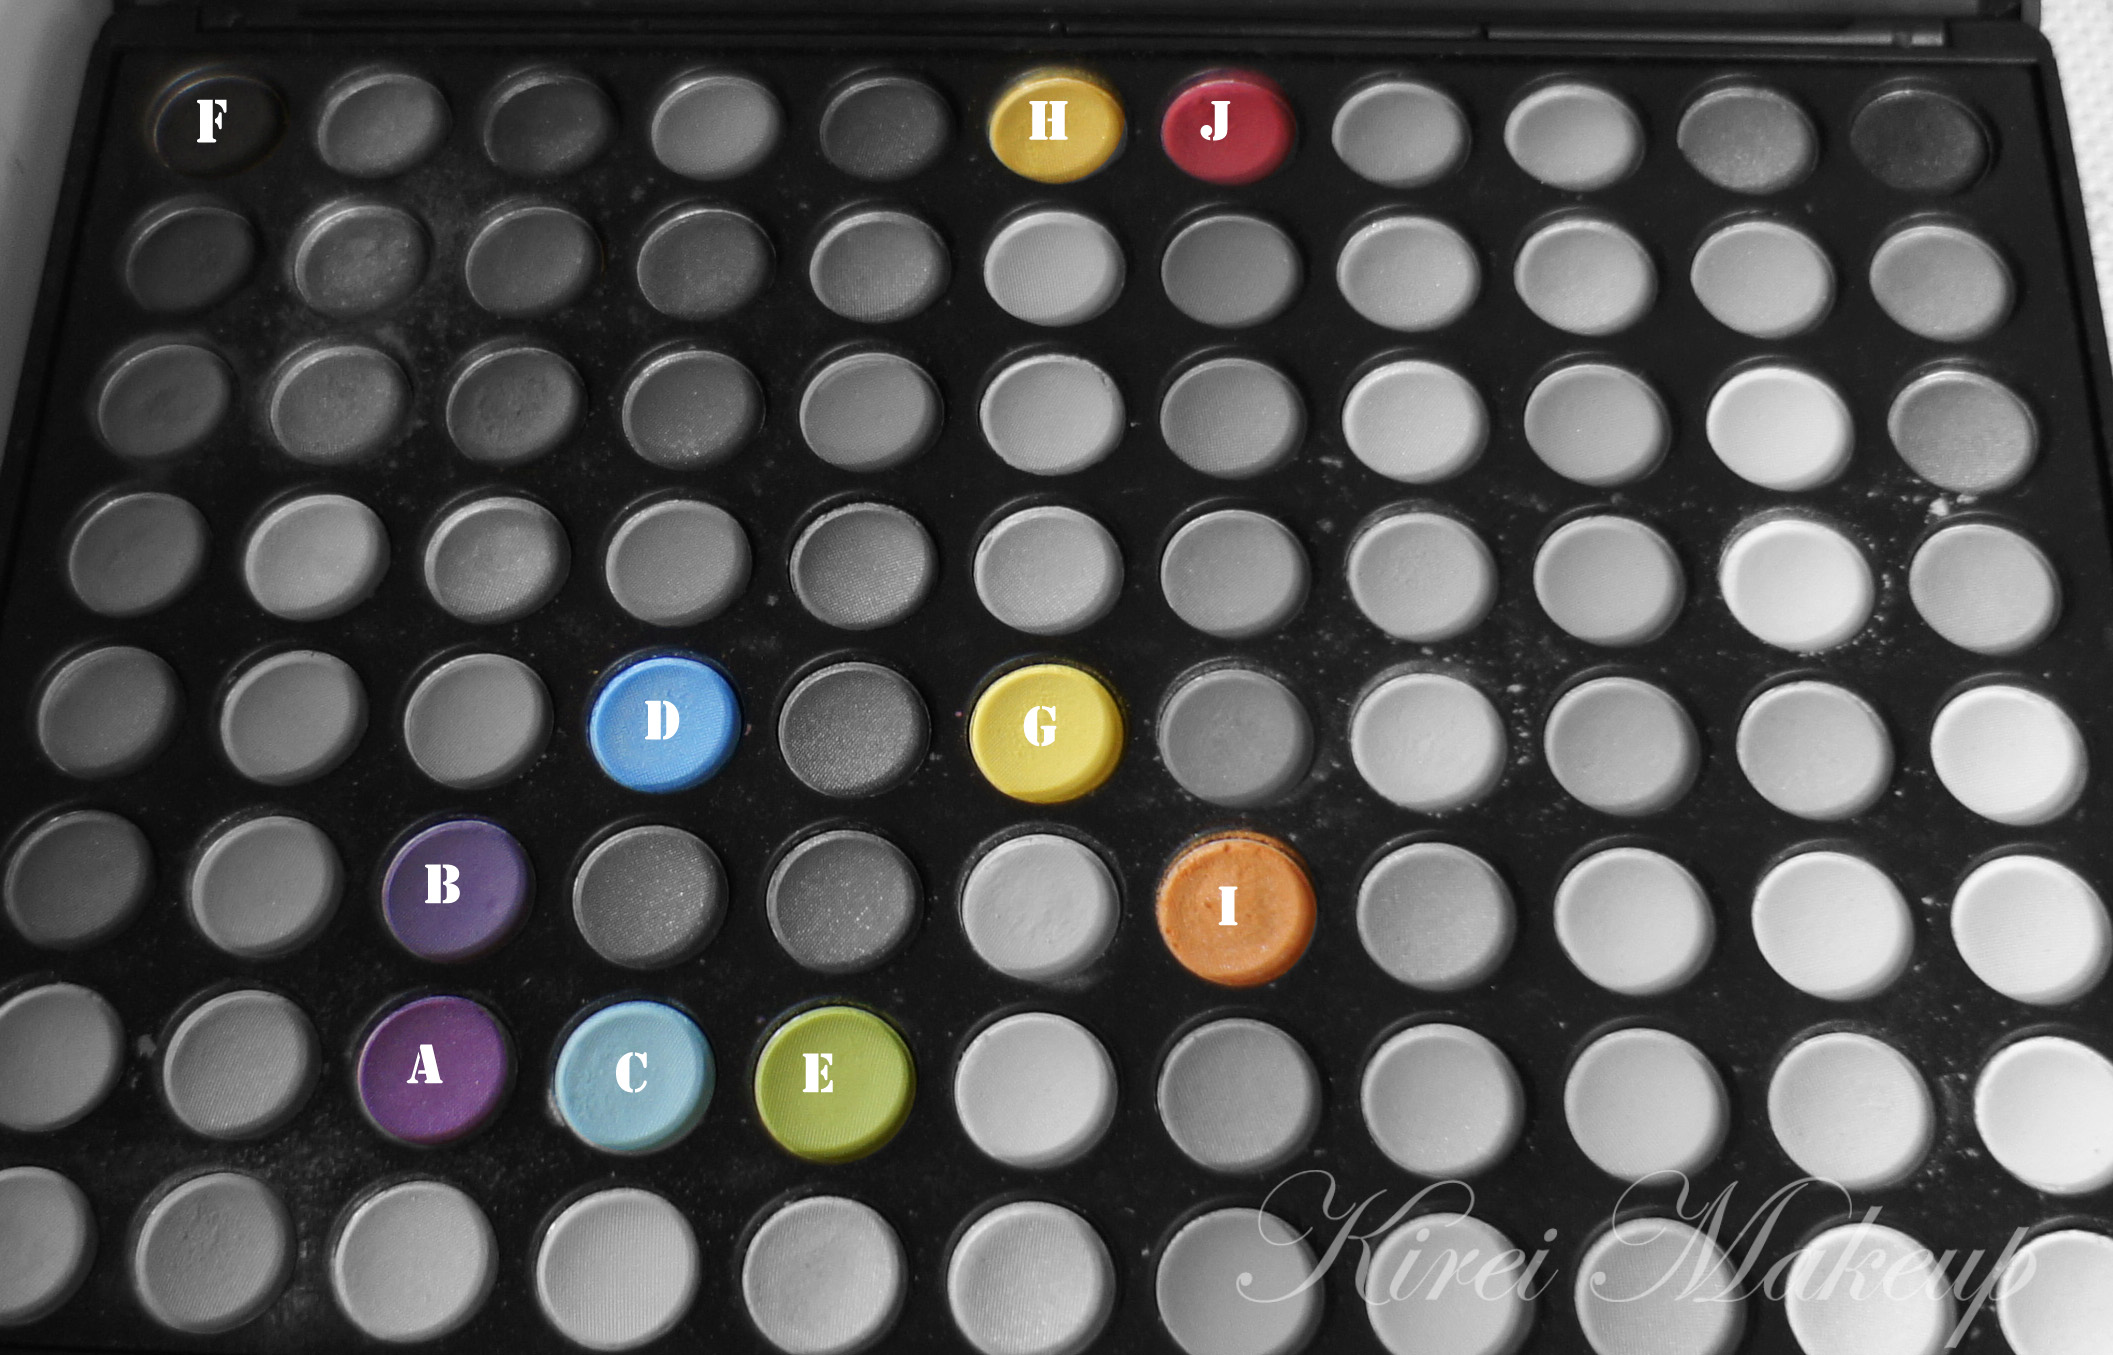
Anyhow, I decided to use my Coastal Scents 88 Prism palette (only $19.95!) for the look, so it’s easier for whoever wants to re-create this look. If you do decide to re-create the look, please link me up!
The reason why I wanted to use the Coastal Scents 88 Prism palette is to create a pastel finish to the look. I quite like how this turned out. I was quite skeptical cause I like a shimmery finish, but as I said I love how this turns out! I’ve labelled the colors that I used in the picture below, so please refer to the colors on the tutorial.
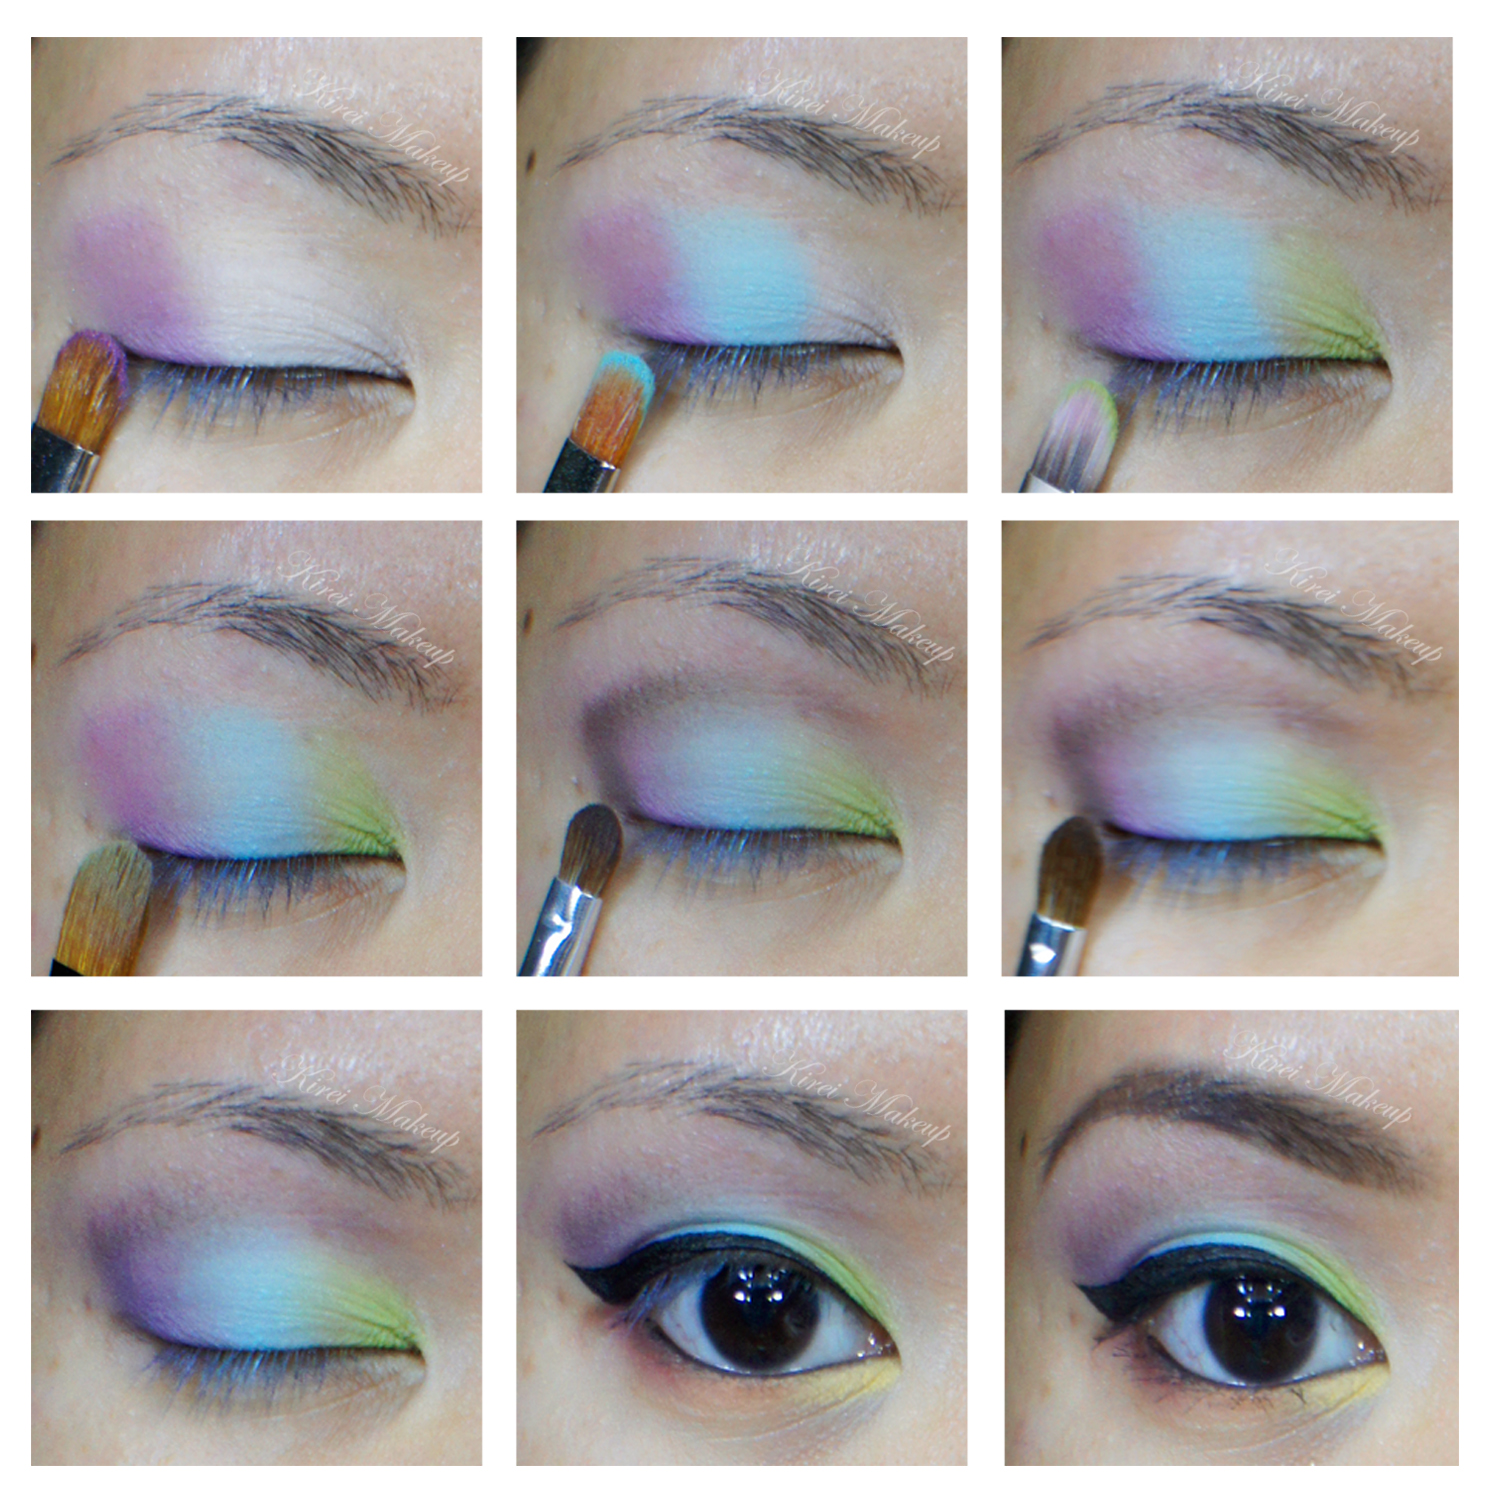
The steps are quite long, so please be patient reading it…the key to this tutorial is to have clean flat eyeshadow brushes (or you can clean in between steps). Make sure it’s clean so the colors don’t get muddy and mixed up.
How-to:
1. I applied NYX Jumbo eyeshadow in Milk and blended it on my eyelid using my ring finger.
2. Using a flat eyeshadow brush, I applied eyeshadow A on the outer corner of the lid.
3. Using another clean eyeshadow brush, I applied eyeshadow C + D (mixed) on the middle lid.
4. I applied eyeshadow E on the inner corner of the lid using a clean eyeshadow brush.
5. Using another clean eyeshadow brush, I blended the line where the eyeshadow met.
6. I applied eyeshadow F on the outer V using a small fluffy brush.
7. Using a clean fluffy brush, I blended the black eyeshadow so there’s no harsh edge.
8. Using a flat eyeshadow brush (from step 1), I applied eyeshadow B on the outer corner and on top of the black eyeshadow.
9. Using an angled eyebrow brush, I applied eyeshadow G+H on the inner corner of the lower lid, I in the middle and J on the outer corner.
10. I lined my waterline using L’oreal Voluminous Smoldering eyeliner.
11. I created a winged liner using Kat Von D Trooper liquid liner.
12. I curled my lashes and applied MUFE Smoky Lash mascara on both top and lower lashes.
13. I filled my brows in using MUFE Aqua Brow gel.
14. On my face, I applied Urban Decay Naked foundation all over using Shiseido foundation brush.
15. I applied Benefit Benetint on my cheeks, and blended it out using a foundation brush.
16. I applied MUFE Rouge Artist Natural Lipstick in N39 (Soft Apricot).
17. Powdered my face using CoverFX translucent powder.