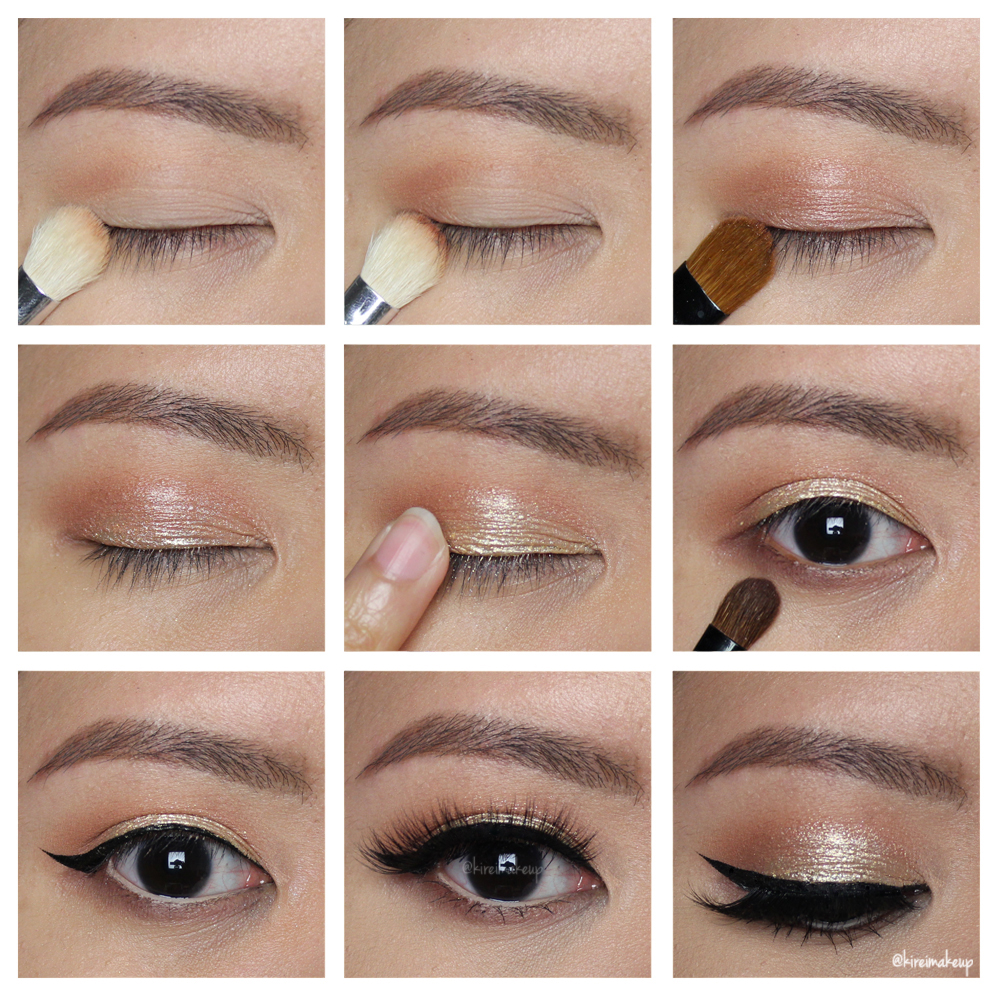
 Today’s Gold New Year Party Makeup tutorial would by my last post for 2015. Almost time for 2016, and so I shall end 2015 with a gold sparkly makeup. This look is super simple, and it doesn’t require much. It’s sparkly, it’s light, it’s super pretty for the New Year. I, myself, prefer this kind of look to attend parties and such.
Tag: beauty bloggers canada
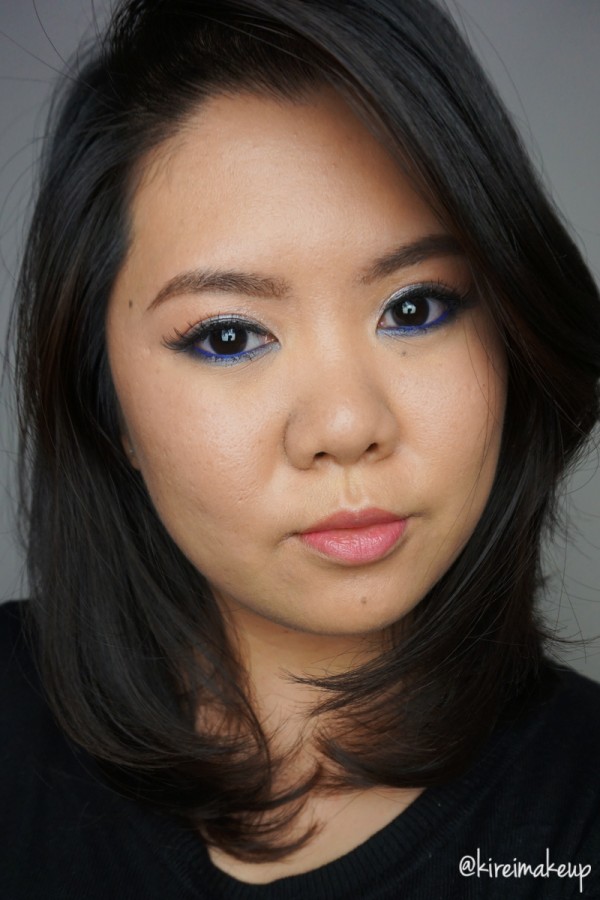
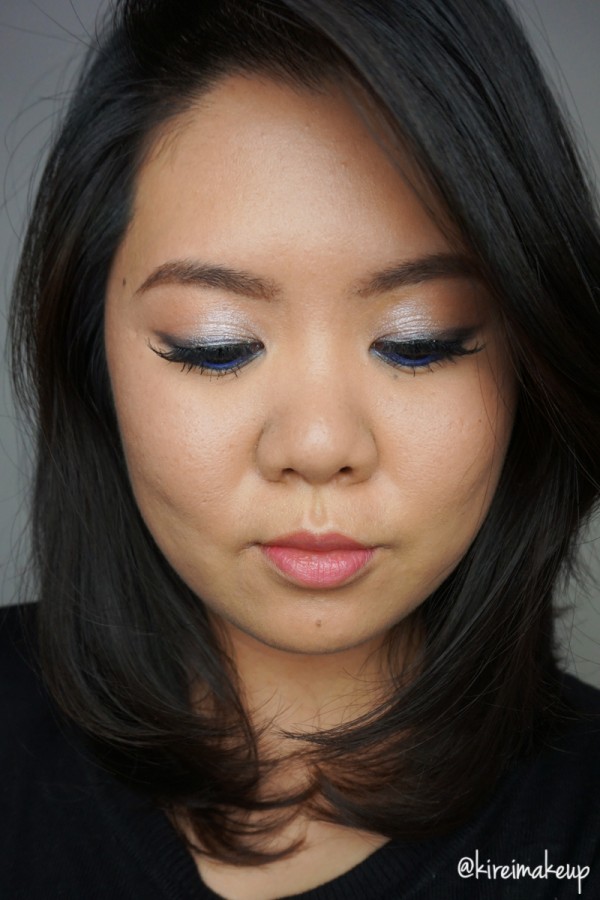
Shu Uemura x Maison Kitsune Look #3
Another day, another look using Shu Uemura x Maison Kitsune Holiday collection 2015! I’ve done 2 smoky eyes using Shu Uemura x Maison Kitsune Indigo palette (Grey Smoky & Blue Smoky), and this will be my third look. I’ll try to do a review and swatches of the Indigo palette next week.
For this look, I wanted to create a simple soft smoky liner makeup, which is an alternative way to glam up your party makeup. If you are not comfortable doing smoky eyes, give this look a try. For the rest of my face, everything is simple, no contouring. Most of the products used are Shu Uemura products, which I’ve been loving lately. It’s a really great line, especially for Oriental skin. Anyways, please scroll down for more pictures and product details.
*Please check out my other Maison Kitsune for Shu Uemura tutorials*
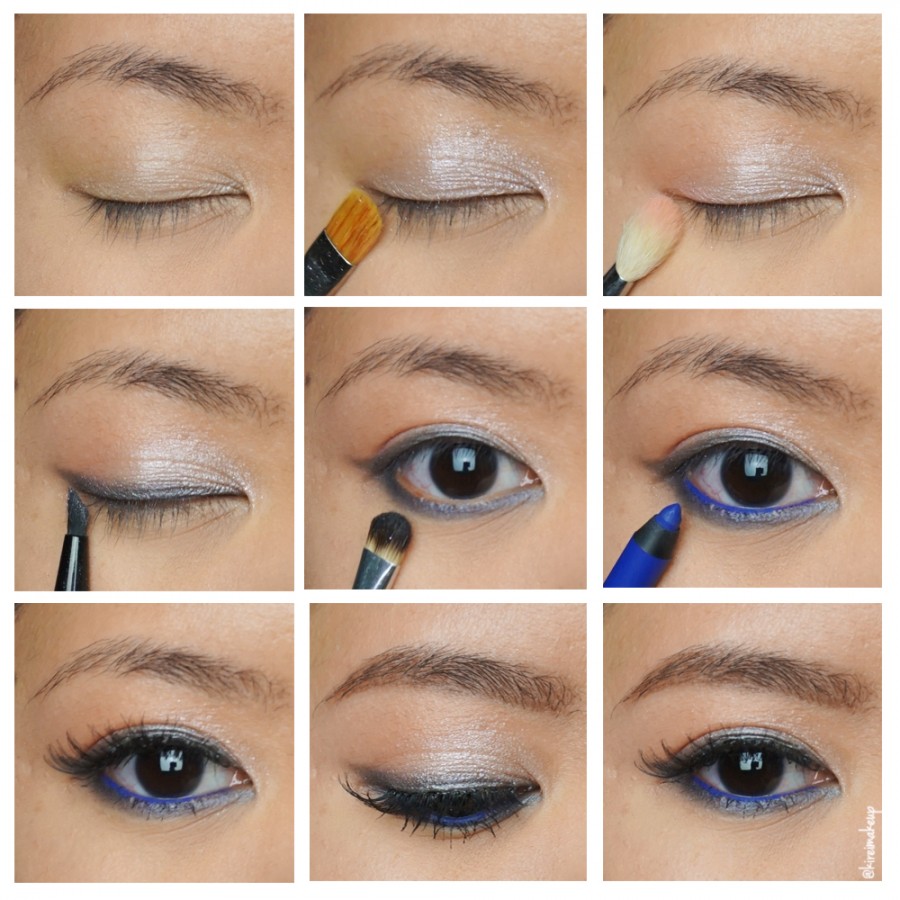
Products used
Eyes
- Base – Shu Uemura cream eyeshadow “Ivory”
- Eyelid – Shu Uemura Maison Kitsune Indigo Palette “Deep Pink”
- Outer third/crease – Shu Uemura Maison Kitsune Indigo Palette “Glow On Blush Pink”
- Upper lash line – Shu Uemura Maison Kitsune Indigo Palette “Black”
- Lower lash line – Shu Uemura Maison Kitsune Indigo Palette “Navy”
- Waterline – Shu Uemura Maison Kitsune Play & Remix Drawing pencil “Indigo”
- Lashes – Ardell falsies “Demi Wispies”
- Brows – Shu Uemura Brow Sword
Face
- Base – Shu Uemura Tsuya Bouncy-Fine Cream
- Foundation – Shu Uemura Lightbulb foundation
- Concealer – NARS Radiant Creamy Foundation “Custard”
- Setting Powder – Laura Mercier “Invisible Setting Powder”
Cheeks
- Blush – Shu Uemura Maison Kitsune Indigo Palette “Glow On Blush Pink”
Lips
Sleek Makeup Candy Palette
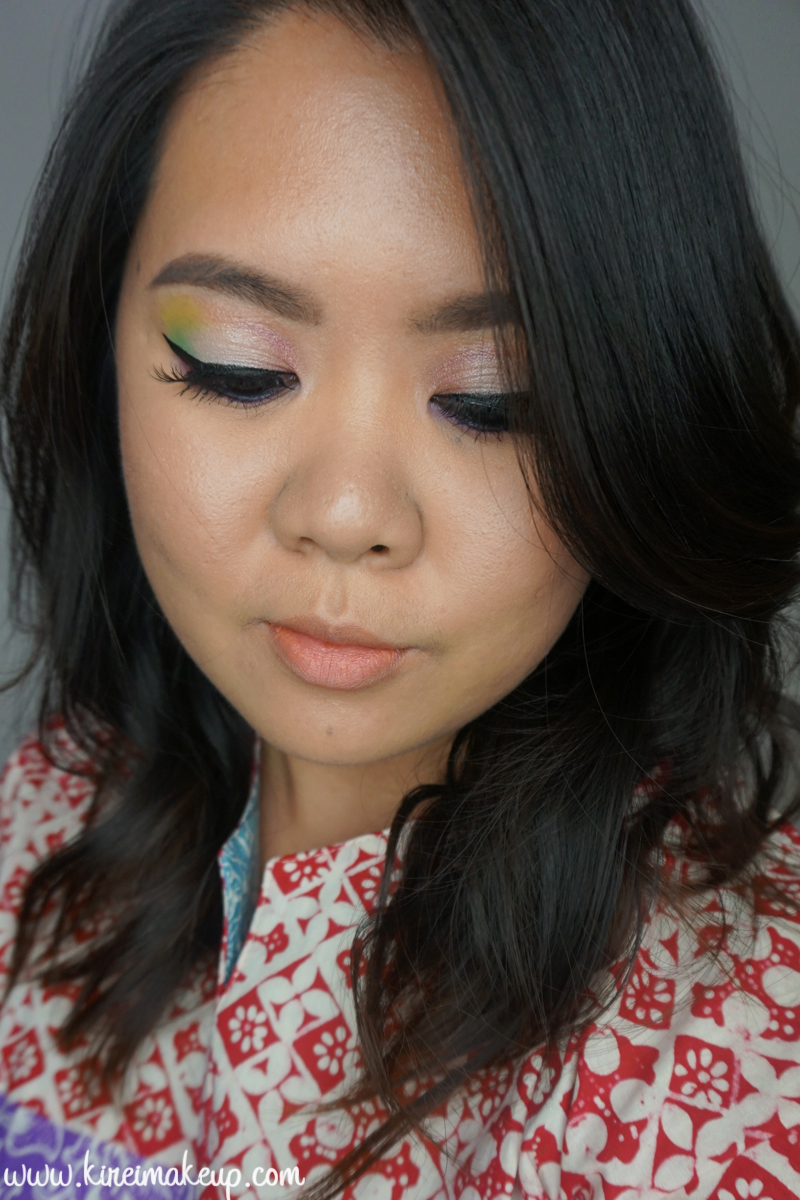
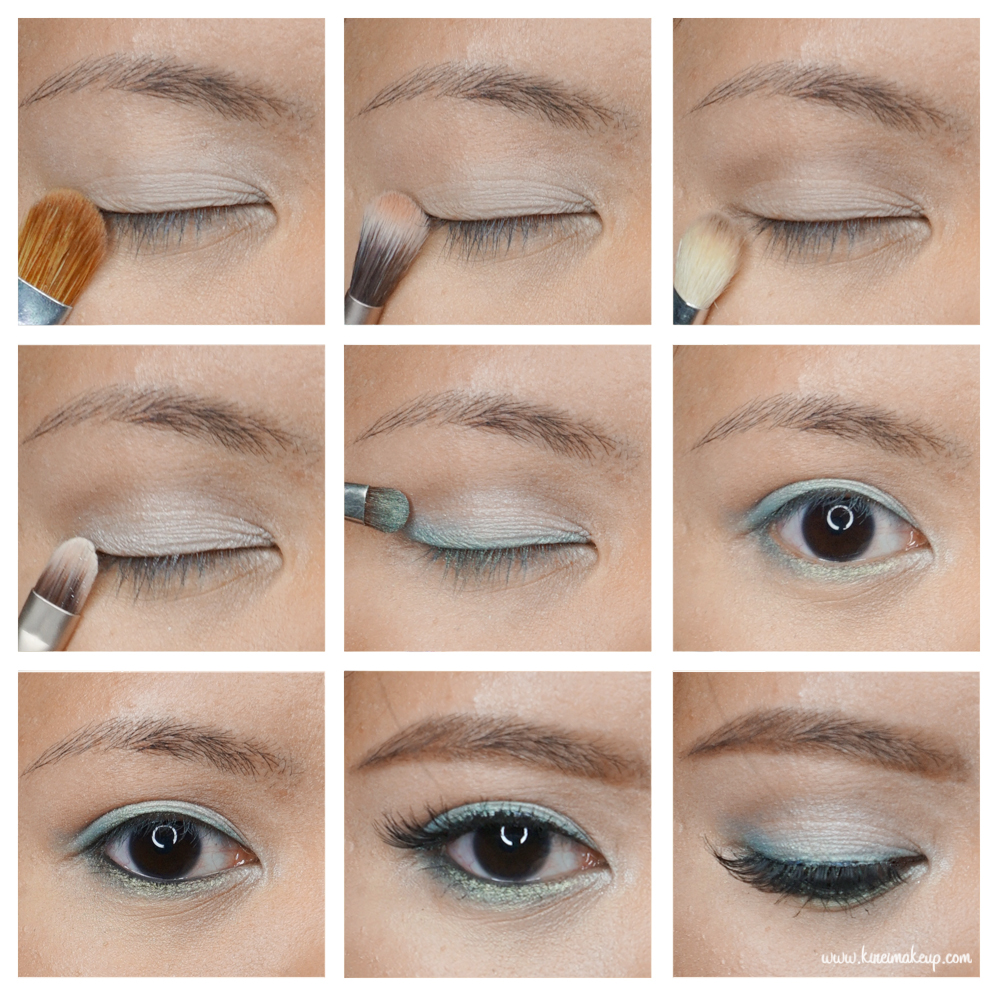
My Sleek Makeup Candy Palette is back in my hands again! I accidentally left it back in Jakarta last year, and my brother brought it back to Canada for me! Woohooo!!! So happy to have this Sleek Makeup Candy palette back to create many colorful looks.
So the inspiration behind this colorful look is actually a “Batik” top (worn in pictures below) I received yesterday from Sofia via my brother. My friend, Sofia from @Sophie_Tobelly, is an amazing fashion designer, and she actually created this top and sold it in her store. A big THANK YOU and shout out to Sofia!!! You guys should really check her out on Instagram (IG)! She also sent down a clutch she created, I posted it on my IG account so please do check it out and follow me on IG!
The top has several different colors like red, purple, white, and blue. I was going to use the blue from the palette, but it ended up being too chalky, so I changed it to green instead. I do love the end result, it almost has a watercolor feel to it. Should you decide to replicate this look, please do tag me on IG or add #kireimakeup.
*For other Sleek Makeup Candy Palette tutorials, please check out Psychedelic and Very Purple*

Products used
Eyes
- Primer – Urban Decay Primer Potion “Original”
- Base – MAC Mineralized Skinfinish “Medium Plus”
- Transition – Sleek Makeup Candy Palette “Pear Drop”
- Outer V – Sleek Makeup Candy Palette “Mint Cream”
- Inner V – Sleek Makeup Candy Palette “Bon Bon”
- Center lid – Sleek Makeup Candy Palette “Cream Soda”
- Lower lid – Sleek Makeup Candy Palette “Parma Violet”
- Waterline – MAC “Smolder” kohl pencil
- Winged liner – Kanebo “Kate Super Sharp Eyeliner”
- Brows – Anastasia Beverly Hills Brow Pomade “Taupe” + “Medium Brown”
- Mascara – Lancome “Hypnose”
- Lashes – Ardell falsies “120s”

Face
- Primer – Bobbi Brown “Vitamin Enriched Face Base”
- Foundation – Diorskin Star Foundation “031”
- Concealer – Diorskin Star Concealer “03”
- Setting powder – Diorskin Nude Air Healthy Glow Invisible Loose Powder “#30″
Cheeks
- Blush – Benefit “Hervana”
Lips
- Lipstick – Revlon ColorStay Ultimate Suede Lipstick “Flashing Lights”
The Balm Balmsai Makeup Tutorial
I bought this Balmsai palette back when I was in Jakarta, but I didn’t get a chance to play with it because I thought the palette was too pretty, and I don’t have the heart to touch it! However, all good things must come to an end, and I finally decided it’s time I used this palette. This The Balm Balmsai makeup tutorial is a really fun and summery look. I think a touch of color along the lash line really perk up this whole look. Feel free to omit the falsies, I used it just to make my eyelashes look longer, and open up my eyes a bit more.
Most of the products used for this tutorial are all by The Balm, mostly of the eyes and cheeks. Even though I know The Balm Indonesia’s brand manager, I am in not paid, nor sponsored to do this post.
I actually had a full face picture for this tutorial, but I realized the foundation I was using was too light for my face, and created a white cast, so I decided to remove the portrait. I didn’t realized I’ve gotten darker since I had to work on an outdoor shoot for the past couple days.
Products used
Eyes
- Primer – Urban Decay Primer Potion “Original”
- Base – The Balm Meet Matt(e) Nude “Matt Maloy”
- Transition – The Balm Meet Matt(e) Nude “Matt Singh”
- Crease – The Balm Balmsai “Woodie”
- Lid and Inner Corner – The Balm Balmsai “High Tide”
- Upper and Lower Lashline – The Balm Balmsai “Big Kahuna”
- Waterline – L’oreal Paris Voluminous Smoldering eyeliner
- Brows – The Balm Balmsai “Score”+ “Dig It” + “Woodie”
- Falsies – Ardell “Demi Wispies”
Navy Blue Smoky Eyes
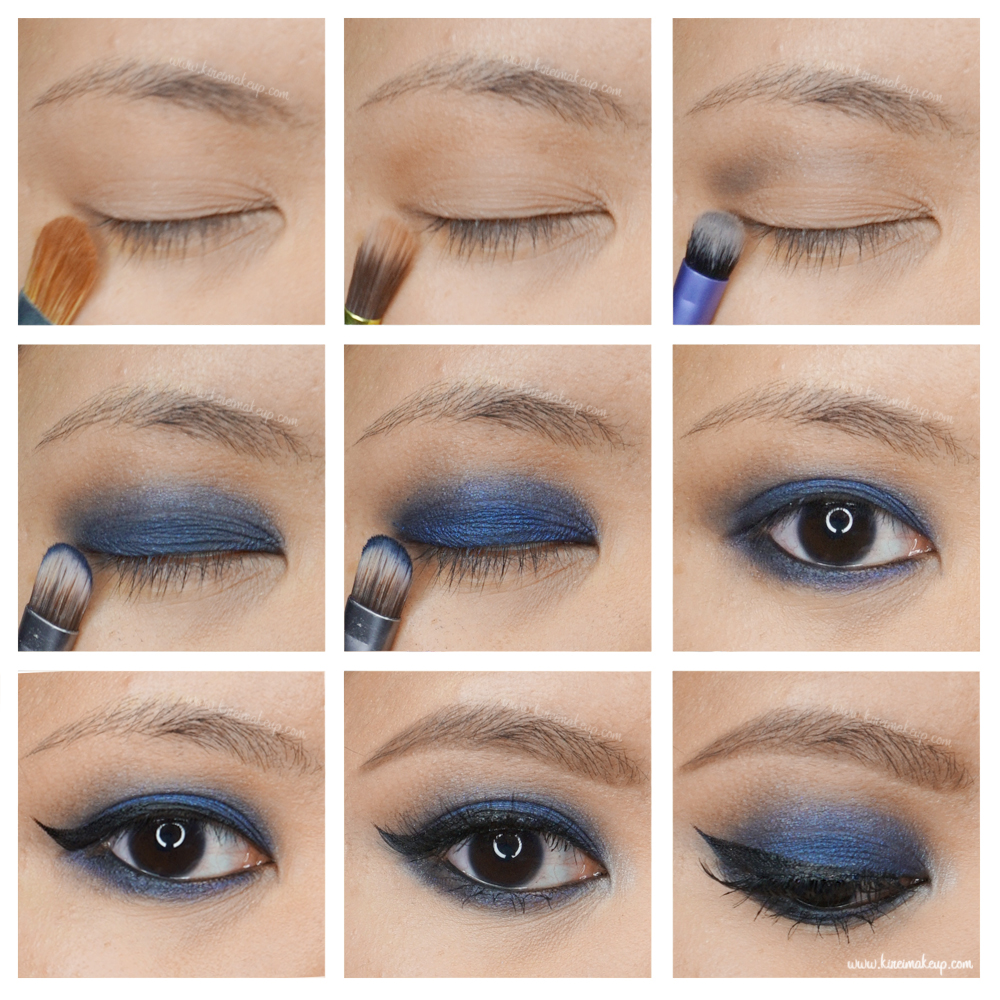
I’ve been going pretty neutrals with my tutorials lately, and I wanted to do colors. I don’t have my bright palettes with me since I left it back in Jakarta, so I decided to utilize what I have here in Canada. I decided to do a very rich Navy Blue smoky eyes tutorial, since I think it’s a really pretty color to do.
I used layers of eyeshadows to make sure everything is blended well. 2 blue eyeshadows are used on this tutorial to allow for the blue to pop even more. This look would look great on brown eyes, green eyes, and gray eyes.
You can skip the winged liner, I just added it as an extra. It’s just something I’m used to do. You can definitely opt out the winged liner.
Products used
Eyes
- Primer – Urban Decay Primer Potion “Original”.
- Base – Urban Decay Vice 3 “Undone”.
- Transition – Urban Decay Vice 3 “Downfall”.
- Crease – Urban Decay Vice 3 “Revolver”.
- Eyelid – Urban Decay Vice 3 “Heroine”; L’oreal Infallible eyeshadow “All Night Blue”.
- Lower lid – Urban Decay Vice 3 “Heroine”.
- Lower lash line – MAC “Black Tied”.
- Waterline – L’oreal Paris “Voluminous Smoldering eyeliner in Black”
- Winged liner – Kat Von D Tattoo Liner “Trooper”.
- Brows – Anastasia Beverly Hills Brow Wiz “Taupe” + “Medium Brown”.
- Falsies – Ardell falsies “Demi 120”.

Face
- Primer – The Bodyshop Drops of Youth “Wonderblur”.
- Foundation – NARS Luminous Weightless Foundation “Punjab”.
- Under eye concealer – NARS Radiant Creamy concealer “Custard”.
- Blemish concealer – MAC Studio Finish concealer “NC30”.
- Setting powder – CoverFX translucent setting powder “Light”.
Cheeks
- Contour – MAC powder blush “Blunt”.
- Highlight – The Balm “Mary-Lou Manizer”.
- Blush – MAC powder blush “Breezy”.
Lips
- Lipstick – Sonia Kashuk Velvety Matte Crayon in “Pink Nude”.
- Lip stain – L’oreal Paris Color Riche Extraordinaire “Blushing Harmony”.
