Sugar and Spice

Halloween is almost here! As much as I’d like to do a zombie tutorial, I’ve yet to find a large amount of liquid latex here. I’ve done a small one, and I posted the photo on my instagram and twitter! Please follow me on instagram (handle: KireiMakeup)/twitter if you haven’t already done so.

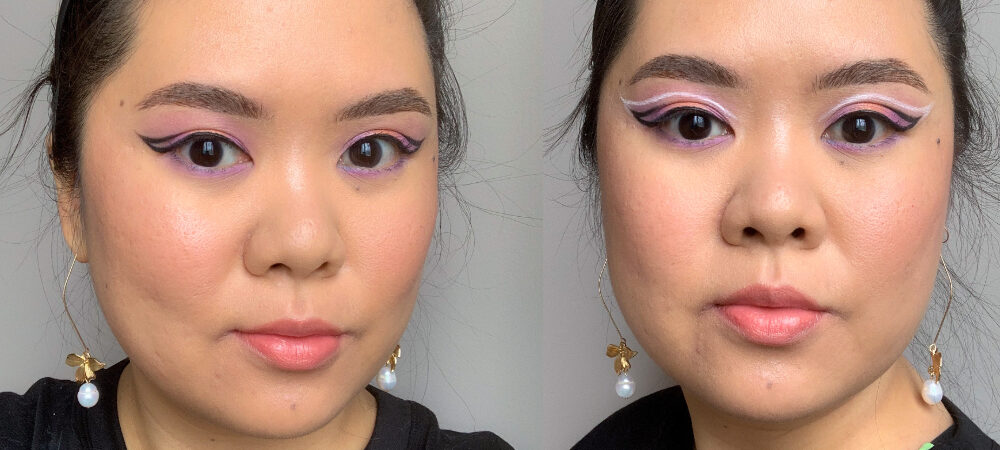
I’ve decided to do 2 looks in this tutorial. One look is more on the pretty and wearable, the other look is more vampy and goth. I wanted to re-do the eye makeup from my published work at Coco magazine (here) on myself since I fell madly in love with a super thick black cat eyeliner. The cat eyeliner made me reached for my contact lenses and I decided to put it on just for fun. Oh also, this extreme winged/cat-eye liner has been seen on Rihanna too!

For this tutorial, I used a pink eyeshadow on the eyes and cheeks called Sweet Strawberry from L’oreal Infallible eyeshadow collection to show my support for Breast Cancer Awareness month! I believe I’ve received a very “pink” package from L’oreal Canada but I’ve yet to open it since I’m not in Canada at the moment, but since I have this shadow, I decided to use it first.

Also, this tutorial will show you how easy it is to get the perfect winged/cat-eye liner in this tutorial. For the winged/cat-eye liner you’ll need: 1) tape (or in my case, I used a labeling sticker), 2) small angled brush (I used MAC 263) and 3) Gel liner (I used MUFE Aqua Black).

Let’s get this rolling!

How-to:

1. Stick the tape to your hand and release it. Repeat this step several times until the tape isn’t too sticky. If it is too sticky, it might pull your skin.

2. Find an imaginary line from the outer corner of your eye to the tip of the brow. Place the tape and try to match the angle of the tape on the other eye.

3. Once you’re satisfied with the angle of the tape, prep your eyes with primer if needed.

4. I applied MAC Pearl cream base all over my eyelid all the way up to the brow bone.

5. Using a flat eyeshadow brush, I applied MAC Hush eyeshadow on the inner half of the eyelid.

6. Using the same eyeshadow brush, I applied L‘oreal Infallible eyeshadow in Sweet Strawberry on the outer half of the eye up to the crease.

7. Now, for the fun part:

  • Using the angled eyeliner brush and gel liner, apply eyeliner on the upper lashline as you’d usually do with a pencil liner.
  • Once you are satisfied with the line, flip your brush and make sure the LONGER side is facing up. Your brush should be parallel to the tape.
  • Place your brush right against the tape and pull it to the middle of the lid. You should end up with a triangle.
  • Fill the triangle up and re-do the liner according to the thickness to your liking.
  • Pull the tape off your face and you’ll end up with a perfect straight line!
  • confusing? may be I should do a video tutorial? (leave comments below)

8. Once the upper liner is completed, I used Urban Decay Perversion eyeliner on the tightline and waterline.

9. Using the same angled brush, I used whatever is left on the brush and created a thick liner on the lower lash-line. I connected this lower liner to the “wing”.

10. I curled my lashes and applied mascara on top and bottom lashes. Also filled in my brows using a clean angled brush and mixture of MAC Omega and MAC Brun eyehadows.

11. For the goth/vampy look, I applied fake lashes on both top and bottom lashes.

extreme cat eyeliner

12. For the face, I applied L’oreal Magic Lumi Foundation all over my face using Sigma Round Kabuki brush.

13. Using a MAC 129 brush, I applied L’oreal Sweet Strawberry shadow on my cheeks.

14. Using MAC 109 brush, I applied MAC Blunt contour shadow on the hollows of the cheeks, jawline and the side of my nose.

15. For the wearable/pretty look, I applied whatever is left on the foundation brush on my lips and applied a clear lipgloss. If you want this to be on the “prettier” side, you can apply a pink/peach/mauve/rose lipstick instead of going nude lips.

high fashion cat eyeliner

16. For the vampy/goth look, I lined my lips using a red lipliner from Complections (that’s my old makeup school).

17. Then I applied a red lipstick by Revlon called Ravish Me Red all over the lips.

18. To make the center of the lips darker, I applied a black lipstick from MAC. I don’t know what it’s called since I put this on a lip palette and I didn’t put the name on it. If you do not have a black lipstick, apply a black pencil liner in the center of the lips and blend it with the red lipstick.

19. Then I applied a clear lipgloss over the lips to complete the look.

20. If you’re oily, apply powder to set the face.
dark glossy red lips

Karl Lagerfeld for Shu Uemura

I had the opportunity to go to the Karl Lagerfeld x Shu Uemura Collaboration event a few days a go (all thanks to Shu Uemura Indonesia for inviting me!). The event was to introduce to the media the latest collection from Shu Uemura, which will launch in Indonesia on November 1st, 2012. This was one of the product launches that I’ve been waiting for ever since I heard about it beginning of the year. If you follow me on Twitter (which you should!), you’d probably already seen some of the sneak preview photos I uploaded there.

If you don’t know about it alraedy, Karl Lagerfeld, yes, that famous designer Karl Lagerfeld is having a collaboration with Shu Uemura by launching the MONSHU girl collection. Karl, himself, is a very dear friend of the deceased Shu Uemura, thus naming the collection MonShu, which means “my darling shu”.

The collection’s icon, named the MonShu girl has a very “Sadako” eerie feel, yet one cannot help but to feel a strange attraction towards this icon. A very 1920s makeup, smoky eyes with red lips, is the signature look of the MonShu girl.

The event started out by introducing the whole concept behind MonShu girl (see video below).

[youtube http://www.youtube.com/watch?v=grFXpd2wxj0]

Then Regina introduced us to John Pagaduan, who’s a Shu Uemura accredited makeup artist from Philippine. John’s work can be seen in countless fashion magazines in Philippine and he was there to show us how to achieve the MonShu look.

Monshu Makeup Demo
John Pagaduan Makeup Demo
Shu Uemura Indonesia
John Pagaduan and Monshu Model
Karl Lagerfeld Monshu
John Pagaduan and Bloggers

Throughout the whole makeup demo, we were lucky to be able to see the soon-to-be-released products. I have my eyes on the super cute eyelash curler, the eyeshadow palette (the purple one), and the eyelashes!

Shu Uemura eyeshadows
Monshu Eyeshadow Palettes
Shu Uemura Monshu Collection
Monshu Lipsticks, Monshu Gel Liner and Monshu Cleansing Oil

The products that will be launched on November 1st are 2 eyeshadow palettes, eyelash curler, 4 lipsticks, cleansing oil, gel eyeliner (eggplant color with glitter) and false eyelashes.

Shu Uemura eyelash curler
Monshu False Eyelashes and Eyelash Curler

After the makeup demo, we were able to have a quick chat with John, as well as having our pictures taken using polaroids with the MonShu models. I think Regina and the rest of her MonShu girls look super adorable in their MonShu Outfit and makeup! Tres Chic!

Shu Uemura Monshu
Monshu Crew
Monshu Models
Jessica with Monshu Models
Shu Uemura Indonesia
Regina and Bloggers

Yes, we also received a goodie bag which I’ll share with you guys on the next post, since this one is getting too long and too picture heavy. Anyways, don’t forget to check the Shu Uemura Indonesia counters in Jakarta on November 1st, 2012 for the MonShu launch! The sales rep and makeup artists from Shu will be wearing their MonShu outfits and makeup too, so be there and join the MonShu movement. :D

Shu Uemura Indonesia
Regina and I

Loki the Mischievious

I know that The Avengers trend is over, but I had to find a title for this look, thus I chose to use Loki as the title. I think this was a the right combination since Loki’s costume is filled with dark green and gold. I absolutely love how this look turned out! The green shadow just sparkles the right way and the gold is perfect.

Anyways! I know I’ve been MIA for a while. I have a very good reason (at least I think so..hhehehe). Some of you might know that I am also working full-time here, and one of the projects I’m currently working on is located in another city. So, I’ve been traveling back and forth, causing extreme exhaustion and lack of time to do tutorials/reviews. I am trying to at least update the blog once or twice a week.

I do have a few reviews that are yet to be posted, and I haven’t got time to post it yet. Hopefully, I’ll be able to do it soon, if not, please follow me on Twitter, Pinterest or Instagram (all of which are under Kirei Makeup) should you feel bored.

Anyhow! Let’s get on with the tutorial! :)

(click on each picture to enlarge it)

How-to:

1. I applied Urban Decay Primer Potion in Sin all over my eyelid all the way up to the brow bone.

2. Using MAC Engraved eyeliner, I lined my waterline, tightline, upper and lower lashlines. I used a pencil brush to smudge the liner.

3. Using MAC 212 brush, I applied Smashbox Serpent eyeshadow (from Smashbox Photo-Op trio in Quick Take) on the outer half of the lid. I used a MAC 219 to blend the edge.

4. Using the same MAC 212 brush, lightly applied L’oreal Color Infallible eyeshadow in Permanent Khaki.

5. I applied Smashbox 24k eyeshadow on the inner corner of the lid using a clean MAC 212 brush.

6. I applied step 2-5 on the lower lid using an angled brush. I also decided to add some warmth on my crease, so I applied a mix of Smashbox Contour and Bronze powder (from their contour palette) on my crease using a blending brush.

7. I lined my upper lashline with a winged/cat-eye liner using Kat Von D Trooper liquid liner.

8. I curled my lashes and applied Clinique Lash Power Curling mascara on both top and lower lashes.

9. I filled my brows lightly using Anastasia Express Brow Kit powder.

Smashbox 24K
Green and Gold eyeshadows

10. For the face, I applied Bobbi Brown BB cream using a Sigma Round Kabuki brush all over my face.

11. I applied L’oreal Magique Touche concealer under my eyes, and Chanel Eclat Lumiere as a highlighter.

12. Using a powder brush, I applied MAC Blot Powder on my T-zone.

13. I applied Benefit Hervana on my cheeks and Tarte Lipsurgence in Hope on my lips.

Loki Inspired Makeup
Green and Gold Eyeshadow

YSL Pure Chromatics no. 7

Finally, I get the chance to play with the Yves Saint Laurent Pure Chromatics quad that I bought during the YSL event a few weeks a go. As I’ve mentioned, I fell in love with the gold and reddish copper eyeshadows of the quad. On this tutorial, I’ll be using the eyeshadows dry. I also found out the names of each color: golden rose, golden pearl, golden orange and burnt red. The quad reminds me of sunset color.

Let me, first of all, mention that I love how the end result turned out. I was expecting a meeeeeh pigmentation since I’m applying the eyeshadow dry, but to be honest, I’ve to take my words back. The colors are amazing when you build them and they blend really nicely, applied very smoothly and very little fall-outs.

I’ve always find it difficult to wear this kind of reddish-copper (or as they call it – burnt red) eyeshadow since they always bring a lot of pinkish tone on my eyes, which make me look sick. However, this burnt red eyeshadow has hint of plum in it, and when I added the black, it shimmers beautifully (which, btw, the camera couldn’t pick up)

Anyhow! Let’s get the tutorial started!

(click on pictures to enlarge it)

YSL Pure Chromatics no. 7

1. I applied YSL Golden Rose eyeshadow from the quad on the inner corner of the eyes using a flat eyeshadow brush from Urban Decay.

2. Then, using another flat eyeshadow from Urban Decay, I applied the Golden Orange eyeshadow in the middle of the lid in a patting motion.

3. Taking a MAC 239 brush, I applied the Burnt Red eyeshadow on the outer V, blending it towards the crease.

3. Using a clean MAC 217 brush, I blended the edge of the shadow.

4. To add extra depth, I added a black eyeshadow just on the crease. I applied this with a very small shader brush (no brand).

5. I, then, picked up a little bit of the Burnt Red eyeshadow on my blending brush and applied the shadow on top of the Smashbox Blackout shadow. At this point, I added more of the Golden Orange and Golden Rose eyeshadows again.

6. Using a black kohl pencil liner like L’oreal Voluminous eyeliner, I lined my tightline and waterline.

7. I applied Burnt Red eyeshadow on the lower lid, leaving the inner 1/4 for the Golden Orange eyeshadow. I applied it using MAC 263 brush.

8. I curled my lashes and applied several coats of mascara on top and lower lashes.

9. I also filled in my brows by using Anastasia Brow Powder and MAC 266 brush.

10. I highlighted the brow bone by applying Golden Pearl eyeshadow from the quad using a clean blending brush from QUO.

YSL Summer 2012 eyeshadows

11. For the face, I applied MAC Face and Body foundation in C3 using a foundation brush from Cover FX. I also applied L’oreal Touche Magique concealer under my eyes to get rid of some of my dark circles.

12. Once the foundation dried, I applied YSL Cream Blush in no. 2 on my cheeks using a Sephora foundation brush.

13. I also applied L’oreal Magic Lumi using a clean foundation brush on my cheekbones, on the bridge of the nose and on my cupid’s bow.

14. I applied MAC Blot powder on my T-zone.

15. I also applied Benefit Hoola bronzer on the hollows of my cheeks and on my temples using an angled brush (similar to MAC 168 brush, but mine is no brand).

16. I completed the look by finishing it off with GOSH Nougat Lipstick and L’occitane clear lip balm.

YSL Rouge Pur Couture & YSL Pure Chromatics

As promised, here’s the 2 things that I bought from the YSL eventthat I attended last week! I bought the YSL Rouge Pur Couture in no. 17 and YSL Pure Chromatics in no. 7. As always, click on each picture to enlarge it 😀

YSL Eyeshadow Quad
YSL Rouge Pur Couture & YSL Pure Chromatics

The lipstick – YSL Rouge Pur Couture in no. 17 is a coral lipstick. You can apply this sheer almost like a balm or you can apply it as a lipstick. It has a satin finish, very moisturizing and has SPF 15. I’m not a big lipstick person myself, but I’d have to place this second on my favorite lip products (my no. 1 favorite lip product is Tarte Lipsurgence). This lipstick cost around Rp. 350,000 if I’m not wrong (about $35).

YSL Pure Colour Satiny Radiance
YSL Pure Colour Satiny Radiance no. 17
YSL Pure Color Satiny Radiance
YSL Rouge Pur Couture
YSL Rouge Pur Couture no. 17

The eyeshadow – YSL Pure Chromatics in no. 7 is actually the Spring/Summer 2012 collection that was just recently released in Indonesia. There were several quads, but I was attracted to this quad the most, I think due to that beautiful gold and copper-red eyeshadows in the palette. This quad cost Rp. 600,000 (about $60) in Indonesia. The eyeshadows can be used wet and dry.

YSL Pure Chromatics
YSL Pure Chromatics no. 7

As you can see from the swatches below, the colours definitely are more intense when it’s wet (wet is on top, dry is at the bottom). The 2 light colors are way too light for my skin-tone if I use it dry, it’s a pretty highlighter colors nevertheless. The gold and copper-red colors look gorgeous dry or wet. If only they make these shadows in the singles/monos, I think I’d definitely buy it 😛

YSL Pure Chromatics no. 7

YSL Grand Indonesia

Hi all!

First of all, I’d like to apologize for the lack of post since last week. Work has been busy, and to add to that so many things going on lately (positive :D )! Just to keep you all up-to-date first with a few things: 1) There will be some changes going on soon, the transferring to the new site has been quite bumpy and I still have a few technical difficulties that I need to sort out, 2) I’m back on Twitter baby! Please follow me @KireiMakeup! Gimme a shout-out, I promise I won’t bite :) .

Now, after the Shu Uemura invite to the dinner, I received another invite the following day by YSL to attend their new counter opening at Seibu in Grand Indonesia. To be honest, I’ve never seen an YSL counter in Jakarta yet since I just recently moved back. Curiosity got the best out of me and I asked Wiwin to come with me to Grand Indonesia to see the new counter, as well as to shop around :P

(as always, click to enlarge the picture)

YSL Grand Indonesia
YSL Grand Indonesia
YSL Grand Indonesia
YSL Grand Indonesia
YSL Grand Indonesia
YSL Grand Indonesia

YSL Lipsticks

YSL Lipgloss
YSL Lipgloss
YSL Lipstick Swatches

The girls who attended to us were nicely dressed and very friendly. One of the sales rep who was helping us, Sylvie, was so kind and helpful. She kept offering us to try on their products on our faces. However, since I already have makeup on, I decided to let Wiwin had all the fun. Sylvie applied a plum mascara on Wiwin, as well as a gold eyeliner (which she ended up buying!). So, with YSL, if you want to buy their products, they will do a consultation for you for free before you buy them to ensure that you will enjoy and use the products to its potential. Thus, there is no refund/exchanges allowed (unlike Canadians’ makeup counters where you can do a refund/exchange if you’re unhappy with your purchase). However, I really like the idea of free consultation before you buy the products, that way you can ask and get all the information you want/need to know before you buy it.

YSL Grand Indonesia
YSL Grand Indonesia
YSL Grand Indonesia
YSL Grand Indonesia

So YSL counters in Jakarta offered a private makeup class, where you pay Rp. 1,000,000 (about $100) to get your makeup done, and explained in details how to do your makeup (from skincare to makeup application). The money you’ve paid is redeemable towards products. I do have to say that the products themselves are quite expensive, so with that Rp. 1,000,000, you can probably get a quad eyeshadow (Rp. 600,000) and perhaps a mascara or lipstick (at Rp. 350,000)

YSL Grand Indonesia
YSL Grand Indonesia
YSL Summer 2012
YSL Summer 2012

Now, I do have to say that I’m very surprised that YSL Indonesia actually carries a larger range of shades of their foundations and, their most popular prized products, the Touche Eclat. I, myself, have already bought one before I left Canada. As you all have known, the Touche Eclat now comes in several shades, that it was very nice to see that YSL Indonesia carries all those shades!

YSL Grand Indonesia
YSL Grand Indonesia

Gemala, the YSL PR rep, informed me that since YSL in Indonesia carries a smaller range of skincare lines compared to other brands, they strive to bring in more range of makeup products into Indonesia. It’s really nice to finally see a well-known brand that finally carries a larger range of shades to cater the different skintones in Indonesia.

YSL Grand Indonesia
YSL Grand Indonesia

Anyhow, the event ended with a breaking fast together, however, since Wiwin and I had to go, we didn’t attend the dinner, but I’m sure it was fun! I mean, Wiwin and I spent about 1hr just browsing around the counter itself, talking to the people, getting to know the products and ended up buying them..hahaha..who can resist?

I do have to say that the prices are a little bit higher than what I usually pay for in Canada, may be there’s about $5-$10 difference. It is YSL and they do tend to be more expensive in North America, and they are even more expensive in Indonesia. I, myself, bought a summer quad and a coral lipstick (which I’ll share with you guys on the next post), and Wiwin bought a gold eyeliner. I received a Rp. 100,000 ($10) voucher from YSL, THANK YOU :D .

I also received a goodie bag which contained a few samples of their products – YSL touche eclat no. 1 and 2, and 3 shades of their lipsticks. Thank you once again YSL for inviting me to the opening of the counter! It was such a pleasant experience and I had fun getting to know more of the beauty industry in Indonesia. :)

YSL Goodie Bag
YSL Goodie Bag

Body Shop Shiso Cleansing Oil

Yesterday I went on a shopping spree with my sis. Both of us caught a cold, and what better way to make ourselves feel better than shopping? 😀 We just recently been re-united, since she left Canada 2 years a go while I stayed there for an extra 2 years to work. Back when we were students, we always go shopping together, looking for new products to try on and poke fun of each other. Yesterday reminded me of those days 🙂

Anyways! Let’s get back to the product part! Yesterday, my sis and I went to the Bodyshop store and we bought several products. One of which is the Shiso Cleansing Oil, which I bought for may be around Rp. 200.000 (or about $20) for 125ml. I realized that beauty products (makeup/skincare) in Indonesia is a little bit more expensive than Canada, might be due to the import tax.

So, it’s been a while since I’ve been to a Bodyshop, and yesterday I just found out that they’ve recently came out with a Shiso line, which is catered towards the Asian market. It is a whitening/brightening skincare line. The line includes cleanser, moisturizer, eye serum, mask, night treatment etc. One of the products which caught my attention was the Shiso Cleansing Oil.

Bodyshop Shiso Cleansing Oil

Bodyshop Shiso Cleansing Oil (picture courtesy of Bodyshop)

I’ve been using Shu Uemura cleansing oil to remove my makeup, but I recently ran out of it and the mall which carries Shu Uemura products are a bit out of the way from my place. So, when I found this product I was very excited to try it!

All you have to do to remove your makeup is:

1. Place some oil on your palm.

2. Rub it all over your DRY face in a massage-like motion.

3. I used a damped face towel to remove the impurities, but you can wash it off with water if you prefer.

4. Voila! Clean face, not over-dried and still feel moisturized! 🙂

Is it worth the money?

I think this product cost USD$15 in the States, so for that price, yeep. You don’t need much to remove your makeup, so definitely worth it, if you don’t want to spend $100 on Shu Uemura’s cleansing oil, or just want to give cleansing oil a try. Definitely will go back and buy this product again.

Cons?

The only thing with this product is that I find it not as “strong” in removing the Kat Von D Trooper liquid liner. BUT then again, I’ve yet to find any cleansing product that can remove the Kat Von D liner in just a single application. 🙂 That’s why I love that eyeliner…hahaha…:D

bodyshop shiso cleansing oil

On my hand: L’oreal Magique Concealer, Chanel Universal Bronzer, Tarte Lipsurgence, MAC Red lipliner, Kat Von D Trooper liquid liner

So, some of you might be skeptical about using oil to remove your makeup. Let me tell you something! It’s amazing! I’ve a combination skin and never once I’ve any issues of breaking out whenever I used oil to remove my makeup. It’s the opposite, my skin feels a lot more moisturized and not over-dried whenever I used cleansing oil. I’ve used Johnson’s Baby Oil, Shu Uemura cleansing oil and extra-virgin olive oil to remove my makeup.

Here’s the thing with the oily skin – your skin produce extra oil because it feels that the skin is too dry. Thus, to regulate it, the brain sends signal to the skin to produce extra oil so that it doesn’t feel dry. Now, if you can trick your skin and brain by sending signal that there’s enough oil on the skin, then you’ve interfered the signal from the brain to the skin. Therefore, you’ve stopped extra oil production since your brain now thinks that there’s enough oil on the skin. Taa-daaaah! Decrease production of extra sebum = less breakout!

It’s ok if you don’t understand what I’m trying to say above…lol…It’s just my personal experience using cleansing oil, and I’ve always have positive experience. It’s not scientifically proven, I don’t think so.

Anyways! I’d like to put it out there that I bought this product with my own money, and I’m not by any means being endorsed or sponsored by Bodyshop.

Guerlain Meteorites Powder for the Face

I’ve bought Guerlain Meteorites Powder probably a few long months a go. I’ve always be intriqued by this product, part of it because I always see my mom using it when I was a child. I couldn’t find the strength to pay close to cad$60 for a highlighter, afterall, there’s a lot of highlighters out there that promise the same thing – a glow from within.

Finally, not too long a go, I decided to buy this seemingly magical pearls that promise to deliver “pure radiance” (taken from Sephora website). I remembered I bought this in Winter. At that time, I had the extra money to splurge on a beauty product, and buying a Guerlain product was definitely on my wish-list.

So, what is Guerlain Meteorites? (excerpt below taken from Sephora website)

What it is:
An illuminating powder that delivers pure radiance.

What it does:
Inspired by light and created by Guerlain, Météorites Pearls employ the technology of white light, which is used in photography and film to erase imperfections and soften features. A constellation of 6 multi-colored pearls blend together for a flawless, radiant complexion. These pearls-with-a-purpose have now been reinvented in 3 color harmonies that are adapted to each skintone.

On the picture below, I didn’t show the different pearls, since it was taken when I first bought it. The different coloured pearls are hidden underneath the beige/bronzed ones. The 6 multi-colored pearls are: green, white, pink, purple, beige and brown. I bought Teint 02, and I believe its composition is made up of more of the beige and brown pearls than the green and white ones.

The packaging is beautiful, no it’s gorgeous! It comes in this silver tin with lovely flower design on the lid. It doesn’t feel cheap either, the tin is quite heavy and the lining inside is such a pretty colour. It comes with a powder puff, which I think is useless, but a nice touch. The powder puff helps to compact the pearls so they don’t move around much.

The smell of these pearls are wonderful! It definitely reminds me of my childhood, but it does not smell old or granny-like.

Does it work?

I don’t have a picture of me wearing it, but it doesn’t really show up much in pictures. May be on the next tutorial I’ll use the meteorites and upload it for you guys to see. It does, however, make a very subtle difference in real life. You can apply it all over your face or as a highlighter. In the winter, I used to apply it all over my face for extra radiance since the skin can look pretty dull. They are not overly shimmery or sparkly like some highlighter can do to your face, but they provide a pretty nice sheen. I think people with dry skin might benefit from this.

What doesn’t work?

It’s pricy! I bought this because it reminded me of my Mom, and because I’ve extra cash to splurge. However, other than that, I doubt I’ll buy it again. I mean, it is a classic product though, but holy guacamole, it’s expensive. Also, the product is quite bulky. They’ve released a compact version of this product, and if I were to buy it again, I might buy the compact, but yet may be I won’t. I also like the pearls..hahahaha 😛 I’m such a sucker for the package!

Click on picture to enlarge it

guerlain meteorites

All That Glitters

Lights are still not up :(…Last week was a busy week for me with work and all that. I’ve decided to de-activate my Twitter account for personal reasons, so that’s the reasons as to why you might not be able to find me on twitter anymore. Please follow me on Pinterest or Like my Facebook Page for updates.

I’m also still working on moving my blog to a self-hosted site, and working on a new header image. If anyone is interested in taking makeup classes, please feel free to contact me at jilly.ijoe@gmail.com.

Anyhow! Let’s get back to makeup. Today’s tutorial I wanted to use my old MAC Reflect pigment. I loved this glitter! It has a teal undertone, so if you put a dark base underneath it, you can see the teal shining so prettily. I paired it with an earthy crease so to not overpower the glitter. The brown colour on the crease is there to add depth to the eyes. I think this is the perfect look if you want to play with glitter but not go overboard with it.

How-to:

1. I applied L’oreal Magique Concealer underneath my eyes and all over the eyelid to prep the eyes.

2. Using a clean blending brush, I applied Urban Decay Darkhorse on my crease.

3. Using a clean flat eyeshadow brush, I applied MAC Reflect Transparent Teal on the eyelid, pressing it slowly to the lid.

4. Taking Urban Decay eyeliner in Perversion, I ran this liner on my waterline and tightline.

5. Using a pencil brush, I smudged the liner on the bottom lid.

6. I applied MAC Reflect Transparent Teal on the lower lid using a small angled brush.

7. I curled my lashes and applied several coats of Cover Girl Lash Blast 24-hr mascara.

8. I filled my brows using Anastasia Express Brow Kit.

9. Once I completed my eyes, I proceeded in applying MAC Face and Body foundation all over my face using Sigma Round Kabuki Brush.

10. I applied Benefit Hervana lightly on my cheeks and top my lips off by applying Tarte Lipsurgence in Hope.

MAC Reflect TealTeal Glitter Makeup

Purple Haze

So, I’m having a difficulty taking the close up pictures since the lights aren’t ready for use yet, which explains why the pictures are of different colours. I tried my best to adjust the colours without affecting the eyeshadow colours.

Anyways, I actually wasn’t quite sure how this look would turn out since I mixed warm purple with cool purple. But, the final result turns out to be quite pretty don’t you think? It’s wearable too. 🙂

Eyes:

1. I prepped my eyes by applying MAC Beige-ing paint stick all over my eyelid.

2. Using a flat eyeshadow brush, I applied NYX Frosted Lilac on the inner corner of my lid.

3. Next, I added NYX Deep Purple lightly in the middle lid.

4. Using a clean blending brush, I applied Makeup Forever #92 on the outer corner and crease lightly.

5. I applied a purple eyeliner from Makeup Forever on my lower lid.

6. Using a clean small shader brush (or you can use a pencil brush), I smudged the liner slightly.

7. Using the same brush as step 6, I applied MAC Stars ‘n Rockets on my lower lid.

8. Then, I decided to deepen the crease shade by applying MUFE #92 using the same brush as step 6 and 7.

9. Using an angled eyeliner brush, I applied winged liners using a black gel liner from MUFE.

10. I lined my waterline using whatever is left on the eyeliner brush, and applied mascara on both top and lower lashes.

Makeup For Ever purple eyeshadow

Face:

1. I applied MAC Studio Tech foundation all over my face using Sigma Round Kabuki brush.

2. Then, I applied MAC Cubic blush on my cheeks.

3. I completed the look by applying a sheer lip balm.


Purple smoky eyes with MUFE 92