Pretty in Pink and Purple

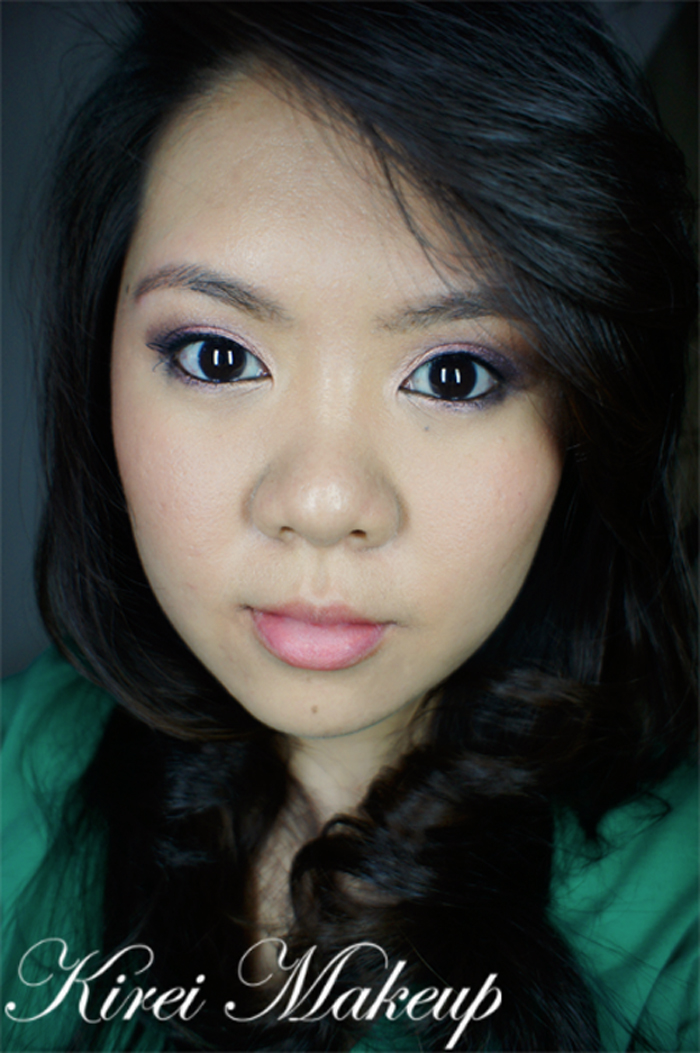
Hola! Today’s tutorial is perfect for Valentine’s Day. The pink and purple combination spells romance and it’s wearable enough to be worn on a date. The look turned out better than expected. The purple blends very nicely into the pink and I took may be about 30mins to complete the whole makeup.

How-to:

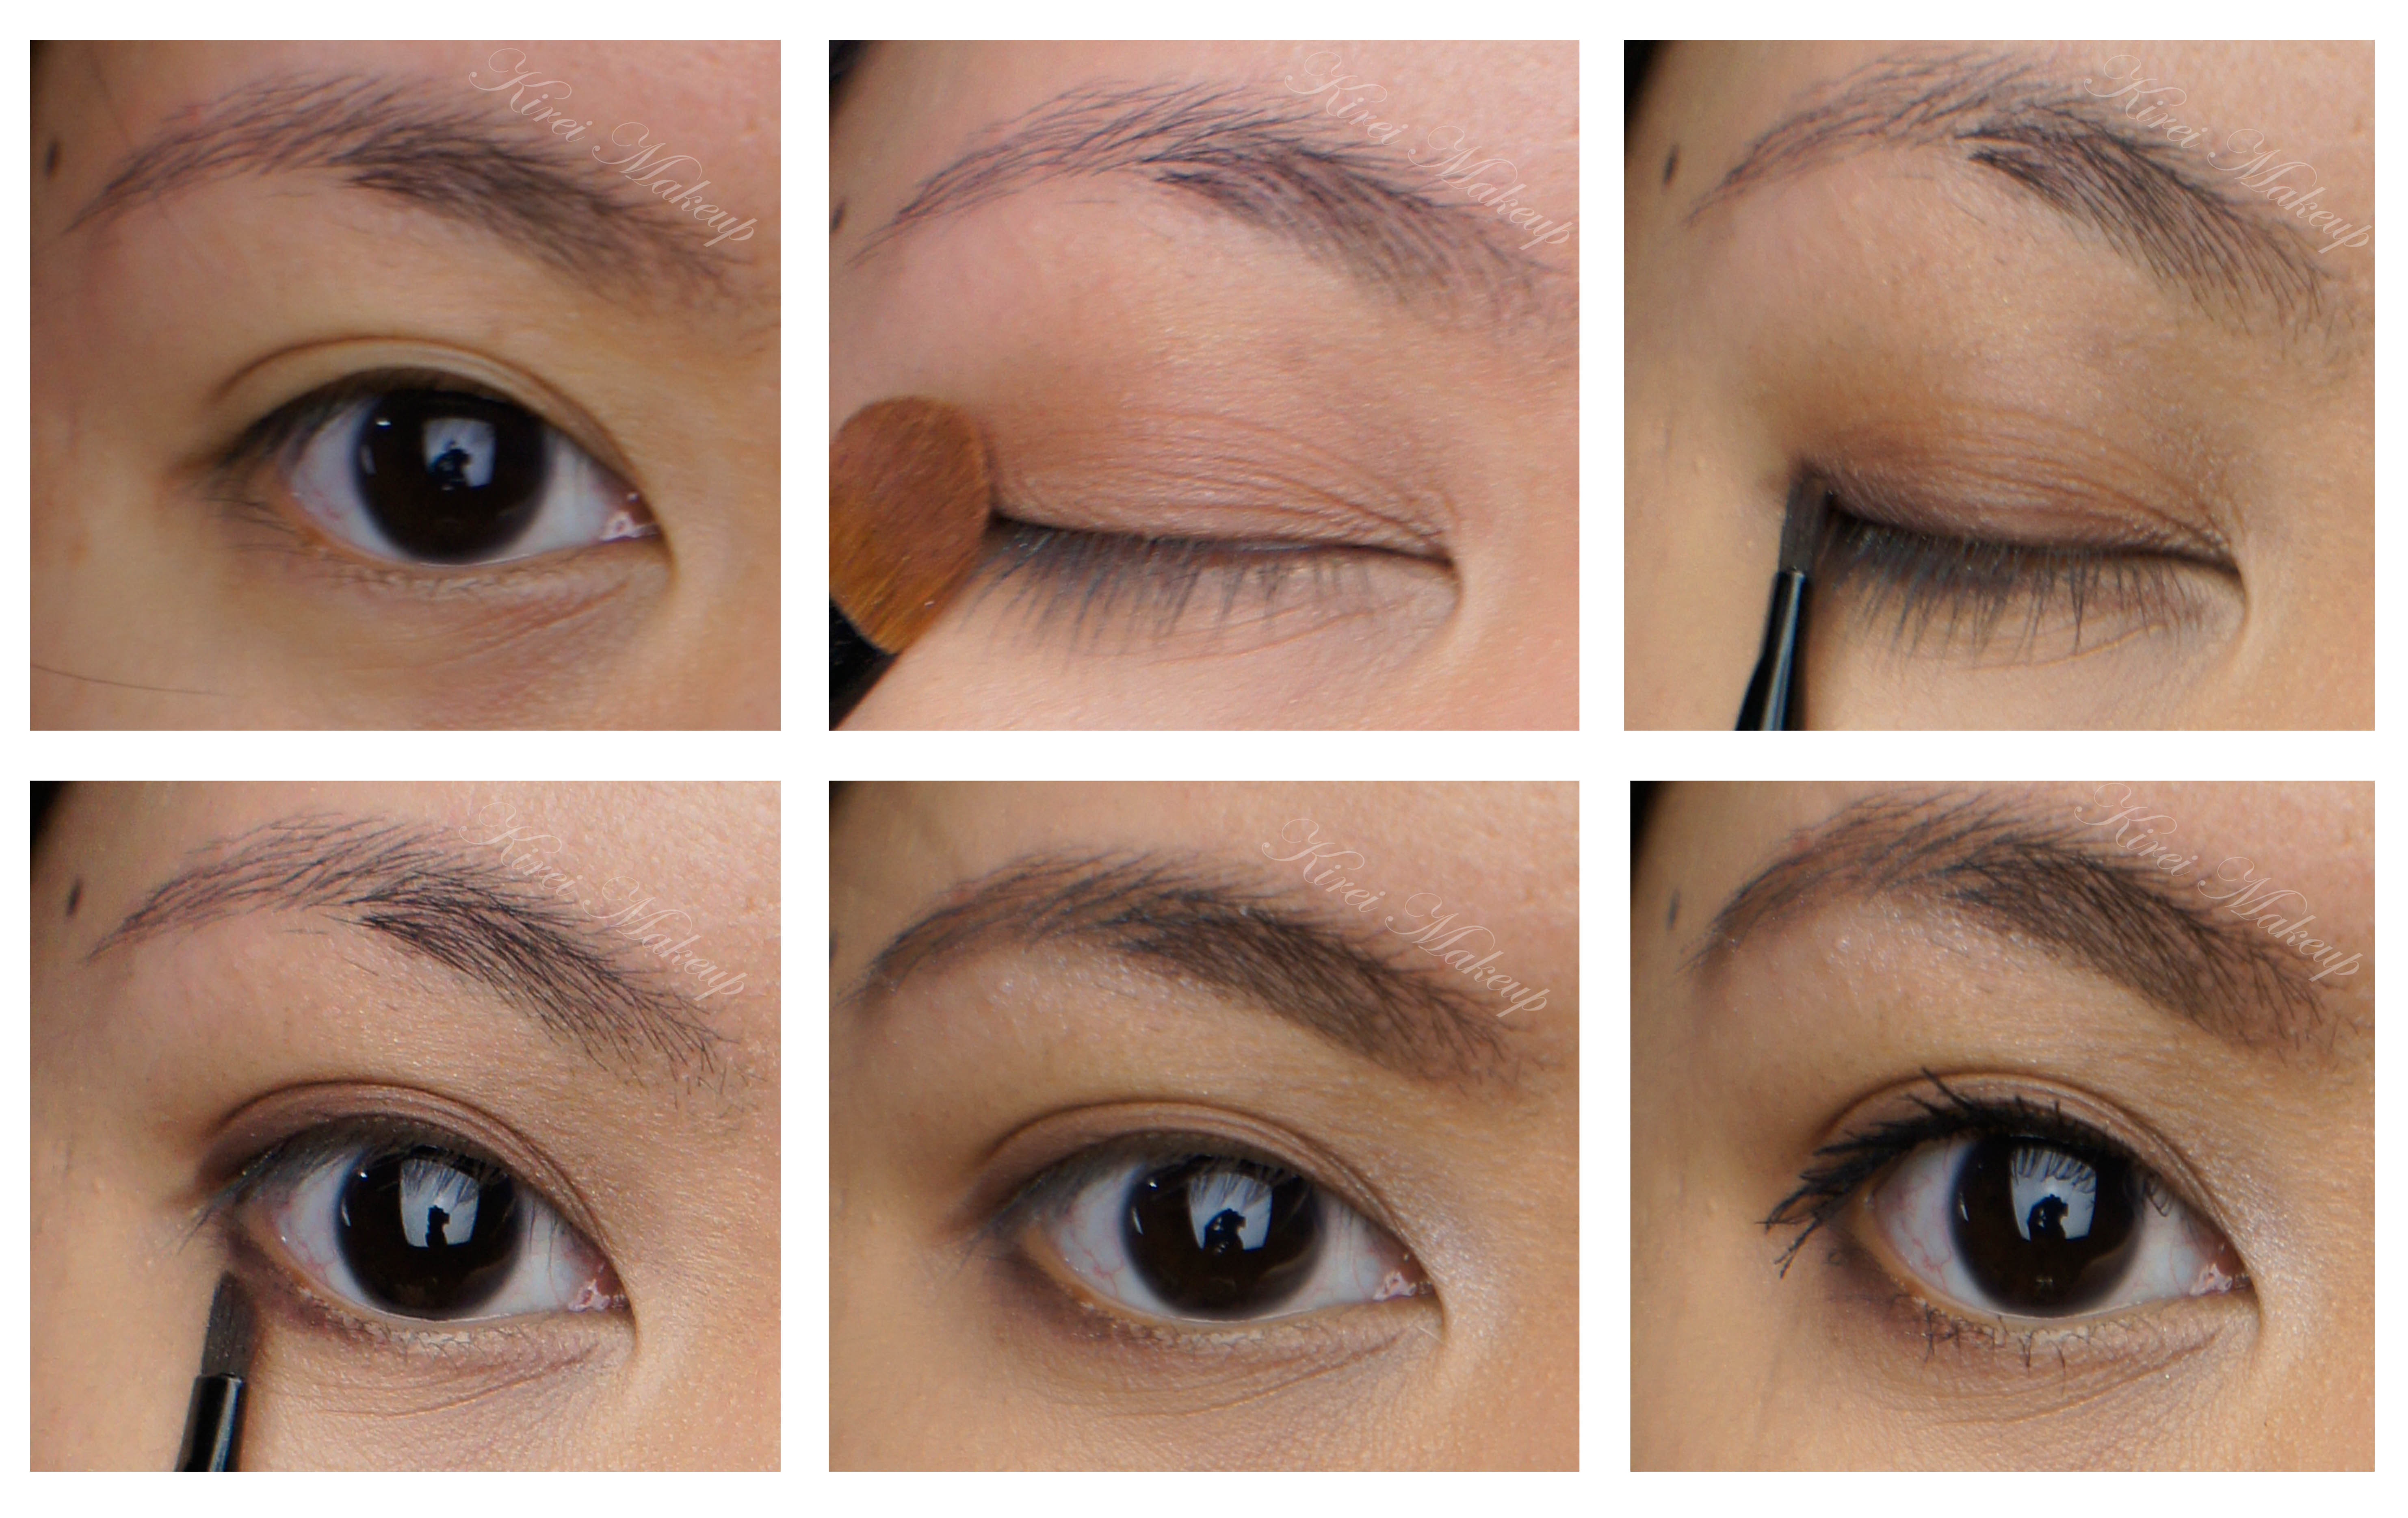
1. I applied Urban Decay Primer Potion all over my lid.

2. For the pink eyeshadow, I used the Burgundy from Smashbox Flash palette on my lid with a flat eyeshadow brush.

3. On the outer V, I gently pat L’oreal Infallible eyeshadow in Purple Obsession using a flat eyeshadow brush.

4. Using a clean blending brush, I blended the crease ensuring there’s no harsh line.

5. Using a small angled brush, I applied Purple Obsession on the outer half of the lower lid and Peachy from Smashbox Flash palette on the inner half of the lower lid.

6. I also applied Peachy lightly on the inner corner of the upper eyelid.

7. Using L’oreal Voluminous Smoldering eyeliner on the waterline and tightline.

8. I curled my lashes using Shu Uemura eyelash curler and applied L’oreal Voluminous Carbon Black mascara on both top and bottom lashes.

9. I filled my brows lightly using Anastasia Brow Wiz in Brunette.

L'oreal Infallible eyeshadow

10. For the face, I applied L’oreal Magic Lumi foundation all over my face using Shiseido foundation brush.

11. For under the eyes, I applied Smashbox Camera Ready Full Coverage stick concealer.

12. I applied MAC Fleur Power on the cheeks and applied Revlon Just Bitten in Charmed on my lips to complete the look.

pink and purple makeup

Peachy

How was everyone’s weekend? I hope you guys are staying warm and comfy! Today’s tutorial is a look using Smashbox Focal Point trio eyeshadow quad. I’ve done an easy look using this trio last year in this post, I thought I’d give this product another shot for a different look this year since I’ve barely touch it lately.

This look is pretty warm and quite mostly asked by the Asian brides. I think peaches and corals look great on everyone. Anyhow let’s get down to the tutorial!

How-to:

1. I applied the Flamingo from Smashbox Focal Point trio all over my eyelid using a flat eyeshadow brush.

2. Using the same eyeshadow brush, I applied L’oreal Infallible eyeshadow in Pepsy Coral on top of the Flamingo for extra coral-ness.

3. Using Java from the Focal Point trio from Smashbox, I applied in with a blending brush on the outer V and on the crease.

4. I applied a winged liner using a small angled brush and Make Up For Ever aqua black gel liner on the upper lashline

5. Using whatever is left on the brush, I applied the gel liner on my waterline.

6. Using a clean angled brush, I applied Java on the outer 3/4 of the lower lid.

7. Using a pencil brush, I applied Champagne from the trio on the inner corner of the eyelid, as well as the inner quarter of the lower lid.

8. I filled my brows using Anastasia Brow Wiz in Brunette.

9. I curled my lashes and applied Tarte Camera, Lights and Lashes mascara on both top and lower lashes.

Smashbox Focal Point

9. For the face, I applied L’oreal Tru Match foundation all over using Shiseido foundation brush.

10. For the cheeks, I applied MAC Well-Dressed lightly.

11. For the lips, I applied Revlon Just Bitten lip balm in Charmed.

Asian bridal makeup


Feather Nails

I was on Pinterest couple days a go (I’m always on Pinterest) when I stumbled upon a Feather Nails image, then my ipad decided to shut down my Pinterest app on me. Since I have a bunch of feathers that I bought and never used, I decided to do the feather nails. My first try wasn’t that great (posted it on my instagram), but my second try turned out pretty good.

All you need it:

1. Clear nail polish – I used Sally Hansen quick dry top

2. Cuticle scissors

3. Feathers

If you want to do a color as base you can do that too šŸ™‚

Do one nail at a time.Ā To make as little mess as possible, I used a napkin on the desk. This will help you to clean up after too.

How-to:

1. Apply a layer of clear (or colored) nail polish on your nail as a base.

2. Wait for about 20-30seconds and then put the feather on your nail.

Feather Nail Polish

3. The feather should be sticking to your nail, press it down lightly with your finger (or an orange stick).

4. Let it rest for about 30seconds and then use the cuticle scissor to trim the excess feather.

Feather Nail Art

5. Trim as closely as you can to your nail and apply another layer of clear nail polish.

Feather Nails

6. If you don’t want the feather texture to show up on the nail, apply 2 or 3 coats of clear nail polish on top of the feather. It’ll be super smooth.

Feather Nail Art

OCC Lip Tars – swatches

As promised, here’s my OCC Lip Tars collection. I didn’t swatch the black and white lip tars cause obviously it’s just white and black šŸ˜›

So the black and white lip tars are called True Black and True White. The purpose of those lip tars are to darken (True Black) and to lighten (True White) any lip tars. Vintage, as mentioned on the previous post is a deep-true burgundy colour.

The lip tars below are purchased from Sephora at Eaton Center. I believe if you buy the lip tars from Sephora’s website, they also come in the little pouch with a lip brush.

OCC lip tars

In the pouch, there’s a little instruction on how to apply the lip tar, which is nice. I might get the OCC Clear Lip Tar next time I get the chance to. šŸ˜€

OCC lip tars

So you’ve seen the other 3 lip tars that I’ve bought during IMATS. No, they don’t come in the little pouches, so I just have to use my own lip brushes to apply these. Anyways, from the L to R: Vintage, Queen, Stalker and Strumpet.

Queen is a Bright Coral Pink, Stalker is a True-Red and Strumpet is a Deep-Red Burgundy.

OCC lip tars

You just need a teeeensie-weeensie dot of the lip tars and wa-lah (read: voila)!

OCC lip tars

For Vintage and Stalker I’ve done tutorials on it šŸ™‚

OCC lip tars

I cannot say enough how much I love these lip tars!

Pros:

  • Reasonable price – for $16 (sephora and occ websites) you get 0.33oz.
  • Very pigmented
  • A little bit goes a long way
  • Long-lasting
  • Vegan
  • Contains peppermint oil – which has a great smell
  • Not drying
  • Comes in a range of colours
  • Lip tars can be mixed to create your own colour.
  • Comes in a squeeze tube which is great for the kit and also hygienic.

Cons:

  • Can only be bought from OCC website for International locations as far as I know.
  • Might stain your lips (or other stuffs) since it’s super pigmented.
  • Can’t be used on the eyes (due to the peppermint oil)


Vintage Red

My love for OCC lip tars grows stronger every day! I’ve never been the “lipstick” kinda gal but I have a certain fondness for anything red lips. So, I’ve another version of the red lips look using OCC lip tars in Stalker. In this tutorial, I’m using OCC lip tars in Vintage. Stalker is blue red, while Vintage is burgundy red.

I bought mine from Sephora Eaton Center in Toronto. It comes in a small pouch with a small lip brush (I’ll do swatches and all that jazz on my next post).

For the look, the eyes are kept to a bare minimum and I skipped the winged liner. The face is dewy with a little contour. I love how the look turned out. The look is wearable for party or a night-out, or even bridal makeup!

Make sure to re-check the blush after you complete the lips. Since the lip color is quite strong, you might need to add more blush so your face don’t look wash-out.

How-to:

1. I applied L’oreal Magic Lumi foundation with my fingers. I applied it on the center of my face, blending it outwards.

2. I applied Bobbi Brown Corrector in Peach under my eyes, tapping it using my ring finger.

3. I applied L’oreal Magic Touche Concealer on my blemishes and under my eyes.

4. I powdered my T-zone with Cinema Secret loose powder and a tapered face brush.

Brown eyeshadow

5. For the eyes, I applied the light brown eyeshadow from L’oreal Paris Good Luck Charm quad eyeshadow with a flat eyeshadow brush, and blended the crease using a clean blending brush.

6. I applied the dark brown eyeshadow from L’oreal Paris Good Luck Charm along my upper lash line and lower lash line using an angled brush.

7. I used a clean blending brush and applied the highlighter color from L’oreal Paris Good Luck Charm quad under the brow.

8. Using whatever is left on the brush, I applied the highlighter color on the inner corner of my eyelid.

9. I curled my lashes and applied Lā€™oreal Telescopic Shocking Extension mascara on both upper and lower lashes.

10.Ā  I filled my brows using an angled brush and a mix of MAC Omega + MAC Brun.

OCC Lip Tars Vintage

11. Using a face fan brush, I applied Smashbox Fusion Soft Lights in Baked Stardust on the cheekbones.

12. Using the same fan brush, I applied MACĀ  Sculpting Powder in Shadowy on the hollows of the cheeks.

13. Using a blush brush, I applied a mixture of MAC Cubic and MAC Fleur Powder on the cheeks.

14. Using the lip brush that comes with the OCC Lip Tar, I applied OCC Vintage lip tar on my lips.

  • I applied a thin layer at first on the center of the lips.
  • Using whatever is on the brush, I traced the outline of my lips to make sure I like the shape.
  • I applied another thin layer to complete the look.


Lā€™oreal Paris Good Luck Charm

Sprained neck is no fun! I could barely move for several days and my shoulder was so sore. Anyways, to cheer myself and put me out of misery I decided to go grab a makeup product (bahahahaha). I bought myself a Maybelline Colour Tattoo in Inked in Pink. I love it!

As you guys know, I received this Lā€™oreal Paris Good Luck Charm eyeshadow from the Lā€™oreal Paris Canada eventā€™s goodie bag. As mentioned, I felt that the pink shadow doesnā€™t really show up on my skin-tone, so I decided to layer the Maybelline Colour Tattoo Think in Pink underneath Lā€™oreal Good Luck Charm.

Iā€™m usually quite wary about pink eyeshadow since it can make one look sickly, but the gold in the shadow quad makes it workable, usable and wearable.

How-to:

1. I applied Maybelline Inked in Pink all over the eyelid using my ring finger.

2. Using a flat eyeshadow brush, I applied the pink eyeshadow from Lā€™oreal Good Luck Charm quad.

3. Using a blending brush, I applied the light brown eyeshadow from Lā€™oreal Good Luck Charm quad on the crease.

4. Using a small shader brush, I applied the darkest brown eyeshadow from Good Luck Charm quad on the outer corner and on the crease.

5. Using a clean blending brush, I blended the brown eyeshadow to the light brown eyeshadow.

6. Using a clean flat eyeshadow brush, I applied the highlighter color from the quad under my brows.

7. I filled my brows using Anastasia Brow Wiz in Brunette, curled my lashes and applied mascara.

pink and brown makeup

8. For the face, I applied Urban Decay Naked foundation all over my face using a foundation brush.

9. For the cheeks, I applied Lā€™oreal Rose Gold blush using a clean foundation brush.

10. For the lips, I applied Lā€™orealĀ Colour Riche Caresse Shine Stain Lipcolour in Extremely Nude.

Maybelline Inked in Pink

Caruso Hair Steam Setter

I think that heat tools pretty much suck the moisture out of the hair, since the heat evaporates the water in your hair. Obviously thereā€™s lots of heat-protectant spray and such, but I believe that itā€™s better to prevent it from happening than having to try to ā€œhealā€ it after the damage has occurred.

I tried the whole ā€œsleep-with-your-hair-wet-in bunsā€ but really, my fine hair loses any type of volume and it just becomes super flat and limp. One of my favorite fashion bloggers, Wendy Nguyen (from Wendyā€™s Lookbook), had a video where she used Caruso Hair Steam Setter to create curls.

Caruso Hair Steamer

(image is courtesy of Amazon)

I got really curious and I was able to get my hands on the Caruso Hair Steamer from Amazon for a very good price: cad$35.44 (tax included) for the Professional 30 rollers set. I think itā€™s more expensive now, but still, pretty cheap :)

So, the rollers are made from foam and you heat it up using water. How it works is that the heated water evaporates, causing hot steam that seep through the foam rollers. You put your hair on these rollers, wait for 3-minute (or leave it on when you do your makeup), and voila! Volume and curls!

Hair Rollers

These rollers donā€™t give much volume. It gives just enough and I love how the curls end up. I also feel that since it uses steam, it does less damage to the hair. It actually gives the hair more moisture instead of sucking the moisture out of it.

Curling asian hair

The rollers are also waaay cheaper than the Babyliss hot rollers or The O velcro hot rollers. If youā€™re just starting or want to give rollers a try, you should keep this roller set in mind. I love the big bouncy curls and how I donā€™t have to put extra styling product on my hair.

Please keep in mind that I purchased this using my own money and Iā€™m not sponsored by Caruso.

IMATS Toronto 2012

Hello Canada! Guess whoā€™s back?! I managed to get into IMATS on its last day together with N. I thought Iā€™d miss this yearā€™s IMATS like last year, but I didnā€™t! yay! Iā€™ve been to IMATS and volunteered a few years back. Iā€™ve expected the usual exhibitors and was pumped to see this yearā€™s classes and workshops! Iā€™m quite surprised to see that this yearā€™s IMATS werenā€™t as big as in the past. Less bloggers too, I feel. Anyways, I was quite happy I get to join this yearā€™s IMATS :D

IMATS

There were obviously lots of exhibitors in the event. I went there knowing I was going to grab some stuffs from OCC. I love their lip tars and I couldnā€™t wait to get my hands on it!

OCC Lip Tars

Truly, we were there not to shop, but to actually sit on 2 of the classes – Gordon Smith and Iantha Goldberg. If you guys donā€™t know who Gordon Smith is, SHAME ON YOU! hahahaha..just kidding. Gordon Smith is like the Prosthetic god in the makeup world. He pioneered the use of Silicone in prosthetics makeup. He worked with celebrities and big Hollywood movies like X-men (thatā€™s right, heā€™s the Mastermind behind Mystique), Platoon, Face Off, Mimic, Truman, Nixon and helloo my favorite tv show FRINGE, and many others! N and I are a big fan of the shows that he worked on and we were definitely uber excited when we get to see him in person, and to hear him talk about his work. Amazziiiing!

Gordon Smith

So after we sat in for Gordonā€™s, we had to rush to the other stage so we can get front row seat for Iantha Goldbergā€™s demo in doing Zombie Makeup! Iantha Goldberg is the makeup artist for Resident Evil, Scott Pilgrim vs The World, Saw V etc. Hmmm, amazing much?

Zombie Makeup

After the show, we walked around and shopped a bit more. Lots of body painting as usual, and of course the studentā€™s competition is always great. I only managed to take pictures of 2 of the works, but as you can see, they are amazing!

IMATS Student Competition

IMATS Toronto 2012

IMATS Toronto

Make Up For Ever Body Painting

Body Painting

Alternative to Latex & Zombie

Okay! So, if you guys followed my twitter, you should know Iā€™ve been looking for liquid latex in Jakarta. I went to the Chemical store and they donā€™t have any :( ā€¦I didnā€™t really want to use my eyelash glue since I only have so little left. So, I wanted to do my own gelatin pieces, but canā€™t find glycerine around my area, and my microwave is bustedā€¦Nevertheless, I didnā€™t want to give up and I throught may be I can use Elmerā€™s glue! Well, thereā€™s no elmerā€™s brand in Jakarta, so I went to the bookstore and bought a white liquid glueā€¦

I went home, tried it on myself and it worked! Not perfectly, but it worked!Ā  Oh, let me just say that you can wash this off with water and soap, it comes out pretty easily.

So here comes my brother, James as zombie :) Itā€™s not how Iā€™d love to do it, but itā€™s cheap and easy..not gory enough, but we had to rush it cause we had to go..oh well..here goes! :)

How-to:

1. I applied a very light foundation on Jamesā€™ face. Heā€™s pretty tanned, and I used Lā€™oreal Tru Match foundation in W2. It looked extra white on his face..hahaha..oh well..I applied the foundation using a dry sponge and applied it quite messily. I donā€™t think zombie needs to have a flawless base..

2. Using PAC Face Paints makeup, I mixed red and dark blue to make purple paint. I applied it lightly under his eyes, along his lid using a Laura Mercier concealer brush.

3. Using a clean blending brush, I applied PAC brown face paints lightly on the crease, under eyes, side of his nose and sides of his nostrils.Zombie makeup

4. Using PAC yellow face paint and a dry sponge, I stippled some yellow face paint on his face on random places.

5. Using another blending brush (and a face angled contour brush), I applied MAC Scene all over the face in places where I want his features to looked sunken in (crease, side of nose, cheekbones, jawline, jawal etc).

6. Now for the fun part, I applied white craft glue on his face using a cheap disposable paint brush. I applied a light cover, let it dry for a few seconds and randomly I tore out cotton balls and applied it on his face. Once Iā€™m happy with the shape, I applied more glue on top of the cotton.

TIP: The messier the better!

Zombie makeup

7. I applied liquid foundation, add some grey eyeshadow, brown eyeshadow, Snazaroo face paints and just make a big mess :)

8. Since we were rushing and didnā€™t have the product, we didnā€™t add blood. HOWEVER, you can make your own blood by adding red/orange food coloring to corn syrup. Just make everything looks nasty, thatā€™s how zombies areā€¦Also, get white contacts if you can to add to the look, James is scared of wearing contacts, he never had to, so he didnā€™t want toā€¦

Zombie makeup

Half and Half

As always, this yearā€™s Halloween isnā€™t complete if I donā€™t do a Skull makeup. This year Iā€™m doing half pretty makeup and half skull makeup on my face. I used a skull photo from Google as reference, but I think Iā€™ve might have made a mistake on the lower jaw. Oh well, next year will be better! :)

Also, Iā€™d like to give a shout out to my cousin, Juicerna who sold me the lovely white contact lens for me to use in the tutorial. If youā€™re in Indonesia and would like to purchase one of these lenses, please go to her facebook page. I bought mine for Rp. 160.000 (plus delivery) and received in within 2 days. Oh, if youā€™re not used with wearing contact lenses, you might want to wear it before the makeup application as it might mess your makeup if you put it after.

Anyways, letā€™s get the tutorial started!

1. Google a skull picture and closely study the structure of the skull.

2. Using a black pencil liner, I used one from Physicianā€™s Formula, I started outlining the structure of my face. This line will serve as a border between dark areas and bone areas.

skeleton makeup3. Once youā€™re satisfied with your outline, fill in the bone area using a flat eyeshadow brush. I used a white cream product from PAC since I find it easier to blend, but you can use water-activated face-paint like Snazaroo or Kryolan or MAC.

skull makeup

4. When youā€™ve finished filling in the white, use a clean flat eyeshadow brush and applied the black makeup on the hollow areas.

5. Add some shading using a small angled brush and MAC Omega/Brun mixture on the areas where the white and black meet.

half skull makeup6. For the teeth area, I filled in the teeth with a small shader brush. Using a clean angled brush and a black eyeshadow, I re-lined the teeth outline.

skull makeup


half skull makeup8. To avoid creasing, I generously applied translucent powder all over my face. For the black area, if you want you can apply black eyeshadow on top of it to make it even darker, but be careful during application since the black eyeshadow might fall on the white part and cause a mess.

half skull makeup