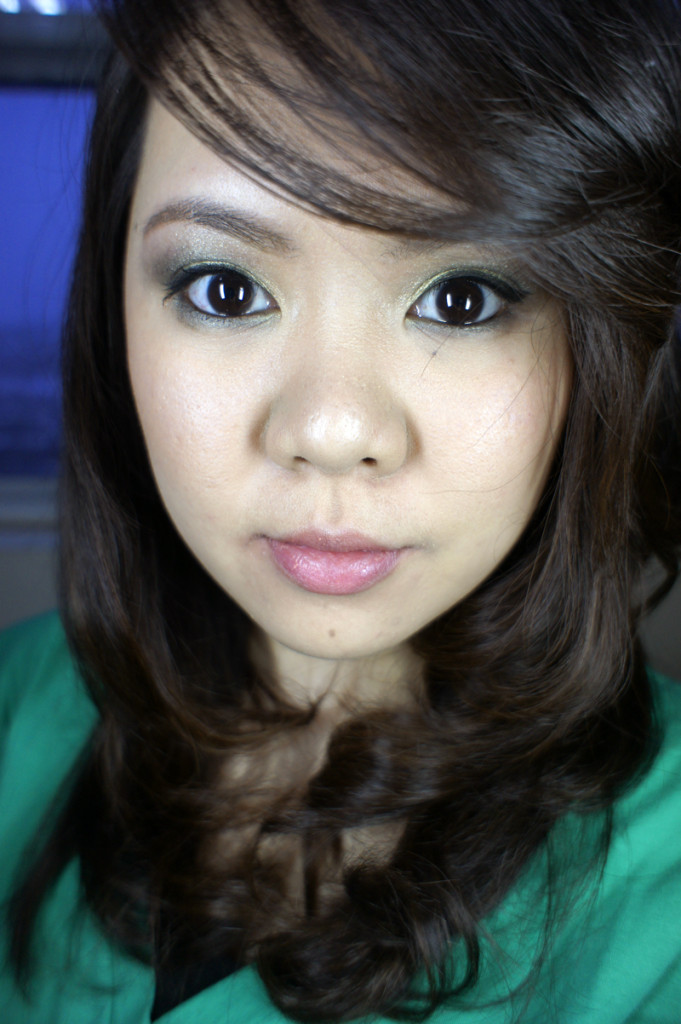
Marylin Inspired

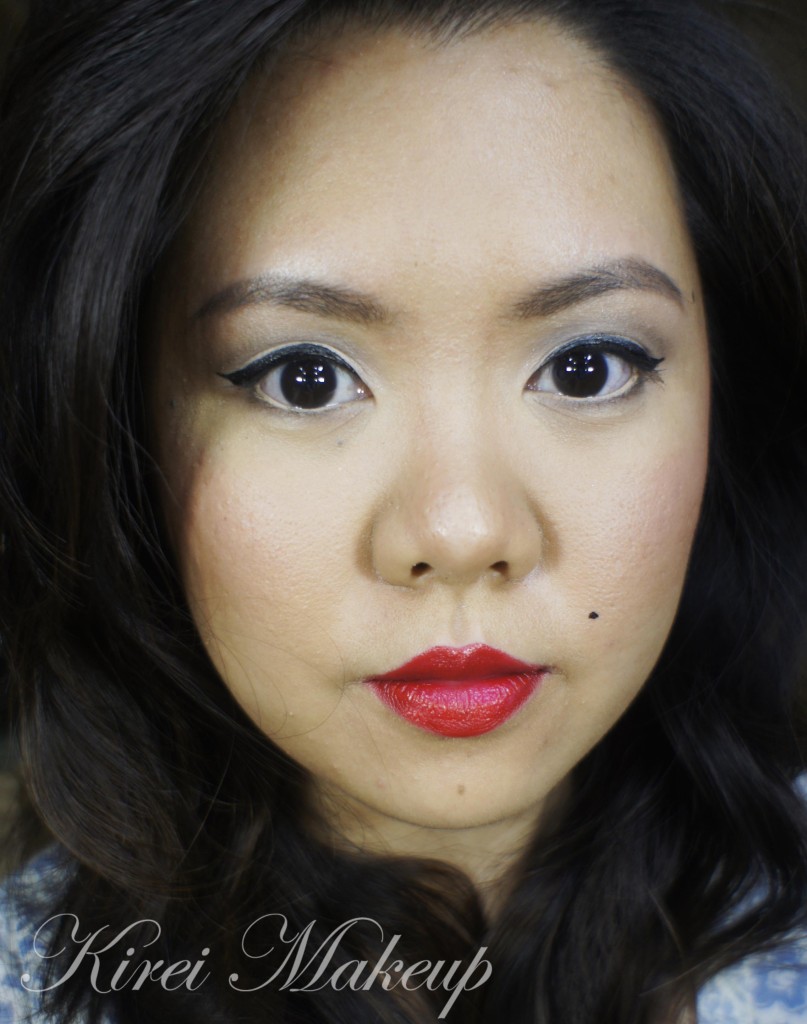
Hellow! I’m back this week with a 50s inspired makeup! Actually there’s a beauty blogger challenge this month in which the theme was Dazzling like Marylin. I’m not sure if I’m gonna join the challenge, I was just running out of some inspiration for tutorials, thus why I made this tutorial..hahaha.. 😛

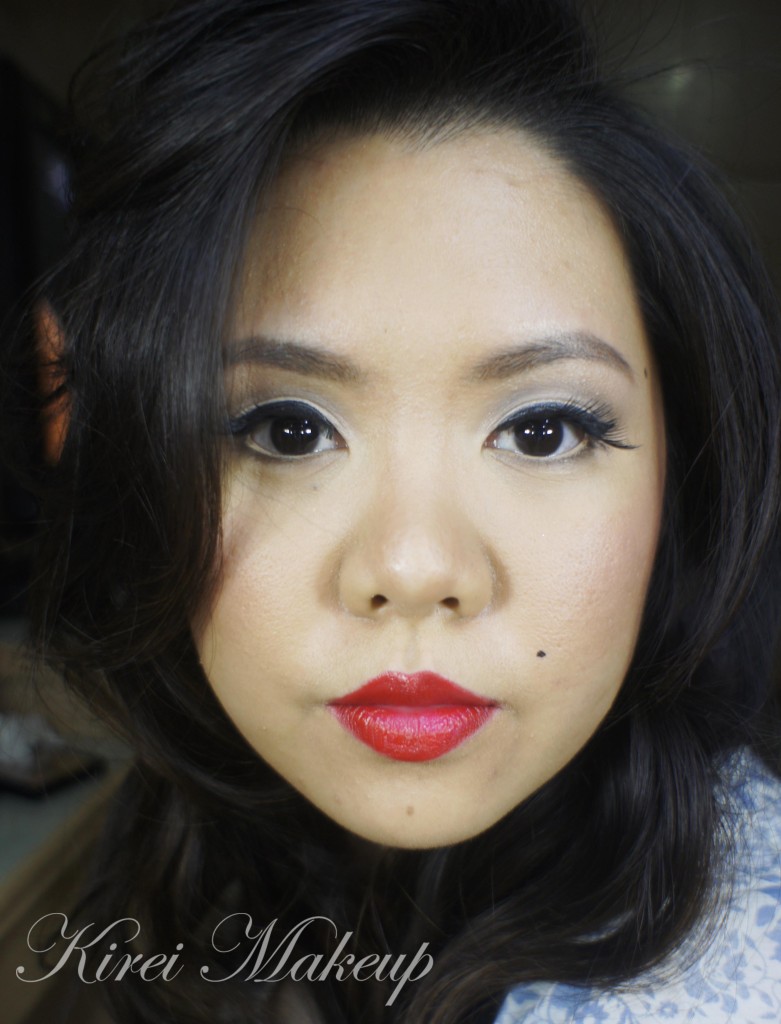
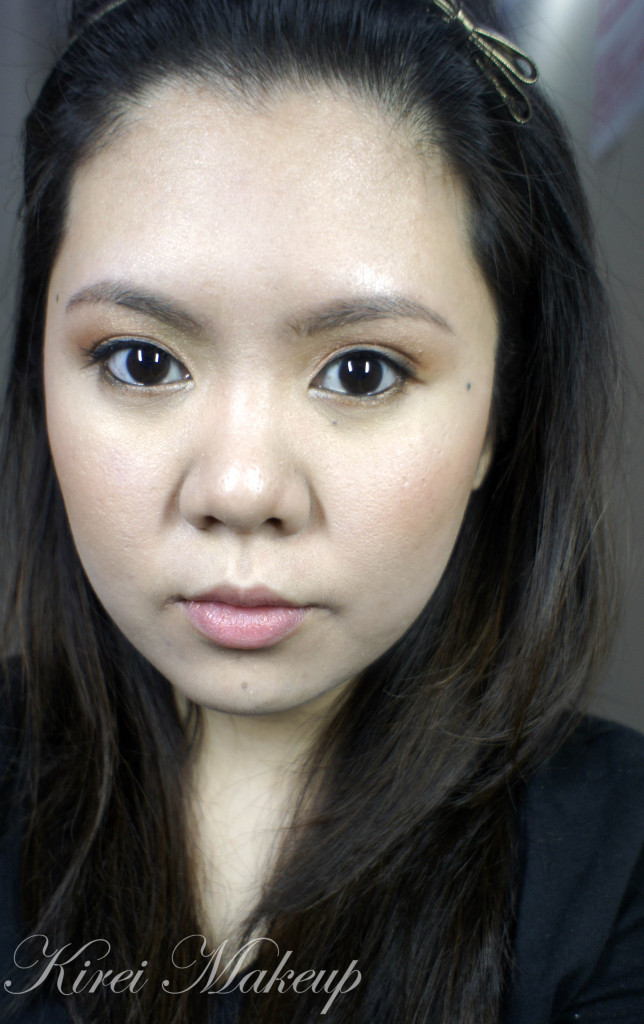
Anyways, as we all know Marylin Monroe is an icon. The first image that comes to mind when someone said Marylin is probably her gorgeous smile, red lips and those sleepy eyes, and obviously her blonde hair. OBVIOUSLY, I’m not Marylin, nor do I look like her. This is an inspired makeup, not supposed to look exactly like her. I’ve to adjust the makeup to suit my face.

I wanted to do the falsies with individual lashes, but I’ve run out of it, so I had to use this one with long wispy corner at the end from Make Up For Ever. The brows in the 50s are more triangular shaped, so I had to re-shape my brows a little since mine aren’t angular.

How-t0:

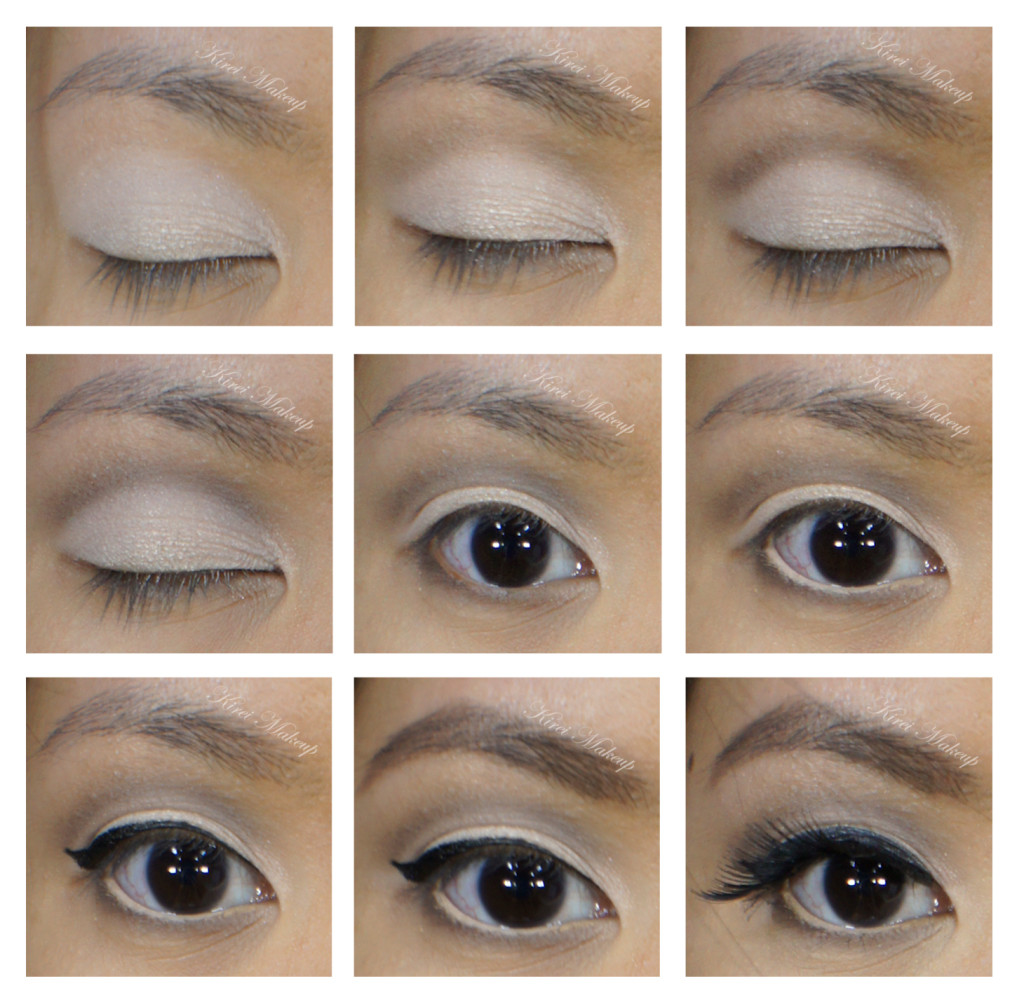
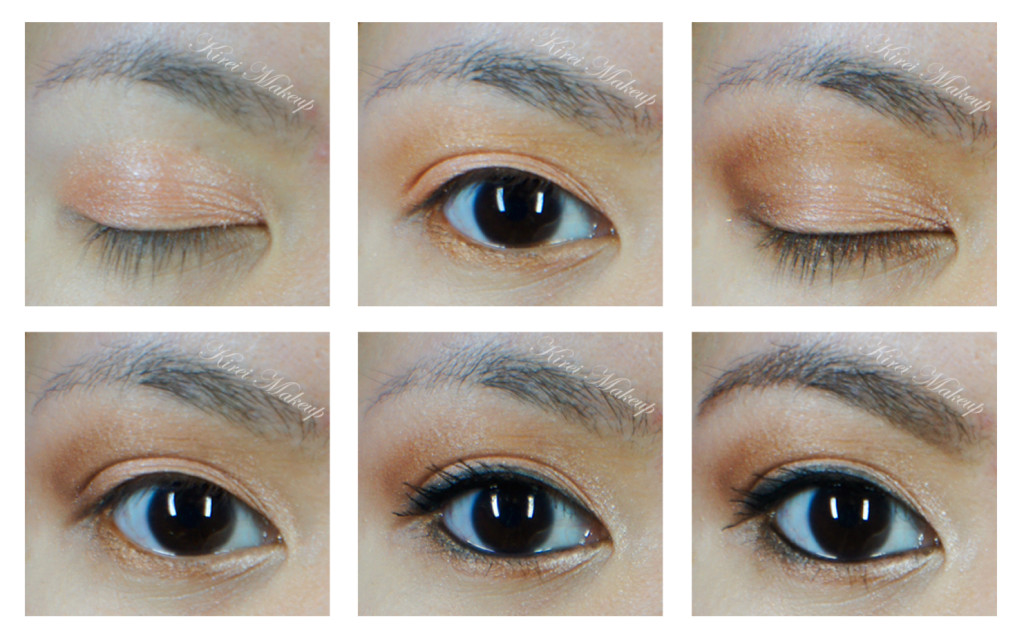
1. I applied MAC Blanc Type all over my eyelid using a flat eyeshadow brush.

2. Using a clean blending brush (MAC 217), I applied MAC Omega just slightly above the crease lightly.

3. Using a small blending brush, I applied MAC Brun on the crease.

4. With a MAC 217, I blended out MAC Brun on the crease so it blends out.

5. I applied MAC Brun on the lower lid using a small angled eyeliner brush.

6. For the waterline, I applied MAC Chromagraphic eyeliner in NC30.

7. I lined my upper lashline using Kat Von D Trooper liquid liner.

8. Lashes are curled and I applied L’oreal Voluminous Carbon black mascara on both top and bottom lashes.

9. I applied Make Up For Ever falsies 125 on upper lashes.

10. I filled my brows using a mixture of MAC Omega and MAC Brun, filled them in with an angled brow brush.

cat liner

11. For the face, I applied Make Up For Ever Pro Finish in 118 all over my face using a round kabuki brush from Sigma.

12. For under the eyes, I applied MAC studio finish concealer in NC30.

13. For contour, I used MAC Blunt blush on the hollows of the cheeks, temples and sides of the nose.

14. For the cheeks, I applied NARS Matahari on the apples lightly. Blush intensity is adjusted after I applied red lips to ensure my face does not look washed off.

15. For the lips, I filled it in with MAC Redd lipliner and applied OCC Stalker lip tar on top of it.

16. For the fake mole, I dotted my face using Kat Von D Trooper eyeliner.

marylin monroe makeup

Photo below is without the falsies. Quite wearable, don’t you think? For parties, may be? 😀
marylin monroe makeup

Iris Inspired

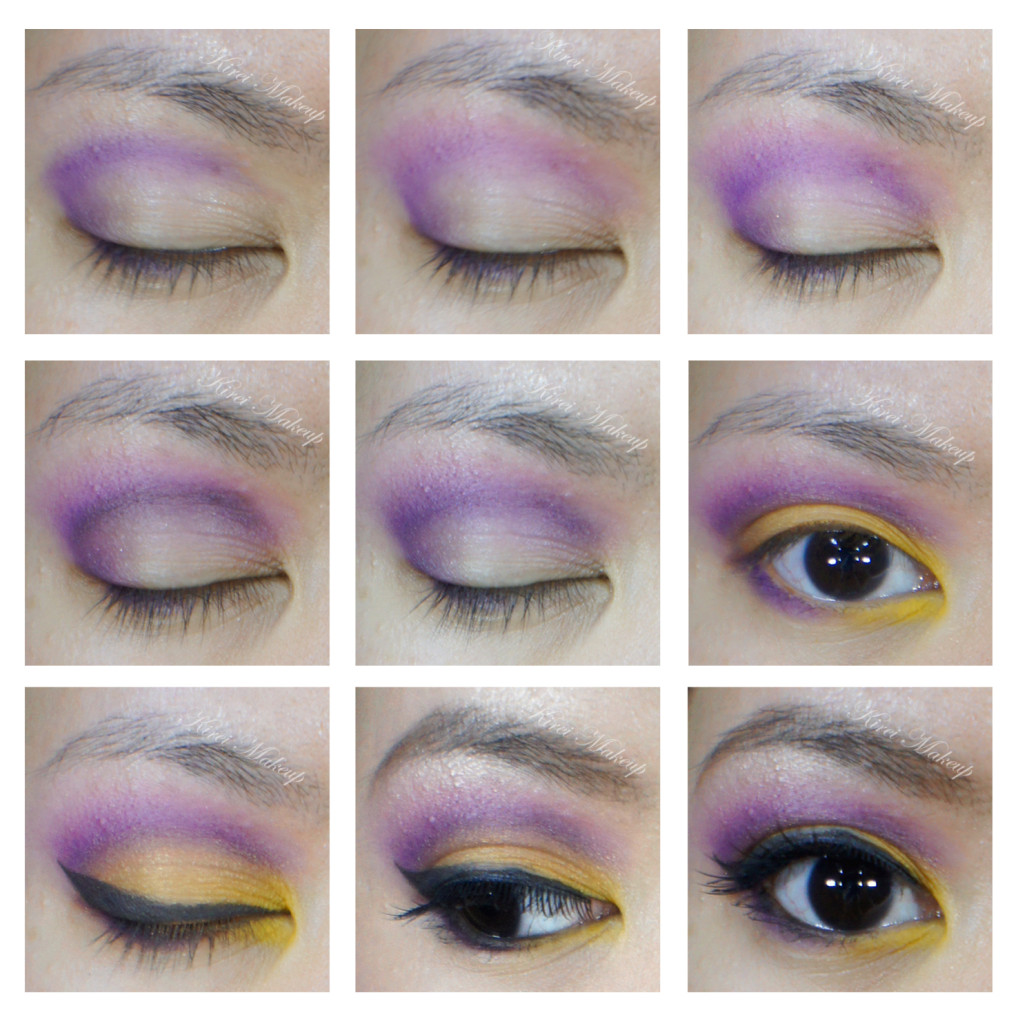
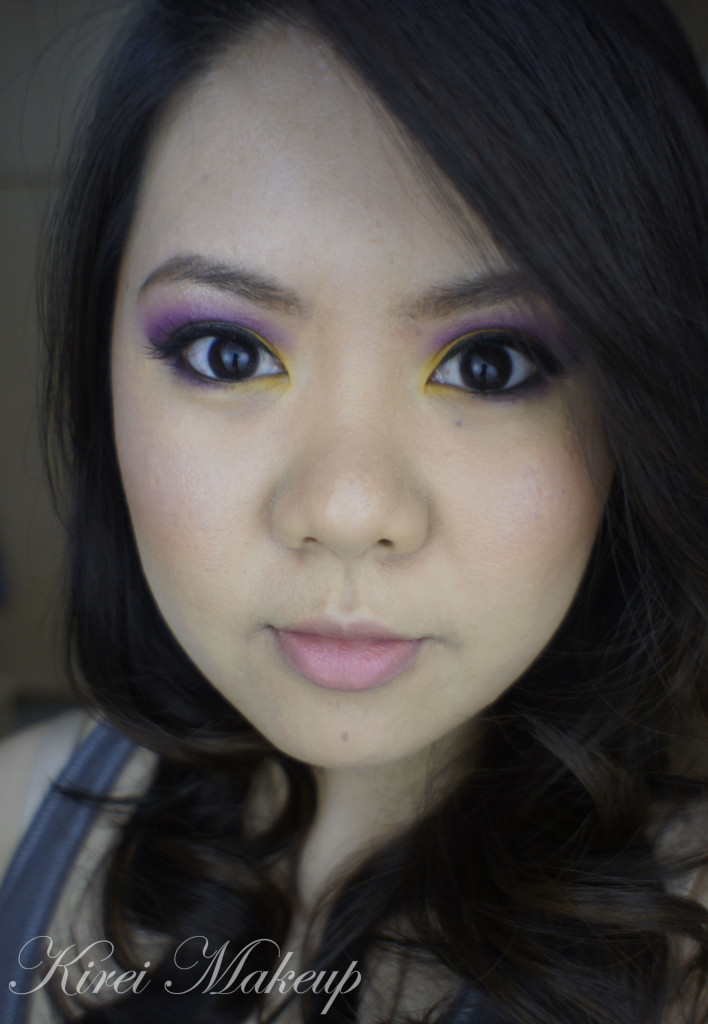
I found a picture of an Iris flower on google image on a website by jaiart, and I fell completely in love with the colour combination of the Iris flower. I’m also lucky that the 3 MUFE eyeshadows that I happened to own are in the colors that are similar to the Iris – yellow (71), purple (92) and pink (75). These 3 shadows are matte. It’s extremely pigmented and easily blendable.

The key with this tutorial is that you’ll need 2 blending brushes – 1 to apply the pink on the crease, the other 1 to blend the pink out to nothingness so there’s no harsh edge. I recommend something similar to the MAC 217 blending brush.

You also need to be patient in packing the colors on so that it is still intense and yet blended out at the same time.

How-to:

1. I dipped one side of a flat eyeshadow brush in MUFE 92 eyeshadow and applied it to the crease and outer corner. The side of the brush with the eyeshadow is facing up towards the eyebrow. Use little at first.

2. Using a blending brush (I used Urban Decay’s), I applied MUFE 75 eyeshadow just slightly above the crease in a small circular motion. Using a clean blending brush, I blended the pink shadow to make sure there’s no harsh edge.

3. At this point the purple started to fade out, so I added the purple eyeshadow again on the crease lightly. I still want the pink to show through just above the crease.

4. Using a small shader brush, like the MAC 228, I applied rMAC Noir Plum from the Mega Metal collection right on the crease.

5. Using the flat shadow brush that I used on step 1, I blended the dark plum shadow slightly so that the purple shows through.

6. Using a clean flat eyeshadow brush, I applied MUFE 71 on the crease.

7. I applied MUFE 71 on the inner lower lid using a pencil brush, as well as MUFE 92 on the outer half.

8. I lined my upper lashline using a small angled eyeliner brush and Bobbi Brown Caviar Ink gel liner, creating a winged liner. I also lined my waterline using whatever is left on the brush.

9. I filled my brows in using Anastasia Beauty Express Kit.

10. Using a fluffy blending brush, I applied the highlighter from the Anastasia Beauty Express Kit under the brow bones.

11. I curled my lashes, applied L’oreal Voluminous in Carbon Black and false eyelashes.

MUFE 75

12. For the face, I want it to be flawless, clean and fresh. I applied Urban Decay Naked foundation using Shiseido foundation brush all over my face.

13. Under the eyes, I applied L’oreal Magic Touche concealer and blended it with my fingers.

14. I applied L’oreal Super Blendable Concealer Crayon in Medium Deep on the places I wanted to contour (side of nose and hollows of the cheeks). I blended the contour using a clean foundation brush.

15. I powdered my face lightly and applied NARS Matahari blush using MAC Stipling brush on the cheeks.

16. For the lips, I applied Revlon Kiss Me Coral very very very lightly for a little stain.

MUFE 71

Product of The Week – Sariayu Eyeshadow Palette

This week I’m proud to present a local Indonesian brand as my Product of the Week. Being in Indonesia, I’ve find it to be quite a challenge to find high quality makeup products that are affordable. Most of the products sold here are either high-end brand which cost double the Canadian price, or Asian brands that don’t really have a good pigment pay-off.

I scoured high and low for a local brand, and found one which is very well-known in Indonesia is Martha Tilaar. Martha Tilaar is an Indonesian business-woman who started off her career in the cosmetics and “jamu” (herbs) industries under the name Sariayu. She started her career and business since 1977. The name Martha Tilaar is like equivalent to Estee Lauder here in Indonesia.

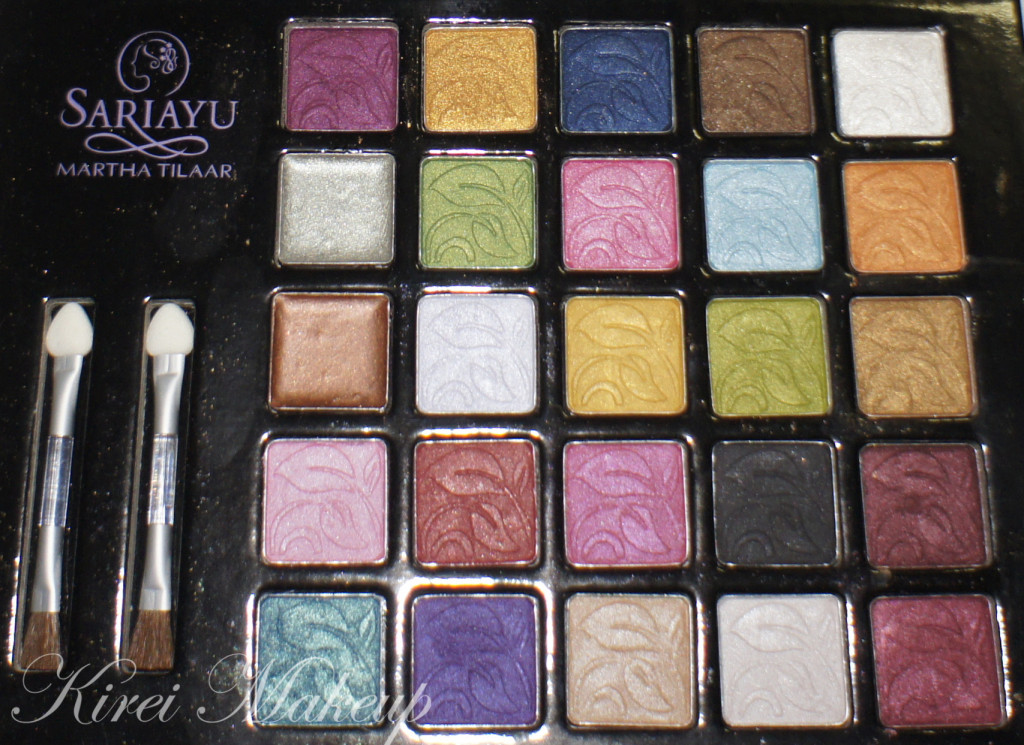
Last year, when I was just window shopping in one of the malls in Jakarta, I stepped inside a store and found this beautiful 25 eyeshadow palette by Sariayu. I bought it for Rp.500,000-ish (about USD$50)   You can buy this palette for Rp. 175,000 – Rp. 200,000 (usd$20) instead of the 500k…the Rp. 500,000 is for the PAC cream eyeshadow palette! My mistake on my note. I bought both palettes on the same time, and I’ve made a wrong note on the price. So sorry! 🙁

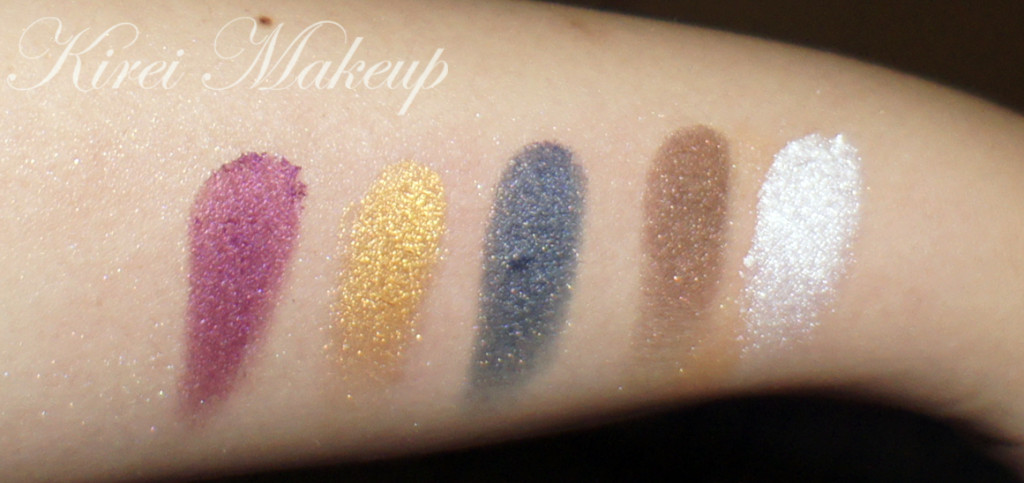
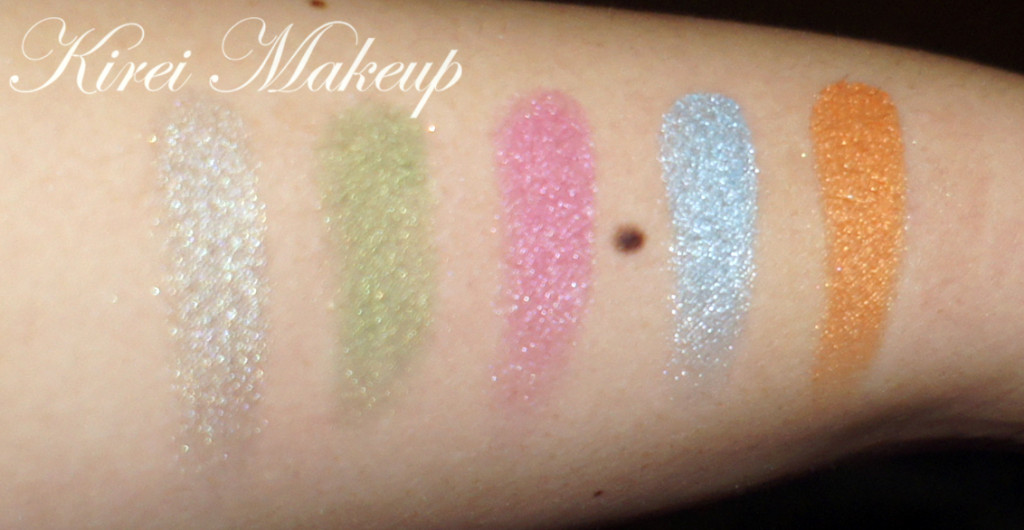
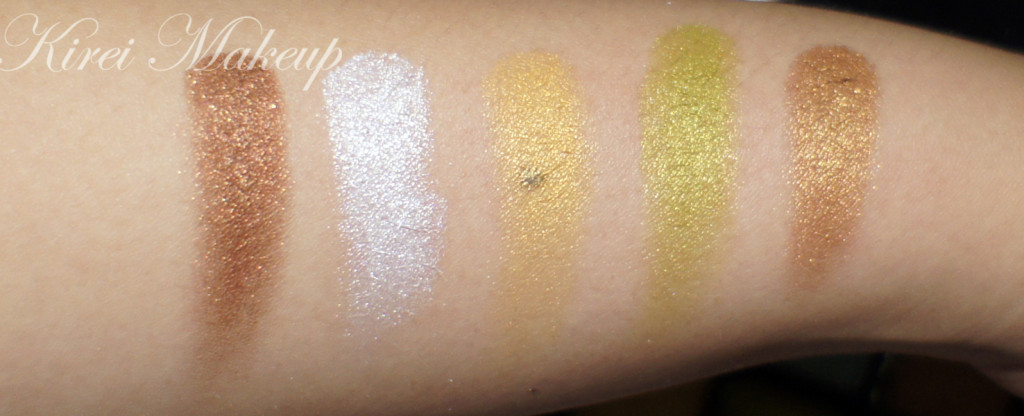
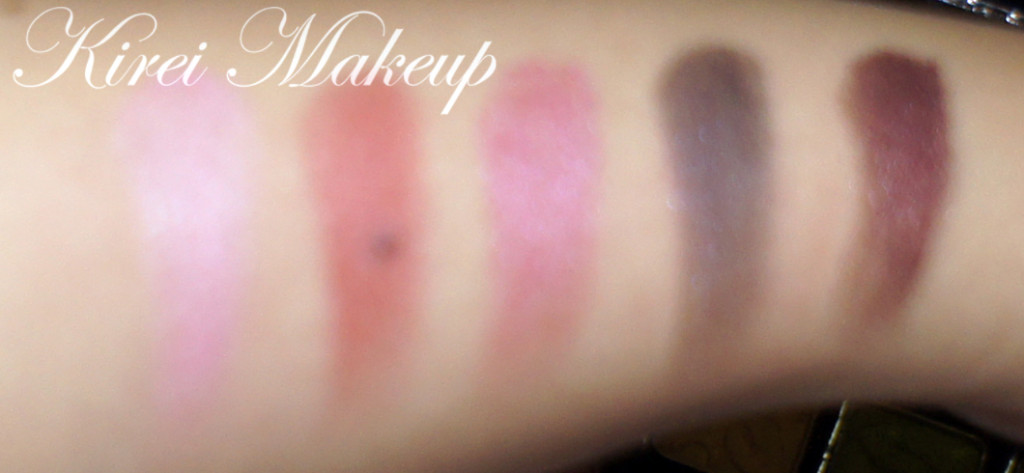
The pigments are creamy, smooth and easily blendable. In this 25-eyeshadow palette, you get 2 cream-based eyeshadow (silver and bronze) and 23 amazing eyeshadows. The eyeshadows are shimmery and very pigmented.

I’ve used this palette for a tutorial called Bright and Bold.  You can use it dry and wet.

Martha Tilaar

The palette also comes with 2 eyeshadow applicators. One side to apply eyeshadow (sponge-tip) and the other side to blend. If I’m not mistaken, you can buy these shadows individually in a bigger pot, or you can buy just the individual refills (kinda like M.A.C eyeshadows).

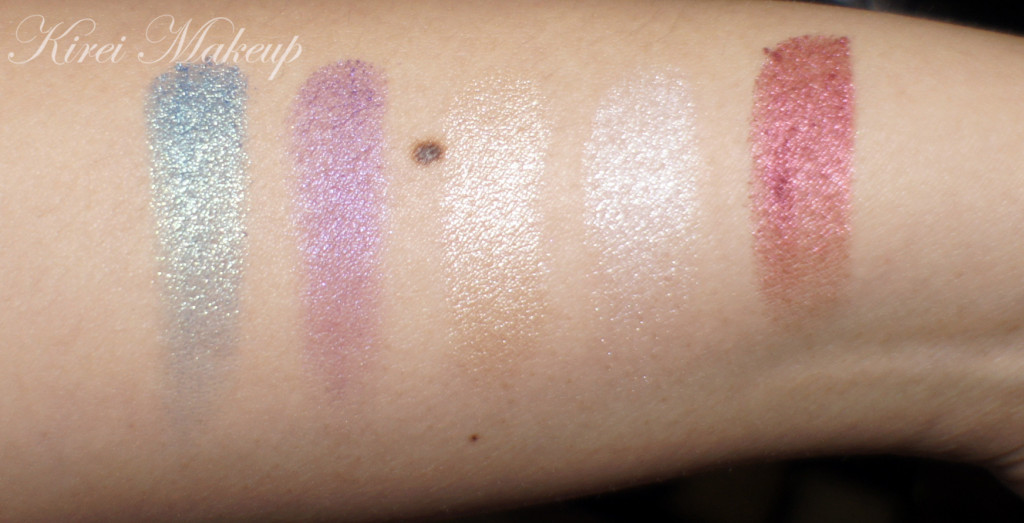
Swatches below are from Top to Bottom (left to right).

martha tilaar

Martha Tilaar

Martha Tilaar

Martha Tilaar

Martha Tilaar

Product of the Week: Tarte Amazonian Clay BB Tinted Moisturizer

That was quite a mouthful title! How’s everyone today? I’m almost in Jakarta! In couple days, blogging might resume to normal. I’m currently somewhere in Asia, and finally got my hands on wi-fi and managed to do a couple of quick snaps of my new Tarte Amazonian Clay BB cream (with SPF 20).

I’ve worn this BB cream for couple days now, but with powder on top of it. For this review, I wore it alone without any powder (or blush/eye makeup etc) for a complete 6 hours. I’m in a cooler  and humid climate, about 17-20 degree Celsius. My skin is combination – oily T-zone, dry cheeks.

I bought the Tarte BB cream on my very last day in Canada, since I knew I wouldn’t be able to get this product in Asia at the moment. I’ve been quite a fan of Tarte products, mostly the Tarte Lipsurgence (click on link for review on those). I also owned an Amazonian Clay Blush from Tarte, which I wear frequently. So, I thought it was about time for me to try on one of their foundation products.

Now, I know we all are getting tired of this whole BB cream bandwagon, and I myself felt that the BB creams are getting quite over-rated lately. However, after testing, swatching, smelling and owning several BB creams from both Asian and Western BB creams, I have only found 1 that I truly loved so far, which is Stila 10-in-1 HD BB cream. I was determined to find another BB cream that suits my skin-tone and type.

(click on each picture to enlarge it)

Tarte Amazonian Clay BB cream

Anyways, let’s break it down!

What is Tarte Amazonian Clay BB Tinted Moisturizer (SPF 20) – formerly known as Tarte Smooth Operator

“A light-to-medium coverage, oil-free tinted moisturizer that delivers a natural, sheer finish to revitalize all skin types while the SPF 20 protects your skin against the sun’s harmful rays. While it works with all skin types, this oil-free tinted moisturizer is ideal for tartelettes with normal to combination skin.  

Product Performance: This weightless, water-based formula blends into your skin as easily as your favorite moisturizer (and it’s formulated without oil, so it won’t clog your pores) while micro-treated mineral pigments diffuse fine lines and wrinkles, giving you an even, smooth finish. This dermatologist-tested formula is chock-full of skinvigorating™ ingredients like Amazonian clay, apple extract, camellia extract,  chamomile, vitamins A, C and E, and sodium hyaluronate, which all work in perfect harmony to visibly hydrate, soften, brighten the appearance of skin for your most  flawless complexion ever.

Powered By: Amazonian clay: this nutrient-rich, multitasking and total-skin-balancing clay reduces dryness and flakiness, improves skin clarity, elasticity, firmness, and texture while removing oil from the skin’s surface for smooth application and wear “

Tarte Cosmetics, 2013

Tarte Amazonian Clay BB cream review

First Impression:

  • Product is to the brim! Holy mackerel, look at that tube, it’s full to the very end.
  • I love how I can see how much product I’m getting.
  • Very cute tube cover.
  • Light and Light-Medium have more of a yellow undertone than the rest of the selection (may be Ivory too, but I didn’t get the chance to swatch it in store)
  • Does not cater to darker skintones (anyone deeper than NC/NW 45).

Pros:

  • Blends beautifully to the skin.
  • I found that this BB cream is more pliable than the other BB creams.
  • Does not have the sunscreen smell.
  • No distinct scent.
  • Long-lasting – tried this for 6 hours and it’s pretty good.
  • Sheer coverage, which is fine for me for daily use. Very natural finish.
  • Contains SPF 20.
  • Yellow undertone which means I don’t look pasty and grey (like most of the Asian BB creams)
  • N said my skin looks smoother, which is always a plus on my list 😀
  • I, personally, find that this BB cream isn’t as moisturizing as how a “tinted moisturizer” should be. However, I don’t mind it since I do have a combination skin.
  • No flashback.

Cons:

  • It has very very very teensy weensy specks of light-reflecting particles which can be a negative thing for those with oily to extremely oily skin. These specks aren’t as big as Revlon Mousse foundation and YSL Touche Eclat foundation. However, those with oily skin in a warm climate might find themselves to be quite shiny after application.
  • Limited shades and undertones. Even though there’s 8 shades in this collection, there’s only 2-3 yellow undertones available. Those who are darker than me with yellow undertones might have difficulties finding a shade that’ll work for them.
  • They advertised their coverage as Medium buildable, but I find this to be more on the sheer side. It does remove some of the redness, but not all – look at the breakout of my forehead, and sides of my nose.
  • PRICY for a BB cream.

Price: CAD$47 (tax not included) in Sephora

Will I buy this again? May be – I might buy it if it becomes available in Jakarta/Singapore, and if I can’t get more of my Stila HD BB Cream. Might not buy it if I can get my hands on more of the Stila HD BB cream in Jakarta/Singapore.

Tarte Amazonian Clay BB cream review

L’oreal True Match Superblendable Concealer Crayon

If you guys were following me on Instagram and Twitter, you’d know that I finally got my hands on the new L’oreal True Match Super Blendable Concealer Crayons! I’ve been looking for these crayons in Shopper’s and couldn’t find any, and by chance I went to Rexall and got them with 15% off! Super awesome 😀

Anyhow, I went to grab 3 colors, because they were on sale and also because I wanted to see if I could use them to do highlighting and contouring. I bought the Fair/Light (W1-2-3), Light/Medium (w4-5) and Medium Deep (N6-7-8).

On me, the Light/Medium (W3-4) is my matched. I used this to conceal blemishes and under eye circles. The Fair/Light (W1-2-3) is quite light, but not super light like the foundation counterpart. If you are very fair (ivory/porcelain), you might find the W1-2-3 a bit too yellow for you. May be the N1-2-3 might fare better for those with very fair skin tone.

The darkest shade (Medium Deep N6-7-8) is definitely darker than the W6-7-8. Those who use MAC NC/NW 50-58 might find the Medium Deep shade to be a shade or two lighter than their skin tone. Might be good as a highlighter for those with NC/NW 50-58 skin tone. This Medium Deep shade is definitely a great alternative for those who has similar skin-tone like mine or lighter to be used as a contour product.

L'oreal True Match Concealer Crayon

Please keep in mind I was doing this post in a rush, so didn’t do a great job in terms of blending or placement. I’ll show you a highlight/contour tutorial next time. The purpose of this post is to show you that these concealers can be used as concealer, highlighter and contour product.

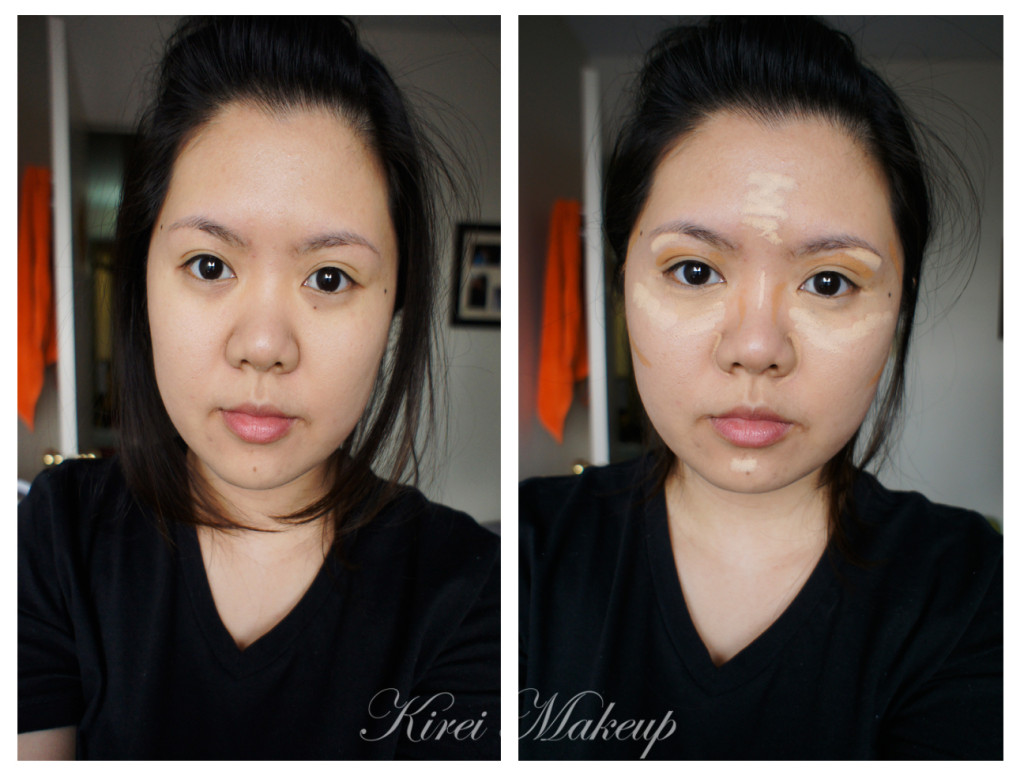
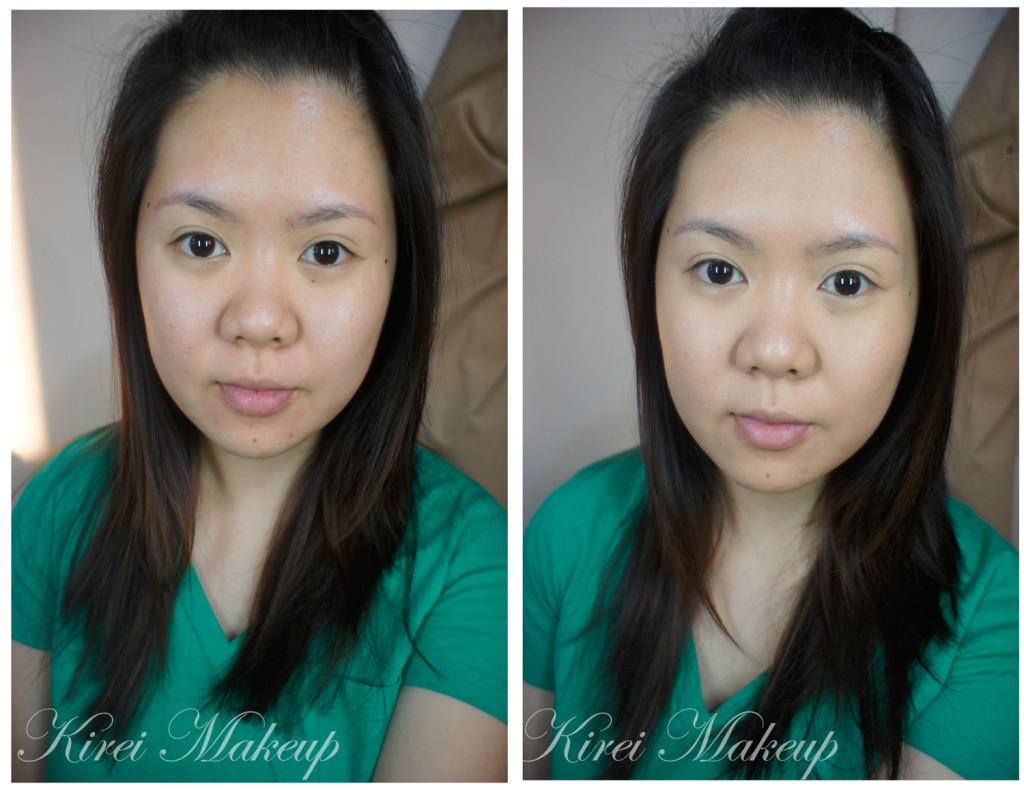
Below on the left side, I only had Urban Decay Naked Foundation (click on link for review of the foundation). As you can see, my dark circles are quite prominent (thanks to lack of sleep and stress). Other than that, I’ve redness around my nose. I applied the foundation using IPKN Artist Auto Wave Makeup.

On the right side, I applied L’oreal Super Blendable Concealer Crayon in Light/Medium (W4-5) under my eyes and around my nose, as well as on my blemishes. For a quick highlight, I applied Fair/Light (W1-2-3) on the high planes of the face: on the bridge of my nose, under the brows, on the forehead, along the cheekbones and chin. I blended everything using Sigma Precision Round brush (first the concealer, then the highlight and lastly the contour).

For contour, I applied Medium Deep (N6-7-8) under my cheeks, on the crease, side of the nose and temples.

L'oreal concealer crayon

Left: With Urban Decay Naked Foundation; Right: Concealer, Highlighter and Contour

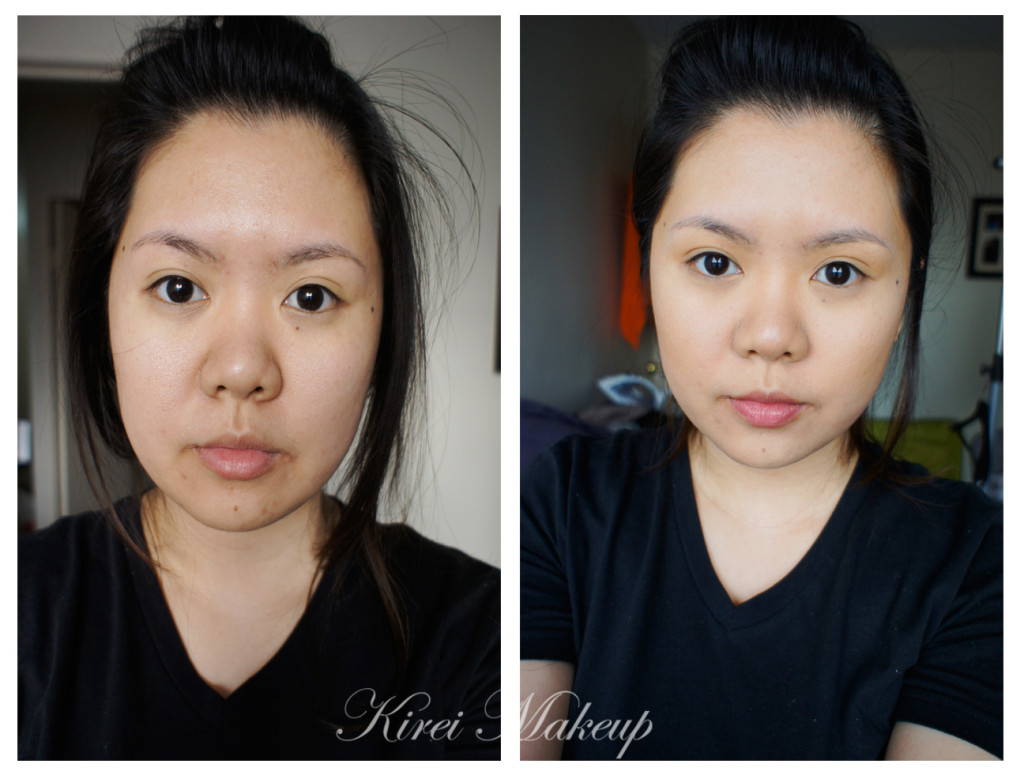
Below is a picture of my bare face (don’t judge!) on the left and a full face with foundation, highlighter, concealer and contour only on the right. Pictures are taken in daylight. The highlight and contour are meant to be a light application. I’d probably do this if I’ve extra time in the morning since it’s fast and easy. Take less than 3 minutes.

L'oreal True Match Superblendable Concealer Crayon

Left: bare face; Right: final look

My experience using this:

Pros:

  • Just like the name said, Super Blendable, the concealers are easily blendable with fingers, brushes and my favorite way with a damped sponge.
  • I found that the crayons are easier to work with when it’s warm, so if you’re in a cold climate, you might want to rub the crayons in between your palms first before application.
  • Love the crayon type of concealer. So easy to be used, so easy for traveling. So much love <3
  • Coverage is medium, pretty good for blemishes.
  • Under eye circles somewhat covered, but the product isn’t as creamy as the True Match liquid concealer. Might sink on fine lines under eyes after 4-6hours.
  • Works as amazing highlighter and contour, I mean, hello look at my cheekbones.

Cons:

  • Dry skin might want to stay away from this product, might cling to dry patches.
  • Only 6 shades available.
  • Need extra work to blend in cold climate.

Will I buy this product again? Absolutely! I do wish they will sell this in Indonesia or Singapore. It’s super convenient and easy to use!

4.5 stars out of 5


Smashbox Admire Me from Love Me Collection

I think I like this palette. Like I’ve said on my “Entice Me” post, the eyeshadows are creamy and buttery, blend very easily. The Admire Me palette has warmer shadows, very bronzy, very summer-y. It has 5 colors: Bronze (left most), Soft Shimmering Coral (top left), Champagne (bottom), Matte Nude (top right) and Deep Golden Brown (right most).Smashbox Admire Me

Picture courtesy of Smashbox

The colors will probably look more intense, leaning towards smoky for those with lighter skin tone (lighter than NC 30), and will be more on the neutral-earthy colors for those with medium to dark skin tone. I really do believe this is a great palette for those with really dark skin tones who are looking for a natural/neutral/nude eyeshadow palette.

This palette on me works as neutral as well as smoky. For this tutorial, I wear it on a lighter side and coralish. 🙂 I kept the rest of the face on the same color palette – coral-orange toned.

How-to:

1. I applied Soft Shimmering Coral using a flat eyeshadow brush all over my eyelid.

2. Using a soft blending brush, I applied Bronze lightly on the crease.

3. I also applied Bronze on the lower lid using a large eye angled brush.

4. Using a smaller blending brush, I applied Deep Golden Brown on the outer V lightly.

5. I applied Champagne to the inner corner of the eye.

6. I lined my waterline and tightline using L’oreal Voluminous Smoldering eyeliner.

7. My lashes are curled using Shu Uemura eyelash curler and I applied L’oreal Voluminous Carbon Black on both top and bottom lashes.

8. I filled my brows using Anastasia Brow Wiz in Brunette.

Smashbox Admire me

9. For my face, I applied Revlon Colorstay foundation using Shiseido foundation brush.

10. For cheeks I applied MAC Utterly Game and for the lips I applied Revlon Just Bitten in Charmed.

Love Me Smashbox

Product of The Week: Urban Decay Naked Skin Foundation

The famous Urban Decay Naked Skin Foundation. I wanted it so bad last year, but alas it was released after I left Canada. As soon as I get the chance to step into Sephora when I arrived couple months a go, this was the first thing that I grabbed from the shelf.

Did it live up to my expectations? Absolutely! Just from the name itself, Naked Skin Weightless Ultra Definition Liquid Makeup, I expected this foundation to be more like Chanel Aqua Vitalumiere. From the website:

“Coverage without compromise. Our weightless formula blurs imperfections for a flawless finish that feels invisible, but looks professionally retouched.” (Urban Decay)

My first reaction when I saw this foundation was whether or not I should grab the Good Karma brush along with the foundation. I decided not to. The brush looked like Sigma Kabuki Round brush, and since I’ve so many brushes I decided not to buy it.

First impression of the foundation: watery consistency (just like Chanel Aqua Vitalumiere), love the packaging – sleek bottle, excellent undertones especially for my yellow Asian skin, very weird shade numbers. With the shades, anything that ends in a .0 is warm/yellow undertone, and anything with a .5 is cool/pink undertone. If you’re in between yellow and pink (aka neutral/beige), ask for samples for both foundation. Yellow undertones might be good to knock off some redness.

I’ve worn this foundation for tutorials and to go out in the winter weather. I’ve to say this is not a foundation for those with dry skin. Since my skin is combination, and since it’s winter here in Canada, my dry patches weren’t doing so great with this foundation. Probably I need to moisturize the skin a bit more. This foundation lasted a good 6hrs without powder (in the winter). I will give another update once I’m in Indonesia (warmer country).

The foundation feels extremely light, kinda like MAC Face and Body. However, unlike the MAC Face and Body, this foundation does not become thicker the more you rub it in to the skin, which I prefer. I like how it spreads thin on the face, and I can build more on it if needed.

The finish is not matte, surprisingly. I find this foundation to be more on a silky finish. It definitely knocked off all my redness, and somehow my pores seem smaller.

Pros:

  • Lightweight
  • Sheer to medium coverage
  • Excellent range of colors
  • Watery consistency
  • There’s a ball inside the bottle so you can give it a good shake before using it
  • Great for oily skin
  • NO SPF means no flashback!

Cons:

  • Pricy – cad$45 (excl. tax) in Canada
  • NO SPF means you need to apply SPF before foundation if you’re planning to go out in the sun

I’m wearing shade 4.0. For your reference, I’m MAC C3 on Face and Body, MAC NC27 on Studio Tech, mix of MAC NC 25 and 30 on Studio Fix Fluid, Smashbox 15-hours foundation in 2.3, and L’oreal a mix of W2 and W4 in Tru Match liquid foundation. I’m one of those people who don’t really have a perfect match on the MAC foundation, and I’m always in between colors. On top of that my face is darker than my neck and chest. So, I’m very happy that this foundation in 4.0 is pretty good for my color.

Urban Decay Naked Skin foundation

Sweet Plums

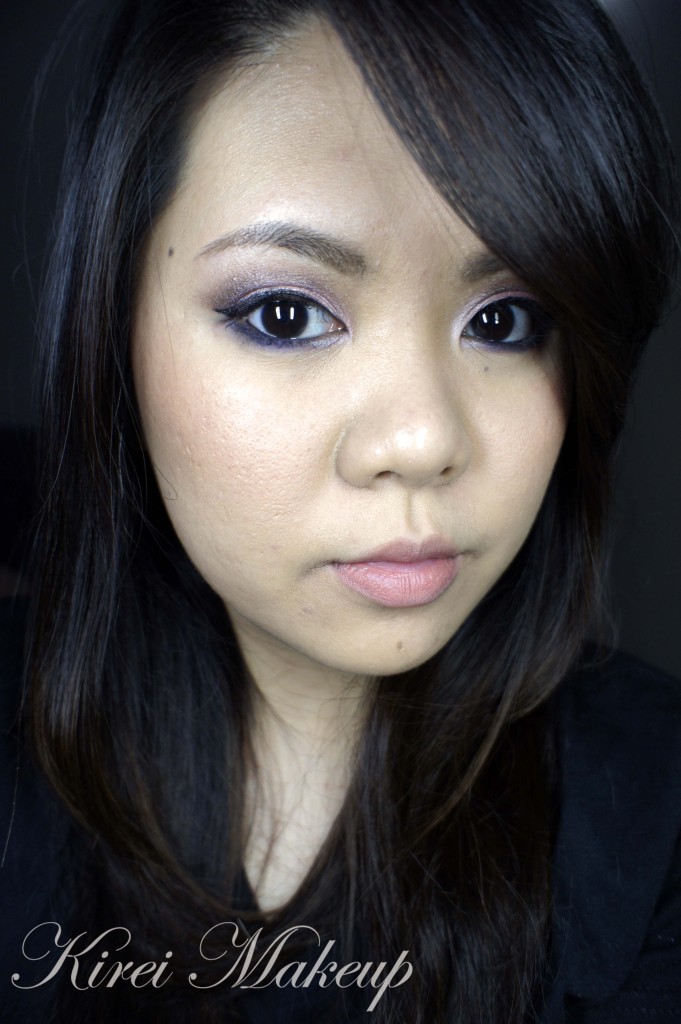
Valentine’s day is 11 days away, and here’s another Valentine’s day inspired look. I probably won’t wear this on a Valentine’s day, but I just pick colors that I feel is valentine-ish. The look has plums, purple and pink in it. I feel that the colors look better on real life, probably because my camera isn’t picking up the colors since I changed my lights (grrrr)..Hopefully once I’m back home I’ll be able to take better pictures…

Anyhoow, enough of me complaining…This look is more on the smokier side. May be on the next tutorial I’ll post a look that’s more wearable for Valentine’s day.

How-to:

1. I applied Maybelline Color Tattoo in Inked in Pink all over my lid using my ring finger.

2. I used a large eye angled brush and applied a berry-burgundy eyeshadow from Lancome (discontinued) on the outer V and just above the crease. I wanted to add some warmth to the look.

3. I used a blending brush and blended it.

4. Using a flat eyeshadow brush, I applied L’oreal Purple Obsession  Infallible eyeshadow right on the crease (or in my case, where the fold of my eyelid is). It’s ok if some of the shadow fall on the lid area (like mine)

5. Using a clean blending brush, I blended the purple until there’s no harsh line. I used small circular motion to blend the shadow.

6. Using a flat eyeshadow brush, I applied L’oreal Sweet Strawberry Infallible eyeshadow on the inner to the center of the lid using a patting motion.

7. I applied a vanilla eyeshadow on the inner corner, but I think a peachy or champagne highlighter will work better. Oh well.

8. I lined my waterline and lower lashline using Make Up For Ever eyeliner (4L).

9. I applied Galeano eyeshadow from Kat Von D Beethoven palette on the lower lid.

10. I lined my upper lashline using Kat Von D Trooper liquid liner to create a winged liner.

11. I curled my lashes and applied L’oreal Voluminous Carbon Black mascara on both top and bottom lashes.

12. Using MAC Brule, I applied it under the brow bone.

13. I filled my brows using a mix of MAC Omega + MAC Brun using an angled brush.

14. Using a very clean blending brush, I blended the crease a little bit more.

Purple Smoky eyes

15. On the face, I applied MAC Moisture Cover on NW 15 under my eyes.

16. Then, I applied L’oreal Magic Lumi foundation all over my face using Sigma Kabuki Round brush.

17. I applied MAC Warmth of Coral mineralized blush on the cheeks.

18. For the lips, I filled in my lips using L’oreal Beyond Pink lip liner and applied Revlon Mauve It Over on top of it.

Pink and Purple smoky eyes

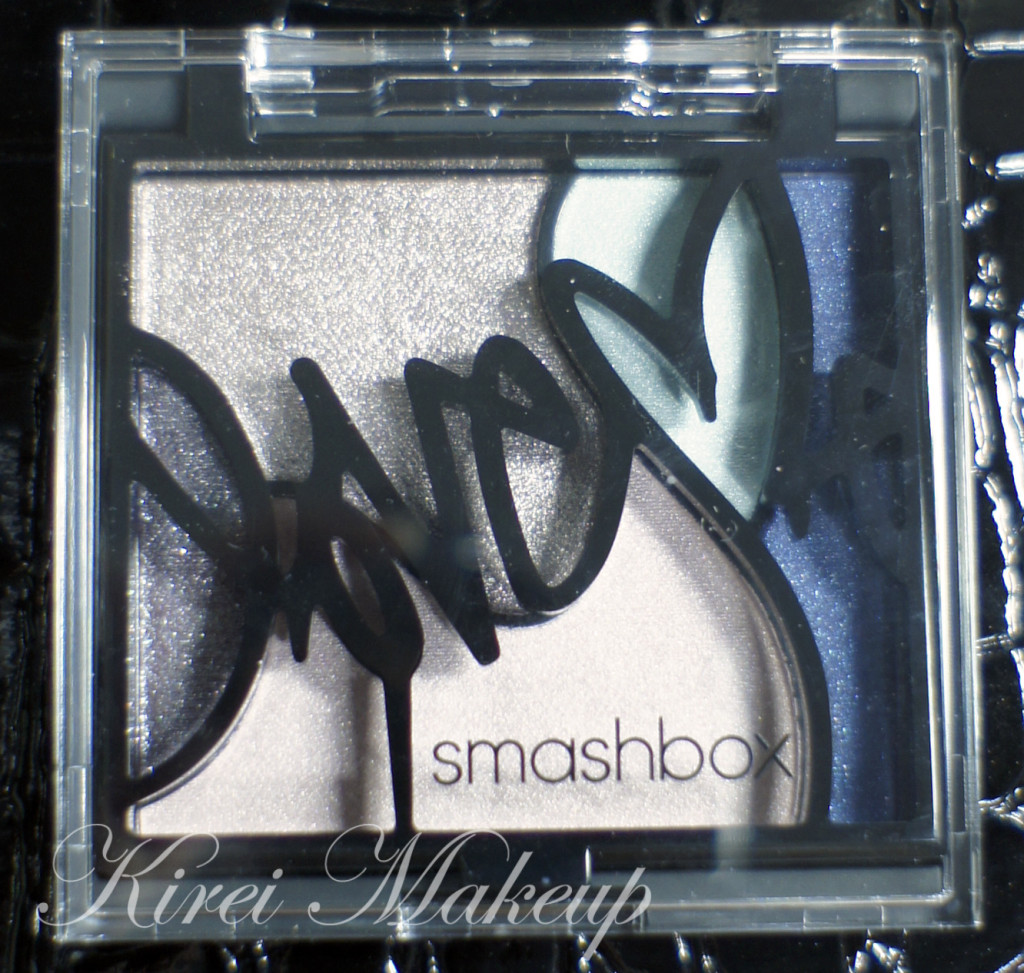
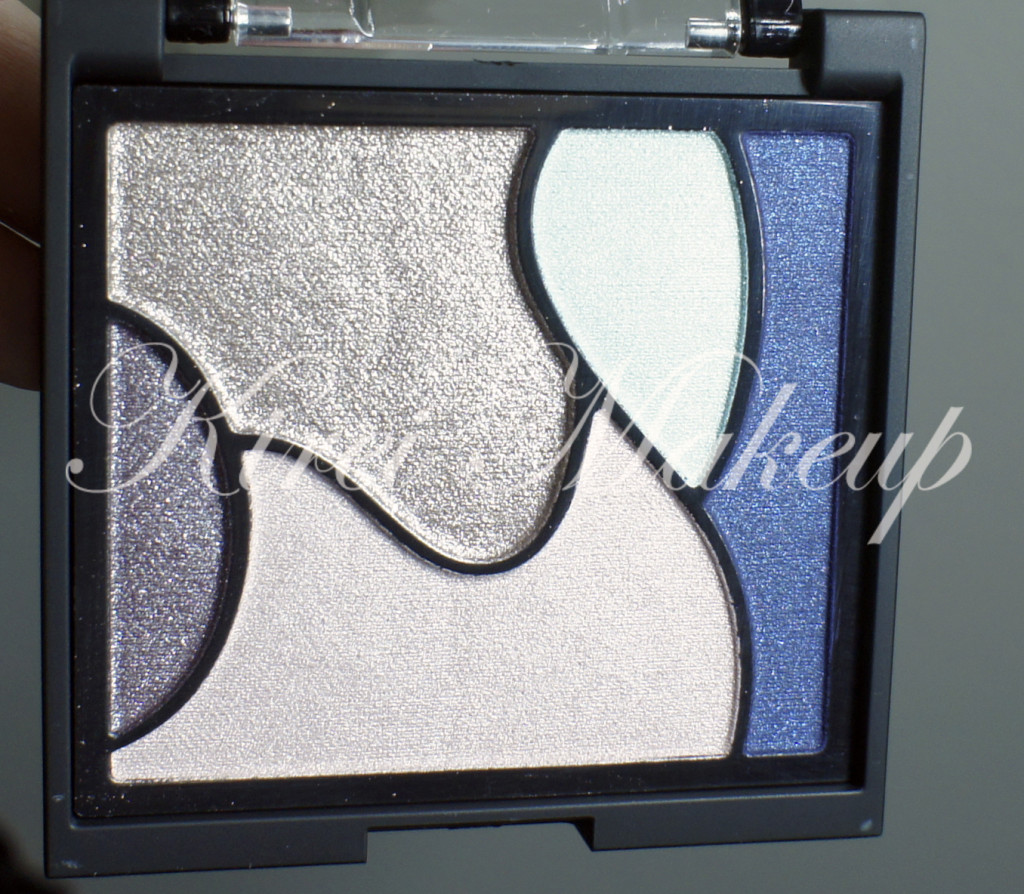
Smashbox Entice Me from Love Me Spring Collection

If you are following me on Twitter, you should know that I went to grab the new Love Me eyeshadow palette from Smashbox couple days a go. Since I couldn’t decide which palette to buy, N told me to grab both! So, I bought both the Entice Me and Admire Me palettes. I bought it at Shopper’s and lucky me, I was able to use my points to pretty much buy both palettes (woo-hoo!!!). It costs CAD$40 for each palette at Shopper’s.

Entice Me Smashbox

Entice Me comes in 5 shadows – Purple Taupe (left), Sparkling Purple (top), Icy Pink (bottom), Icy Blue (right top) and Deep Sparkling Navy (right). The “base colors (Sparkling Purple and Icy Pink)” occupied most of the palette.

The texture of the shadows is very buttery and creamy. It blends very easily. The Icy Blue and Icy Pink are very light and pastel-y. The other 3 colors are quite shimmery.

Love Me palette Smashbox

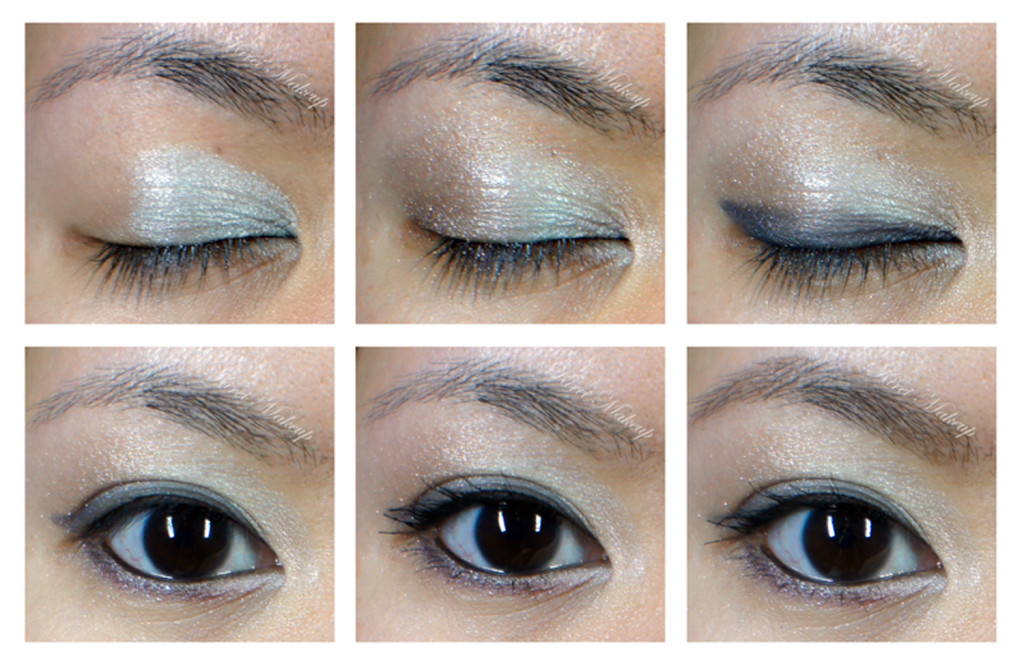
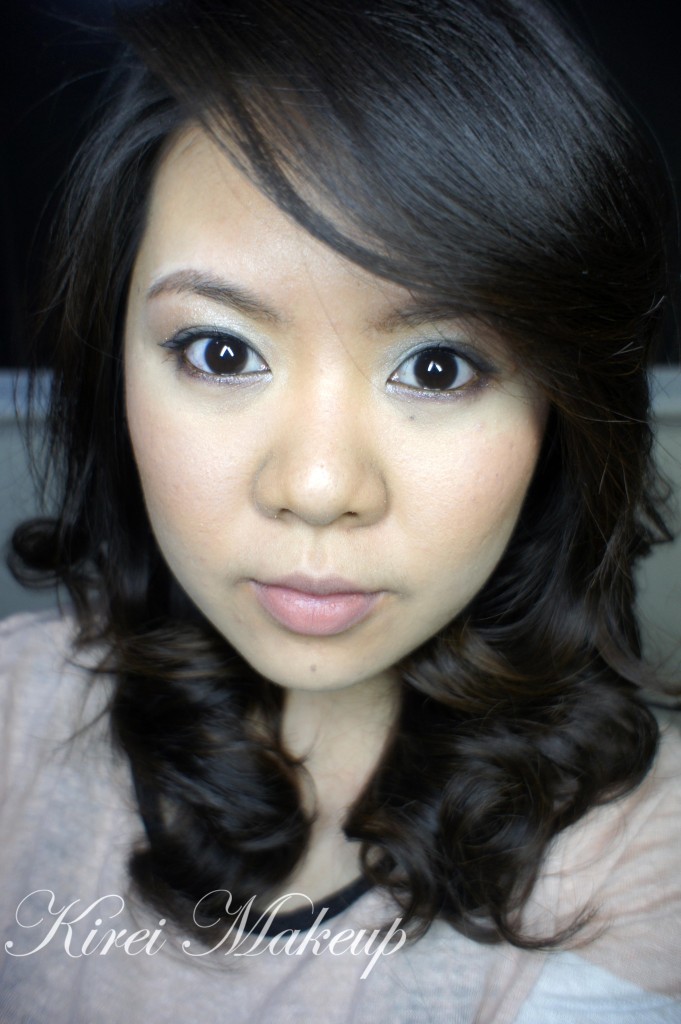
Anyhow, I’m using Entice Me palette for this tutorial. I used the same step-by-step look on the upper eyelid as what they recommend at the back of the palette.

How-to:

1. I applied Icy Blue from the inner corner to the center of the eyelid using a flat eyeshadow brush.

2. Then, I applied Sparkling Purple from the outer corner to the center of the lid, blending it towards Icy Blue.

3. Using a small shader brush, I applied Icy Pink on the inner corner of the eyelid.

4. Using an angled brush, I applied Deep Sparkling Navy on along the upper lashline as a winged liner.

5. I used a clean angled brush to apply Purple Taupe on the lower lashline (not on the palette instruction).

6. I lined my waterline and tightline using L’oreal Smoldering Voluminous eyeliner.

7. I curled my lashes and applied L’oreal Voluminous Carbon Black mascara on both top and bottom lashes.

8. I filled my brows using Anastasia Brow Wiz in Brunette.

Love Me Smashbox

9. For my face, I applied Urban Decay Naked foundation.

10. I applied L’oreal True Match Concealer Crayon W1-w3 under my eyes, along the bridge of my nose, on top of my brows and on my cupid’s bow.

11. Then, I used L’oreal True Match Concealer Crayon N6-N8 on the hollows of my cheeks, on the side of my nose and on my temple.

12. I applied MAC Cubic on the cheeks and completed the look by applying Revlon Mauve It Over matte lipstick.

ps: please ignore my under eye circles..I haven’t been able to have a good rest for a few days, and I got sick…

Entice Me Smashbox


Green Snake Inspired

A post for Chinese New Year! I know this year is the year of Snake, and when I was a kid I remembered having to watch the Tale of the White Snake. It’s a great story, and I remembered how the White Snake has a little sister, the Green Snake. The Green Snake supported her sister and saved her from danger and bla bla bla… Anyways, if you’re interested in the story, you can find it in Wikipedia 🙂

So, today’s tutorial is a bit tinker bell-ish, a bit green snake-ish..I don’t know. I just find the colors that I used to be really quite beautiful. I do have to mention that the MAC Crush Metal Pigment that I used in this tutorial is probably not available anymore, as well as the dark green eyeshadow – MAC Grey Range.

How-to:

1. I applied Chanel Illusion D’ombre in Epatant all over my lid using my fingers.

2. Using a flat eyeshadow brush, I applied the green pigment from MAC Crush Metal Pigment Stack 2!

3. Using another flat eyeshadow brush, I applied MAC Grey Range, blending it to the green and up on the crease.

4. I used a blending brush to blend any harsh edge, re-apply MAC Grey Range, blend again, apply again, blend again until I reached enough intensity to my liking.

5. I lined my waterline using L’oreal Voluminous Smoldering eyeliner, and then applied winged liner using an angled brush and gel eyeliner from Make Up For Ever Aqua Black.

6. I curled my lashes using Shu Uemura eyelash curler and applied L’oreal Voluminous Carbon Black mascara on both top & bottom lashes.

7. I filled my brows using a mix of MAC Omega + MAC Brun using an angled eye brush.

green eye makeup

8. On my face, I applied Urban Decay Naked Foundation using Shiseido foundation brush.

9. Under my eyes, I applied Smashbox Full Coverage concealer stick blending it using a concealer brush.

10. I contoured my cheeks lighty using a face fan brush and Smashbox contour powder.

11. Using a blush brush, I applied MAC Peaches on the cheeks.

12. On the lips, I applied Revlon Just Bitten lip balm in Charmed.

tinker bell inspired eye makeup