Spring Lilac

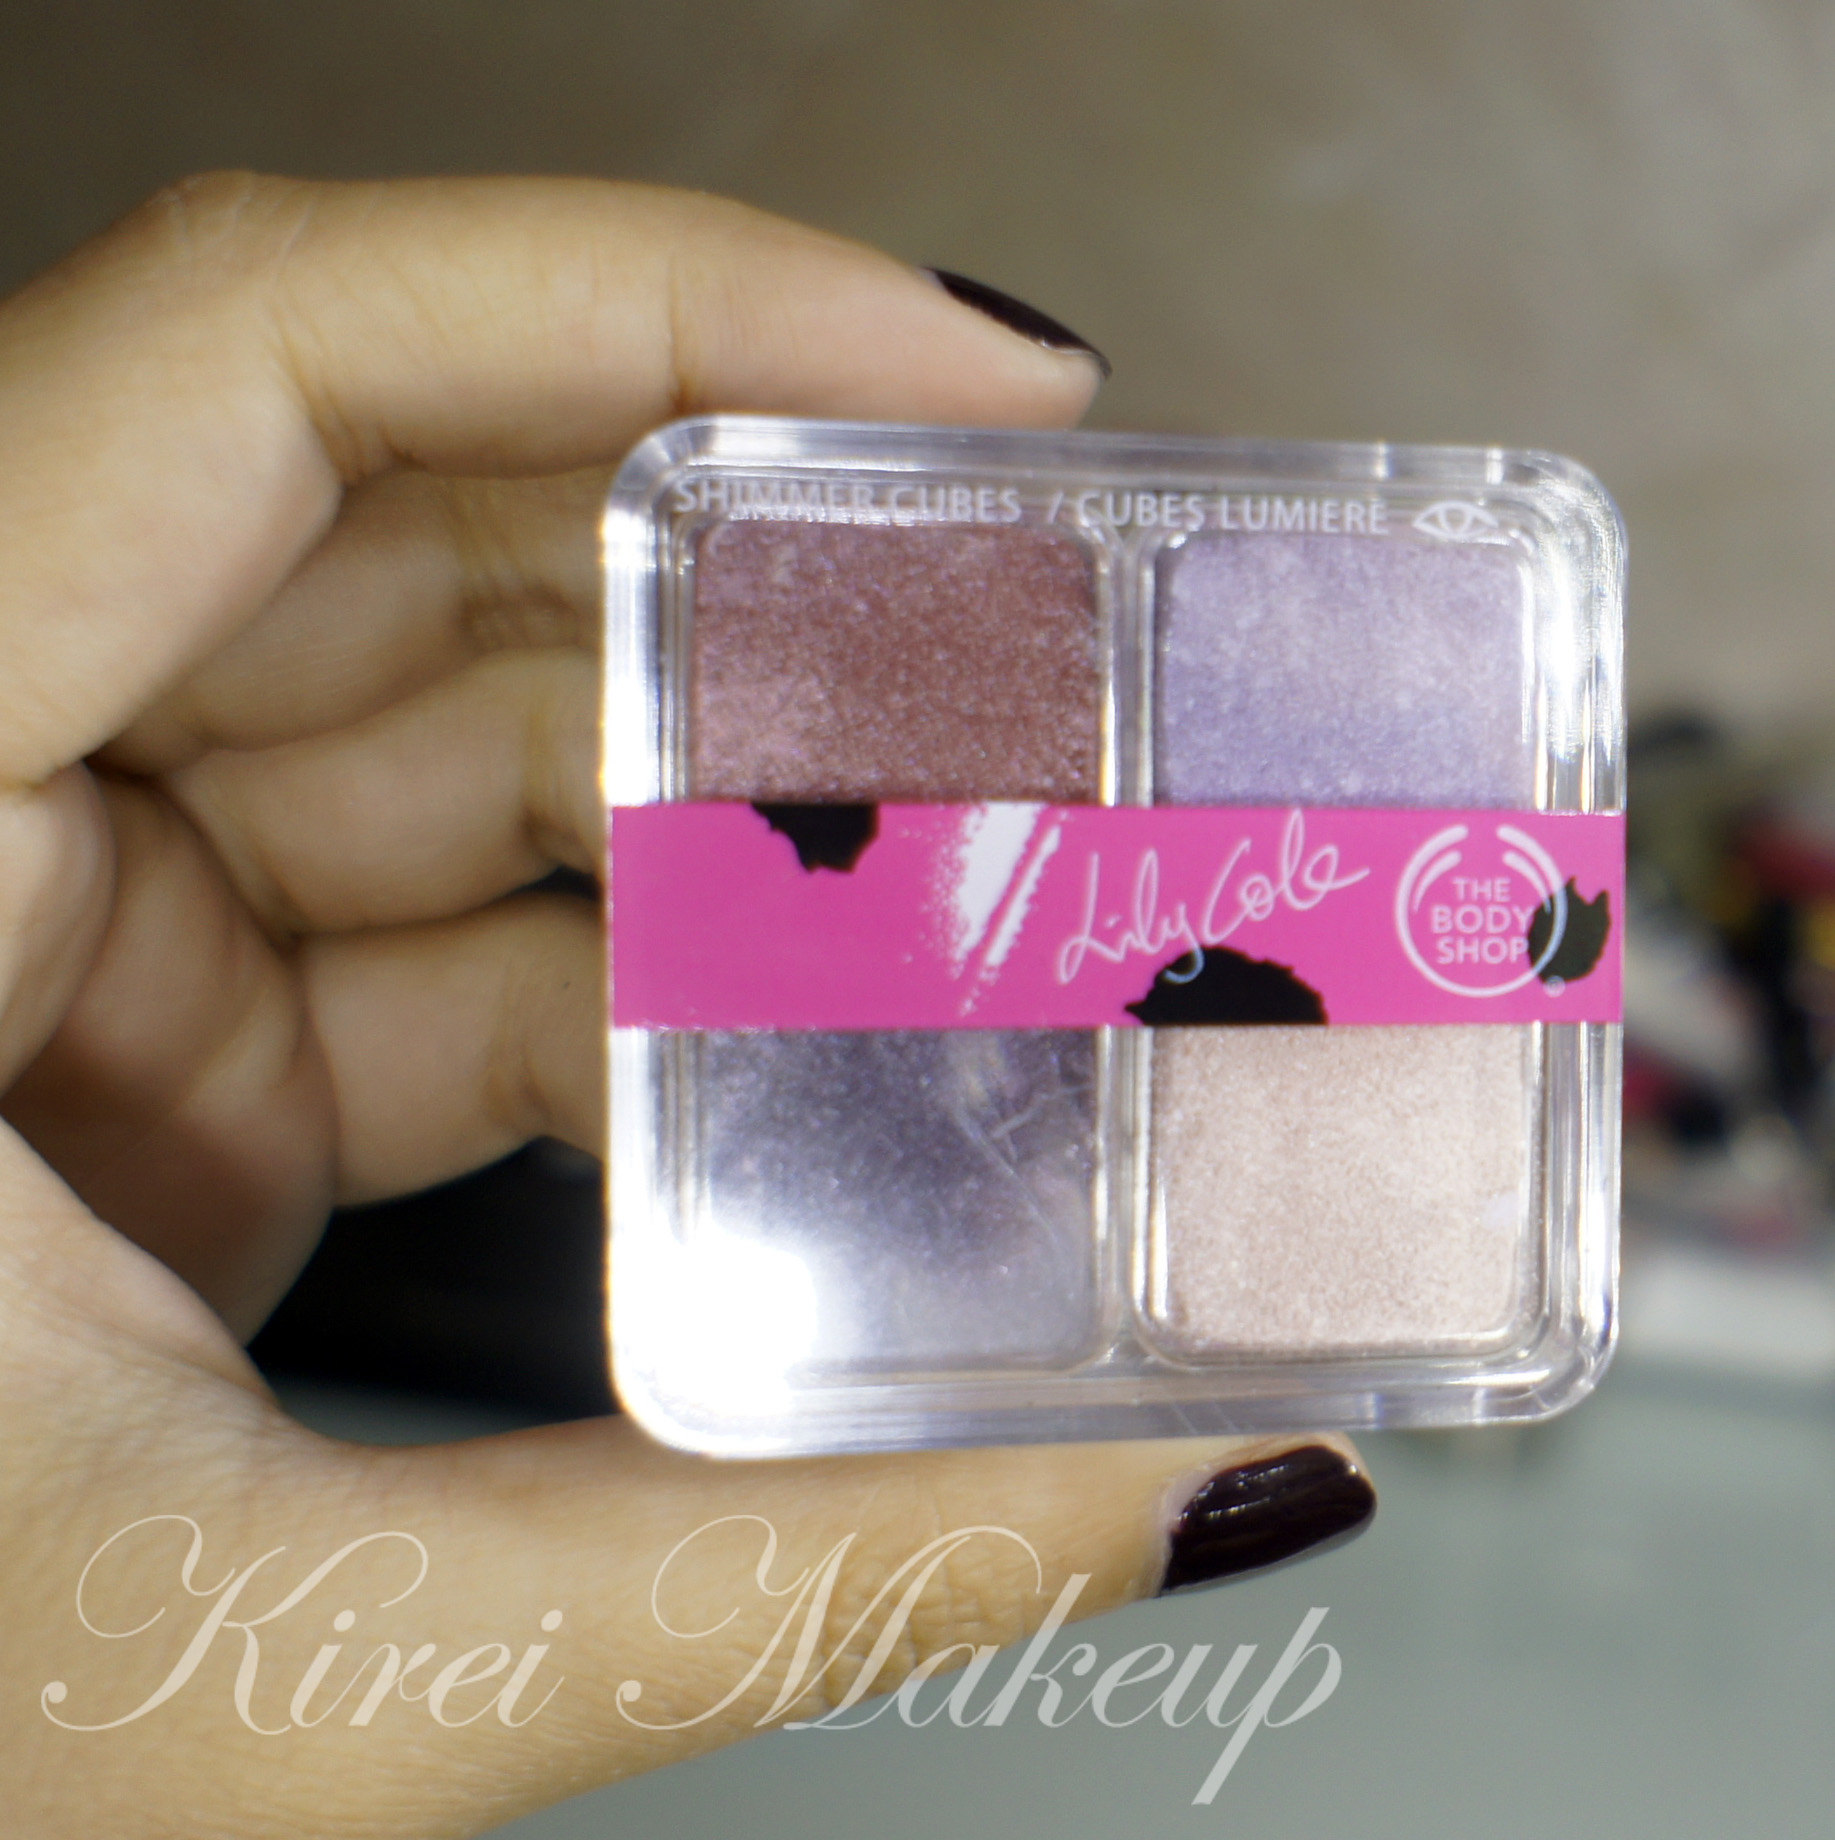
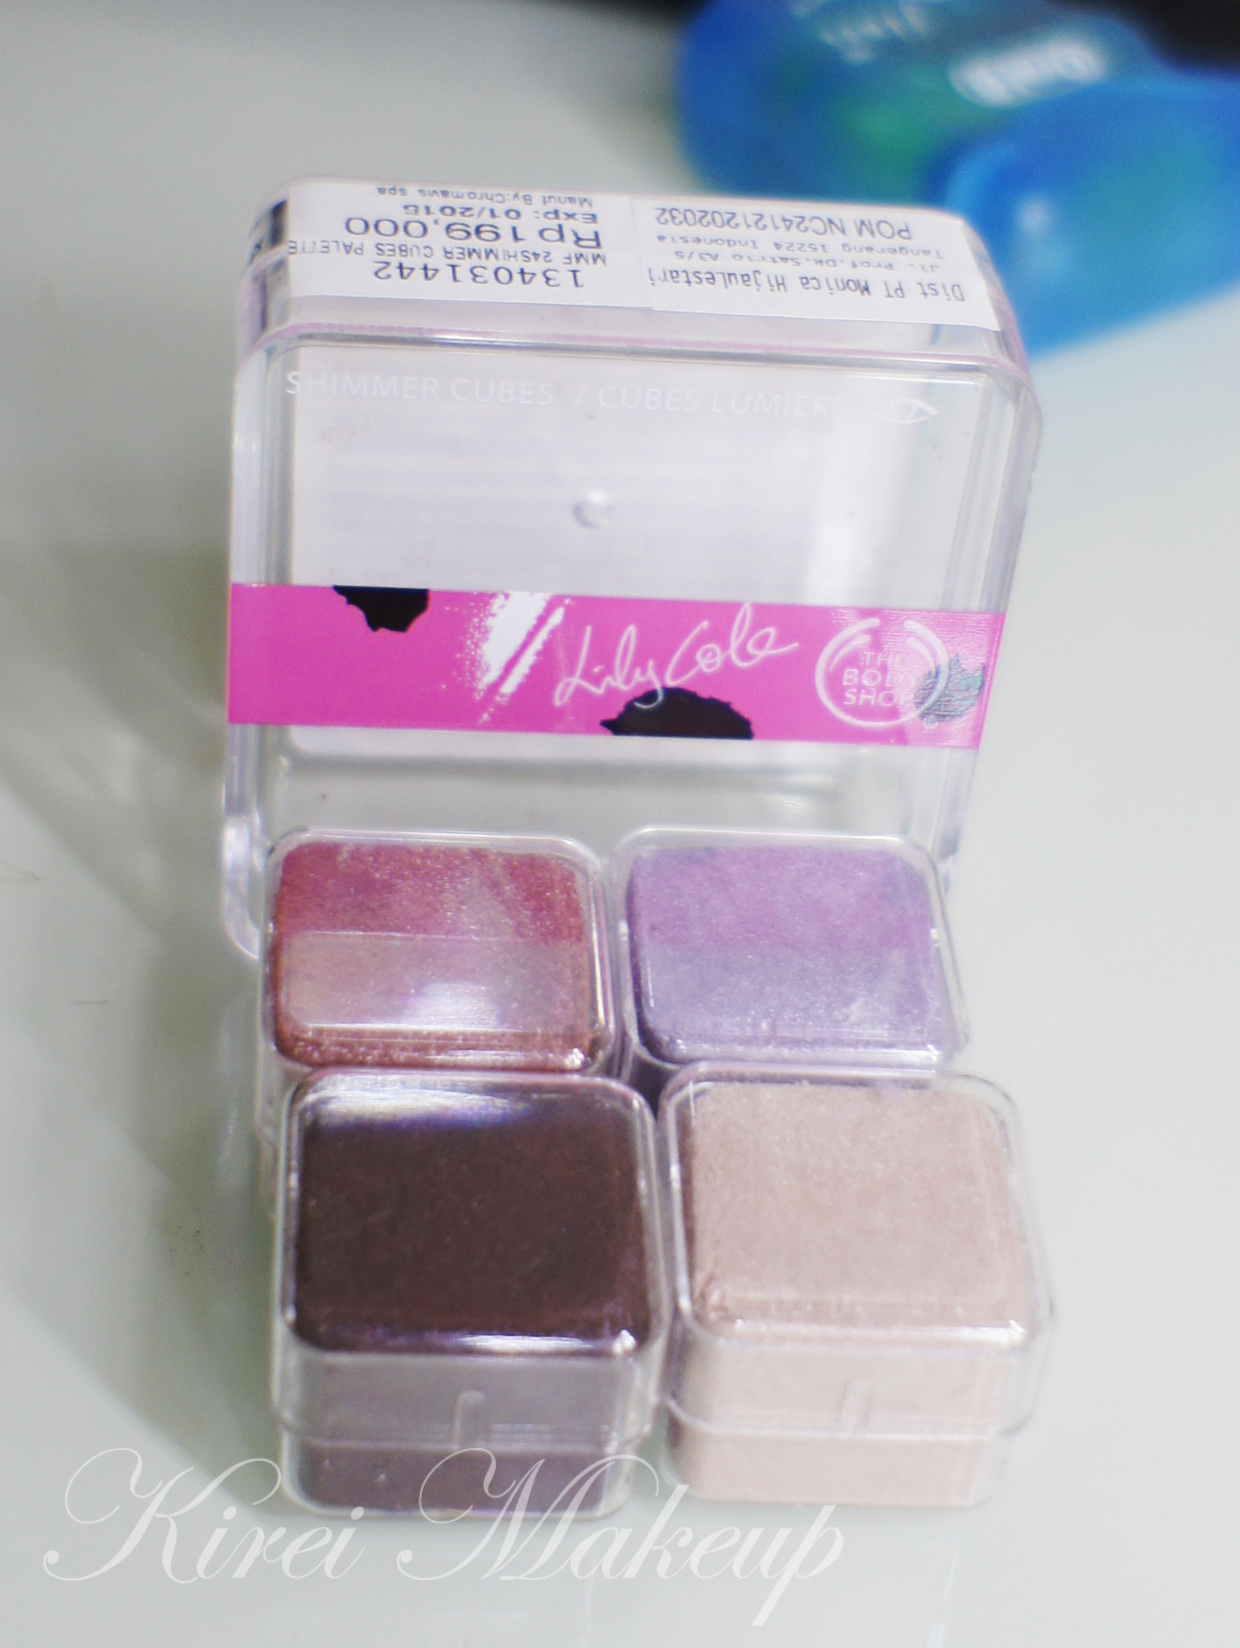
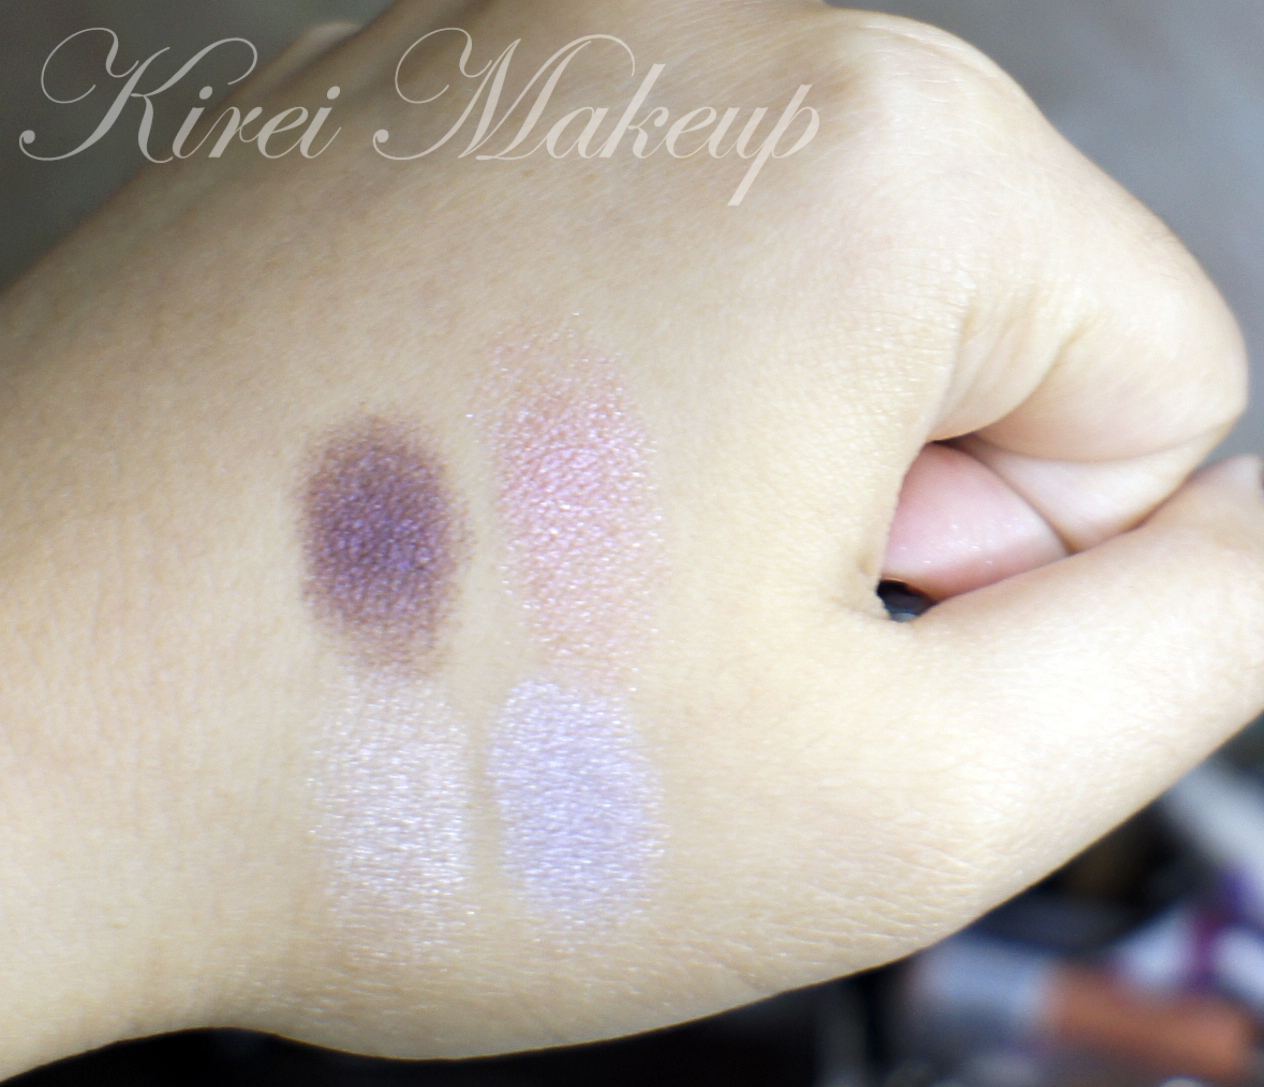
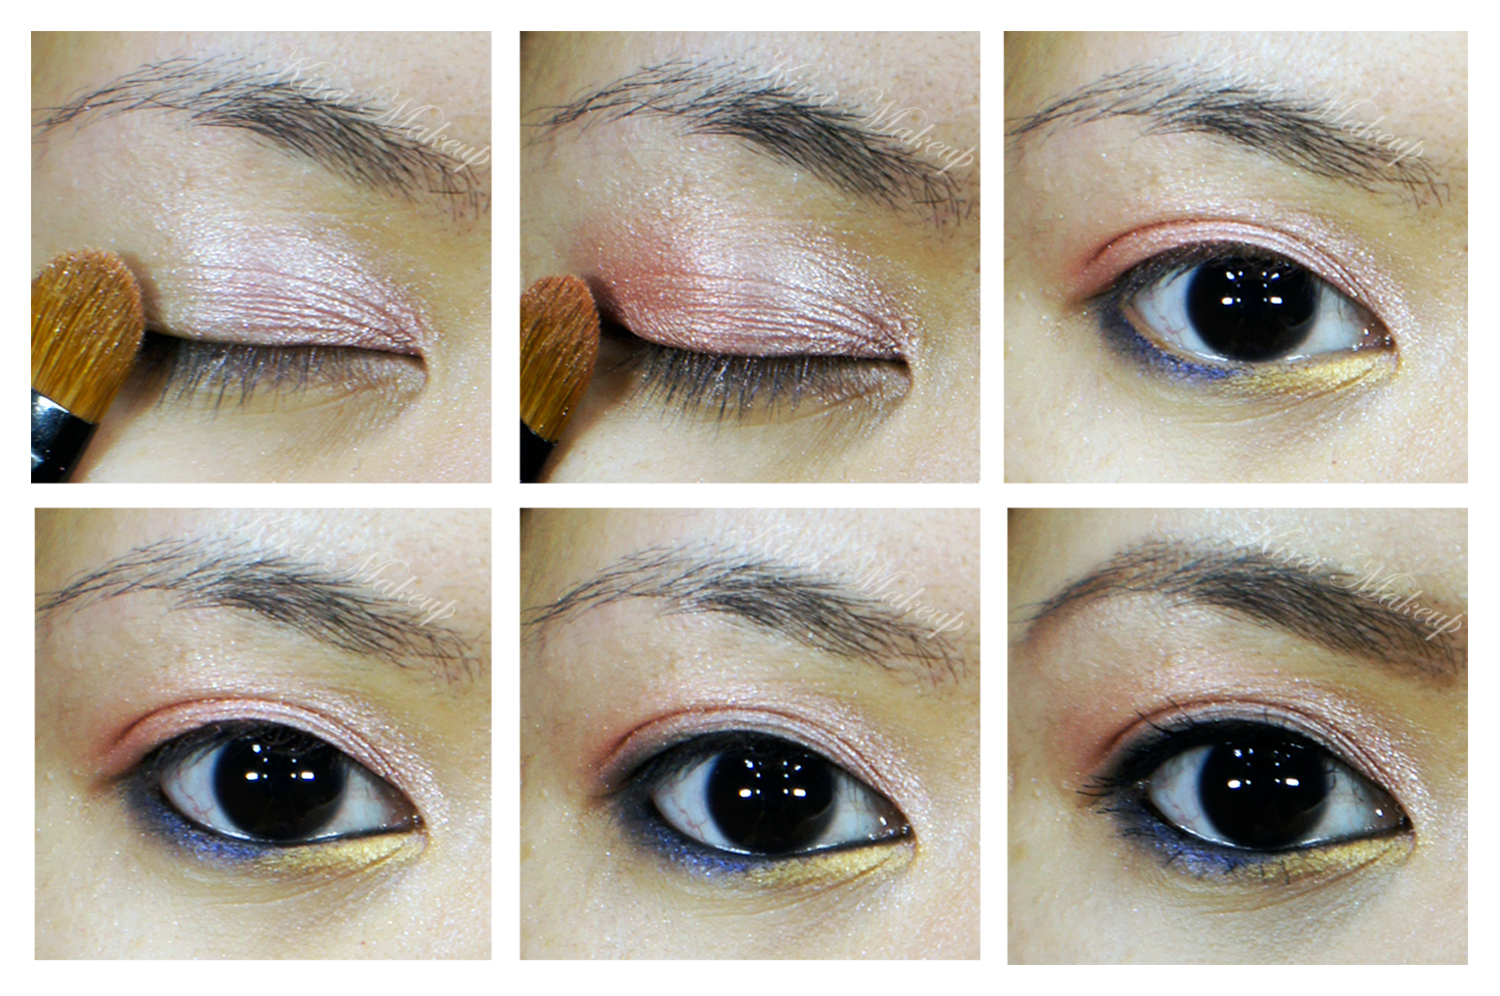
Aye, if you’ve read my previous post, you know this tutorial is coming, right? Right! As I’ve said previously, the colors from this Bodyshop Lily Cole Shimmer Cube are a lot more pigmented when applied with a flat eyeshadow brush. So, don’t be surprised when you see that the colors here are a lot more pigmented than the ones that I swatched on my hand.

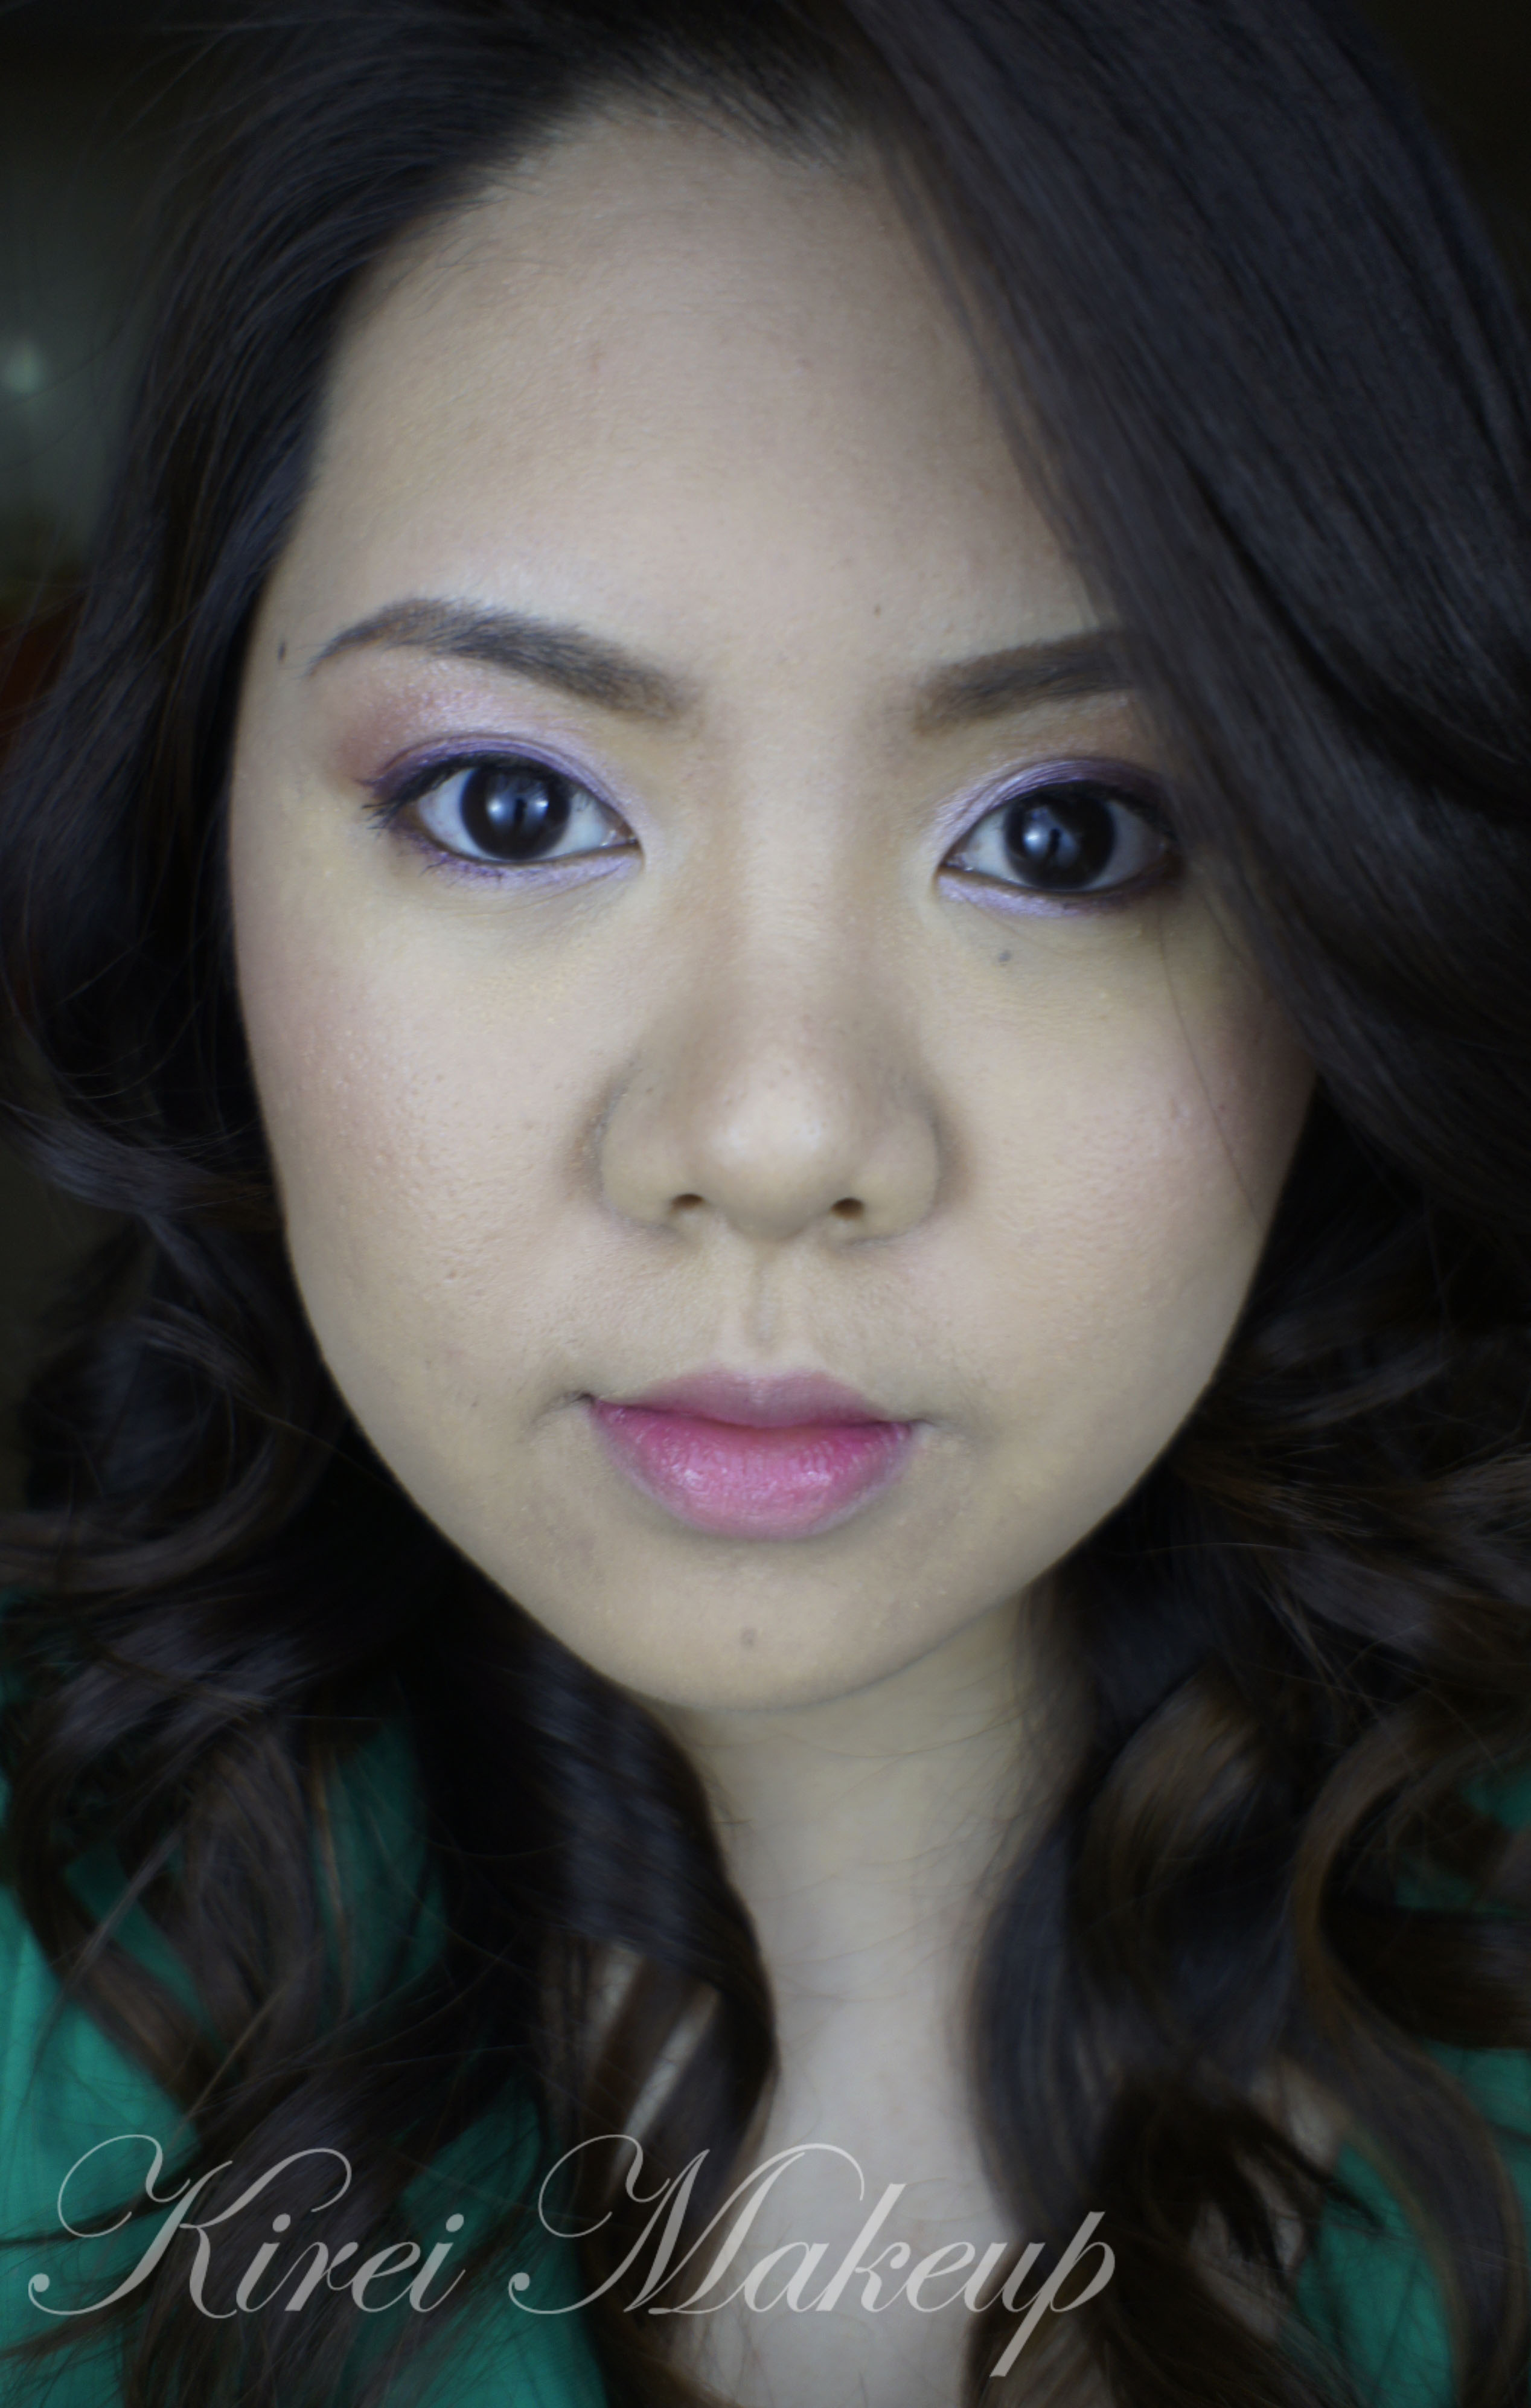
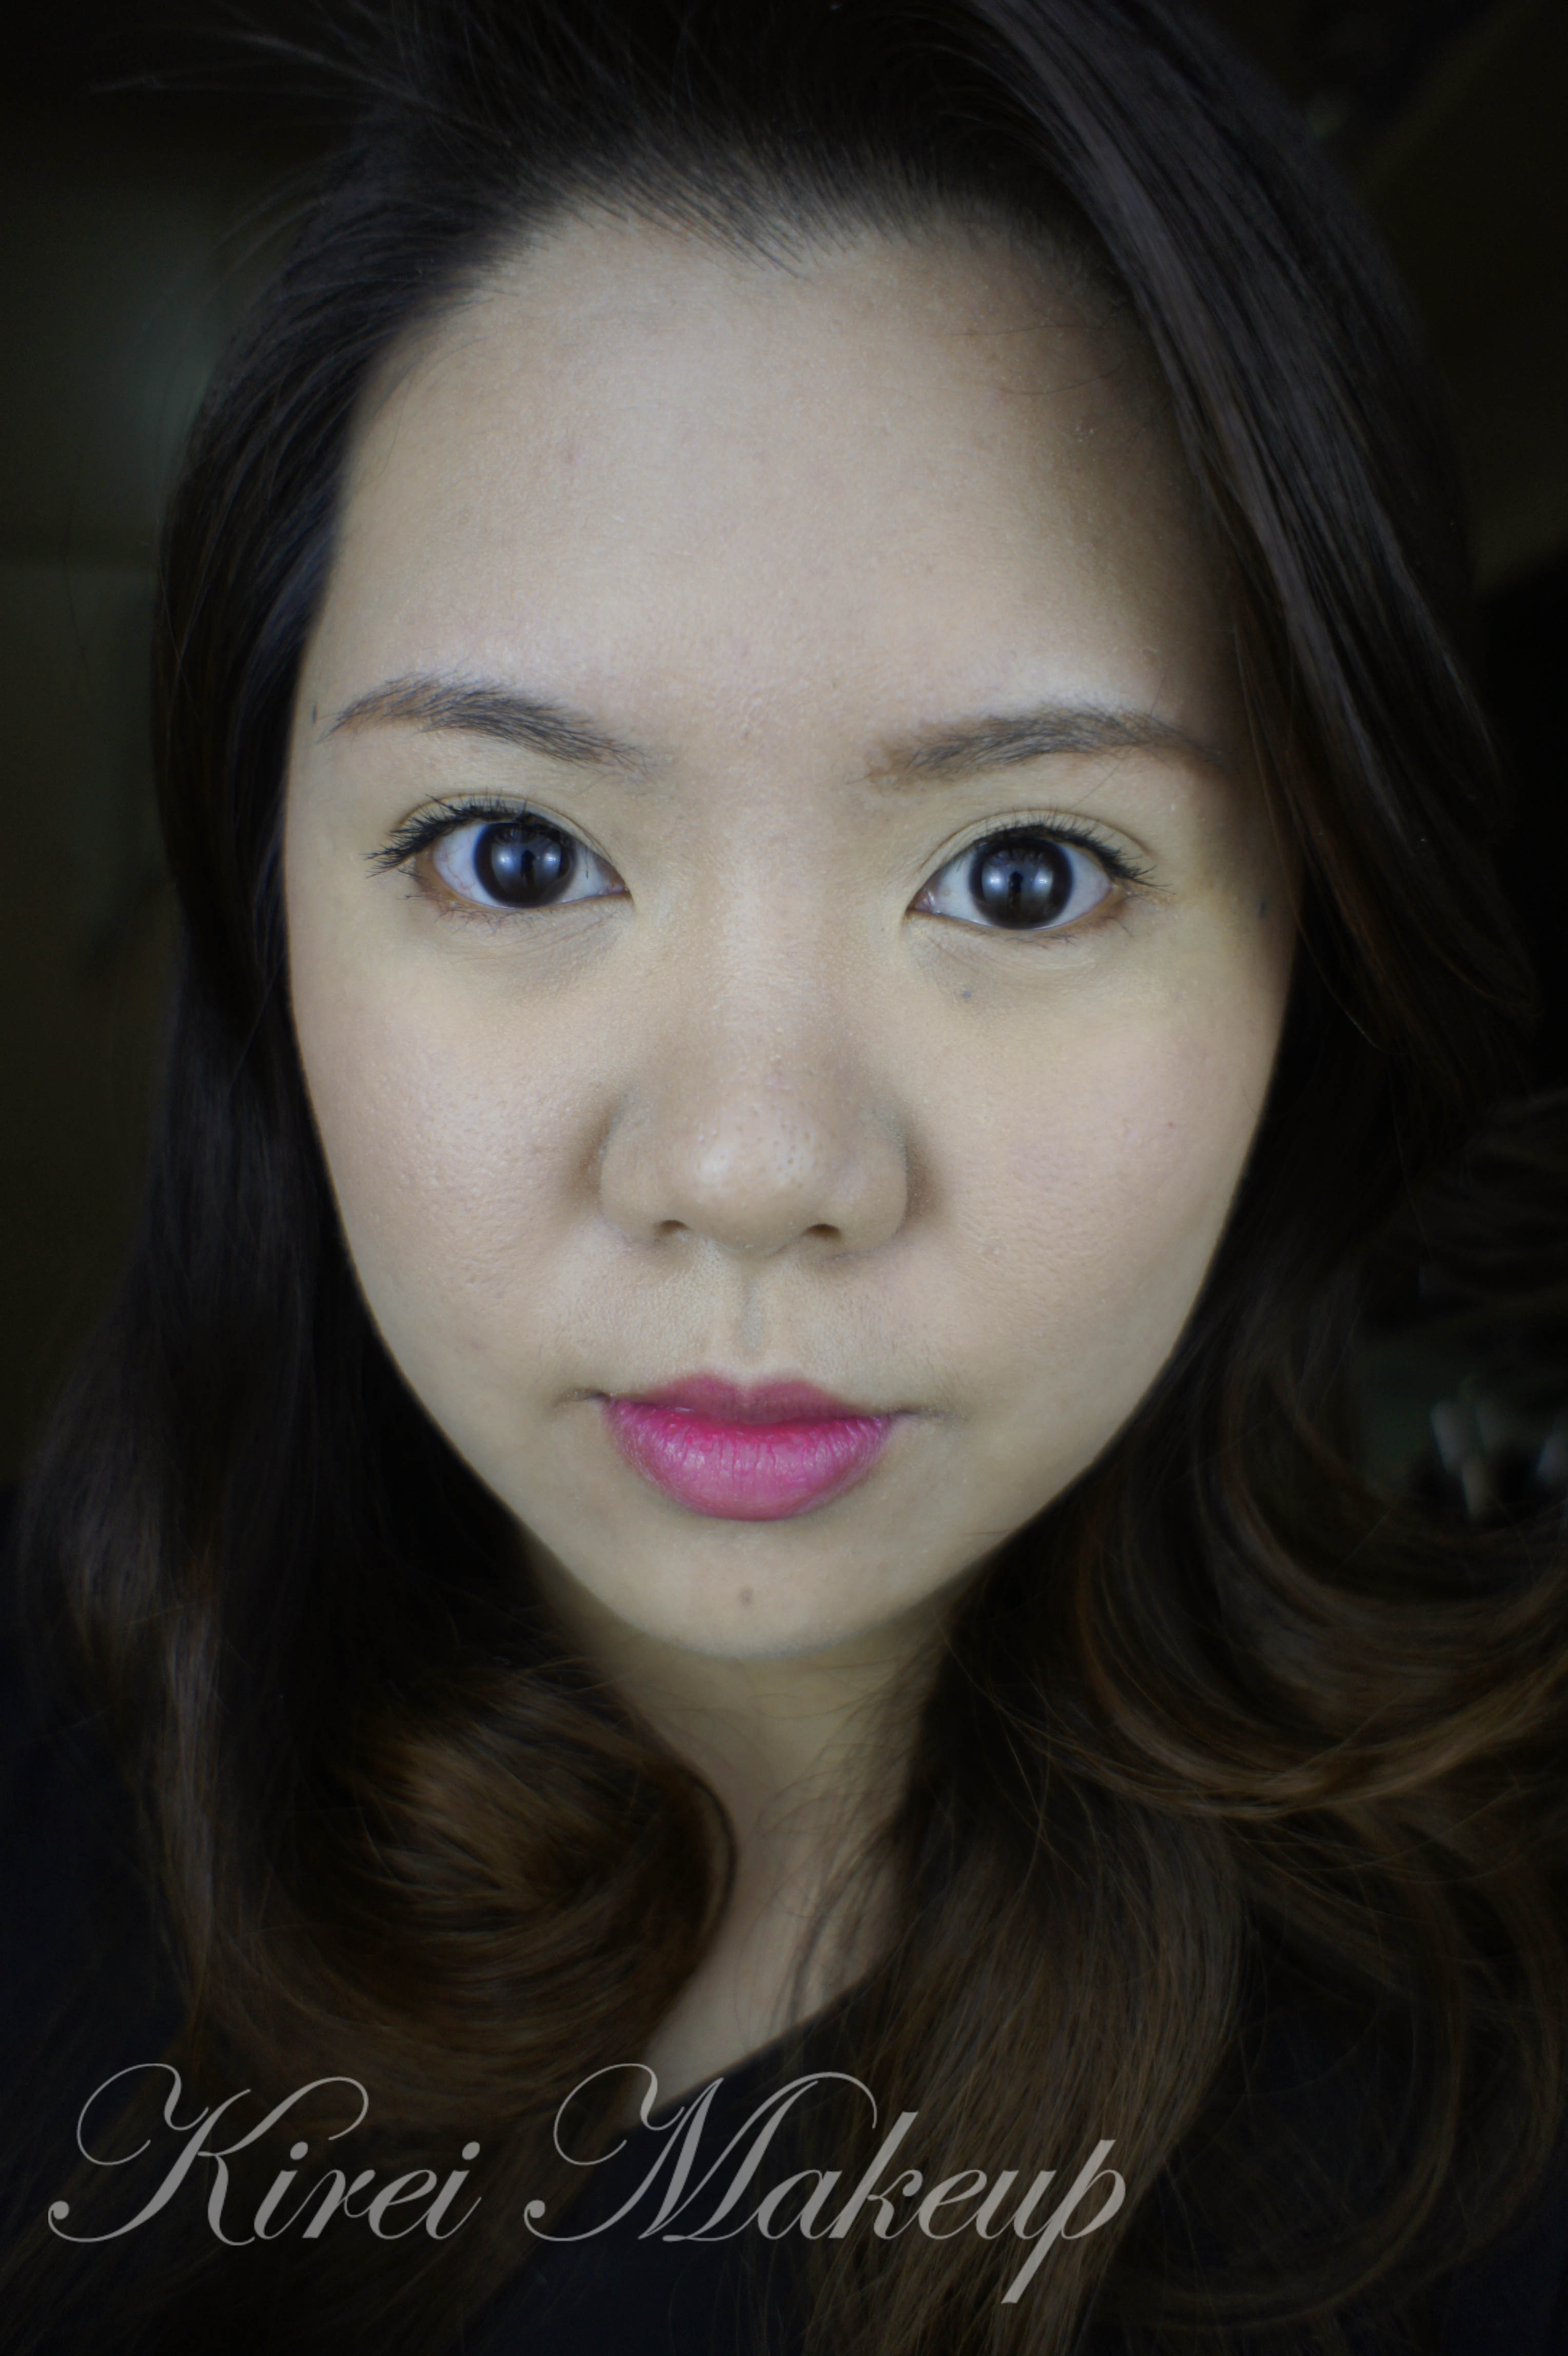
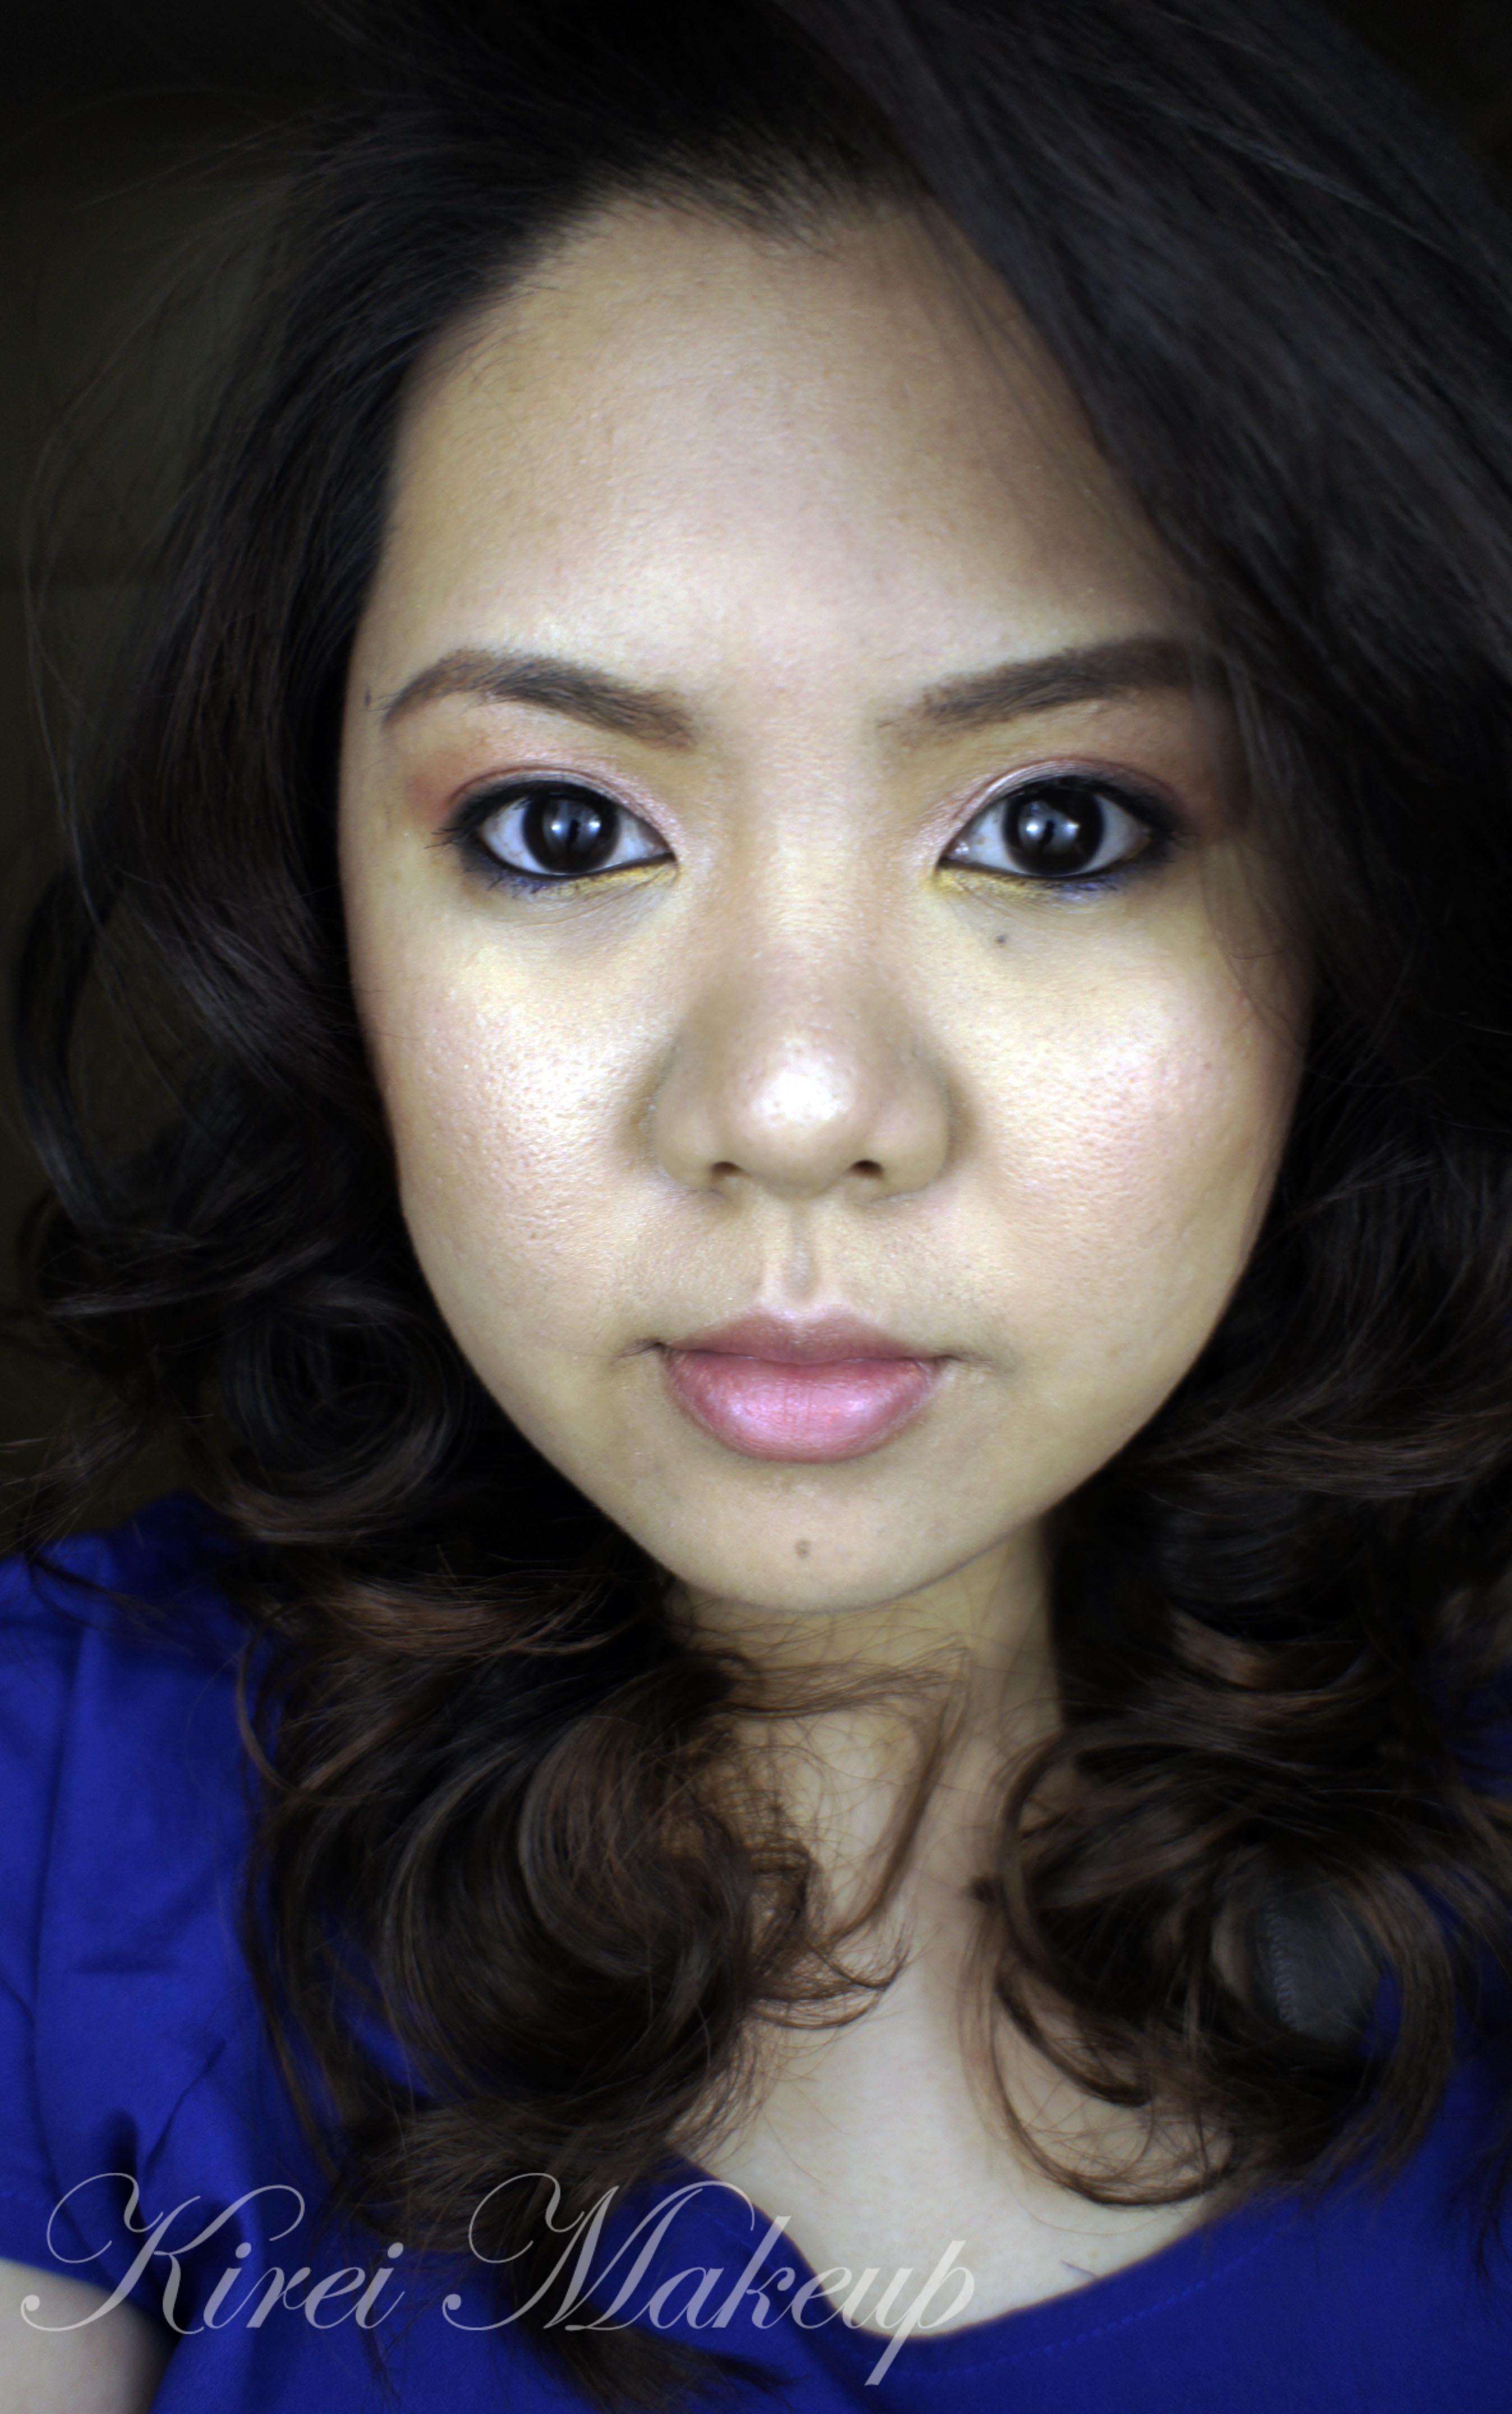
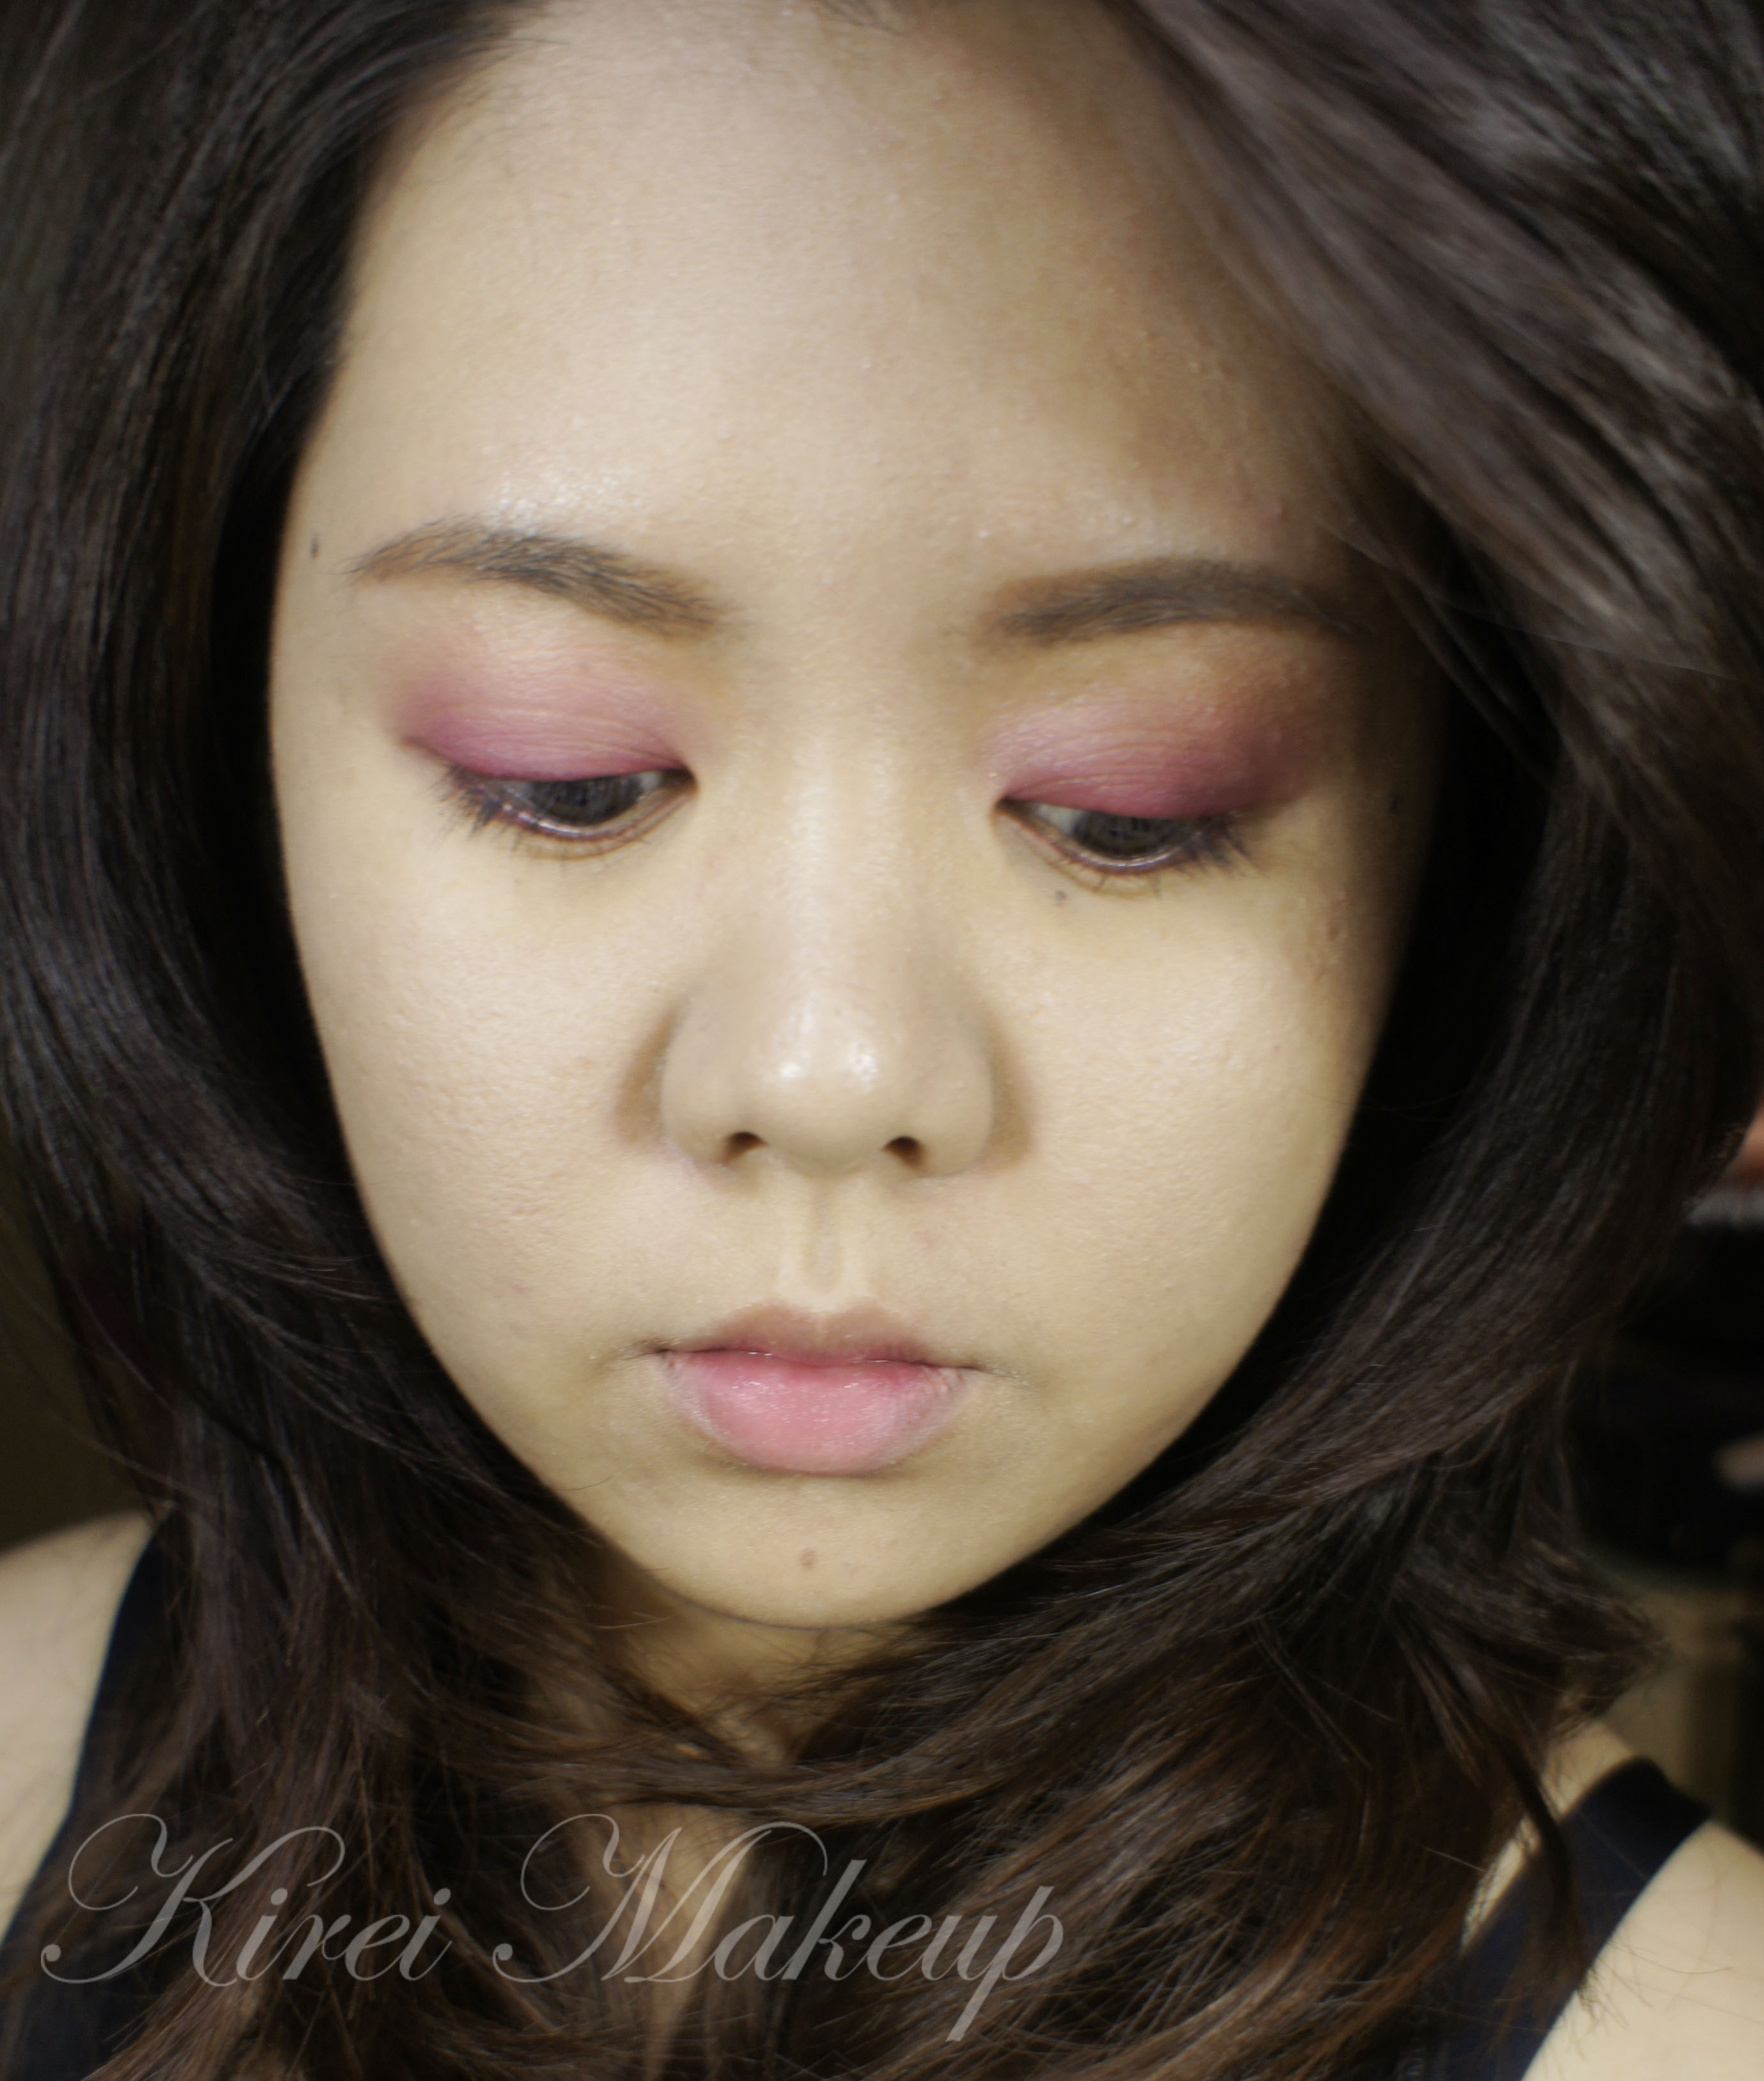
Now, I added an extra full front photo of myself with my eyes looking down. You might notice that the eyeliner on the other eye is way thicker, that’s because one of my eye is smaller than the other one. So, I have to draw a thicker eyeliner on the other eye so when I opened both eyes, the eyeliner looked equal. Also, the bigger eye has a lot more folds/lines. The small eye has an almond shape while the bigger one is more rounded. Ugh, there’s a reason why I have the bangs covering that eye! hahaha..Anyways, doesn’t matter. I can’t really help it, so I just make the best out of it!

Repeat after me, people: my imperfections make me perfect and unique 😉

So this look will suit almost everyone! I’m not sure how this will show up on those with darker skin than mine. I think darker skin might be able to use the 2 dark colors, but might not be able to use the lighter ones. This cube works for any eye colors! The look is very spring. It’s a great look if you dare to wear colors during the day.

Anyhow, let’s get the tutorial started! I prep my eyelids by applying Maybelline Inked in Pink 24hr Color Tattoo.
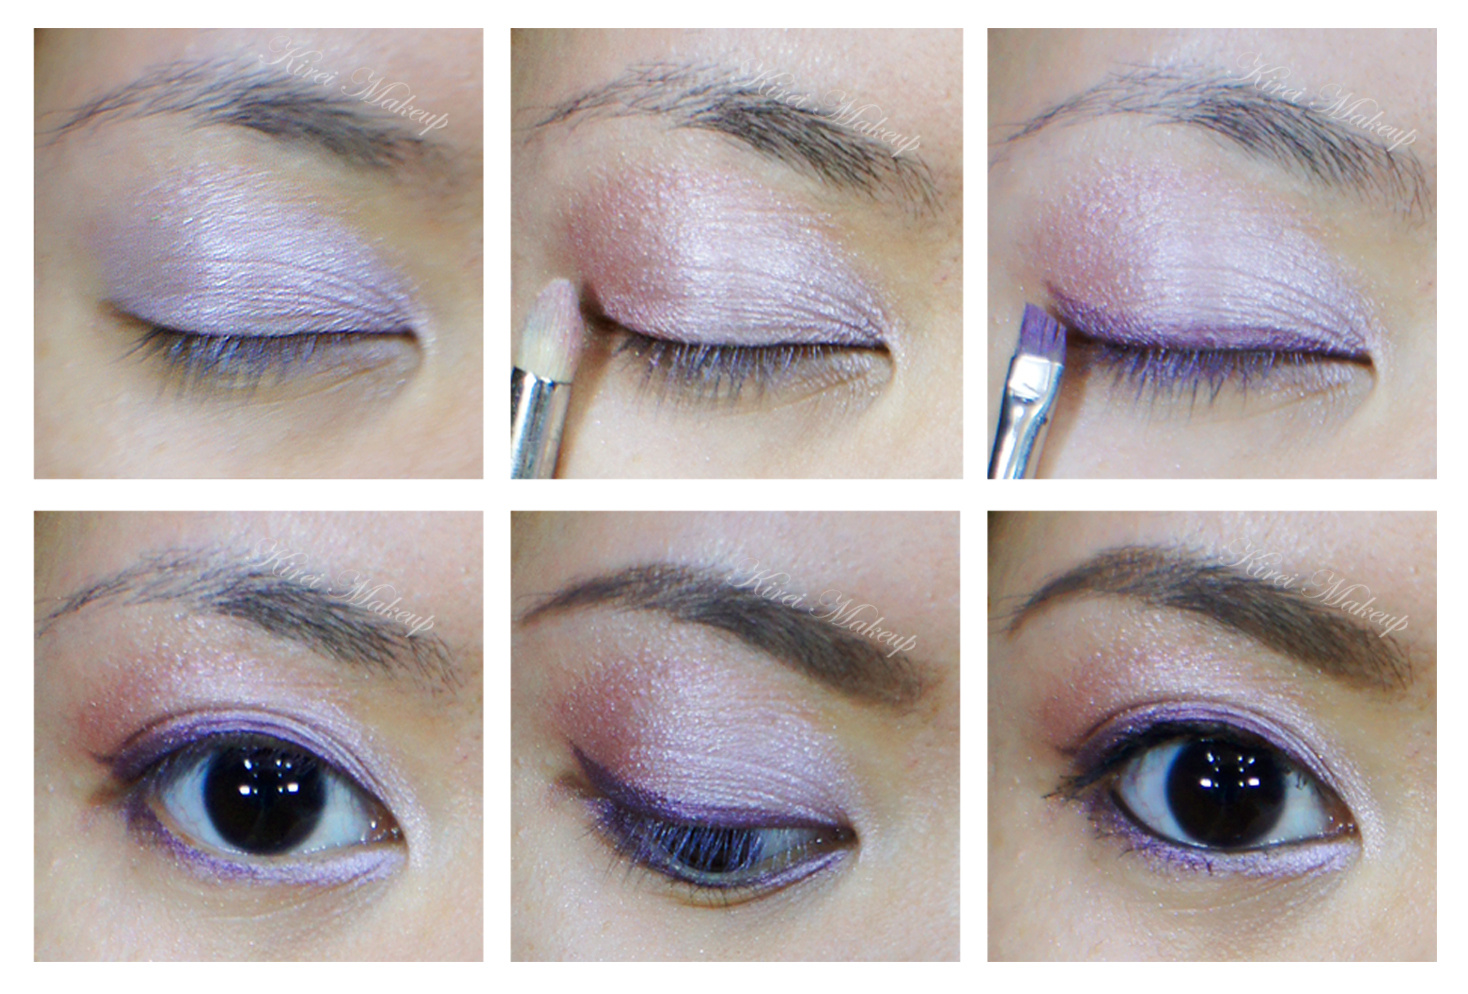
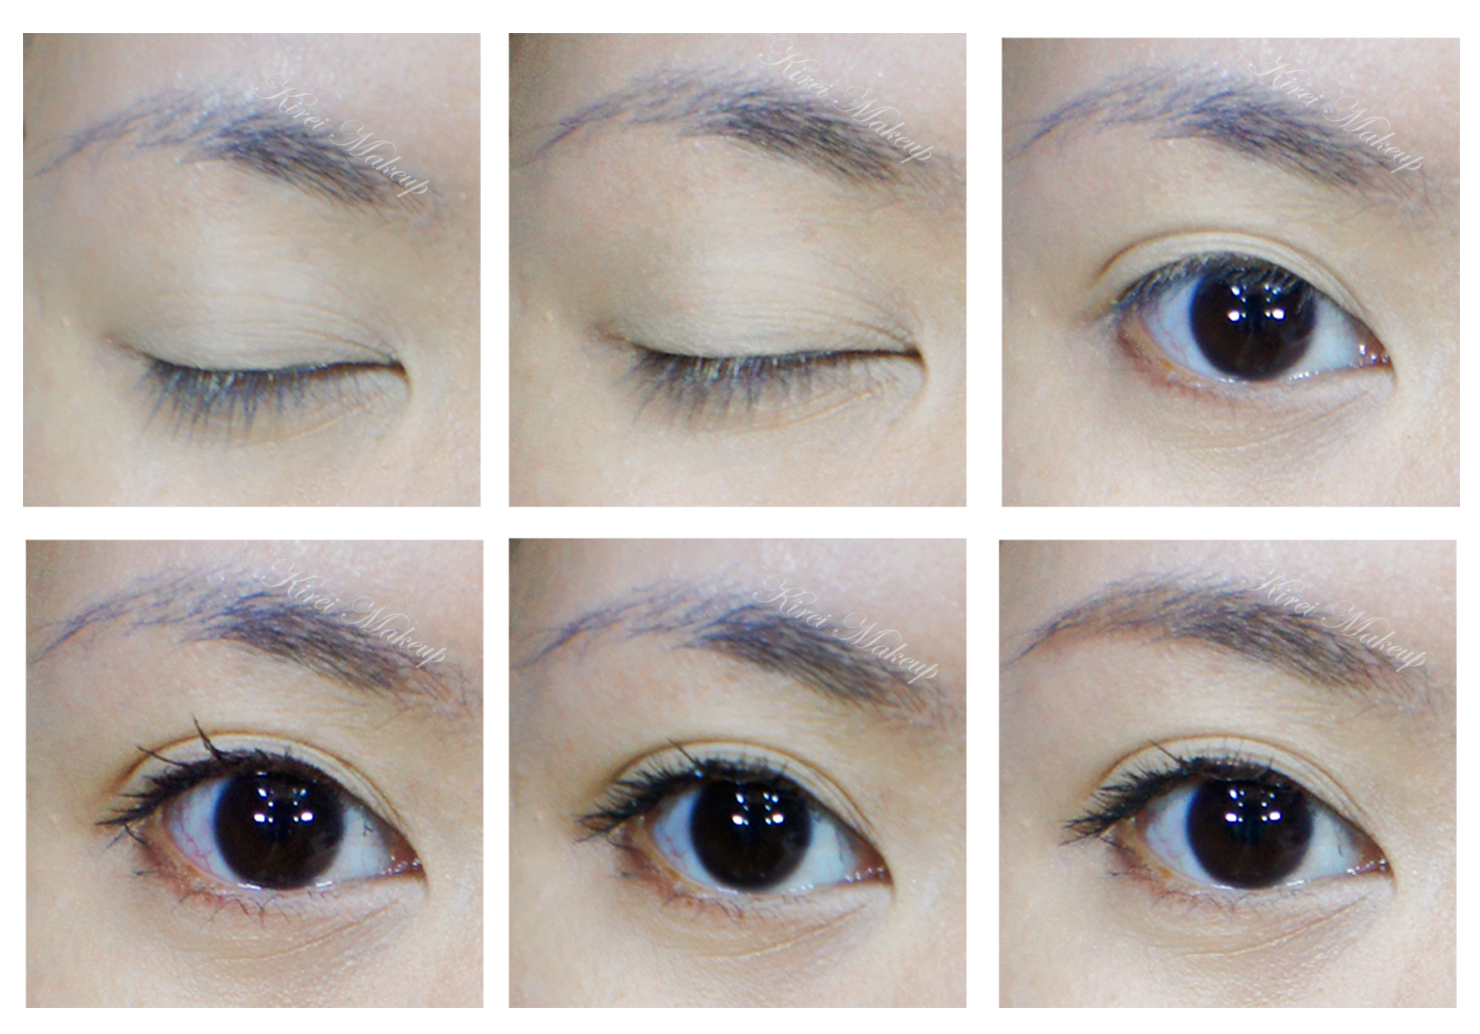
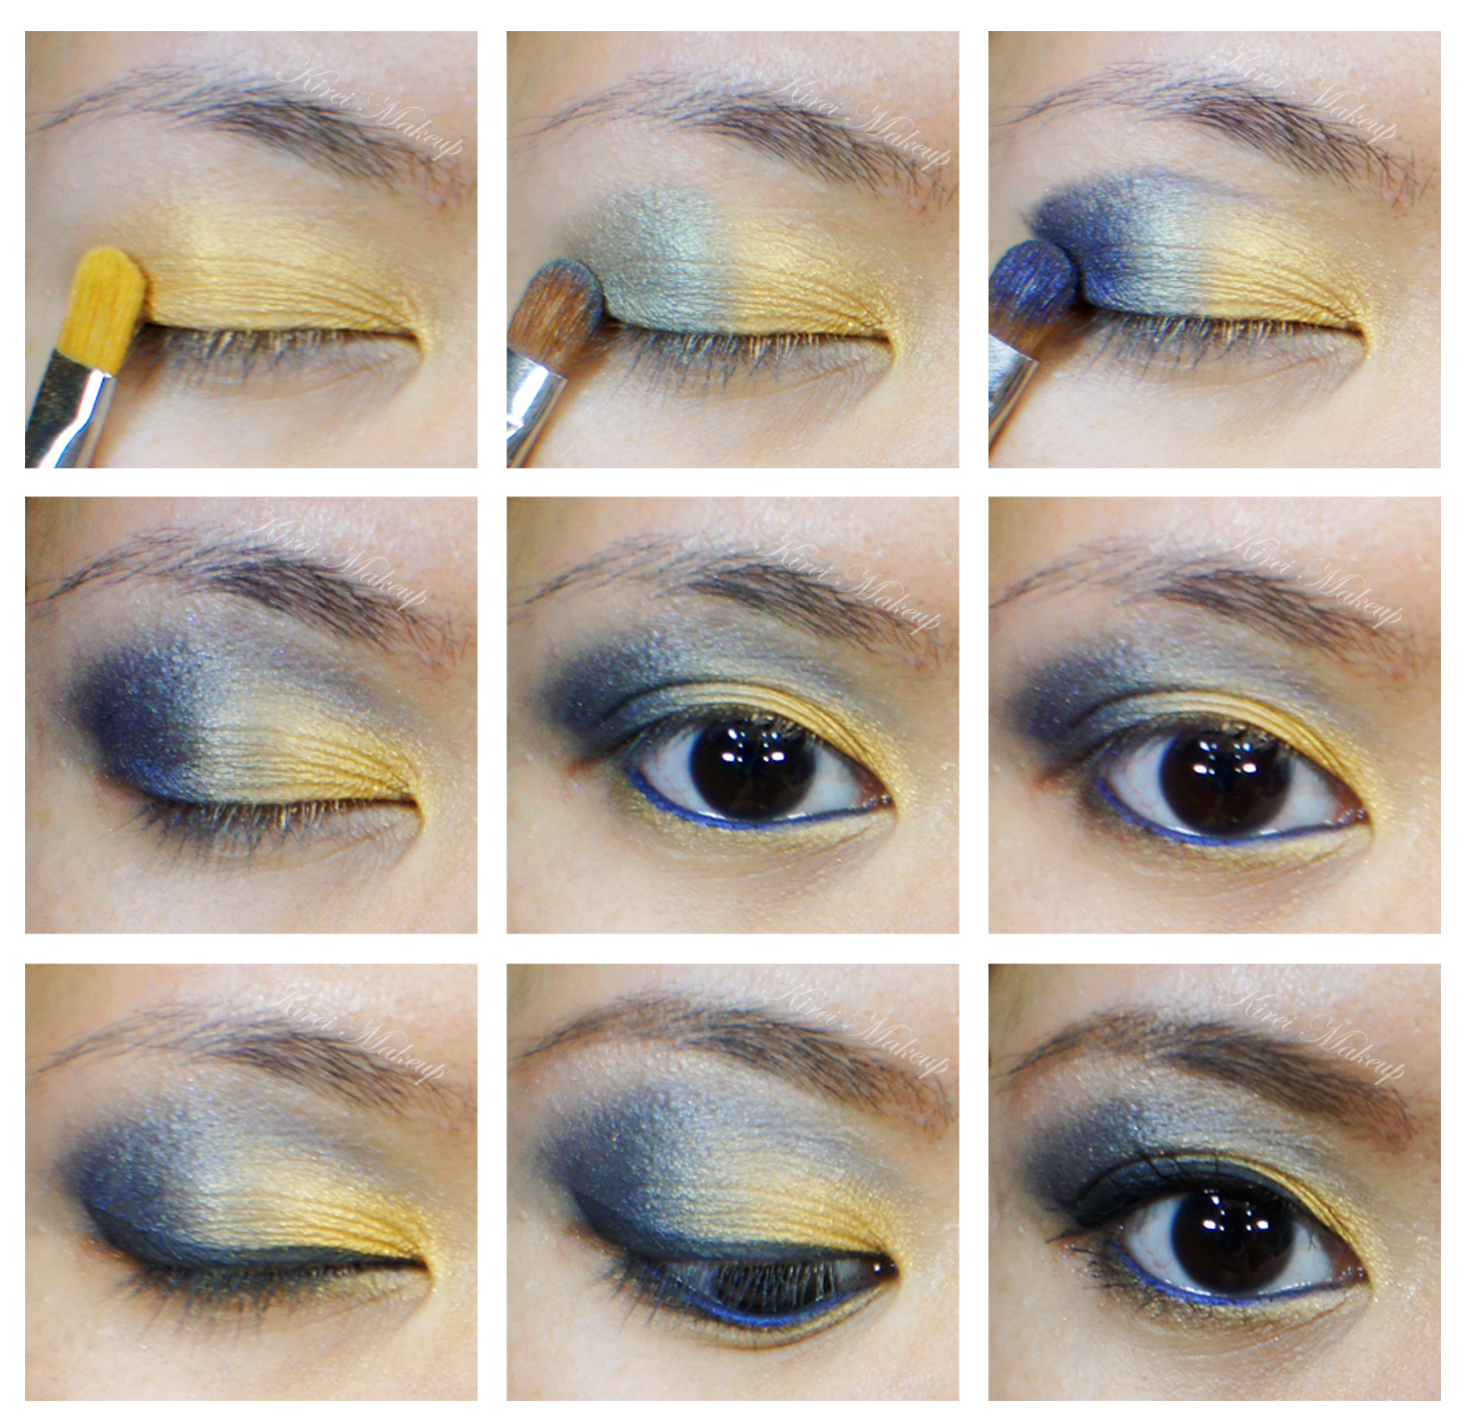
Lilac makeup

How-to:

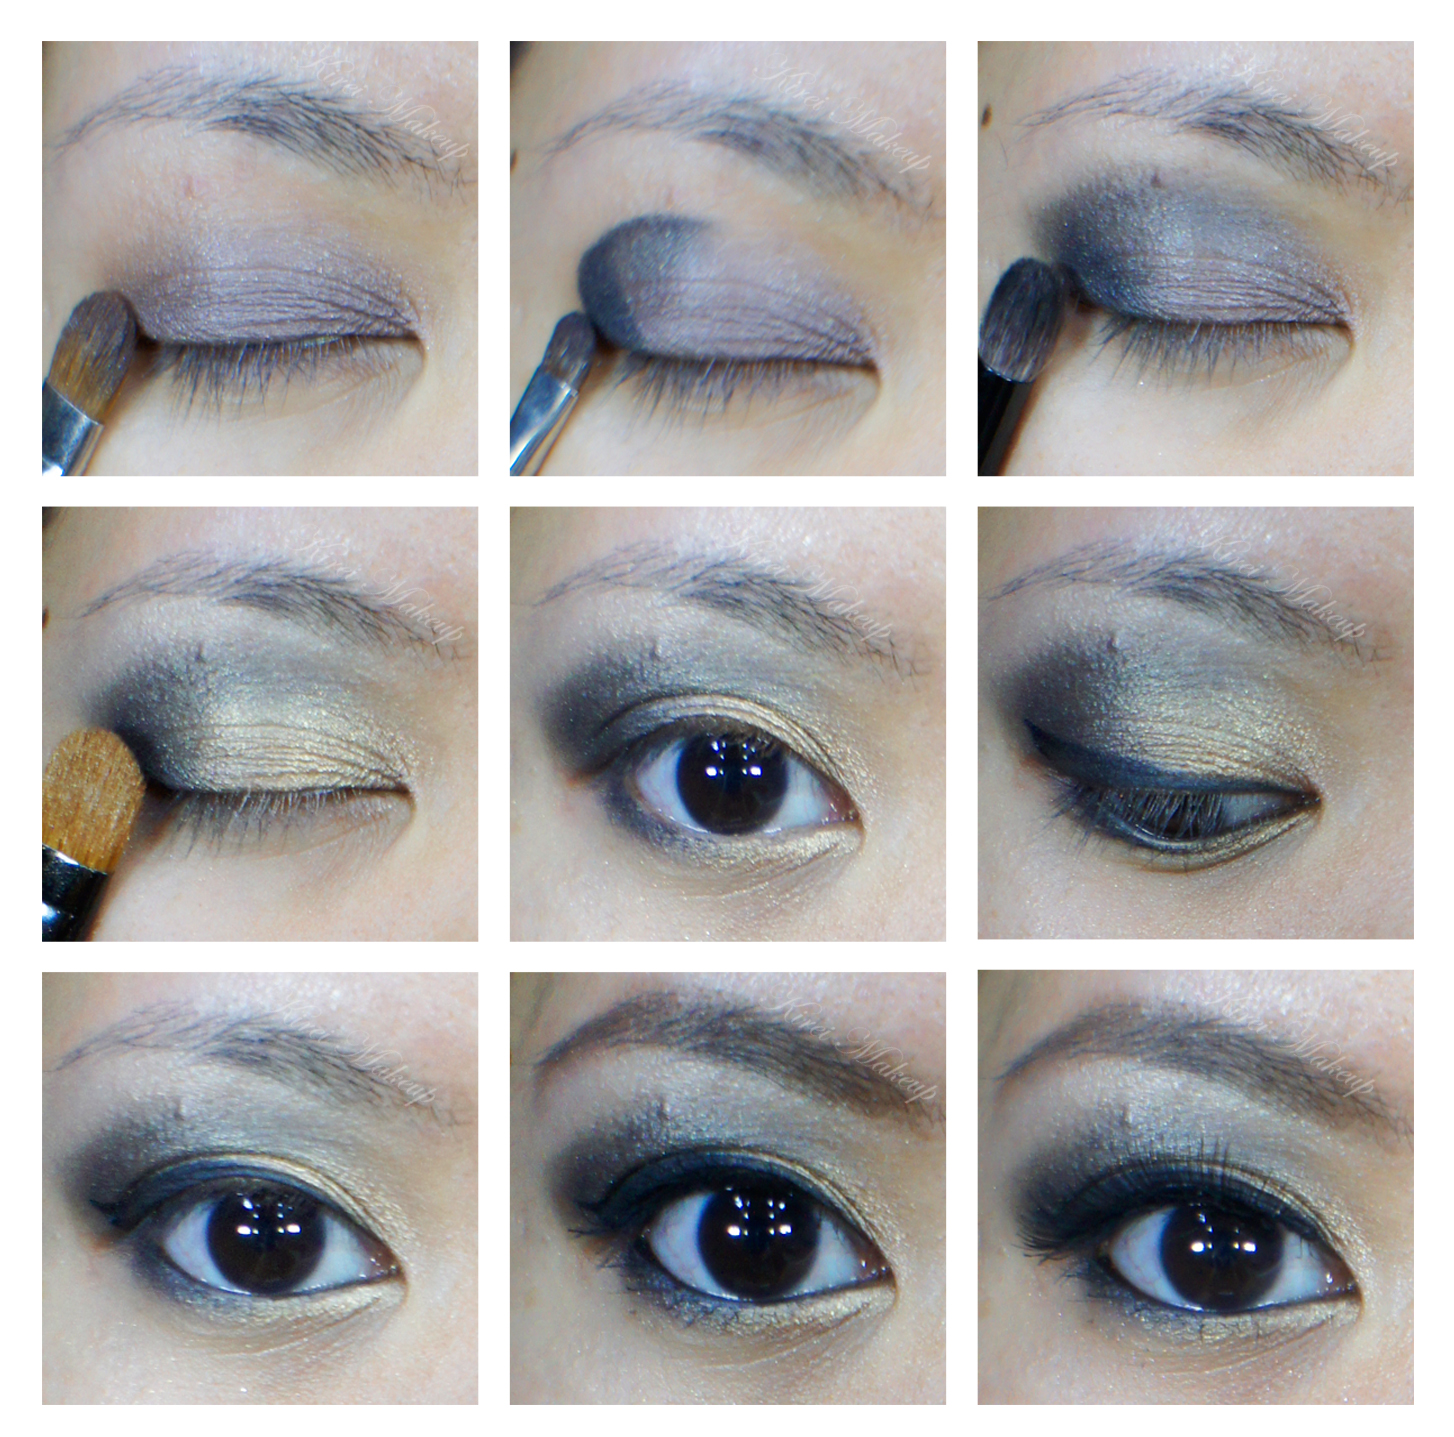
1. Using a flat eyeshadow brush, I applied Live Lilac all over the lid.

2. With a pencil brush, I applied Think Pink on the outer V and on the crease.

3. I blended the crease by applying a clean blending brush.

4. Using an angled eyeliner brush, I dipped the brush in water and then to Go Violet eyeshadow. I created a winged liner on the upper lid. I also lined my waterline using black eyeliner from Annabelle.

5. Using whatever is left on the brush, I applied Go Violet on the lower lashline. I also applied Live Lilac on the inner corner of the lower lid.

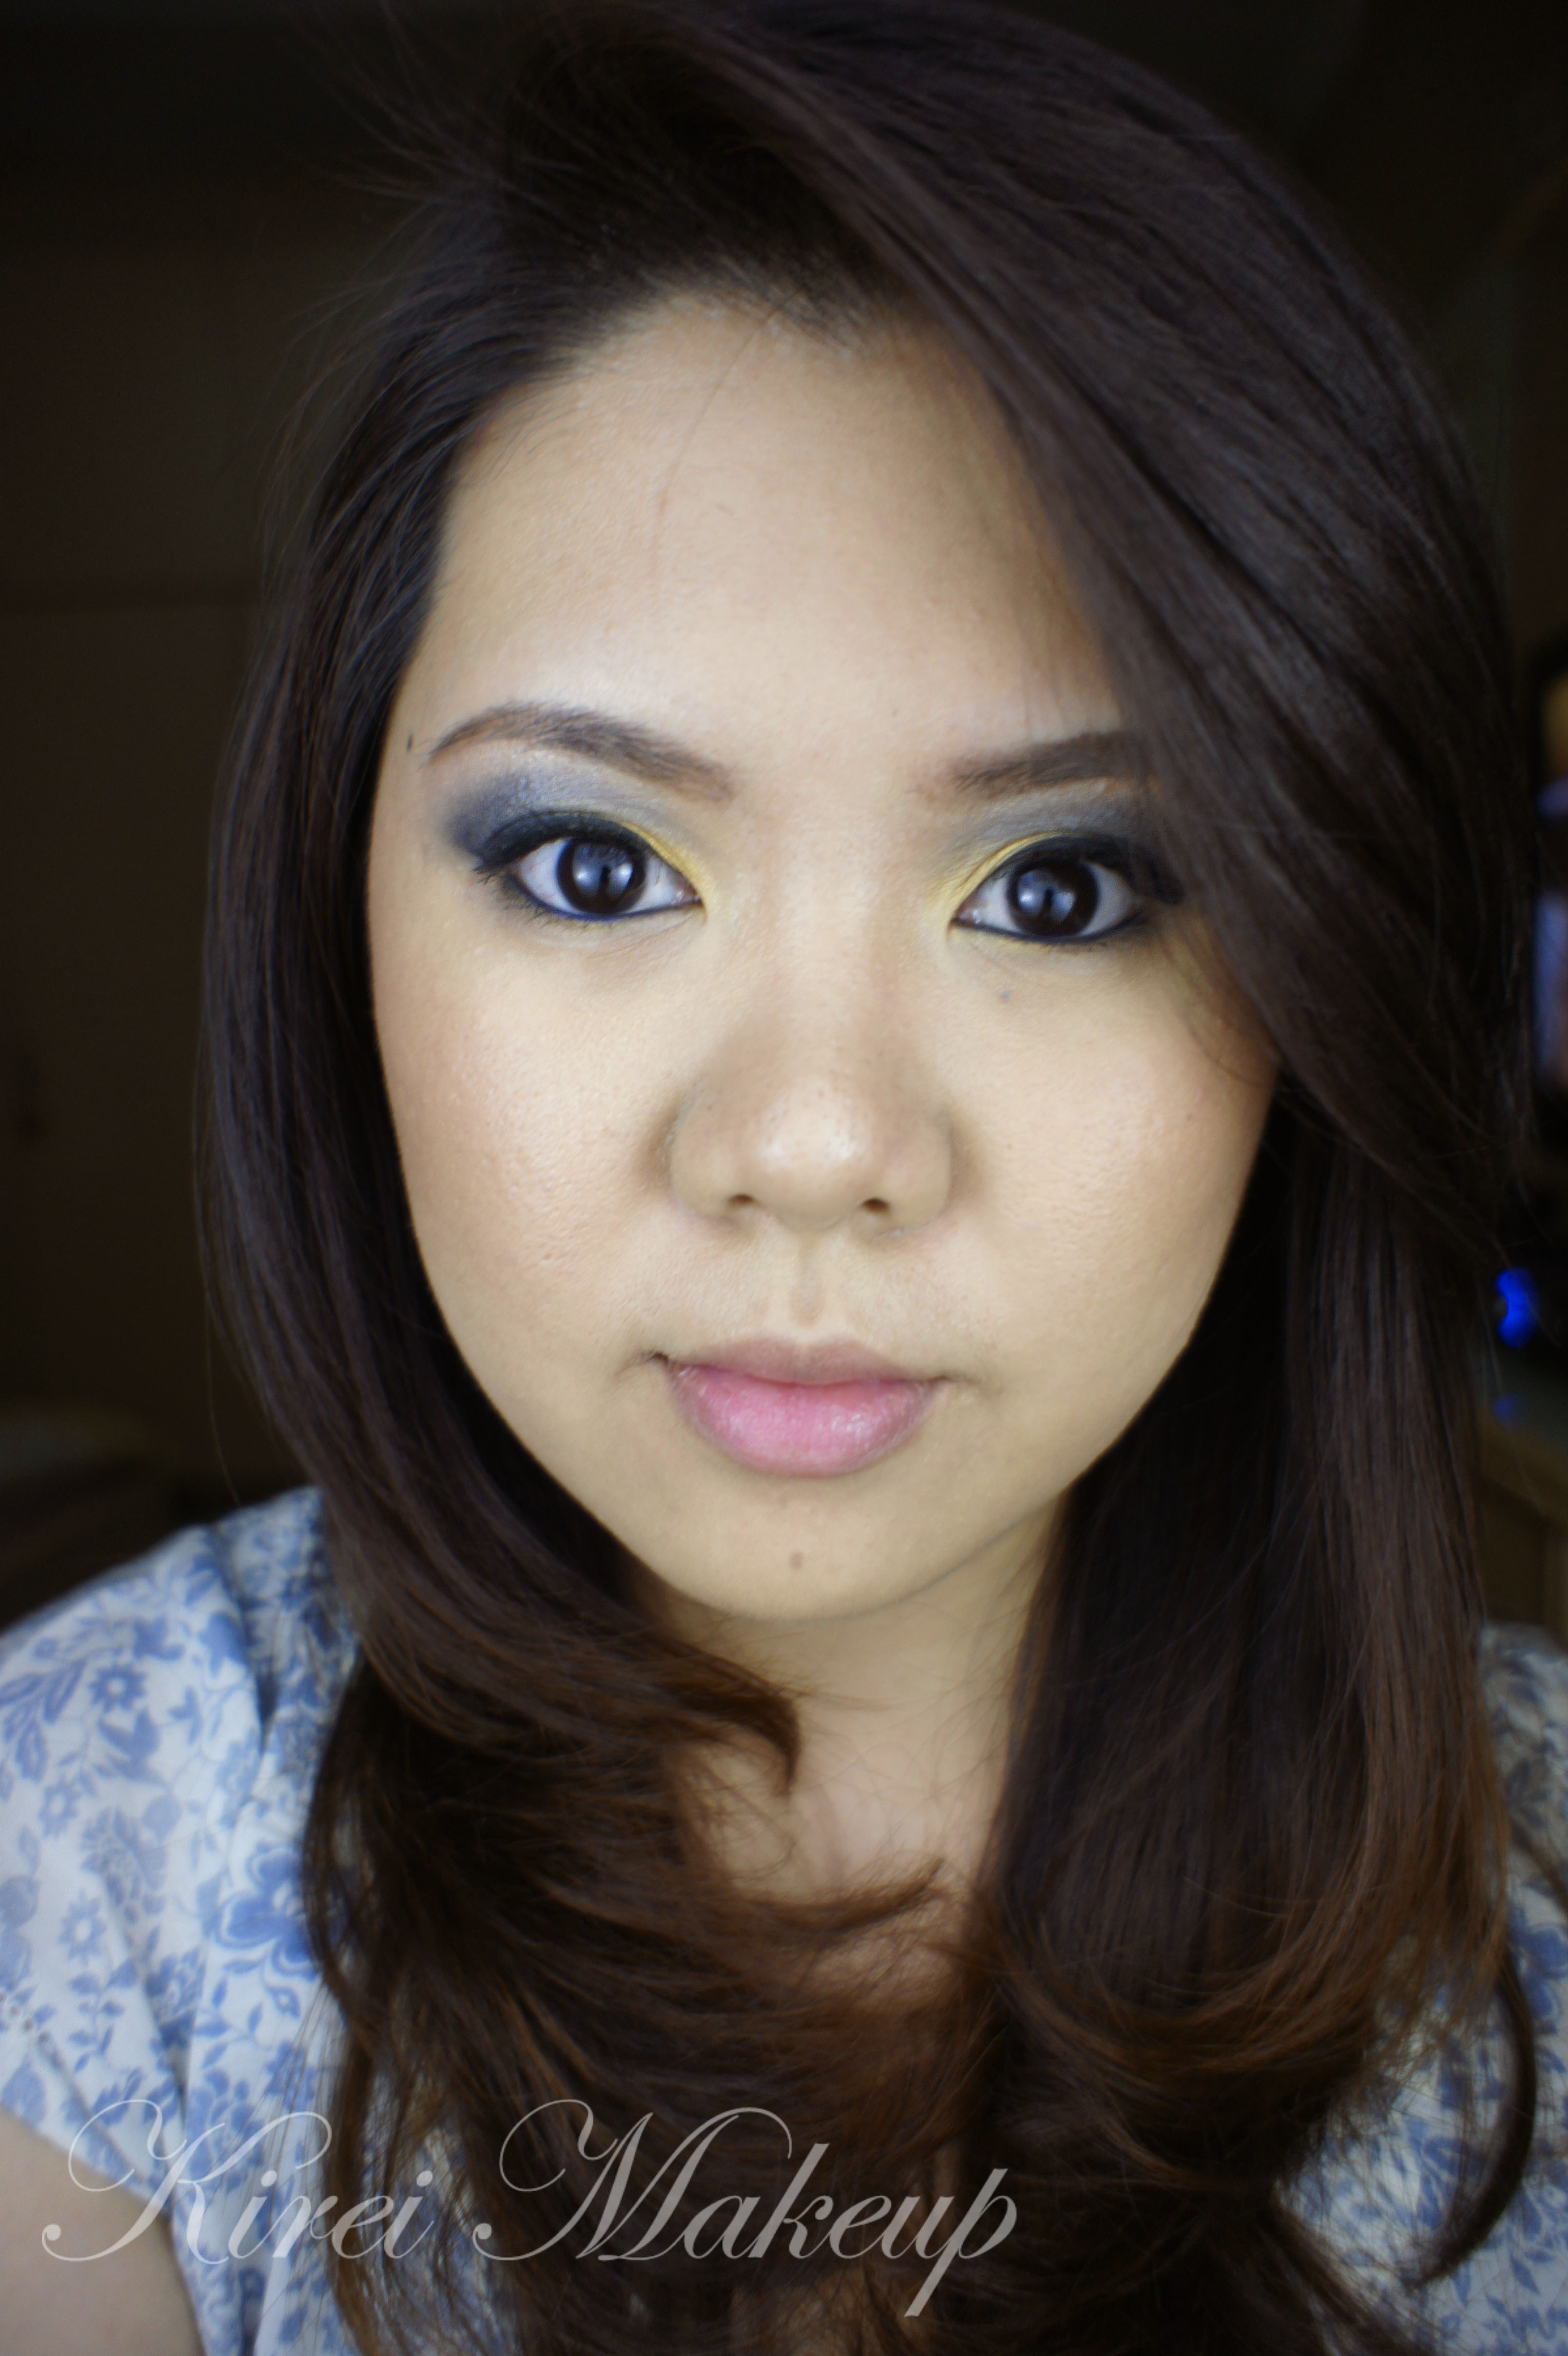
6. I filled in my brows using Anastasia Brow Powder in Brunette.

7. I curled my lashes and applied L’oreal Curl Impact Collagen mascara on both top and lower lashes.

bodyshop lily cole shimmer cube

8. I applied MAC Matchmaster foundation on my face using MAC Stippling brush. This foundation is quite matte, and I purposely chose it because the eyes are quite frosty.

9. I powdered my T-zone using a loose powder.

10. I contoured the side of my nose and the hollow of the cheeks using MAC Shadowy.

11. For the cheeks, I applied MAC Well Dressed blush.

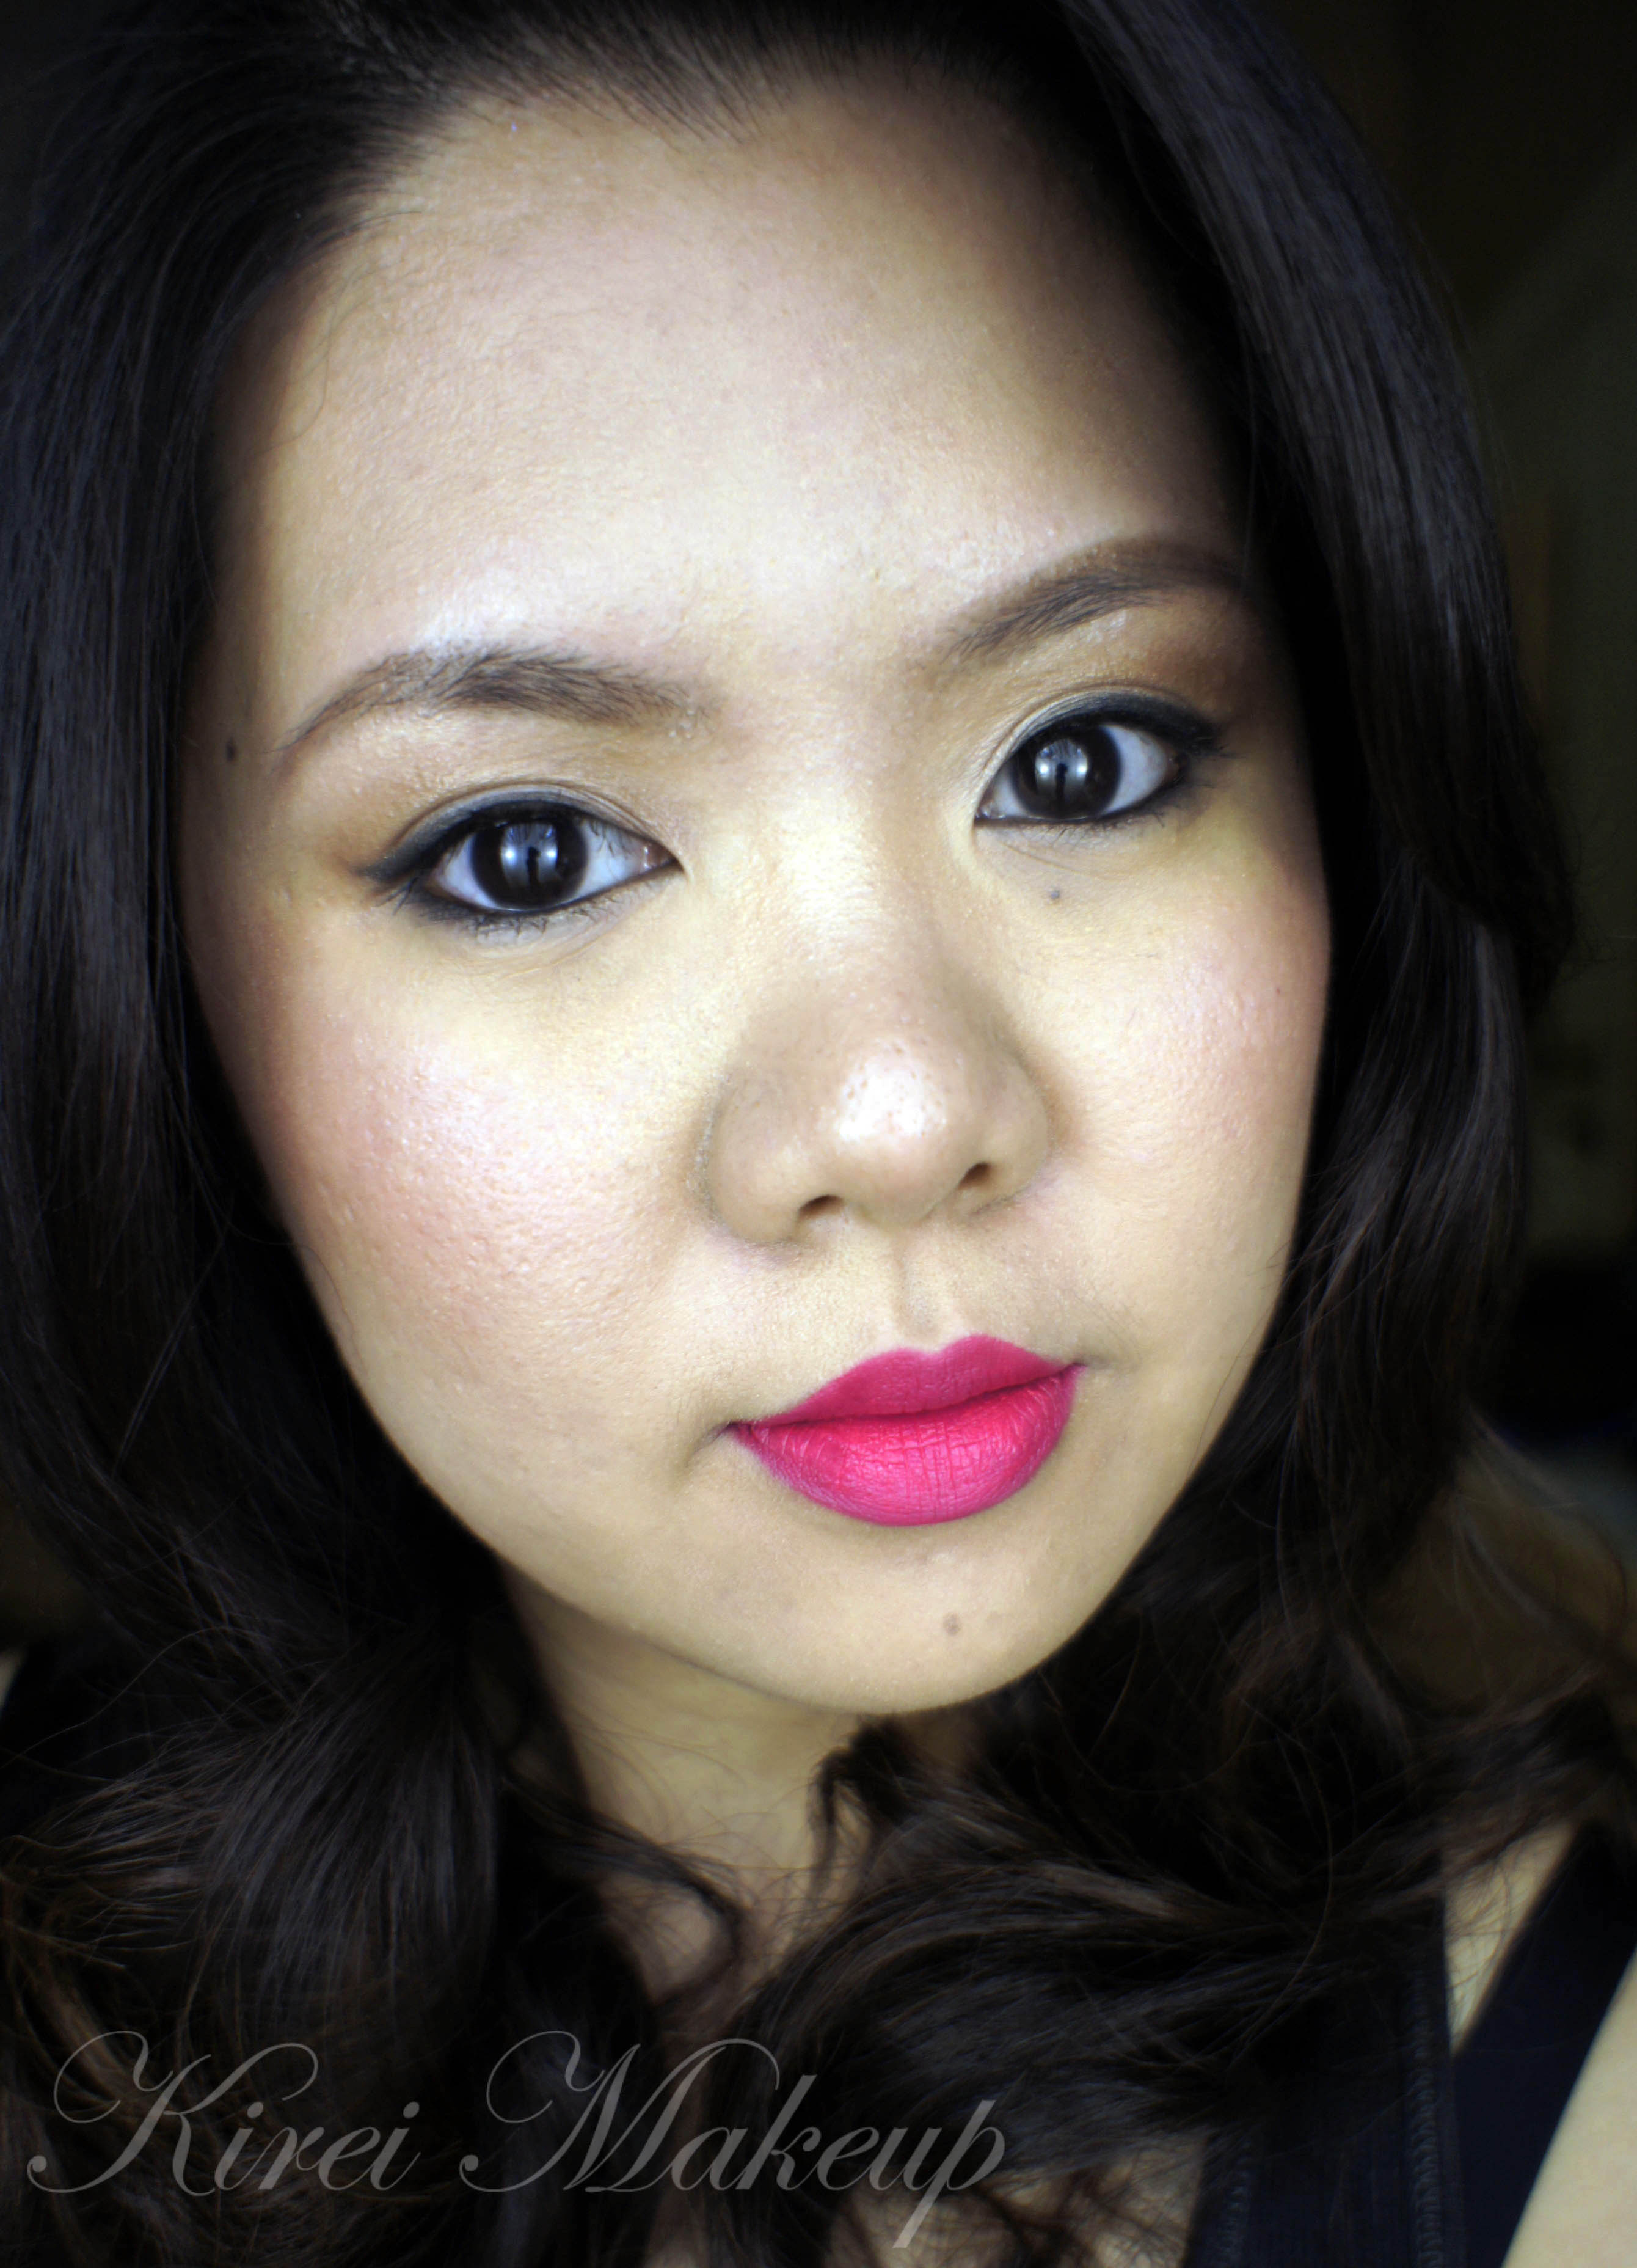
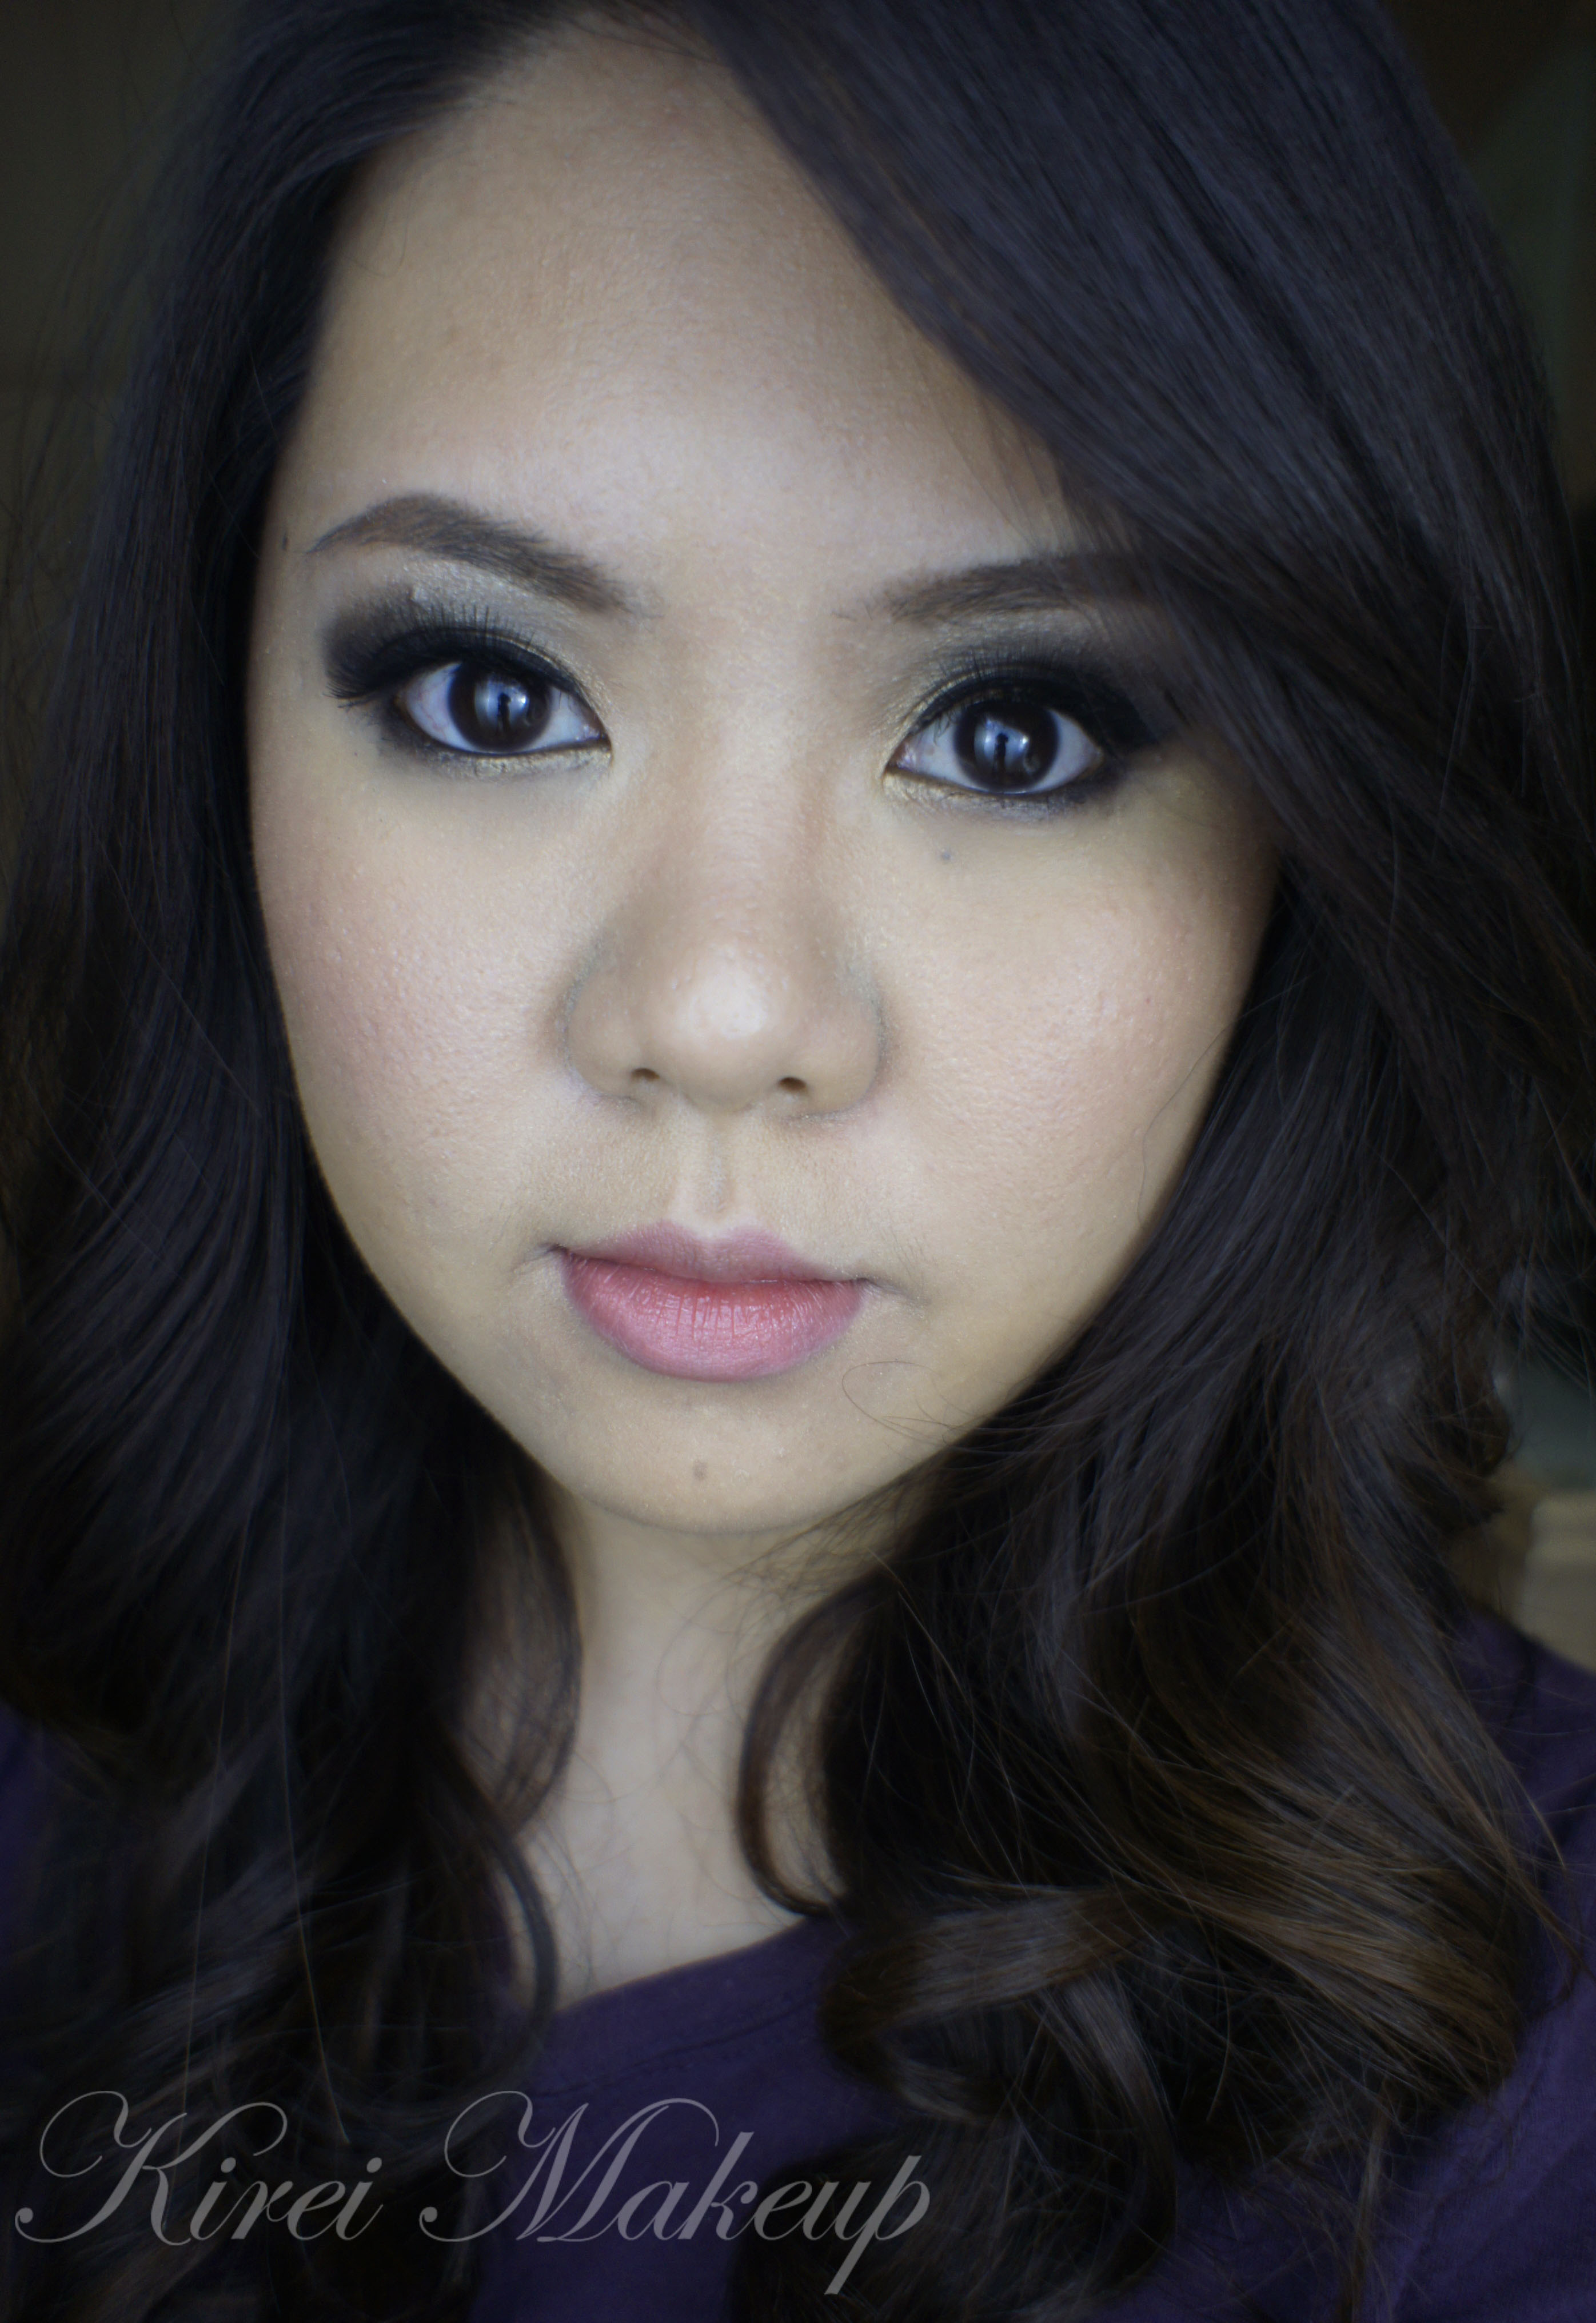
12. For the lips, I applied Revlon Just Bitten lip balm in Crush on the center of the lid and blended it outwards using my finger. On top of it, I applied a clear lipgloss and blot excess off.

spring makeup 2013

Bodyshop Lily Cole Shimmer Cube

I had the most pleasant experience in The Body Shop Indonesia at Emporium Mall the beginning of the week. The staff who worked there was extremely nice without being too intrusive. You know what I mean? In Jakarta, the staff sometimes are either too friendly and pushing sales too much, or they can be unfriendly and unhelpful. It felt really nice to be able to shop inside a store with someone who was helpful, but not pushy. It was really nice!

As always, this is not a sponsored or ad post. I bought this product out of my own pocket and my review is based on my experience. let’s get to it!

Bodyshop lily cole shimmer cube

I was looking around the Bodyshop store to stock up on my Tree Tea Oil Facial cleanser to wash my brushes, and I came across the Bodyshop Shimmer Cube. Now, I’ve had experience with a few of them before, but I found them to be too frosty and the colors are so-so. However, I couldn’t take my eyes off this gorgeous Lily Cole Shimmer Cube (no. 24).

The Lily Cole Shimmer Cube is perfect for Spring! It consisted of Think Pink (top left), Go Violet (bottom left), Live Lilac (top right) and Tint It Pink (bottom right).

  • Think Pink: cranberry with metallic finish.
  • Go Violet: deep plum with metallic finish.
  • Live Lilac: frosty lilac.
  • Tint It Pink: frosty champagne with a pink undertone.

Lily Cole Shimmer Cube

Yes, this is a limited edition product. If you want it, grab it as soon as you can in your nearest store! This cost Rp. 199,000 in Indonesia. This no. 24 cube isn’t available anymore online in Bodyshop Canada and Bodyshop USA.

Texture:

Even though it’s called a Shimmer Cube, I find most of the eyeshadows to be on the frosty side for the lighter colored ones, and metallic for the darker ones.

Application:

Easily blendable and very smooth, to my surprise. I’ve had bad experience with another shimmer cub, but this one is pretty good. Best applied with a flat eyeshadow brush so that you can pack it on the eyes. Very little fall-out.

Pigments pay-off:

Very lovely! Ok, I know it might not look like as though it’s super pigmented on my hands, but when I applied it on my eyes using brushes, it’s quite pigmented. If you apply it dry, the pigment is sheer, but if you apply it wet you can get more pigments out of it. Just you wait till you see my next post with a tutorial using the shimmer cube. You’ll be surprised! I, especially, love the Lilac eyeshadow!

Price:

Surprisingly cheaper than the N. American counterparts! It’s USD$22 and CAD$22, and I believe it’s AUS$40.95 (all prices quoted from the respective BodyShop websites). It’s only Rp. 199,000 (about USD$20) in Indonesia!

lily cole shimmer cube

Lee Hi It’s Over MV Inspired

Hi all! This look was requested by Sarah over on Facebook! I think the video was super cute and the makeup is very chic. From the video itself, Lee Hi has 4 different looks mainly playing with the lip colors: pink in the center and nude on the outer, bright pink lips all over, orange red lips and lastly peach colored lips. The eyes pretty much stayed the same. It’s a very doll-like makeup. I quite like how she looked in the video. Very cute!

I did the tutorial in a rush and I didn’t get the chance to look closely on the video, but I think she might have a thin eyeliner on the upper lashline, which I skipped (my bad). It also seems that she had individual lashes put it. I only owned the short lashes in my possession currently, since I ran out of the medium ones. She looked like she wore the medium ones, so again, my apologies for the difference.

Anyhow, the rest of the face is very simple and easy. It’s not a lot of makeup, very clean, very little is on her face. I chose the one with the pink lips just cause I think it’s the cutest one, but feel free to change it to peach or the nude or the red.

How-to:

1. I applied MAC Soft Ochre paint pot all over the eyelid using my finger.

2. I applied a nude colored eyeshadow (Foxy by Urban Decay) all over the lid.

3. On the lower lashline, I applied MAC Blunt blush using an angled eyeliner brush. I blended the edge using a clean pencil brush. You can use any reddish-brown eyeshadow for this.

4. I curled my lashes and applied Dior Overcurl mascara.

5. I applied short individual lashes by Elise (Indonesian local brand) on the upper lashes. I think I applied about 6-7 of the short ones, and then pinched my real lashes to the fake ones to blend it together.

6. I filled in my brows using Dolly Winked brow pencil.

lee hi it's over makeup

7. For the face, I applied MUFE HD Foundation using Sigma Round Kabuki brush.

8. Under the eyes, I applied L’oreal Magic Touche concealer.

9. I applied a little bit of Benefit Moon Beam along the bridge of the nose and on top of the cheekbones. I also applied Benefit Hervana blush on the cheeks.

10. Powder lightly if necessary.

11. On the lips, I applied a very tiny drop of OCC Lip Tar in Queen on the center of the lips.

12. Using a clean lip brush, I blended the liptar outwards.

13. Blot excess with kleenex and applied lip balm/gloss if needed.

lee hi it's over makeup

Golden Blue

As mentioned on the previous tutorial, I wanted to do a look using gold and blue eyeshadow. I think the beautiful gold eyeshadow compliments the blue eyesadow nicely. It helps when blue and yellow are complimentary colors too 😉

This look will work well for those who don’t like to put dark shadows on the lower lid. The gold eyeshadow really opens up the eyes. The blue liner on the waterline also helps to make the white part of the eyes look whiter. This will look great on any eye colors.

How-to:

1. I applied Smashbox 24k eyeshadow on the eyelid using a flat eyeshadow brush.

2. Using another flat eyeshadow brush, I applied MAC Birds and Berries on the outer half of the lid.

3. Using a flat eyeshadow brush, I applied L‘oreal Infallible eyeshadow in All Night Blue on the outer V and a tiny bit on the crease.

4. Using a clean blending brush, I blended the darkest blue towards the gold and blended the crease. Add more blue eyeshadow to make it as dark as you like.

5. I lined my waterline using MAC Technakohl liner in Auto-de-Blu and stamped L’oreal All Night Blue infallible eyeshadow on top of the liner using an angled eyeliner brush.

6. Using a clean angled eyeliner brush, I applied Smashbox 24k eyeshadow along the lower lashline.

7. Using the same angled brush, I applied Smashbox Sienna eyeshadow on the outer half of the lower lashline.

8. I created a winged liner along the upper lashline using Clinique Gel Liner in black and a small angled eyeliner brush.

9. I filled in my brows using Anastasia Brow Powder in Brunette.

10. I curled my lashes and applied Maybelline Volum Express Turbo mascara on both top and bottom lashes.

blue and gold eyeshadow

11. For the face, I applied Giorgio Armani Silk foundation using MAC Stippling Brush. Stippled it on my face for an airbrush finish.

12. For the cheeks, I applied MAC Cubic blush along my cheekbones.

13. For the lips, I applied L’occitane clear lipgloss since my lips are uber chapped. Blot the excess so it’s not sticky and gooey.

loreal infallible all night blue

Top 100 Beauty Blogs To Follow in 2013

I was emailed couple days a go and to my surprise, I was listed as one of the Top 100 Beauty Blogs to Follow in 2013! I’m no. 83!!! I’m extremely grateful that my blog is even considered as Top 100 Beauty Blogs to Follow in 2013! I mean, I know I don’t constantly update my blog regularly, or even do as much as other bloggers in the social media side of things. I’m very personal and don’t really share my life outside makeup into my blog. So, it was SUPER AWESOME to know that I made it into the list!

Anyhow, let’s not get all cheesy and sobby and thanking everyone..hahaha..I know I’ve my READERS and FOLLOWERS to thank to, as well as those who’ve been supporting me! So for those of you who’s been following my blog from when I was a student till now, THANK YOU SO MUCH! 😀

I know most of my readers are probably like me, a silent reader, but I’m totally cool with that cause I know you guys returned to read the posts 😉 hahaha..

Anyways, again, thank you for following my blog! Don’t forget to SUBSCRIBE to the mailing list (I promise it only sends email when I publish a new post), follow and chat with me on Twitter (don’t forget to tweet this!) , like my Facebook page and follow me on Instagram! Oh, don’t forget to keep track with my daily routine in Pinterest..more like an addiction really 😀


An infographic by the team at CouponAudit

.

Salon of The Week: Do Hair Salon

Just to change up a little, this week’s installment of Product of the Week is changed to Salon of the Week! First of all, just to clear things of, I paid for all the services in the salon out of my own pocket. This is not an advertisement or endorsement. I do not gain anything from the salon or the stylist by reviewing about this salon.

As you guys know from my Twitter and Instagram, I went to a salon to get my hair colored and trimmed. I’ve been wanting to go ombre for a while, but last year when I did it in another salon in Jakarta, my ombre highlights ended up in a disaster. I decided that it’s time to give it another try, but was concerned as to which salon I should go.

In Canada, I usually go to Hairem salon with Vera, who is an amazing hairstylist. She knows how to cut my hair and colored it the way I love. I’ve high expectations for the next stylist who’ll touch my mane. Being away from Jakarta for way too long, I was unsure if anyone could live up to the standard that I have. I’m actually not that picky with salons and stylists, but since the ombre disaster I’m more wary about which stylists/salons I picked.

Now, 10-13 years a go, I went to this home salon, Do Hair Salon, yearly to get my hair trimmed and colored whenever I returned to Jakarta for the Summer. I tried to relocate the salon, but since I couldn’t remember the way to get there, and I thought all hope was lost. Until, I found out that the salon has moved to a commercial area.

I was so excited and decided that it was time to give the salon a visit. To my surprise, all the staff was still working there. It was great to see familiar faces. Not to mention, the Owner/Master Hairstylist still remembered me! Ko Harry was very pleasant and he knew what I wanted.

Back in my teens, I had my hair dyed purple and red with him, and he managed to do it without having the need to bleach my hair. However, now I like my hair colors to be subtle, much like my daily makeup. I think as I get older, I preferred subtle colors now. Not to mention, in my non-makeup job, I have to present myself to look professional. Nevertheless, I still wanted to bring a little bit of “oomph” into my hair.

Anyhow, I wanted a brown ombre for my hair, since blonde might look harsh and damaging. As soon as I said I wanted an Ombre hair, he immediately whipped out his special recipe and gave me the colors that I wanted. Ko Harry knew exactly what I want. He gave me a beautiful reddish-brown color for the base that gradually gets lighter at the ends. He mixed a little bit of orange on the tips and the end result was awesome!

He also gave me a warranty – if the ends weren’t light enough I could return to get it lightened for free. I used it. I returned and get the ends lightened a bit more so that it showed up even more. I loooove the result and I think my hair looks a little bit more shiny than usual.

Price for trim, color, wash, blow-dry: Rp. 1,300,000 (around USD$130).

Do Hair Salon is located at Centro Metro Broadway Blok A-16 Pantai Indah Kapuk (PIK). Their phone number is: 021-30010337

For a front-look photo, please head over to my Instagram 🙂

Brown Ombre hair

Opposites

Hello beauties! Today’s tutorial is something simple and to be honest I did this look just because I wanted to play with some colors. As you all know, I’ve quite a collection of the lovely L’oreal La  Couleur Infallible eyeshadows. FYI, it’s not available in Indonesia. I received mine from L’oreal Canada and they hold a special place in my makeup kit…hahaha..cheesy, much…

I do wish that L’oreal Indonesia can start selling these gems. I mean, the eyeshadows are amaaaazing! You can apply them dry of wet. I think so far, I’ve about 12 infallible eyeshadows. If I were still in Canda, I’d definitely bought more…:P

Tutorials using the infallible eyeshadows are Icy Blue, L’oreal Infallible in Bronzed Taupe, Sweet Plums , Pretty in Pink and Purple, Carrie Underwood Allure Cover and L’oreal Infallible tutorial.

For the tutorial, I wanted to pair colors that are warm and also cold. I want something bright and dark, but at the same time I want this to be wearable. The colors on the eyelids are warm and bright, while those on the lower lid is darker. I think this might work well for those who have monolids. The colors on the upper lids are bright, thus allowing the eyes to look bigger, while the colors on the lower lid is darker and more intense to play up with a smoky look.

I find the gold/blue combination on the lower lid is quite pretty, and I might do a tutorial on that.

Anyways! Let’s get the tutorial started 🙂

How-t0:

1. Using a flat eyeshadow brush, I applied L’oreal Infallible eyeshadow in Forever Pink on the inner half of the lid.

2. Using another flat eyeshadow brush (or the same one but cleaned), I applied L’oreal Infallible eyeshadow in Pepsy Coral on the outer half of the lid.

3. Using an angled eyeliner brush, I applied Smashbox 24k eyeshadow on the inner corner of the lower lid and L’oreal Infallible eyeshadow in All Night Blue on the outer half of the lower lid. I used a pencil brush to blend the shadows ‘ edge.

4. Using L’oreal Voluminous Smoldering eyeliner, I applied it on the tightline and waterline.

5. Using an angled eyeliner brush, I applied MAC Black Tied eyeshadow along the upper lashline just to make my lashes look thicker.

6. I curled my lashes and applied L’oreal Curl Impact Collagen mascara on the upper and lower lashes.

7. I filled my lashes in with Anastasia Brow Powder in Brunette, and applied Anastasia highlighter under my brows.

L'oreal Infallible eyeshadows

8. For the face, I applied Tarte BB cream using Sigma Kabuki Round Brush.

9. For under the eyes, I applied Bobbi Brown under eye brightener.

10. On the cheeks, I applied Benefit Hervana blush.

11. Top it all off with Revlon Just Bitten Kissable Balm Stain in Charmed.

L'oreal La Couleur infallible

Lee Hi Rose MV Inspired

I received a request! Whuaaaat! hahaha..It’s been a while since I gotten requests for makeup tutorials, and it makes me very happy that one of my followers actually requested one! Pdo send me requests on comments below or over on Twitter 😀

Anyhow, so Cahya requested me on Twitter to do Lee Hi’s makeup in her MV Rose. I was like whaaat??? Who’s this Lee Hi girl. I searched her on youtube and found the MV. Lee Hi is a Korean singer, and she has an amazing voice! Being Korean, she obviously has like the most perfect skin just like most of my Korean friends. She has 3 different looks on the video – red eyes and pink lips, red eyes and red lips, yellow/pink eyes with pink lips. I chose the red eyes/pink lips combo for this inspired look just because it showed up most of the time on the MV.

Can we please admire how gorgeous that rose crown on her head is!

lee hi rose mv

Image is Courtesy of Kpopstarz

Keep in mind that she is probably 2 shades lighter than me. Her makeup is quite minimal. Let’s break it down:

  • Her brows are straight across, just like most Korean actresses/singers. Mine has more shaped than hers, so I had to fill mine in more to make it less angular.
  • Seeing her video, I don’t think she wore any blushes or contour, which made the red eye more chic and modern.
  • It also seemed like she barely has any mascara on, perhaps she wears a brown mascara or even a clear one.

A word of caution! Please make sure that whatever red blush or product you are going to use are allowed to be used for the eyes. Some red lip products or cheeks are not allowed for the eyes due to sensitivity issue. I used Ben Nye blush because I’ve tried and tested it on myself and others, and found no allergic reaction or sensitivity towards it.

How-to:

1. I applied MAC Soft Ochre paint pot all over my lid using my finger.

2. Using an angled eyeliner brush, I applied Ben Nye Soleil Red blush along my upper lashline.

3. Using a fluffy blending brush, I picked up a teeensy weensy bit of the blush and applied it lightly on my lid, avoiding the crease.

4. Using a clean blending brush, I blended whatever is on my lid so it fades.

5. Using a clean blending brush, I applied Ben Nye  Mango eyeshadow lightly on the crease.

6. Using a clean angled eyeliner brush, I mixed Ben Nye Mango eyeshadow with Ben Nye Soleil Red blush and applied it very lightly on the lower lashline.

7. I applied Urban Decay Woodstock eyeliner along the waterline.

8. You can choose to apply a very light coat of mascara or skip it.

9. I filled it my brows using Dollywinked eyebrow pencil in brown and set it with Anastasia Brow Powder in Brunette.

Ben Nye Soleil Red

10. For the face, I applied MUFE HD foundation in 117 all over my face using Sigma Round Kabuki brush, going over my lips with it as well.

11. I applied Revlon Ravishing Red lipstick on the center of my lips using my ring finger, just dabbing on it.

12. Lastly, I applied Chanel Levres Scintillantes Glossimer no. 165 (Volupte) lightly on my lips and then blot it with a piece of kleenex.

Lee Hi Rose MV Makeup


Neon Pink!

If you want to stand out in a party (or wedding, or prom or anything really), perhaps you’d want to give a bold lips look a try. Today’s tutorial definitely packed a punch of color! I kept the eyes on the low-key to make it wearable during the day. If you like it more intense, you can definitely make it darker, or applied the liner using liquid or gel liner.

It’s really quite a chic look for modern brides! For those who do not want to go with the classic look, and looking for something different, definitely give this a try.

In this tutorial, I used Obsessive Compulsive Cosmetics Lip Tar in Queen. It is described on their website as bright coral pink, but I feel that it’s leaning more towards neon pink. It doesn’t have enough peach in it to make it as coral, I think. Of course, that’s just my opinion.

I’ve done swatches on my lip tars collection and also for the other lip tars tutorial, you can find it here –> Stalker Red, Vintage Red and Marylin Inspired. I’ve also done a fuschia lips and blue eyeliner  in Colour Splash if you want a more colorful look.

Anyhow! Let’s get right into the tutorial!

How-to:

1. I applied Estee Lauder Double Wear Light foundation all over my face using Tarte face foundation brush.

2. To prep my lips, I applied Blistex lip balm.

3. I filled in my brows using Anastasia Brow Powder in Brunette and an angled eyebrow brush.

4. Under the brows, I applied Anastasia highlight brow powder using a flat eyeshadow brush.

5. Using a clean flat eyeshadow brush, I applied MAC Sweet Satisfaction all over the lid.

6. Using Urban Decay blending brush, I applied Urban Decay Smog eyeshadow on the crease.

7. I created a winged liner using Urban Decay Blackout eyeshadow and an angled eyeliner brush.

8. Using MAC 239 brush, I blended the edge of the eyeliner slightly.

9. I also applied Urban Decay Blackout eyeshadow along the lower lashline and used MAC 239 brush to blend it. On the inner corner, I applied MAC Sweet Satisfaction using a clean eyeliner brush.

10. I lined my waterline and tightline using L’oreal Voluminous Smoldering eyeliner.

natural eye makeup

11. For the lips, I remove the remaining of the lip balm. Then, I filled my lips using OCC Queen Lip Tar using a lip brush.

12. I blotted my lips twice using a kleenex to remove the excess lip tar.

13. I applied MAC Fleur Power + MAC Well-Dressed mixture on the cheeks.

Pink Lips

Baked It Up!

Who doesn’t love Urban Decay Half-Baked eyeshadow? It’s bronzy, it’s shiny, it’s shimmery and it’s just gooorgeous! I think it might work for brides-to-be who’d like to go for a smoky look, definitely a party makeup and might look great for prom! It suits every eye colors and skin color. The bronze might pop out even more on medium-dark skin. If you’re pale, opt for brown instead of black eyeshadow if this is too intense.

*Please do ignore the acne on my crease*

How-to:

1. I applied the brown eyeshadow from  Smashbox  Smokeout trio eyeshadow (discontinued) on the eyelid using a flat eyeshadow brush.

2. Using a small shader brush, I applied the black eyeshadow from Smashbox Smokeout trio eyeshadow on the outer V.

3. Using Smashbox bullet brush, I blended the black eyeshadow so there’s no harsh line.

4. Using a flat eyeshadow brush, I applied Urban Decay Half-Baked eyeshadow on the inner lid and center of the lid, carefully blending it towards the black eyeshadow.

5. At this stage, you can opt to add more black eyeshadow, or use the brown eyeshadow to blend the black eyeshadow towards the bronze using the flat eyeshadow brush on step 1.

6. Using a clean small shader brush, I applied Urban Decay Half-Baked eyeshadow on inner part of the lower lid, and the black eyeshadow on the outer part of the lower lid.

7. Using an angled eyeliner brush, I applied Clinique gel liner along the upper lashline as a winged liner.

8. I lined my waterline and tighline using L’oreal Voluminous Smoldering eyeliner.

9. I filled in my brows using Anastasia brow powder in Brunette.

10. I curled my lashes and applied L’oreal Voluminous Carbon Black mascara on both top and bottom lashes.

11. Optional – I applied M.A.C False Eyelashes no. 4 on the upper lashes just for some added drama. Made my eyes look bigger, I think 😀

Party Makeup

12. For the face, I applied yellow corrector from MAC Pro Correct and Conceal palette in Medium. I applied it under my eyes, on the bridge of my nose, on the temples and cupid’s bow.

13. Using MUFE HD foundation and a Sigma Kabuki Round Brush, I buffed the foundation all over my face.

14. I applied Clarins Instant Light Blush in Vitamin Pink on the cheeks using a foundation brush.

15. I powder my T-zone using Cinema Secret loose powder.

16. For the lips, I lined and filled my lips using MAC Dervish lipliner and applied L’oreal Colour Riche Caresse Shine Stain Lipcolour in Eternally Nude on top of it.

Prom Makeup