Iron Man Inspired

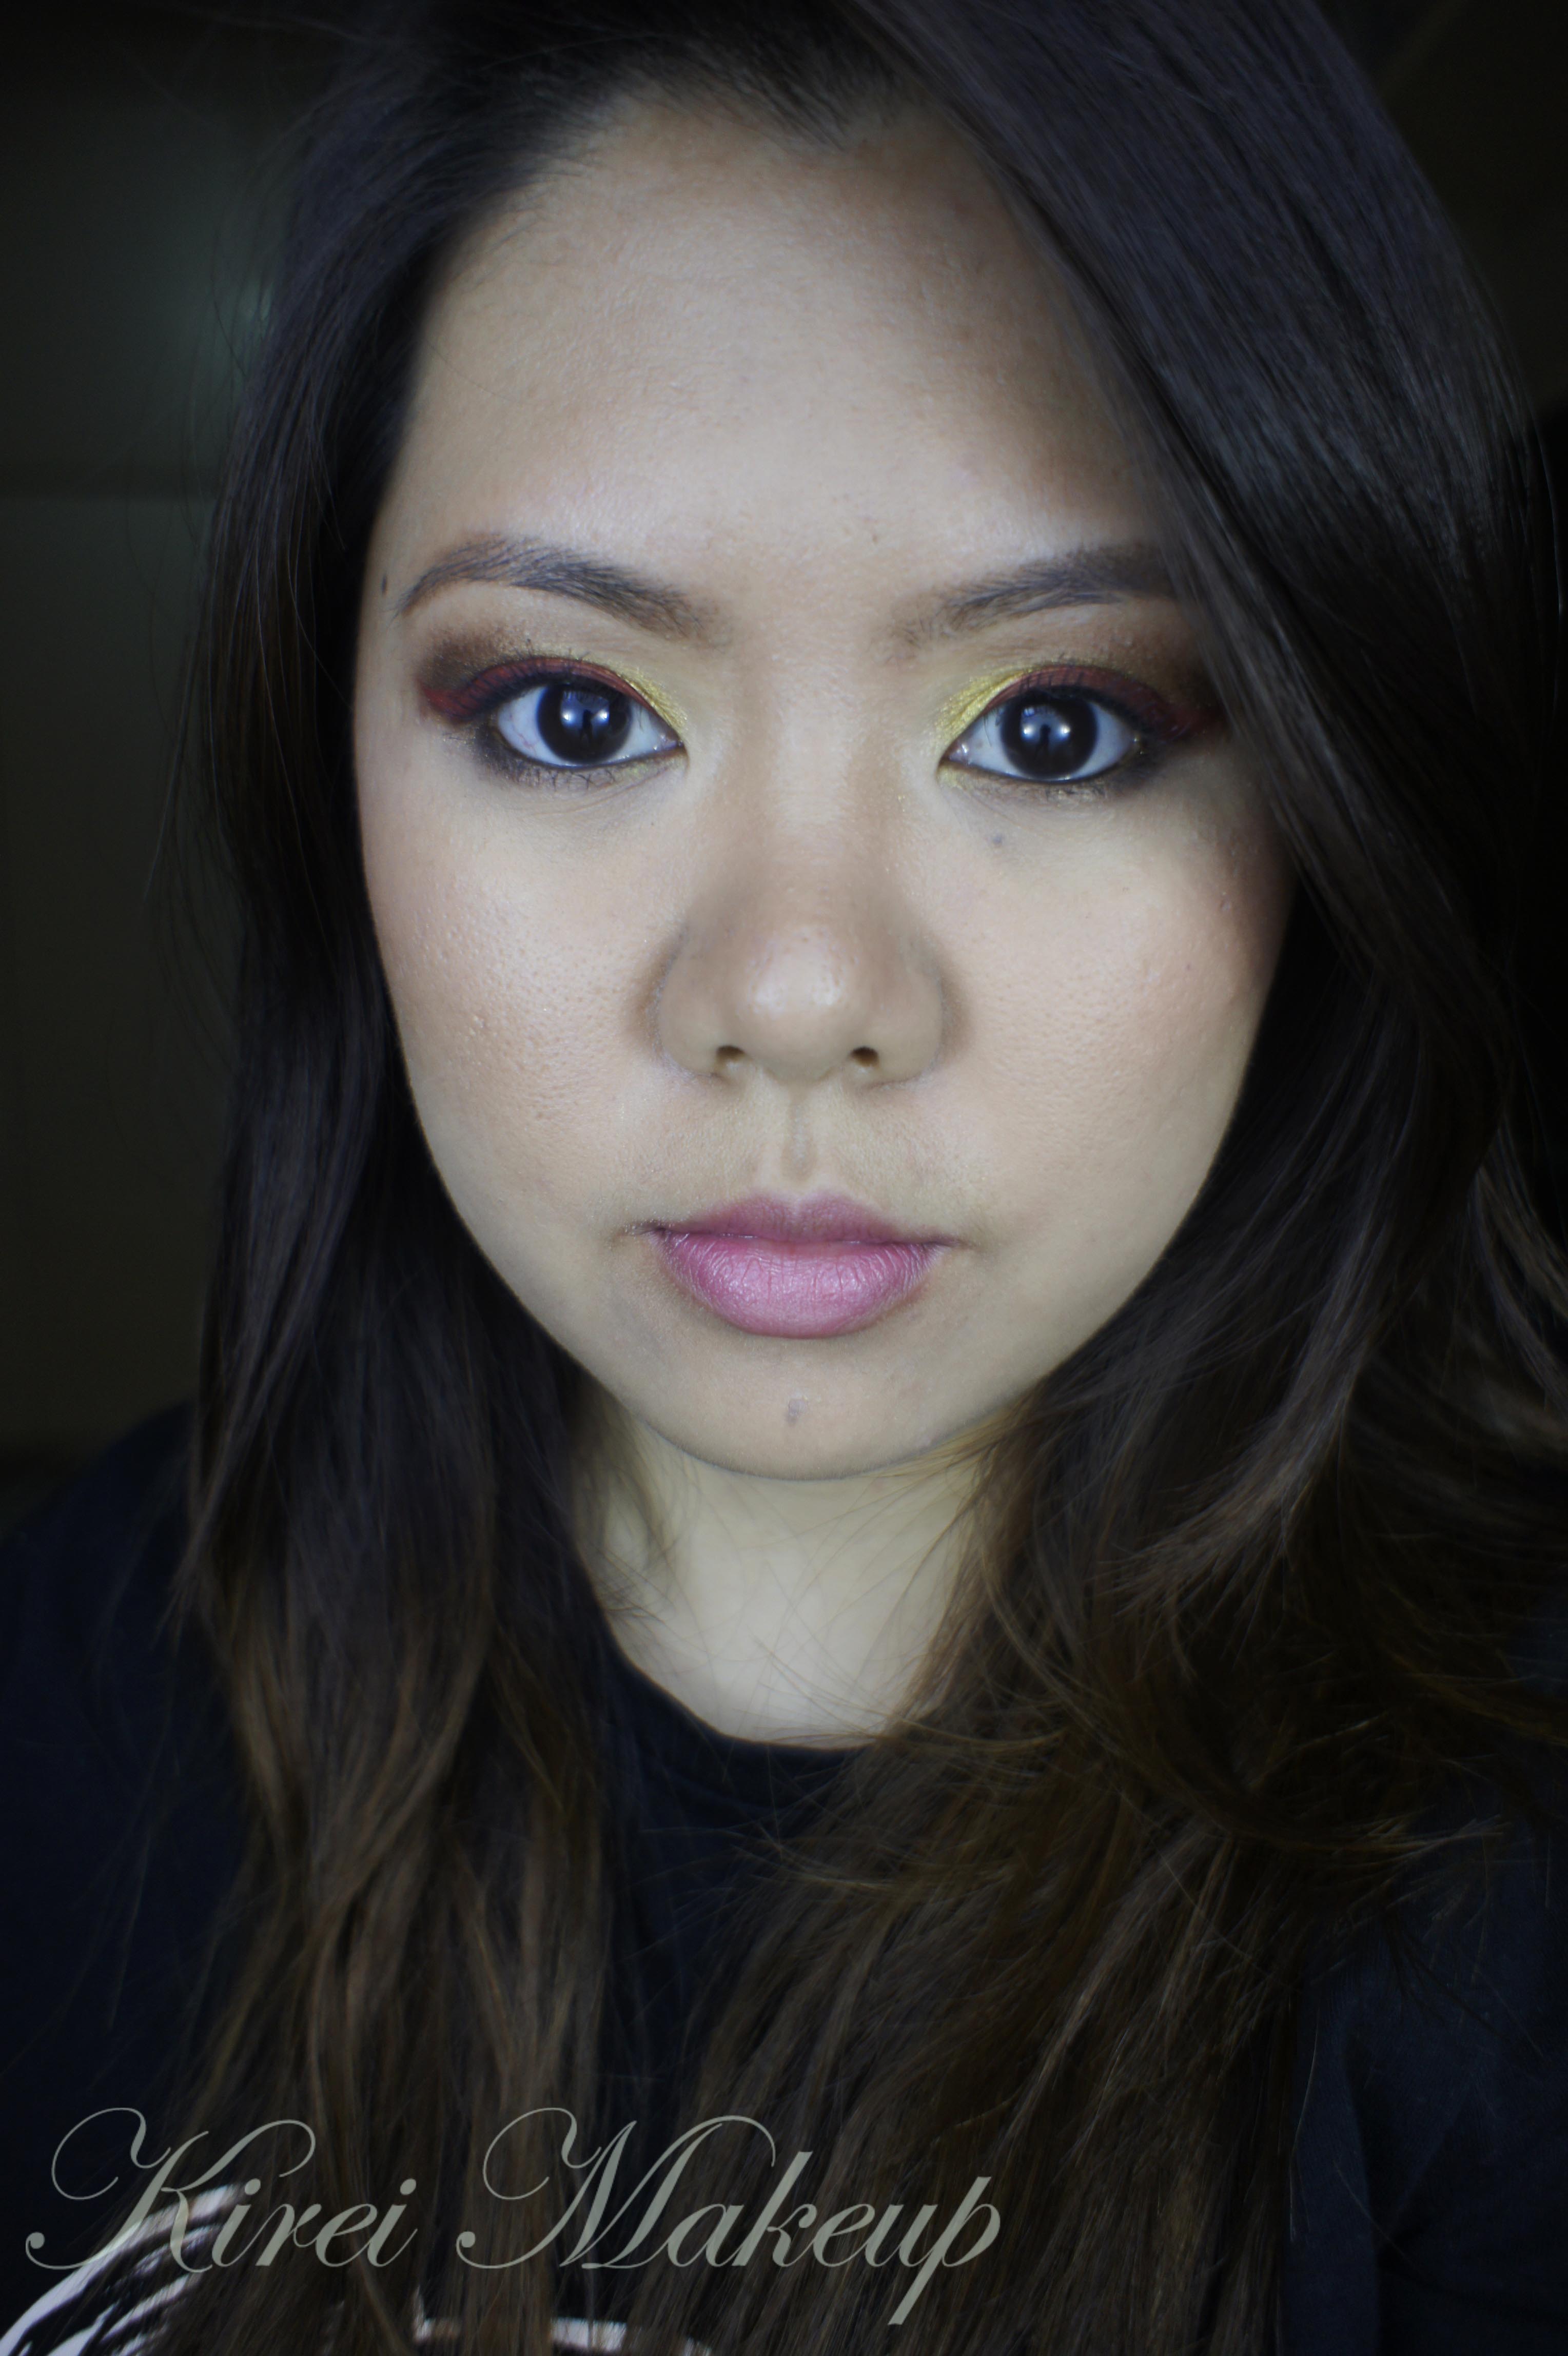
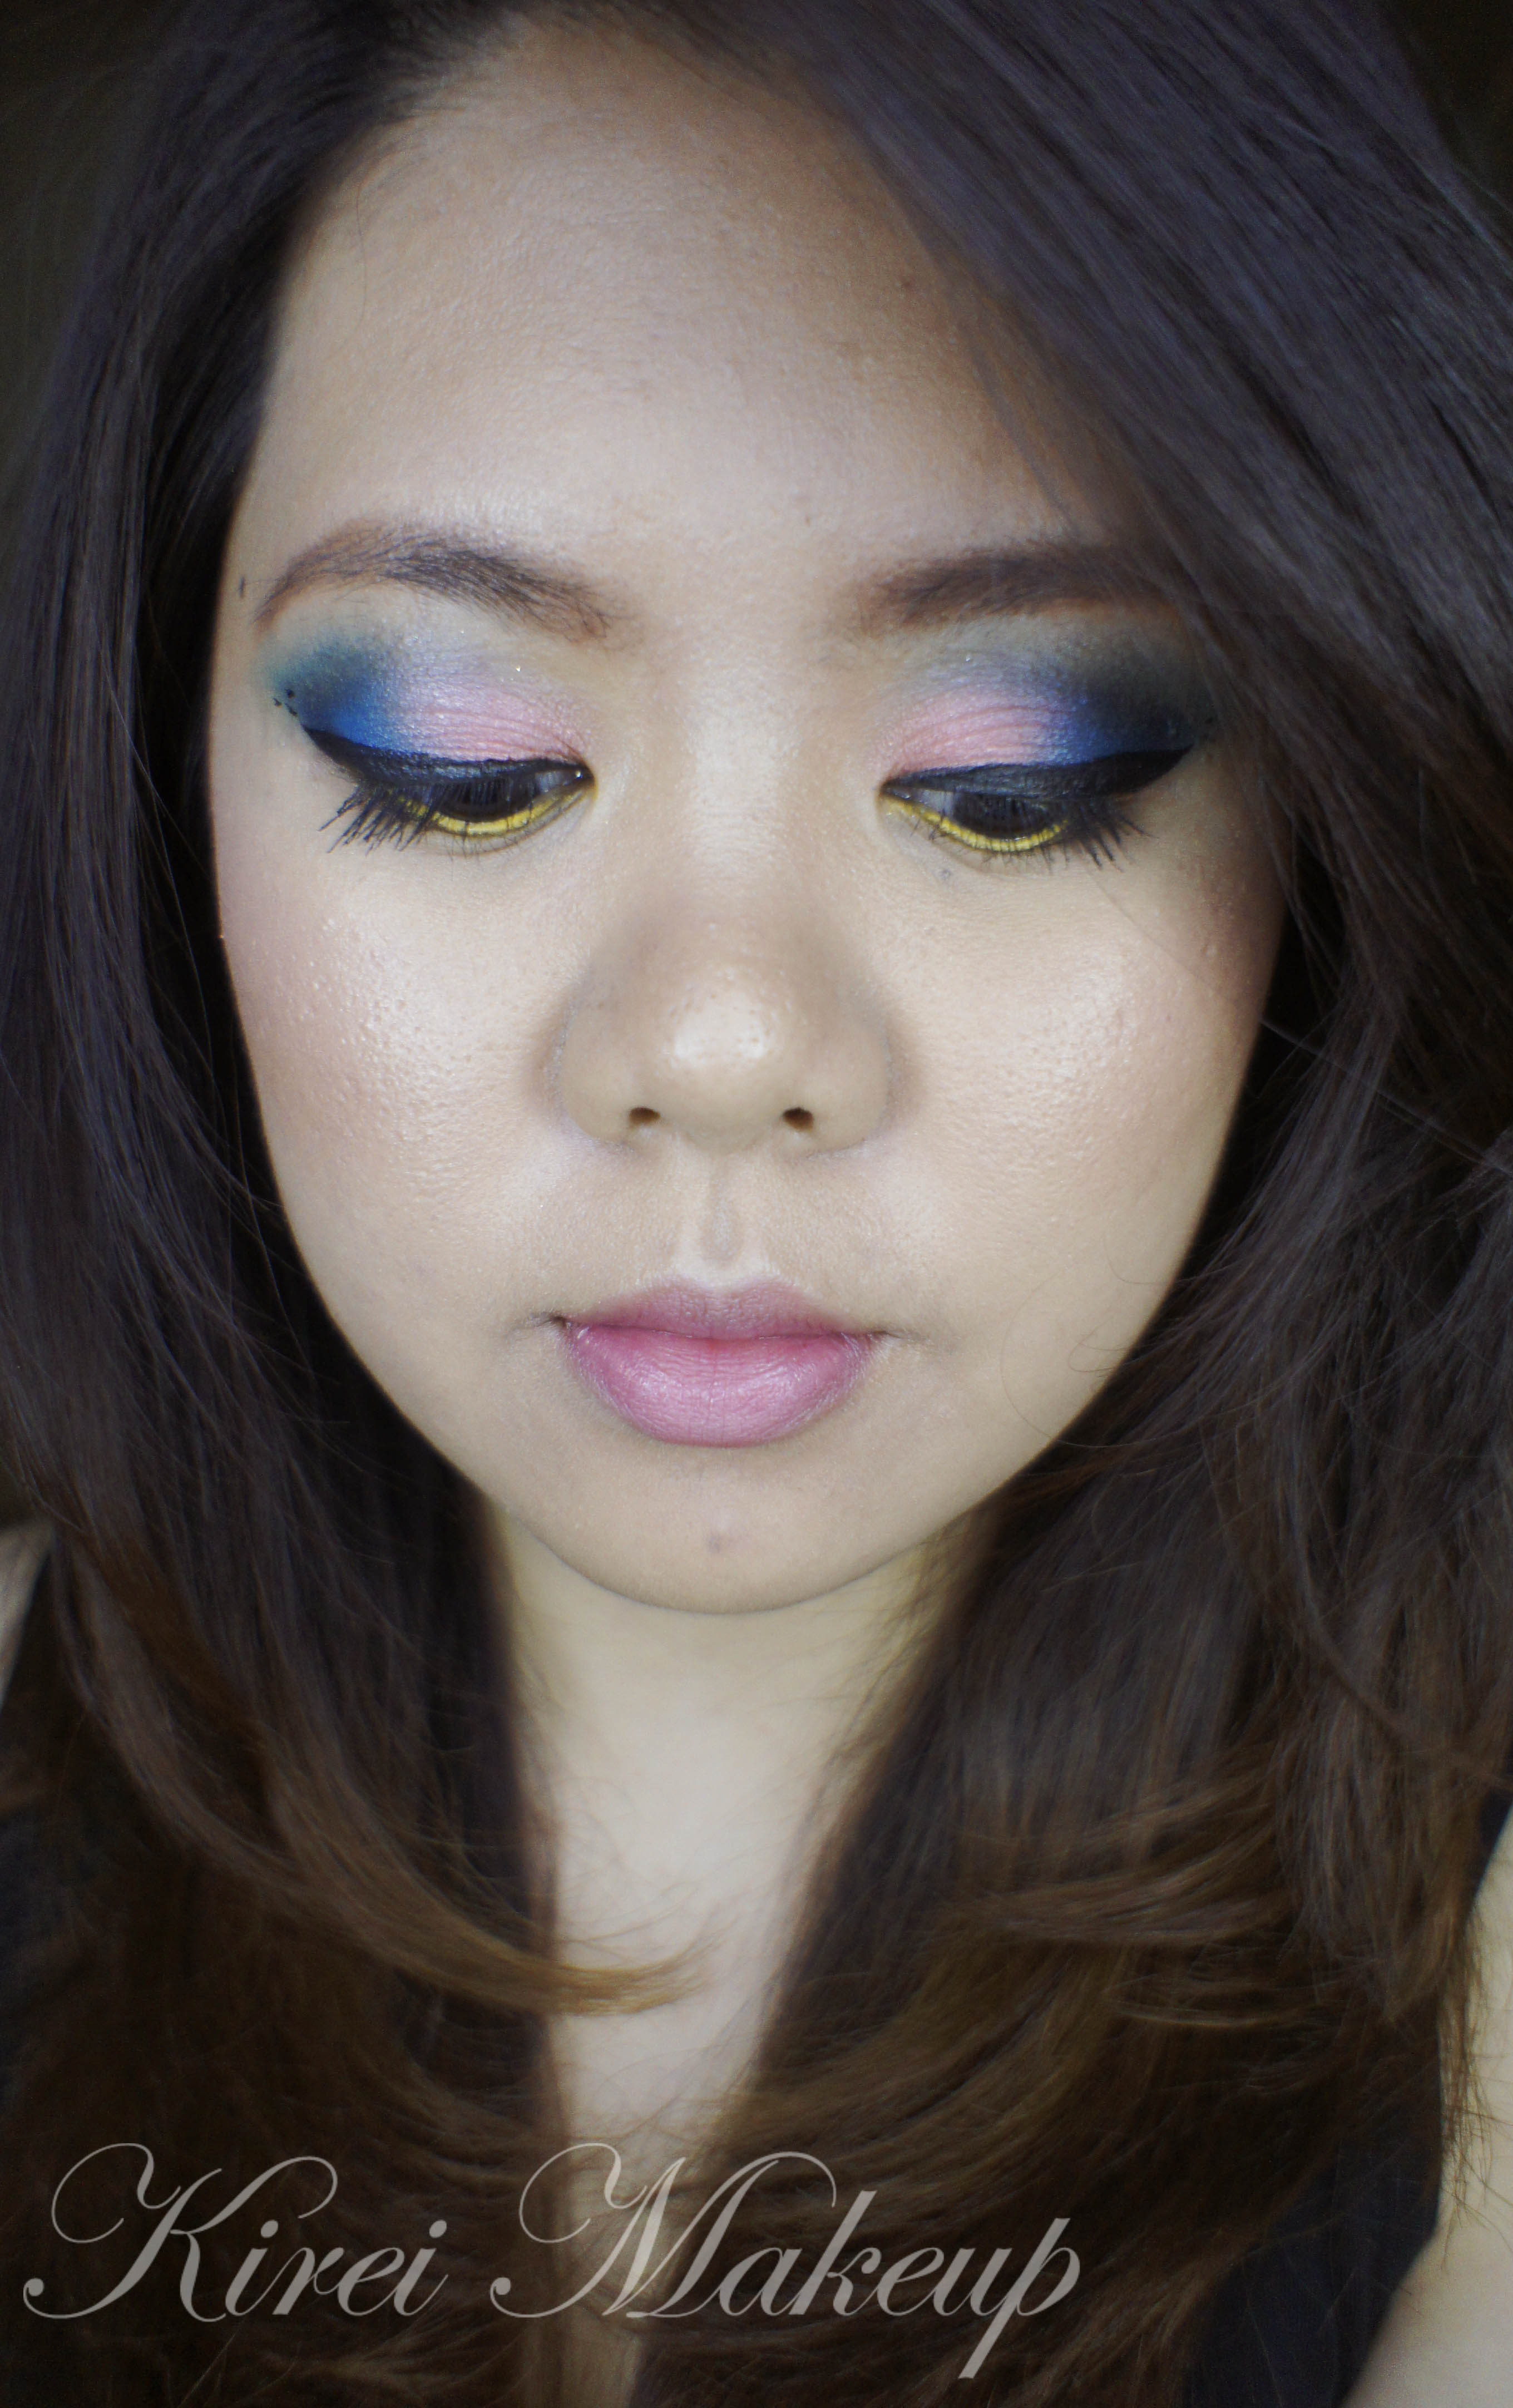
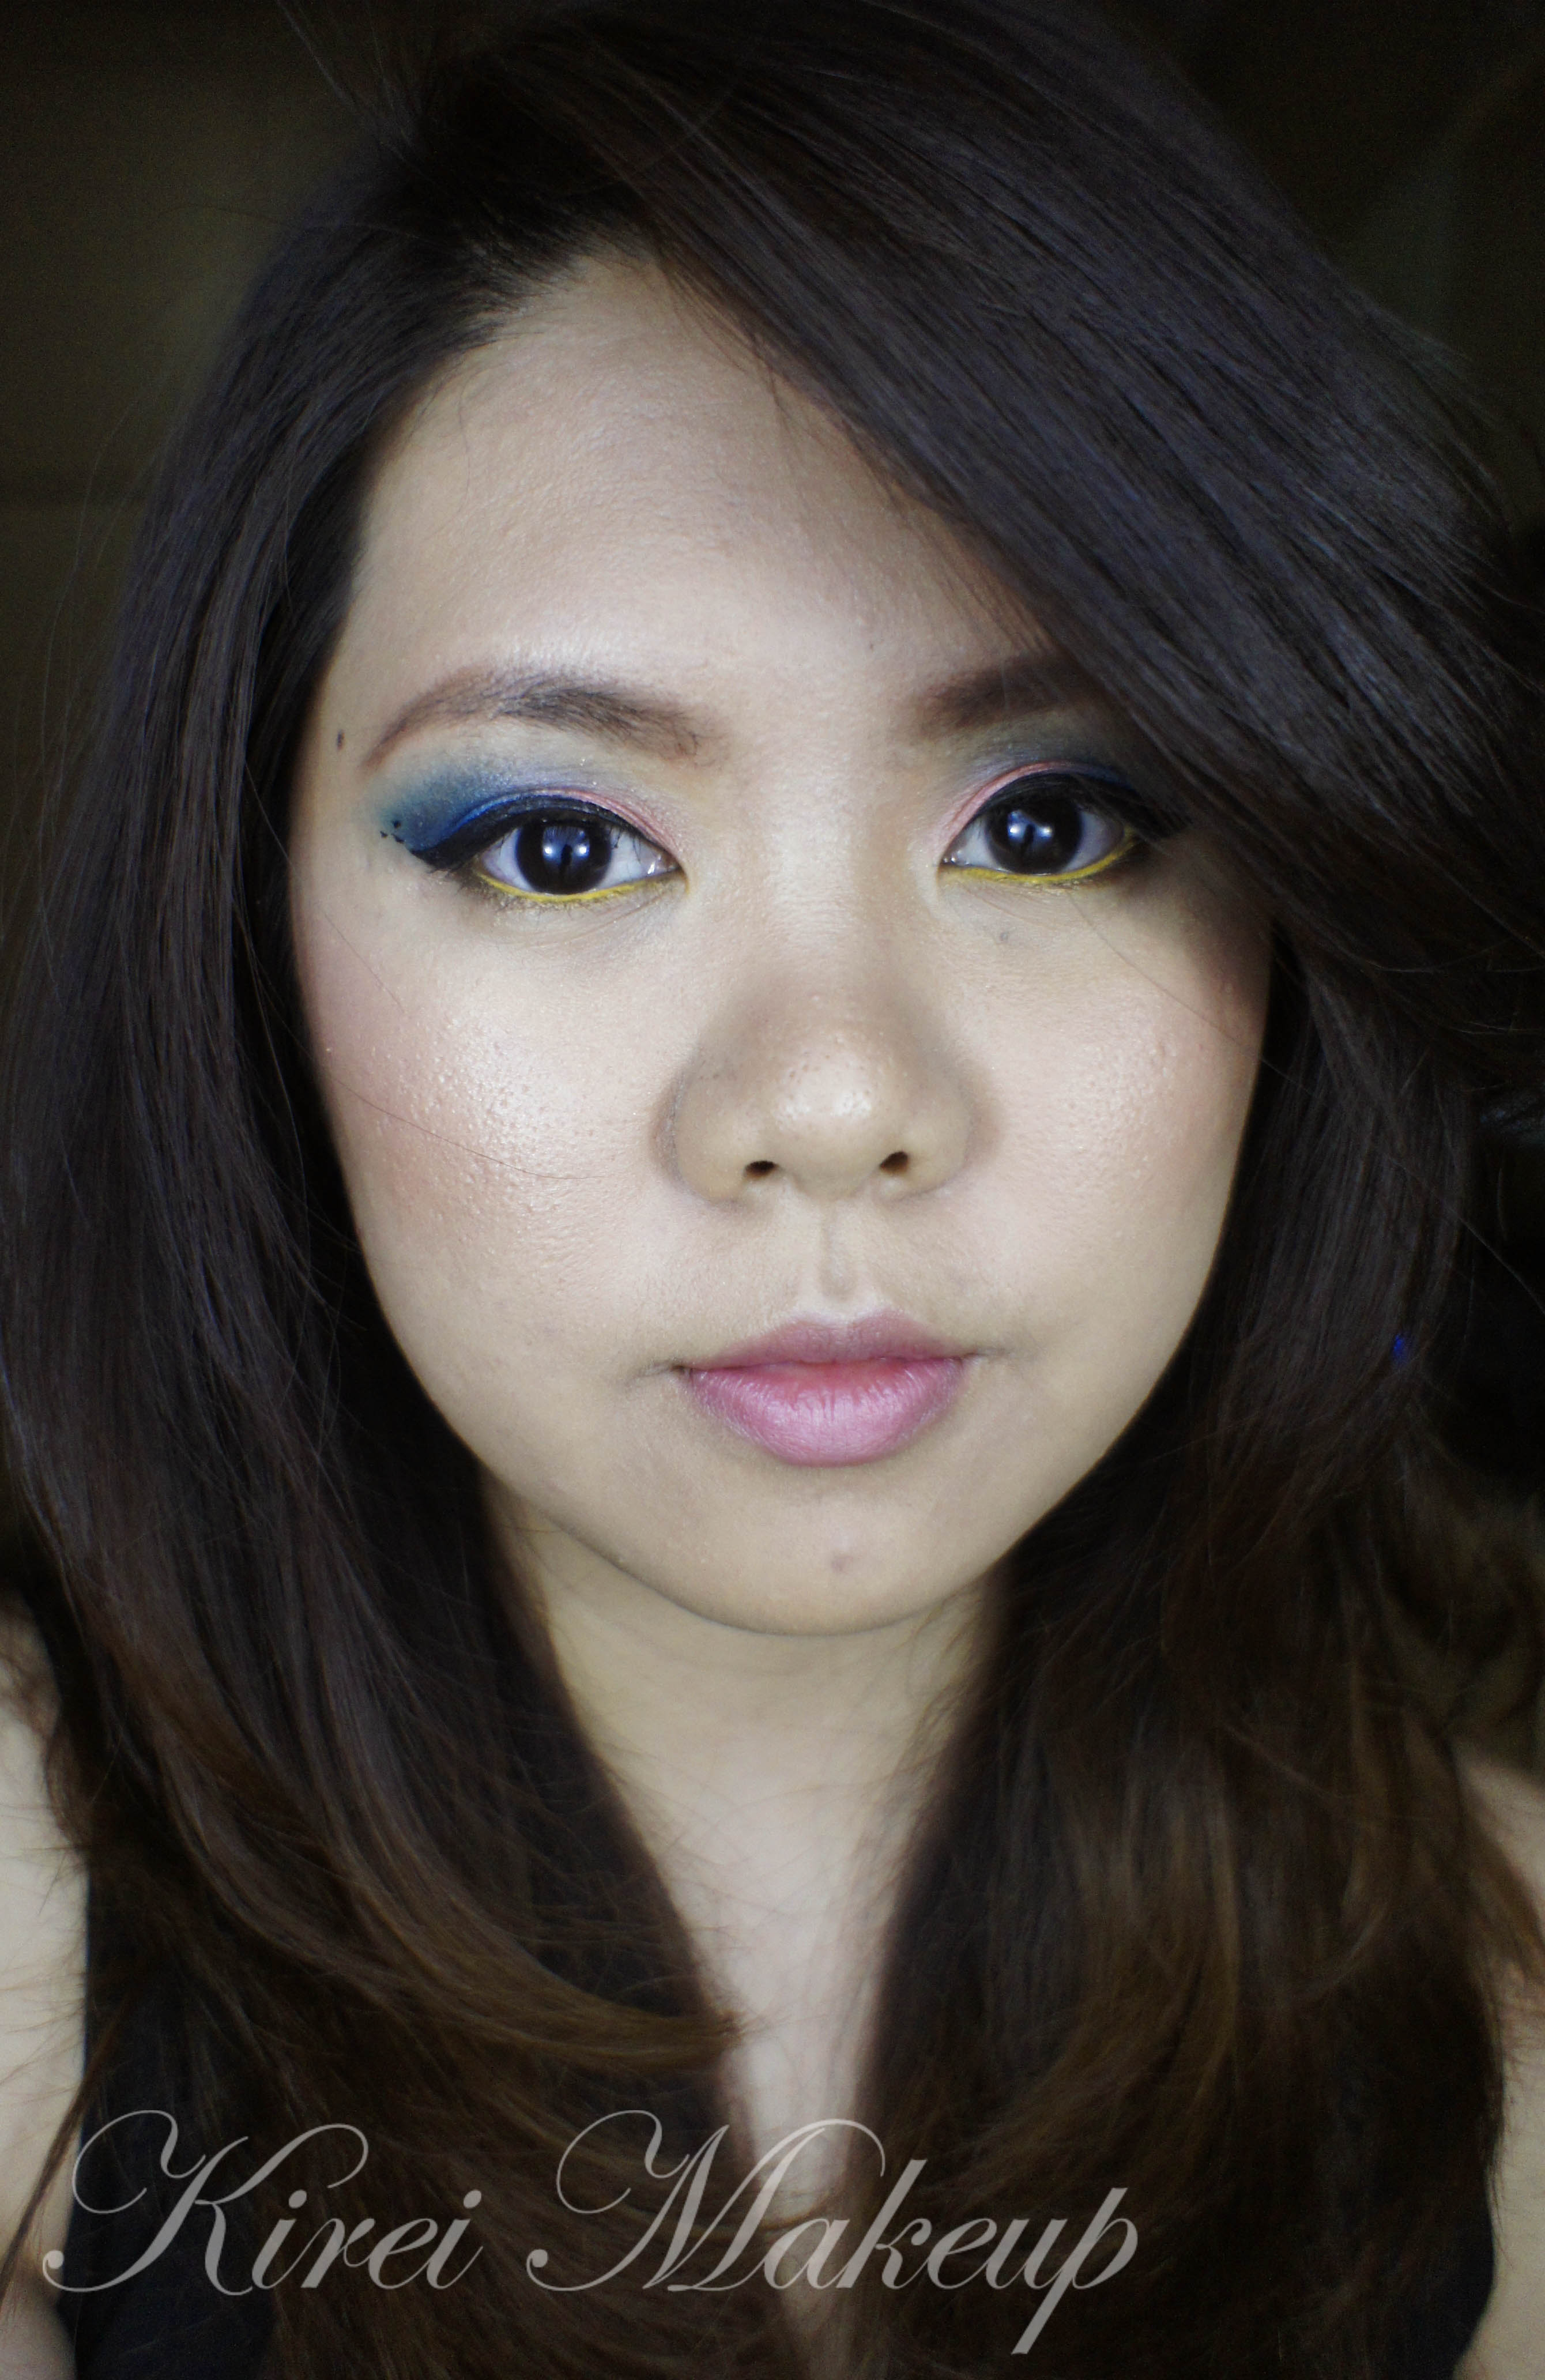
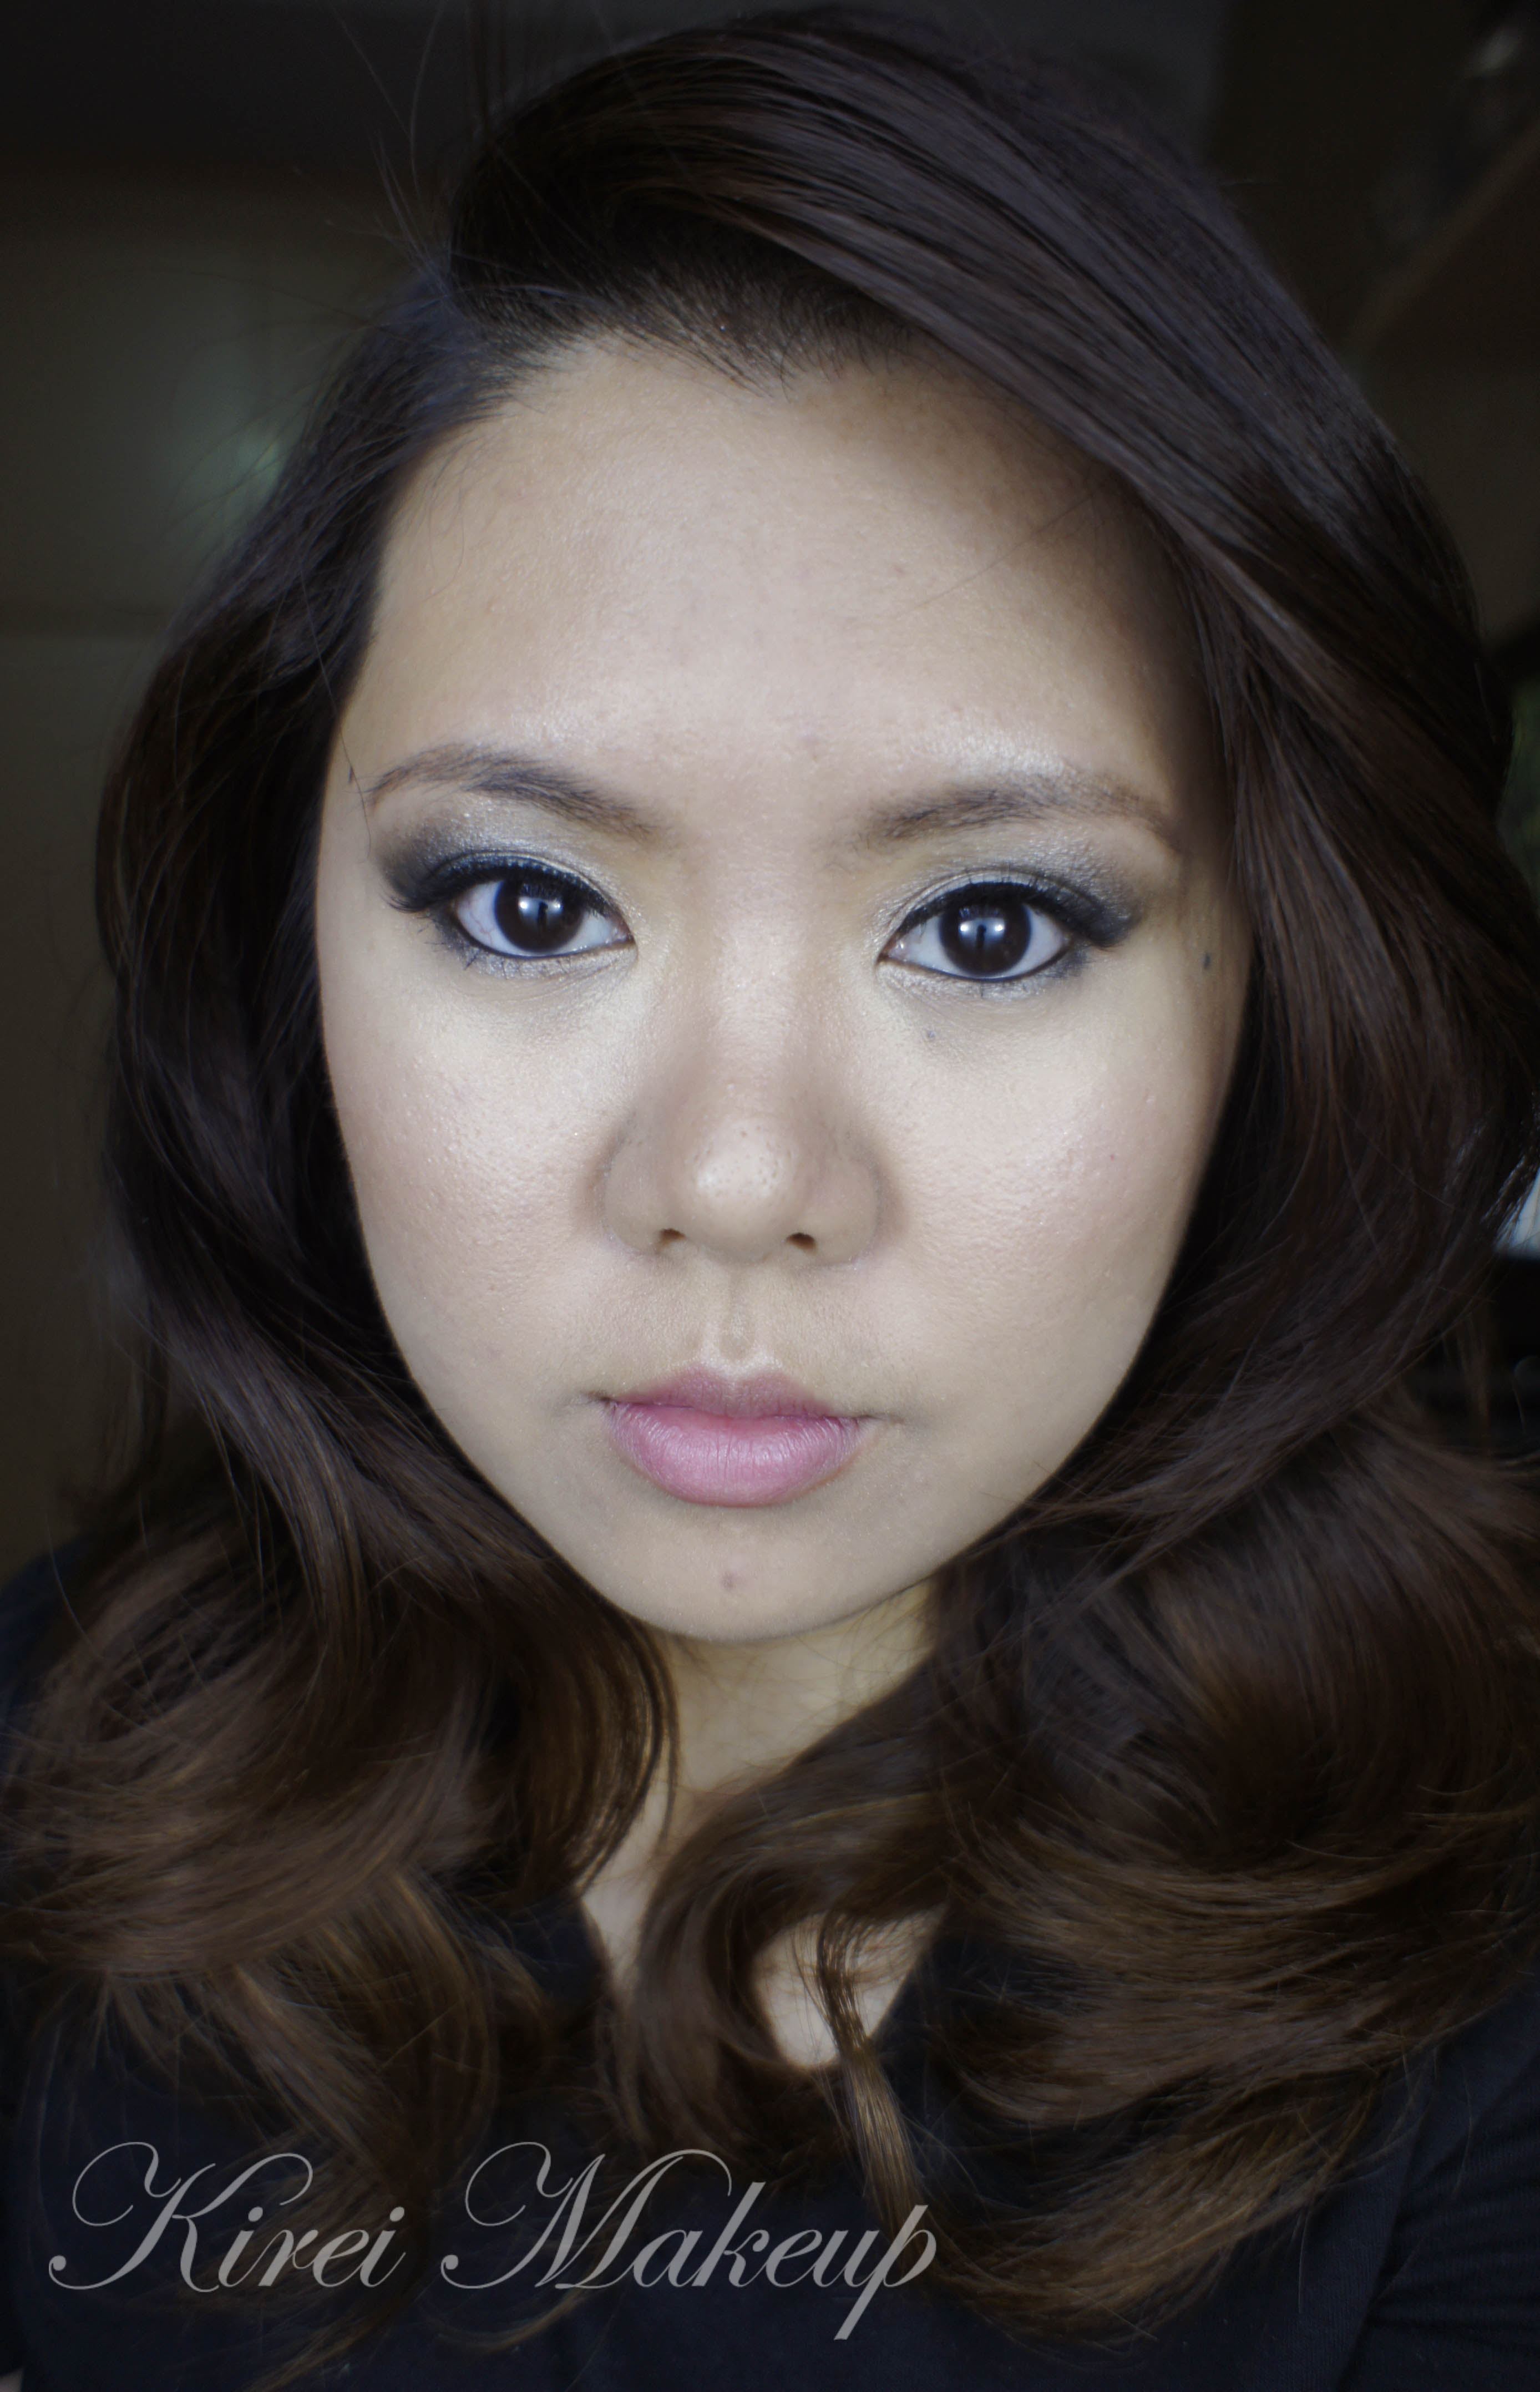
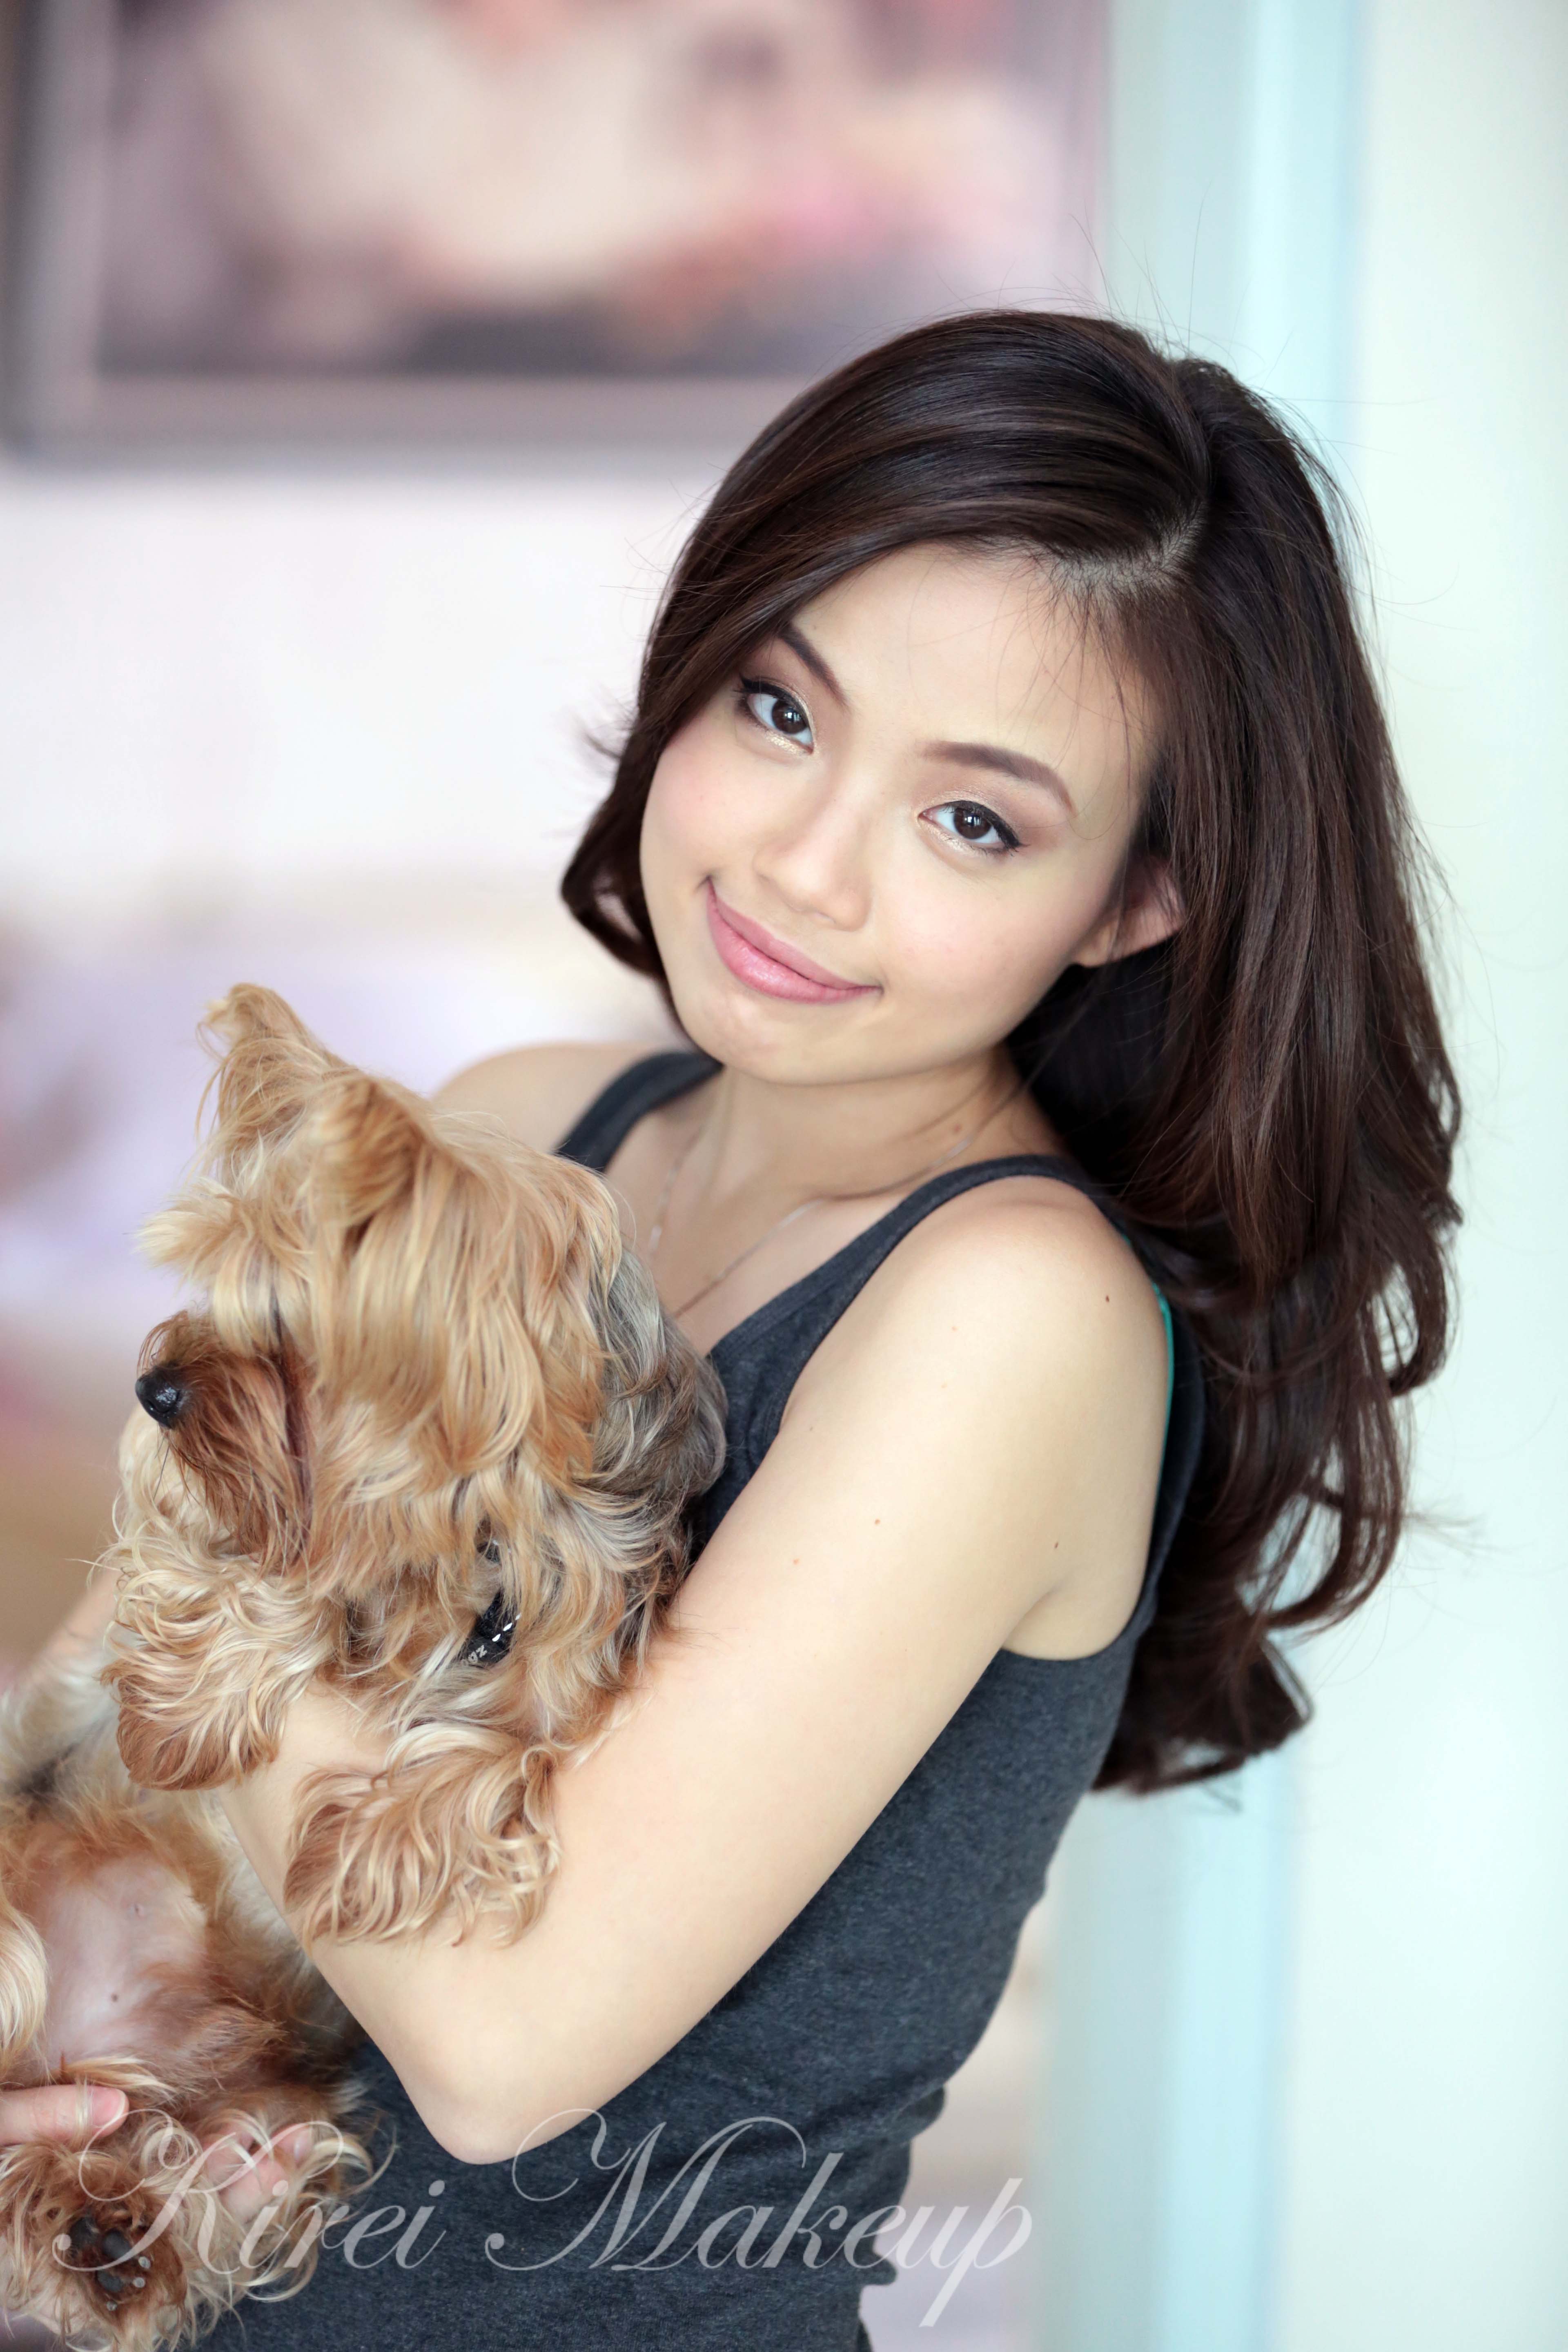
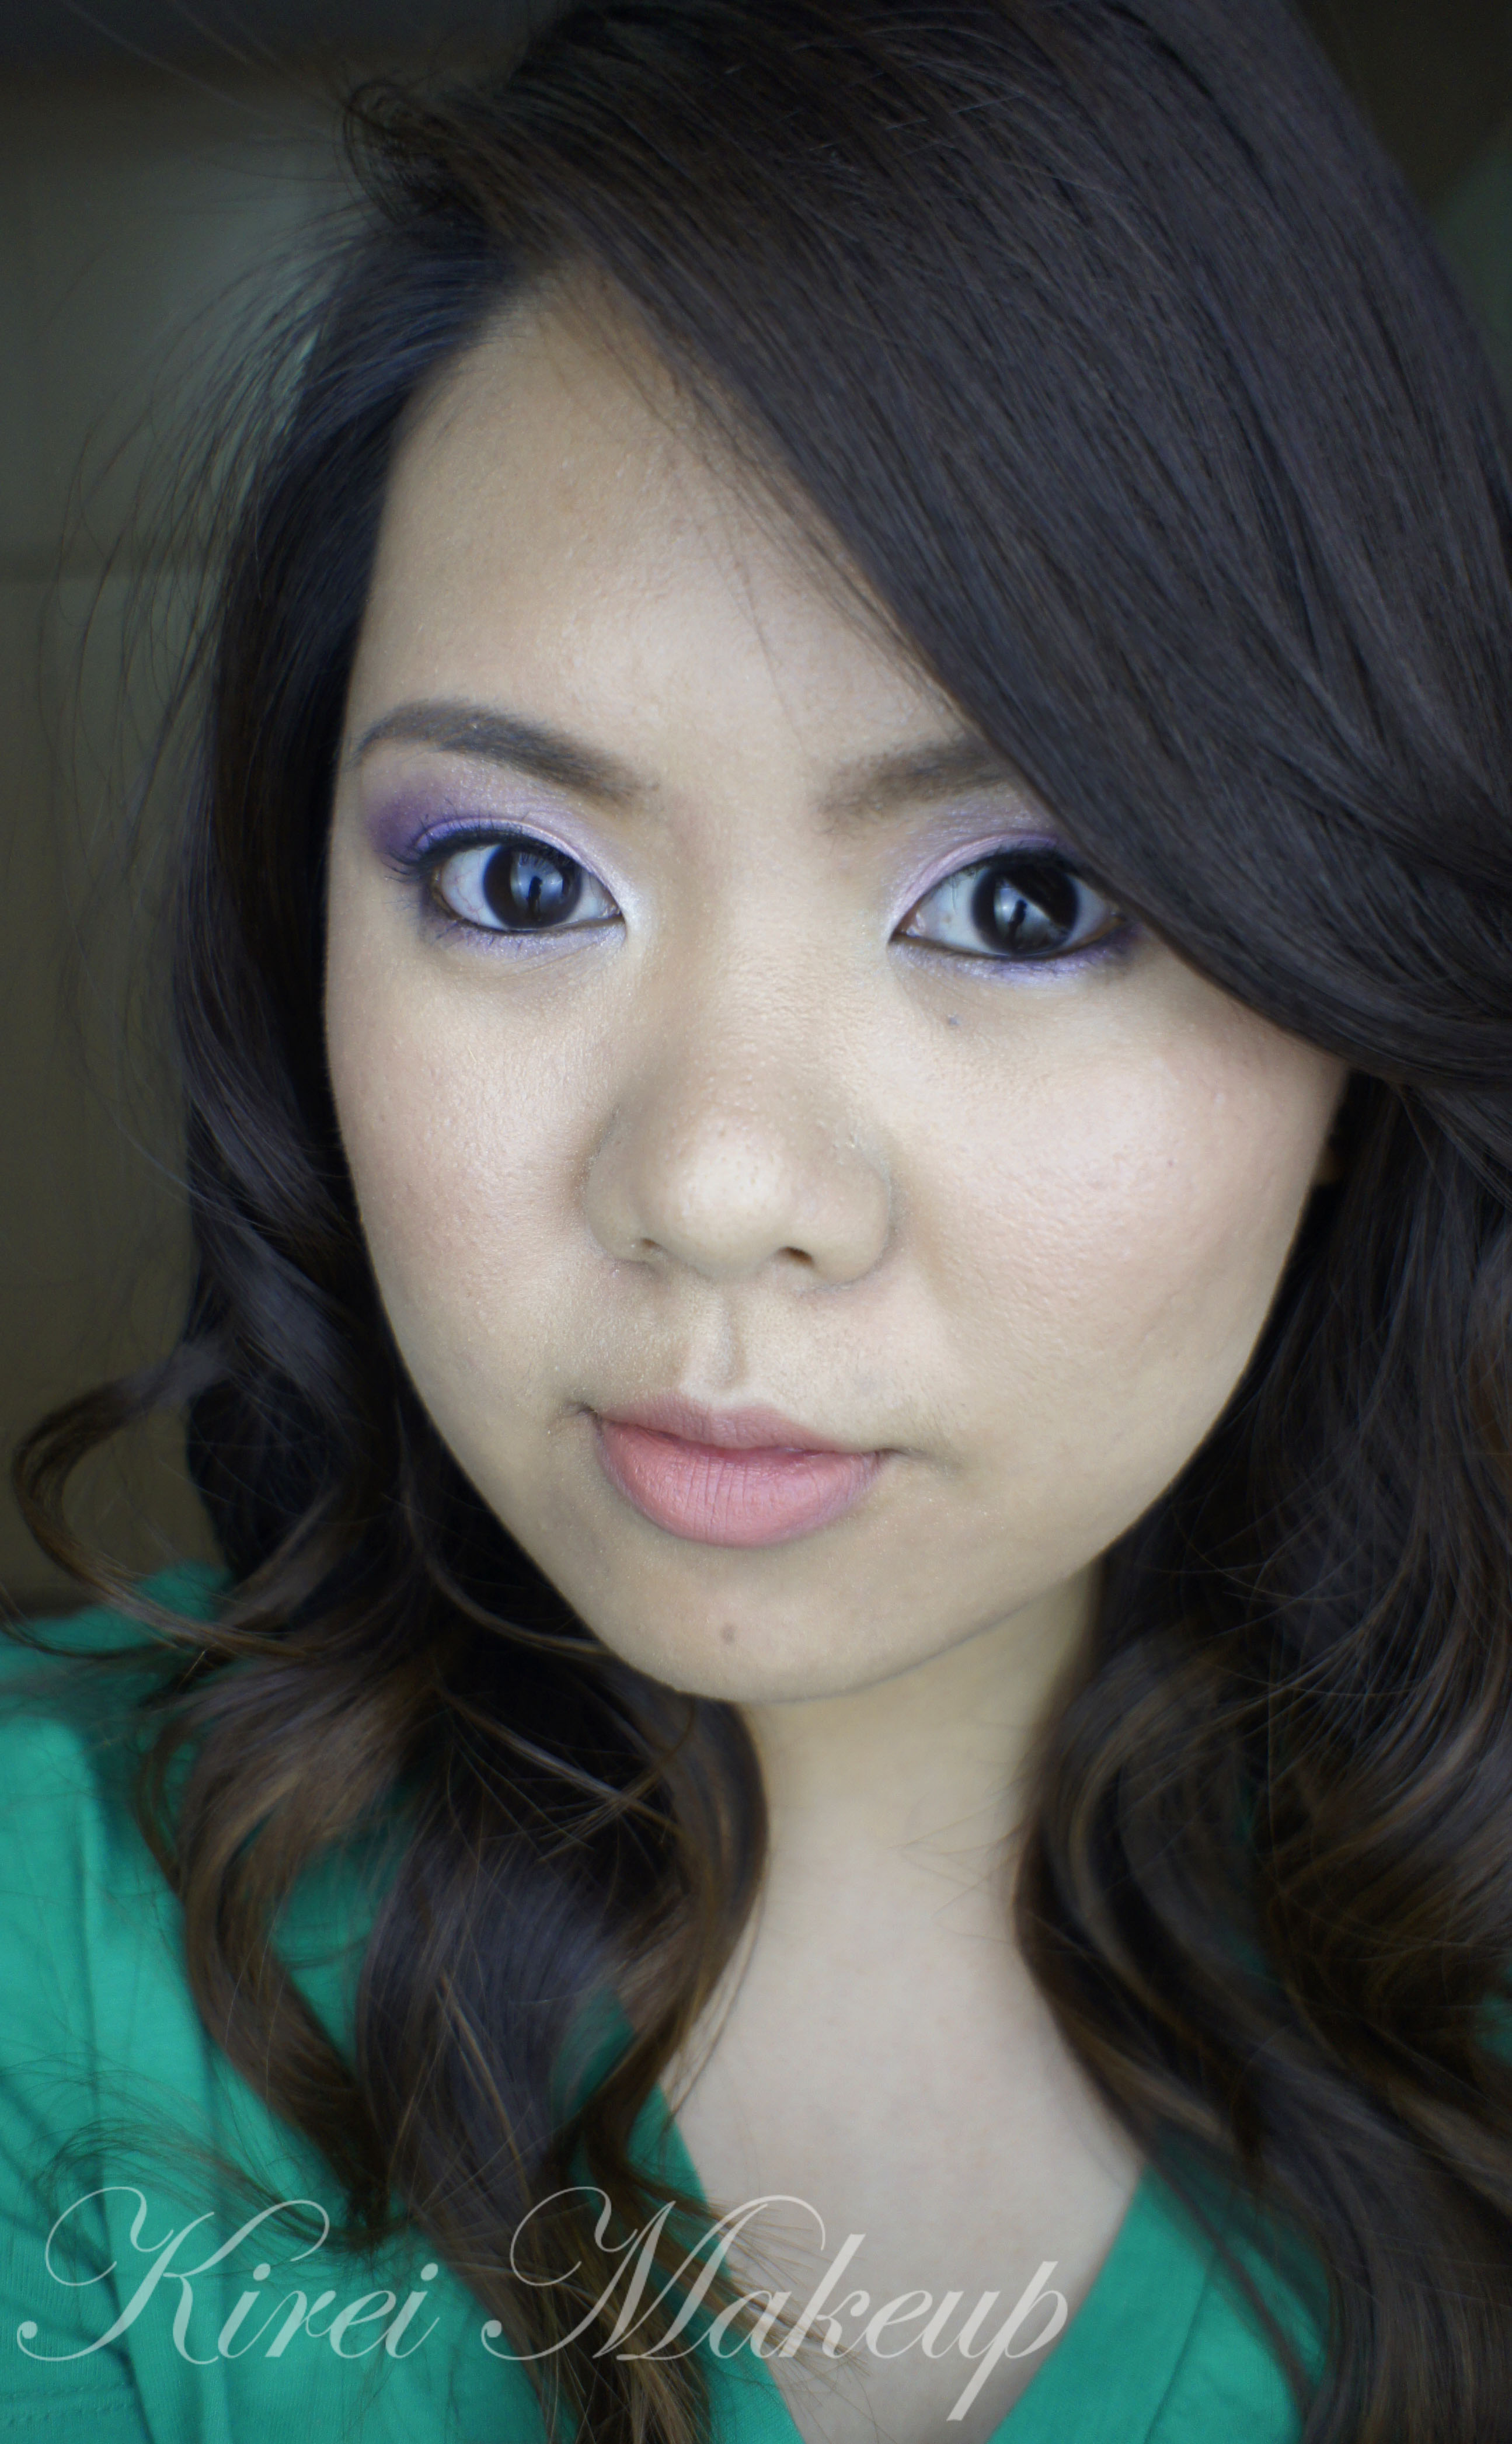
Hello gorgeous! I’m back with a new tutorial! Has anyone not watch Iron Man 3 yet? I did last week and I wanted to do a makeup inspired tutorial using the colors from the Iron Man suit – gold and red.

To be honest, I wasn’t quite sure how I wanted to incorporate the red into the look. I’ve thought of doing a red lip but I changed my mind and added the red winged liner instead. It’s an ok look, I think. Could I have done better? Probably.

I love the brow and gold combo, though! I used Make Up For Ever aqua cream shadows as my base. Remember to work fast and in thin layers with the aqua cream shadows. You can apply the cream and skip the powder if you’d like. I just like wearing both for extra punch of colors.

Oh, on a side note, I went to get my brows done on Saturday 😉 More on that on the next post.
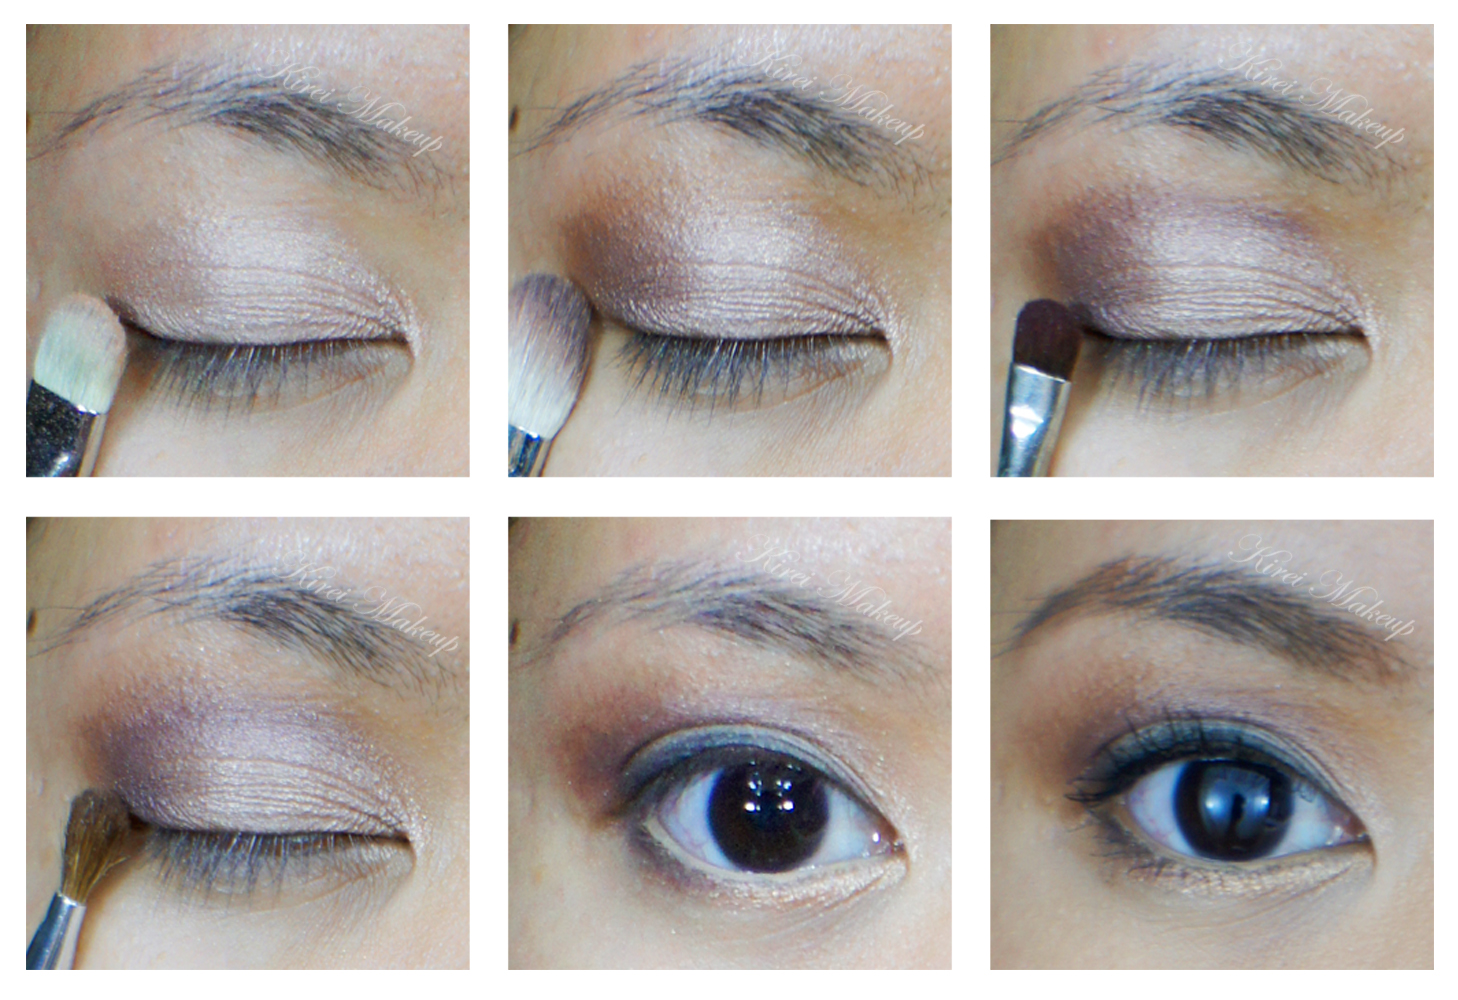
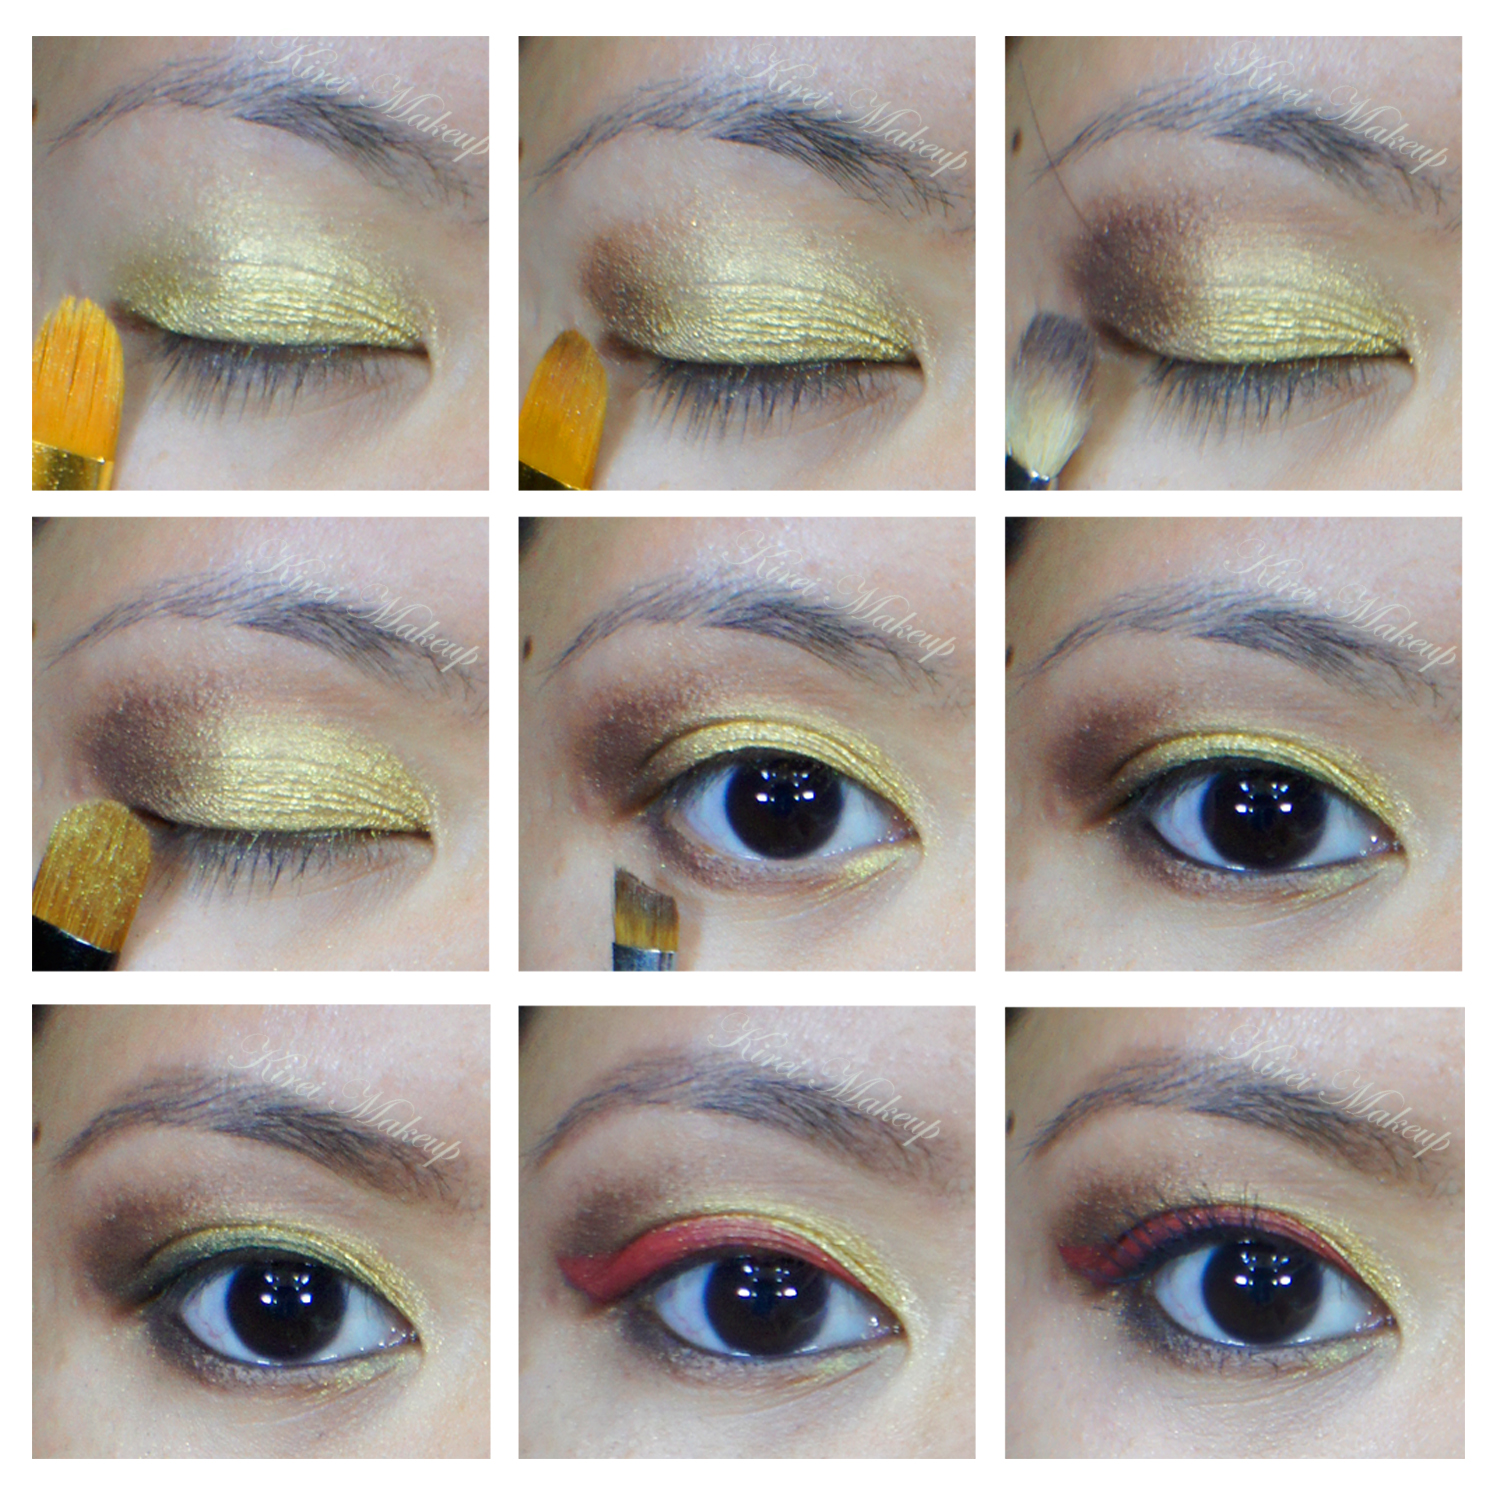
How-to:

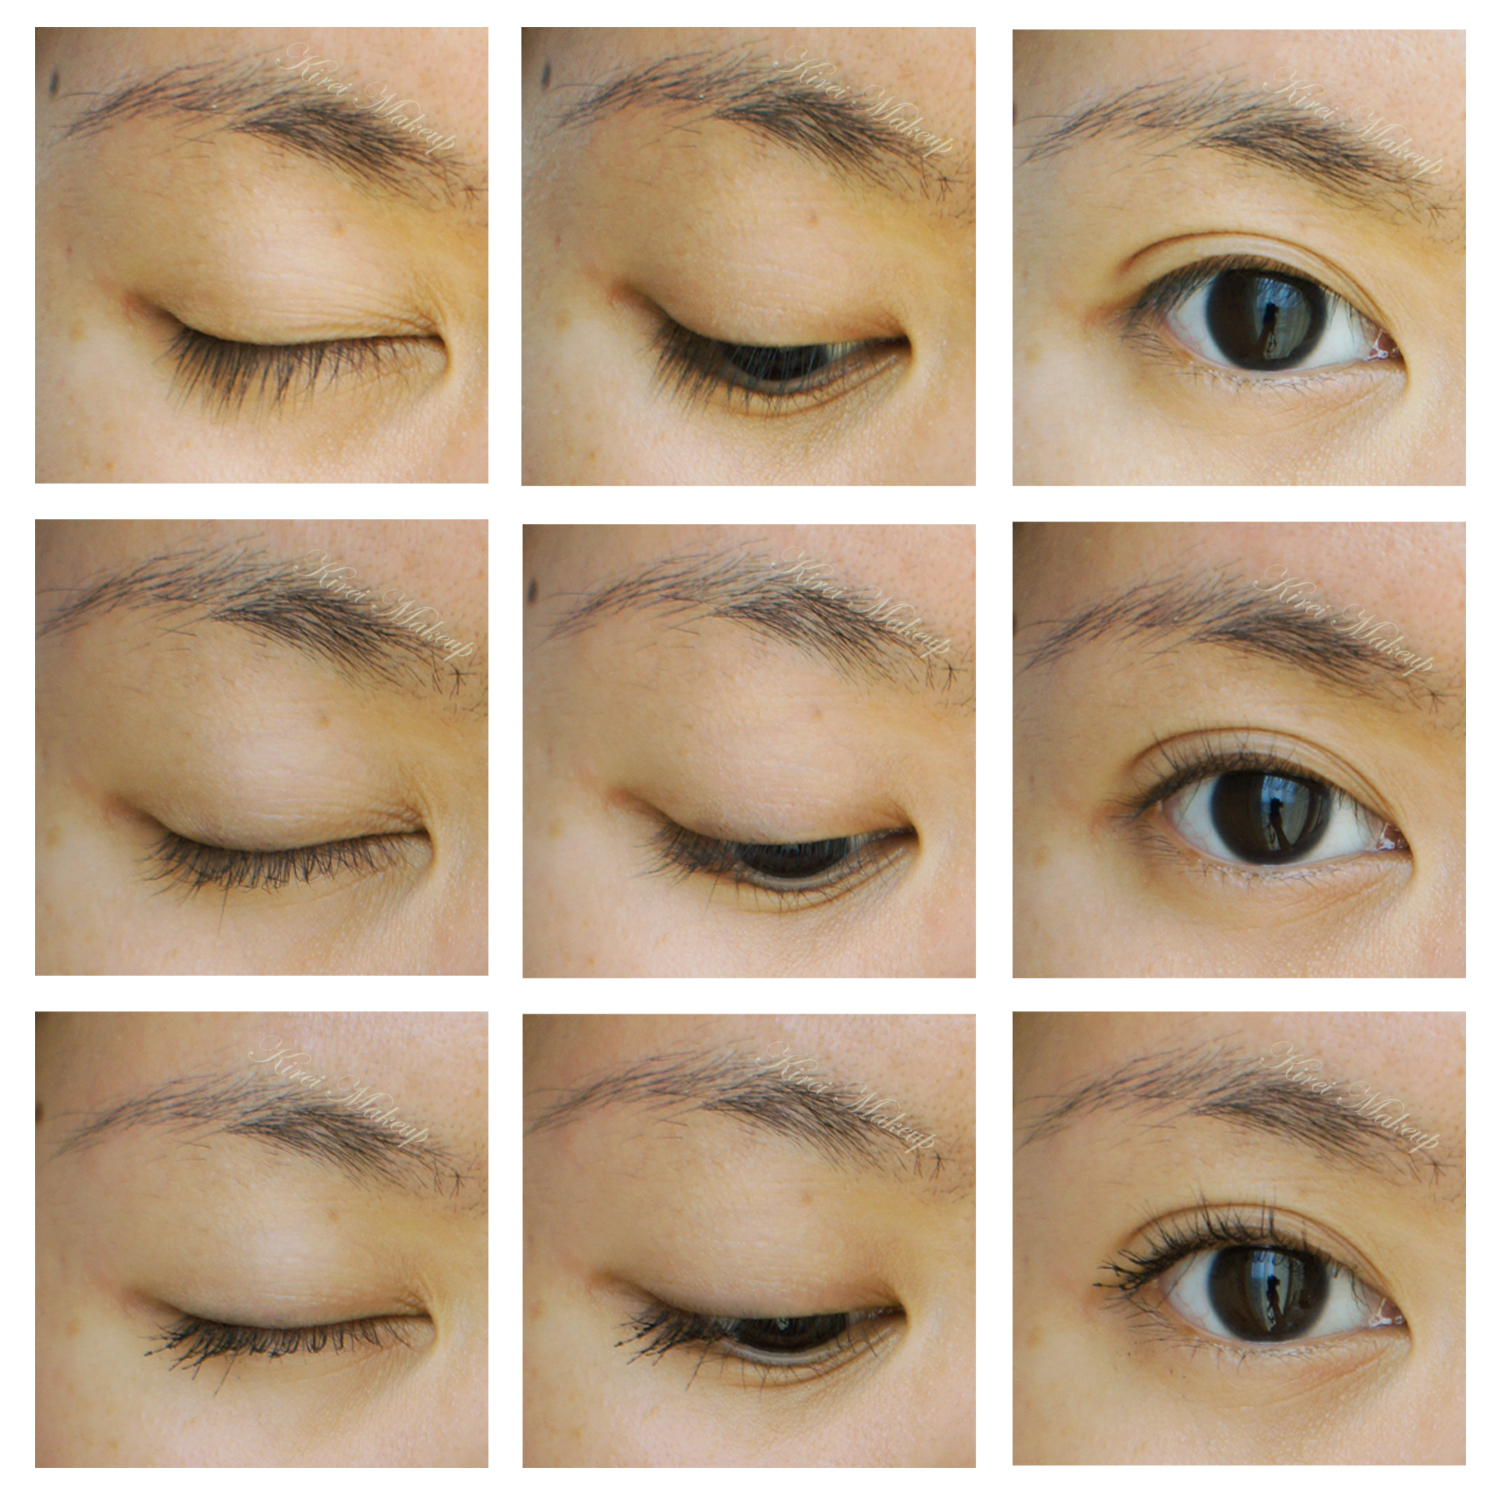
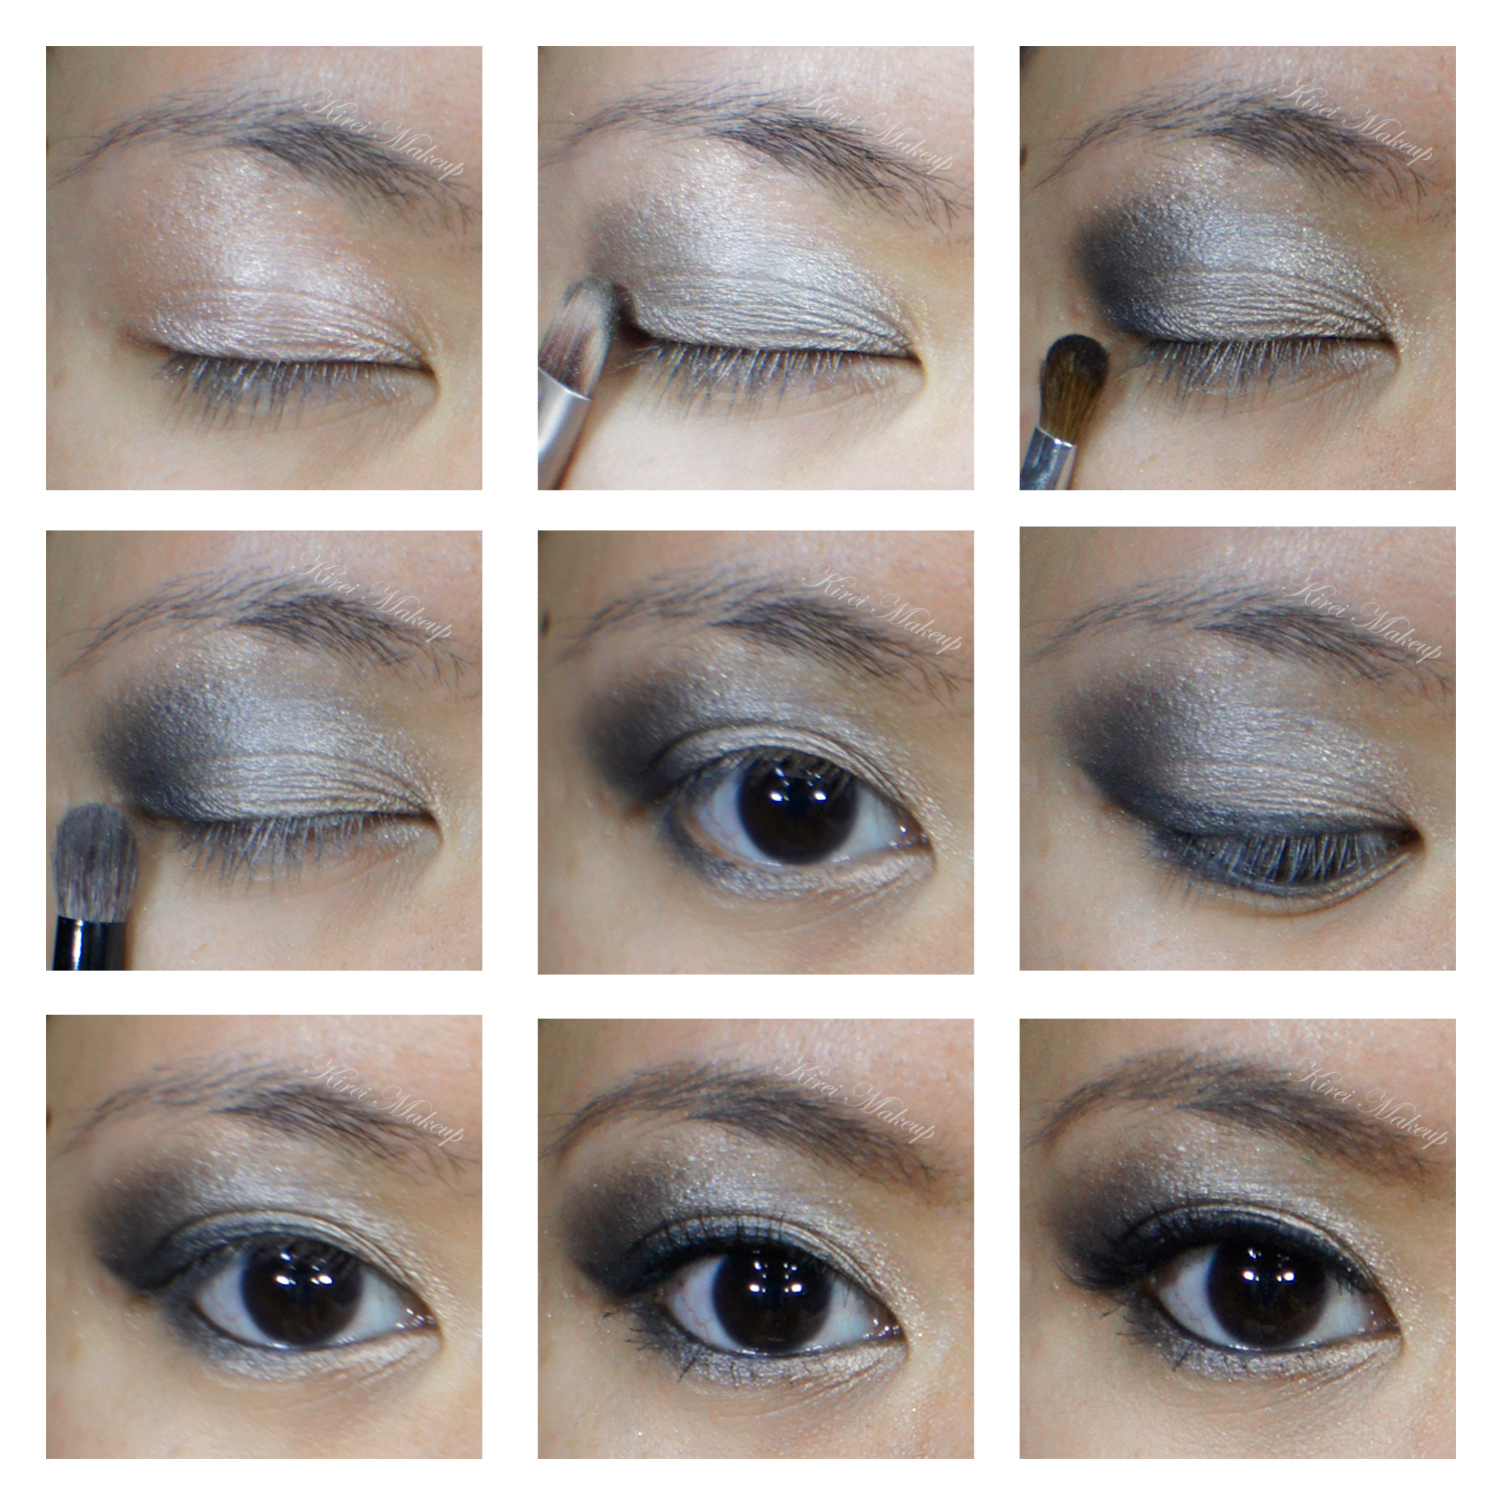
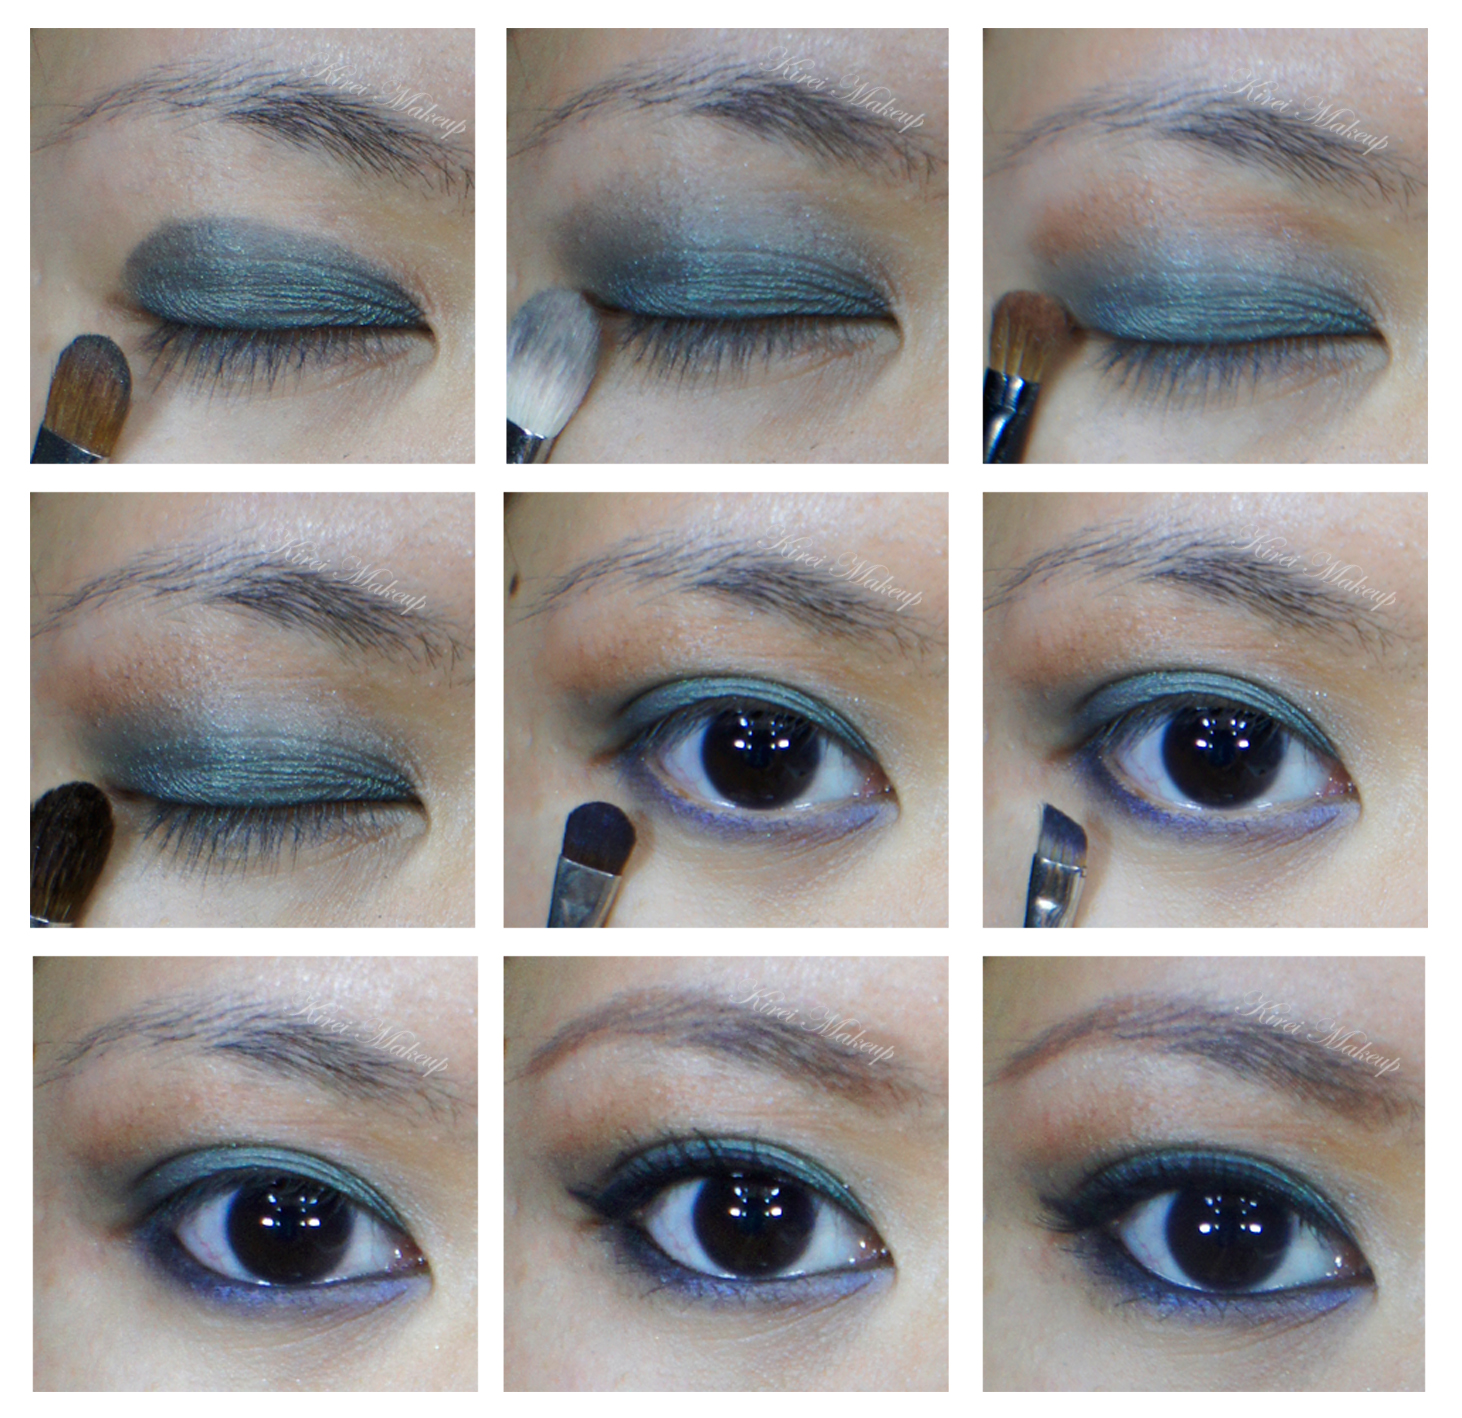
1. I applied MUFE Aqua Cream shadow no. 11 using a synthetic art brush all over my eyelid.

2. Using the clean side of the art brush, I lightly applied MUFE Aqua Cream Shadow no. 15 on the outer V of the lid.

3. Using Smashbox Sienna eyeshadow and a blending brush, I applied the shadow on the outer half of the eyelid and lightly on the crease.

4. Using a flat eyeshadow brush, I applied MAC Old Gold on top of the gold cream shadow.

5. I applied Smashbox Sienna eyeshadow on the lower lid using an angled eyebrow brush.

6. I lined my waterline and tightline using L’oreal Voluminous Smoldering eyeliner.

7. Using my new Shu Uemura brow pencil, I filled in my newly threaded eyebrows 😀

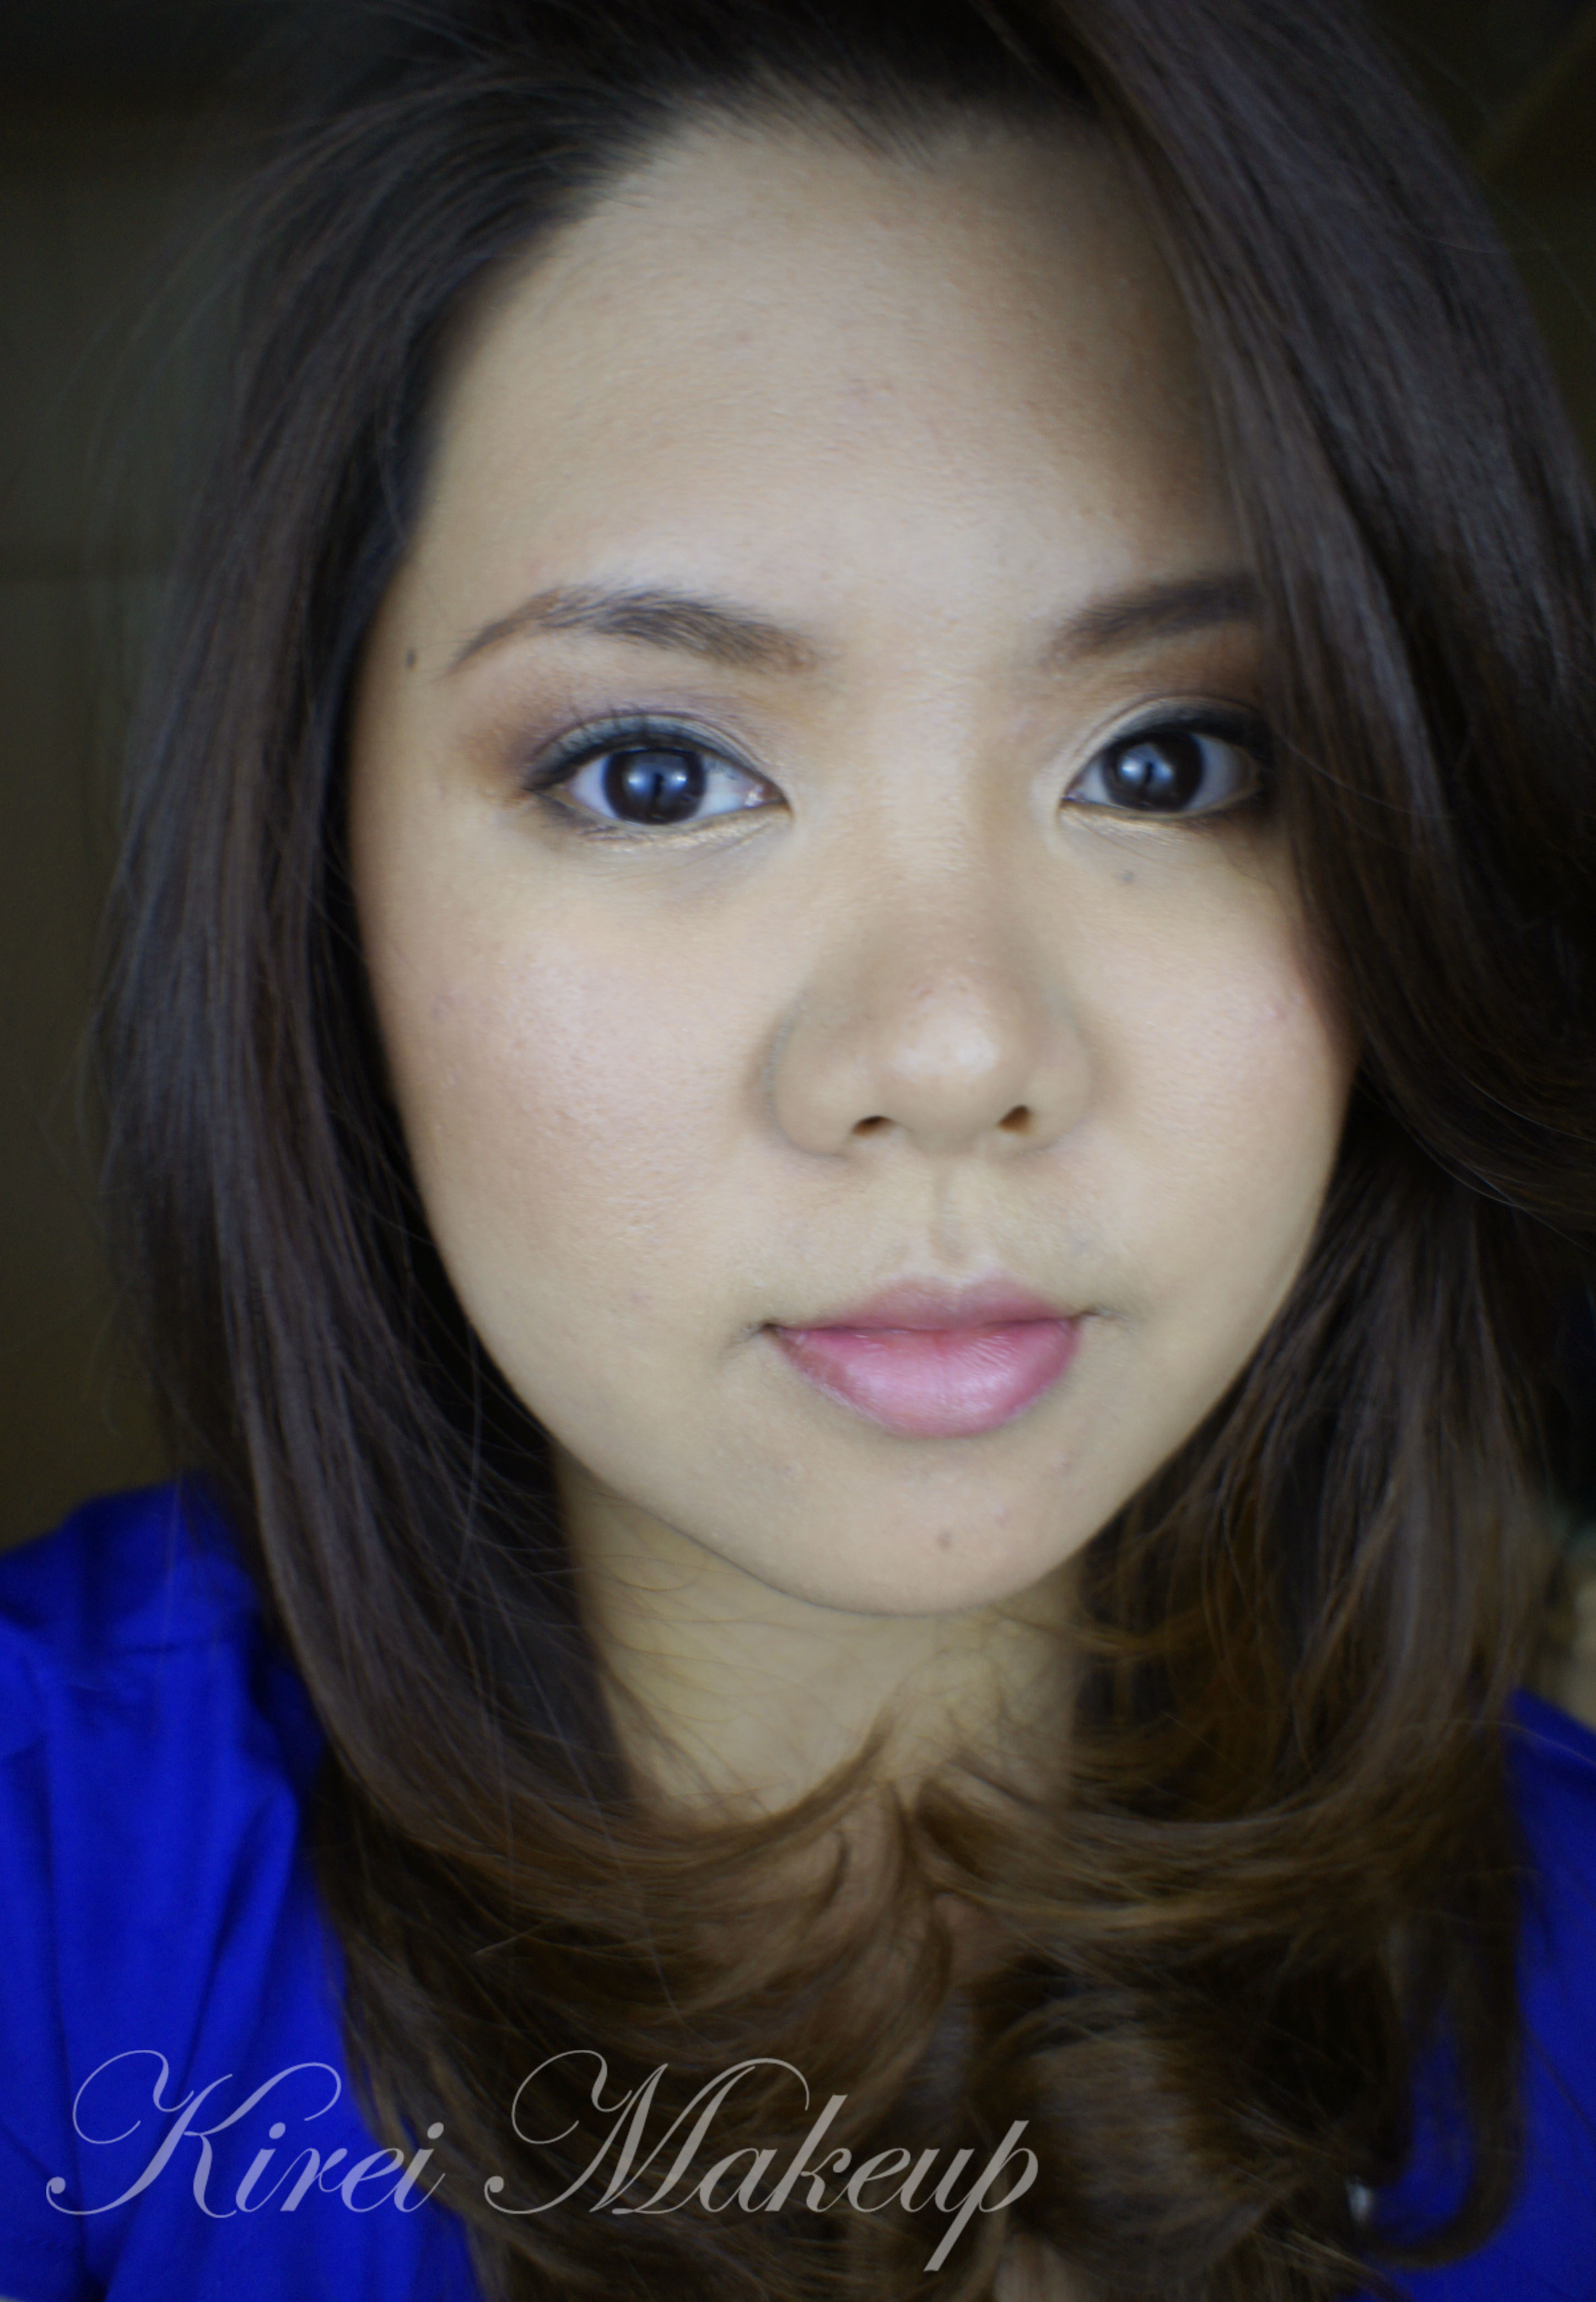
8. Using a wet angled eyeliner brush, I dipped the brush into Ben Nye Soleil Red powder blush and created a winged liner. You can use a cream shadow or face paint (e.g. PAC face paint in red, Snazaroo or Kryolan face paints etc) to create the red winged liner.

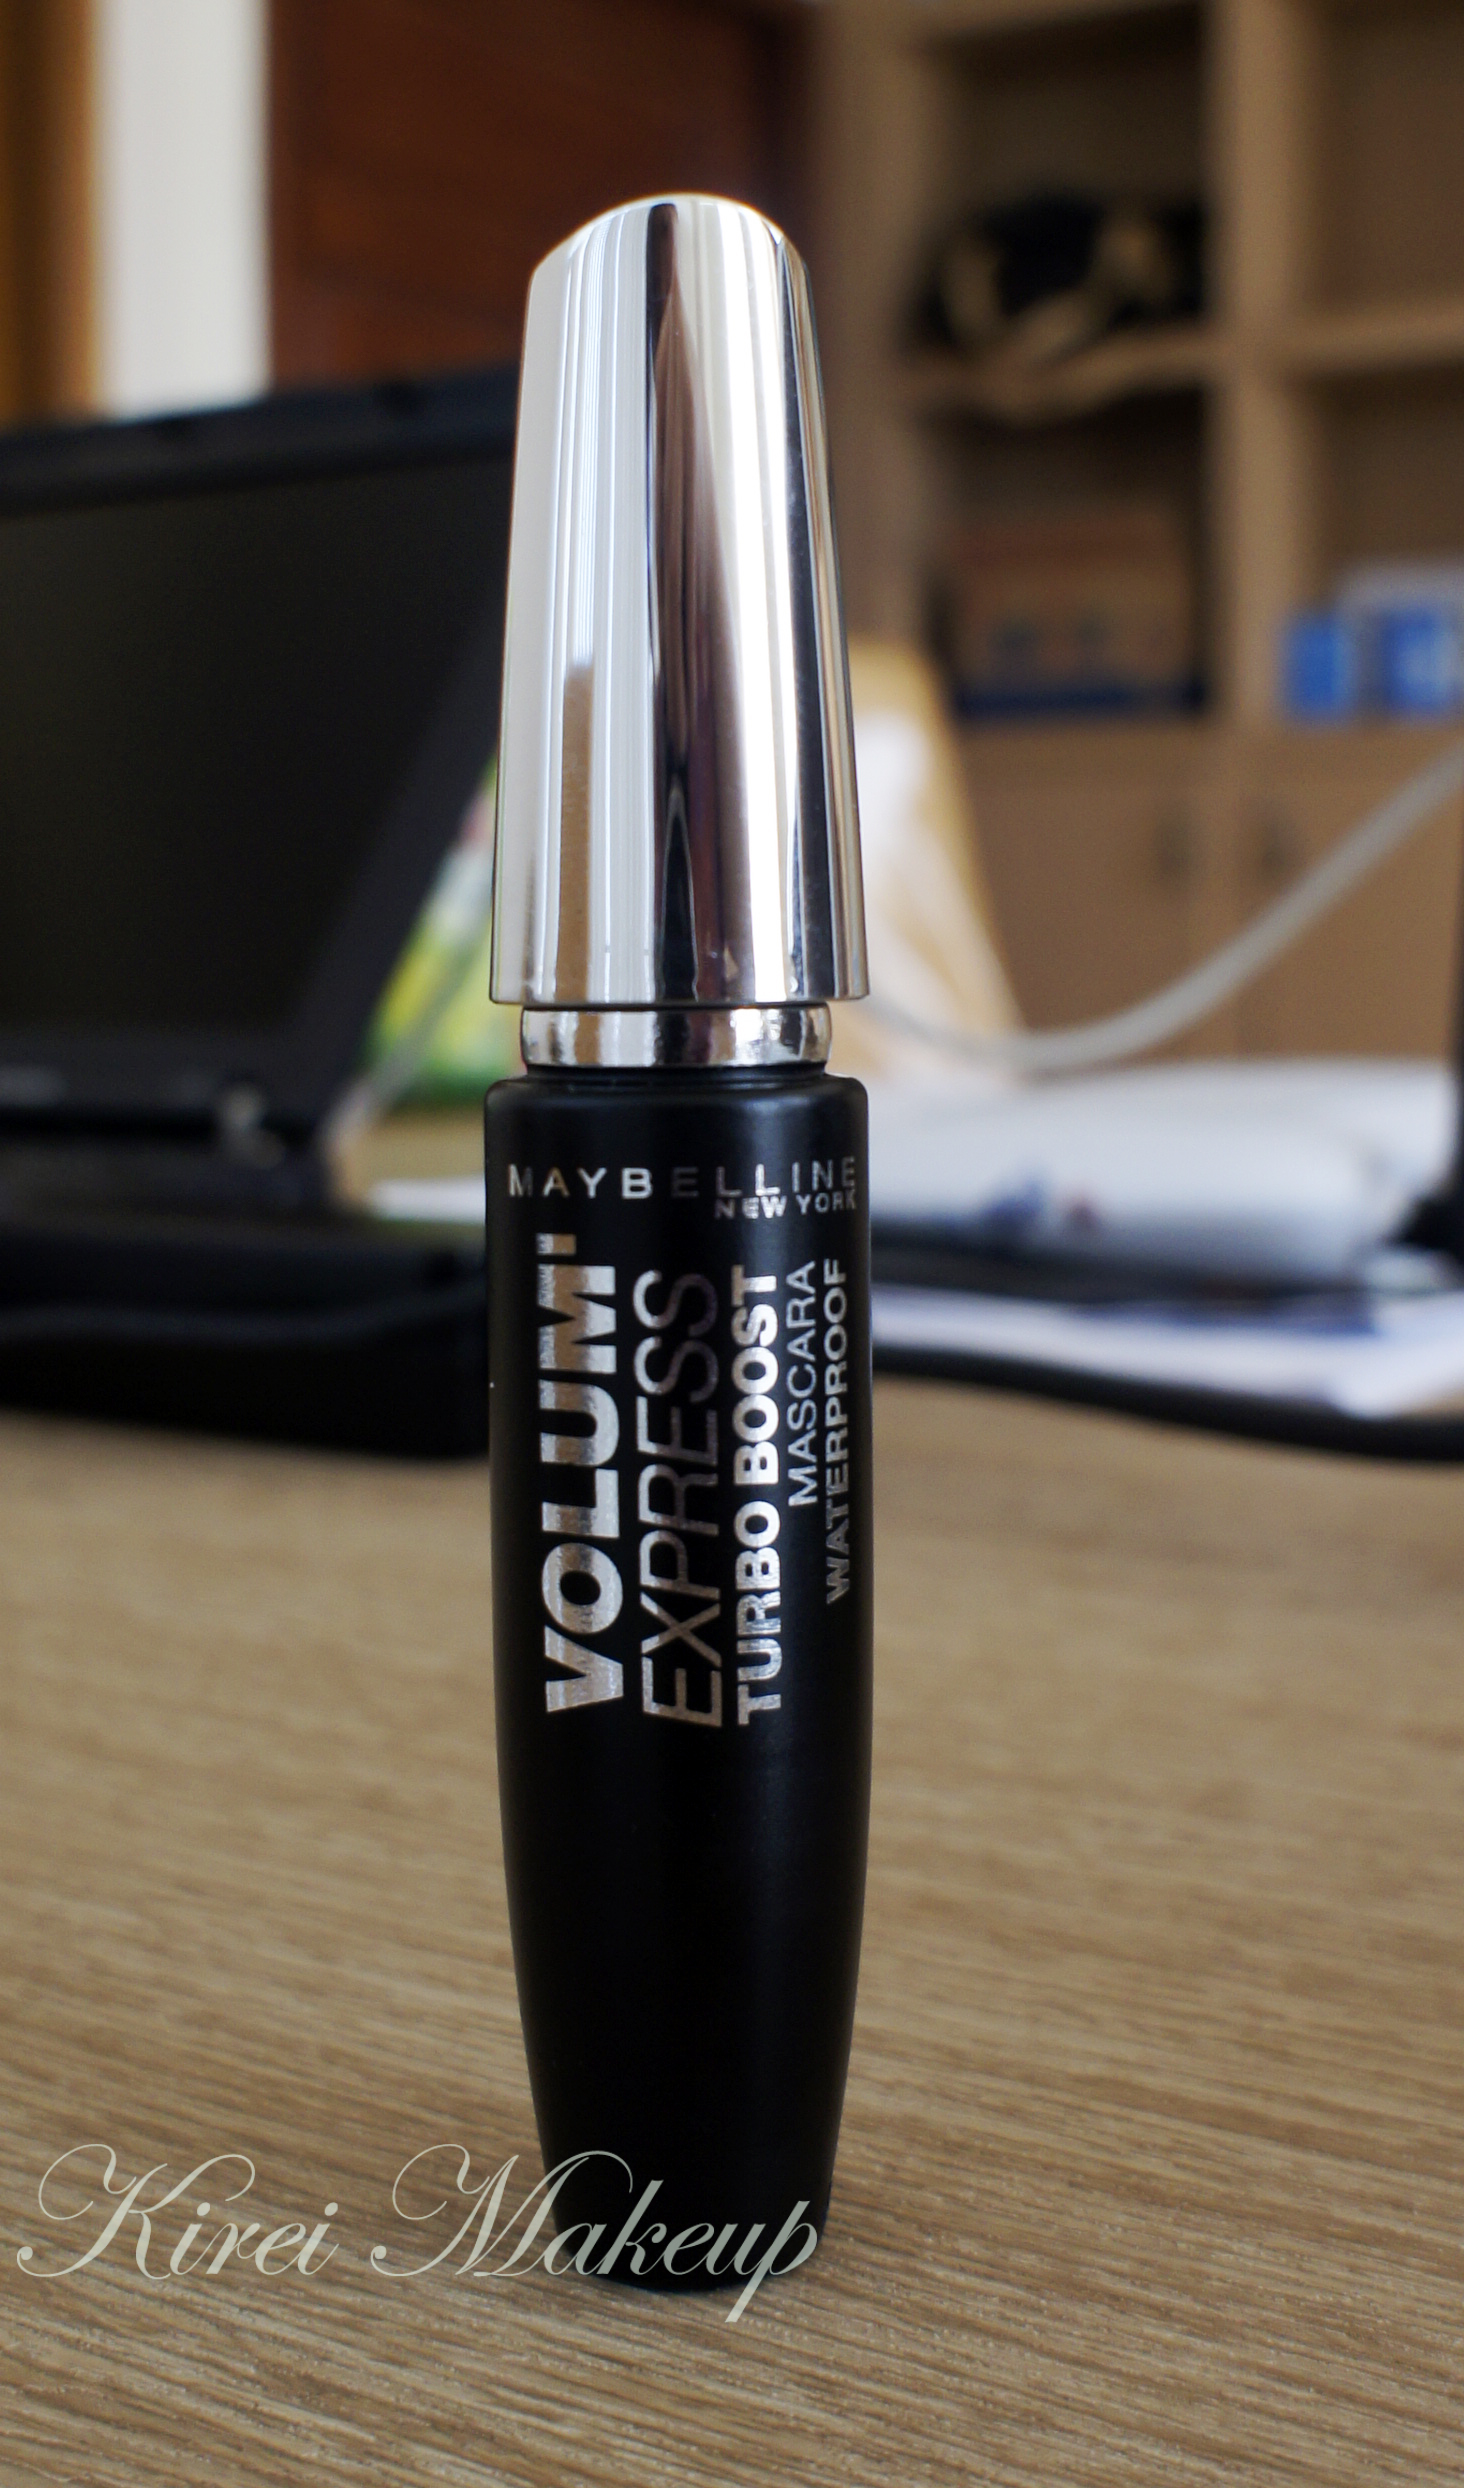
9. I curled my lashes and applied L’oreal Double Extension Curl mascara on both top and bottom lashes.

makeup forever aqua cream

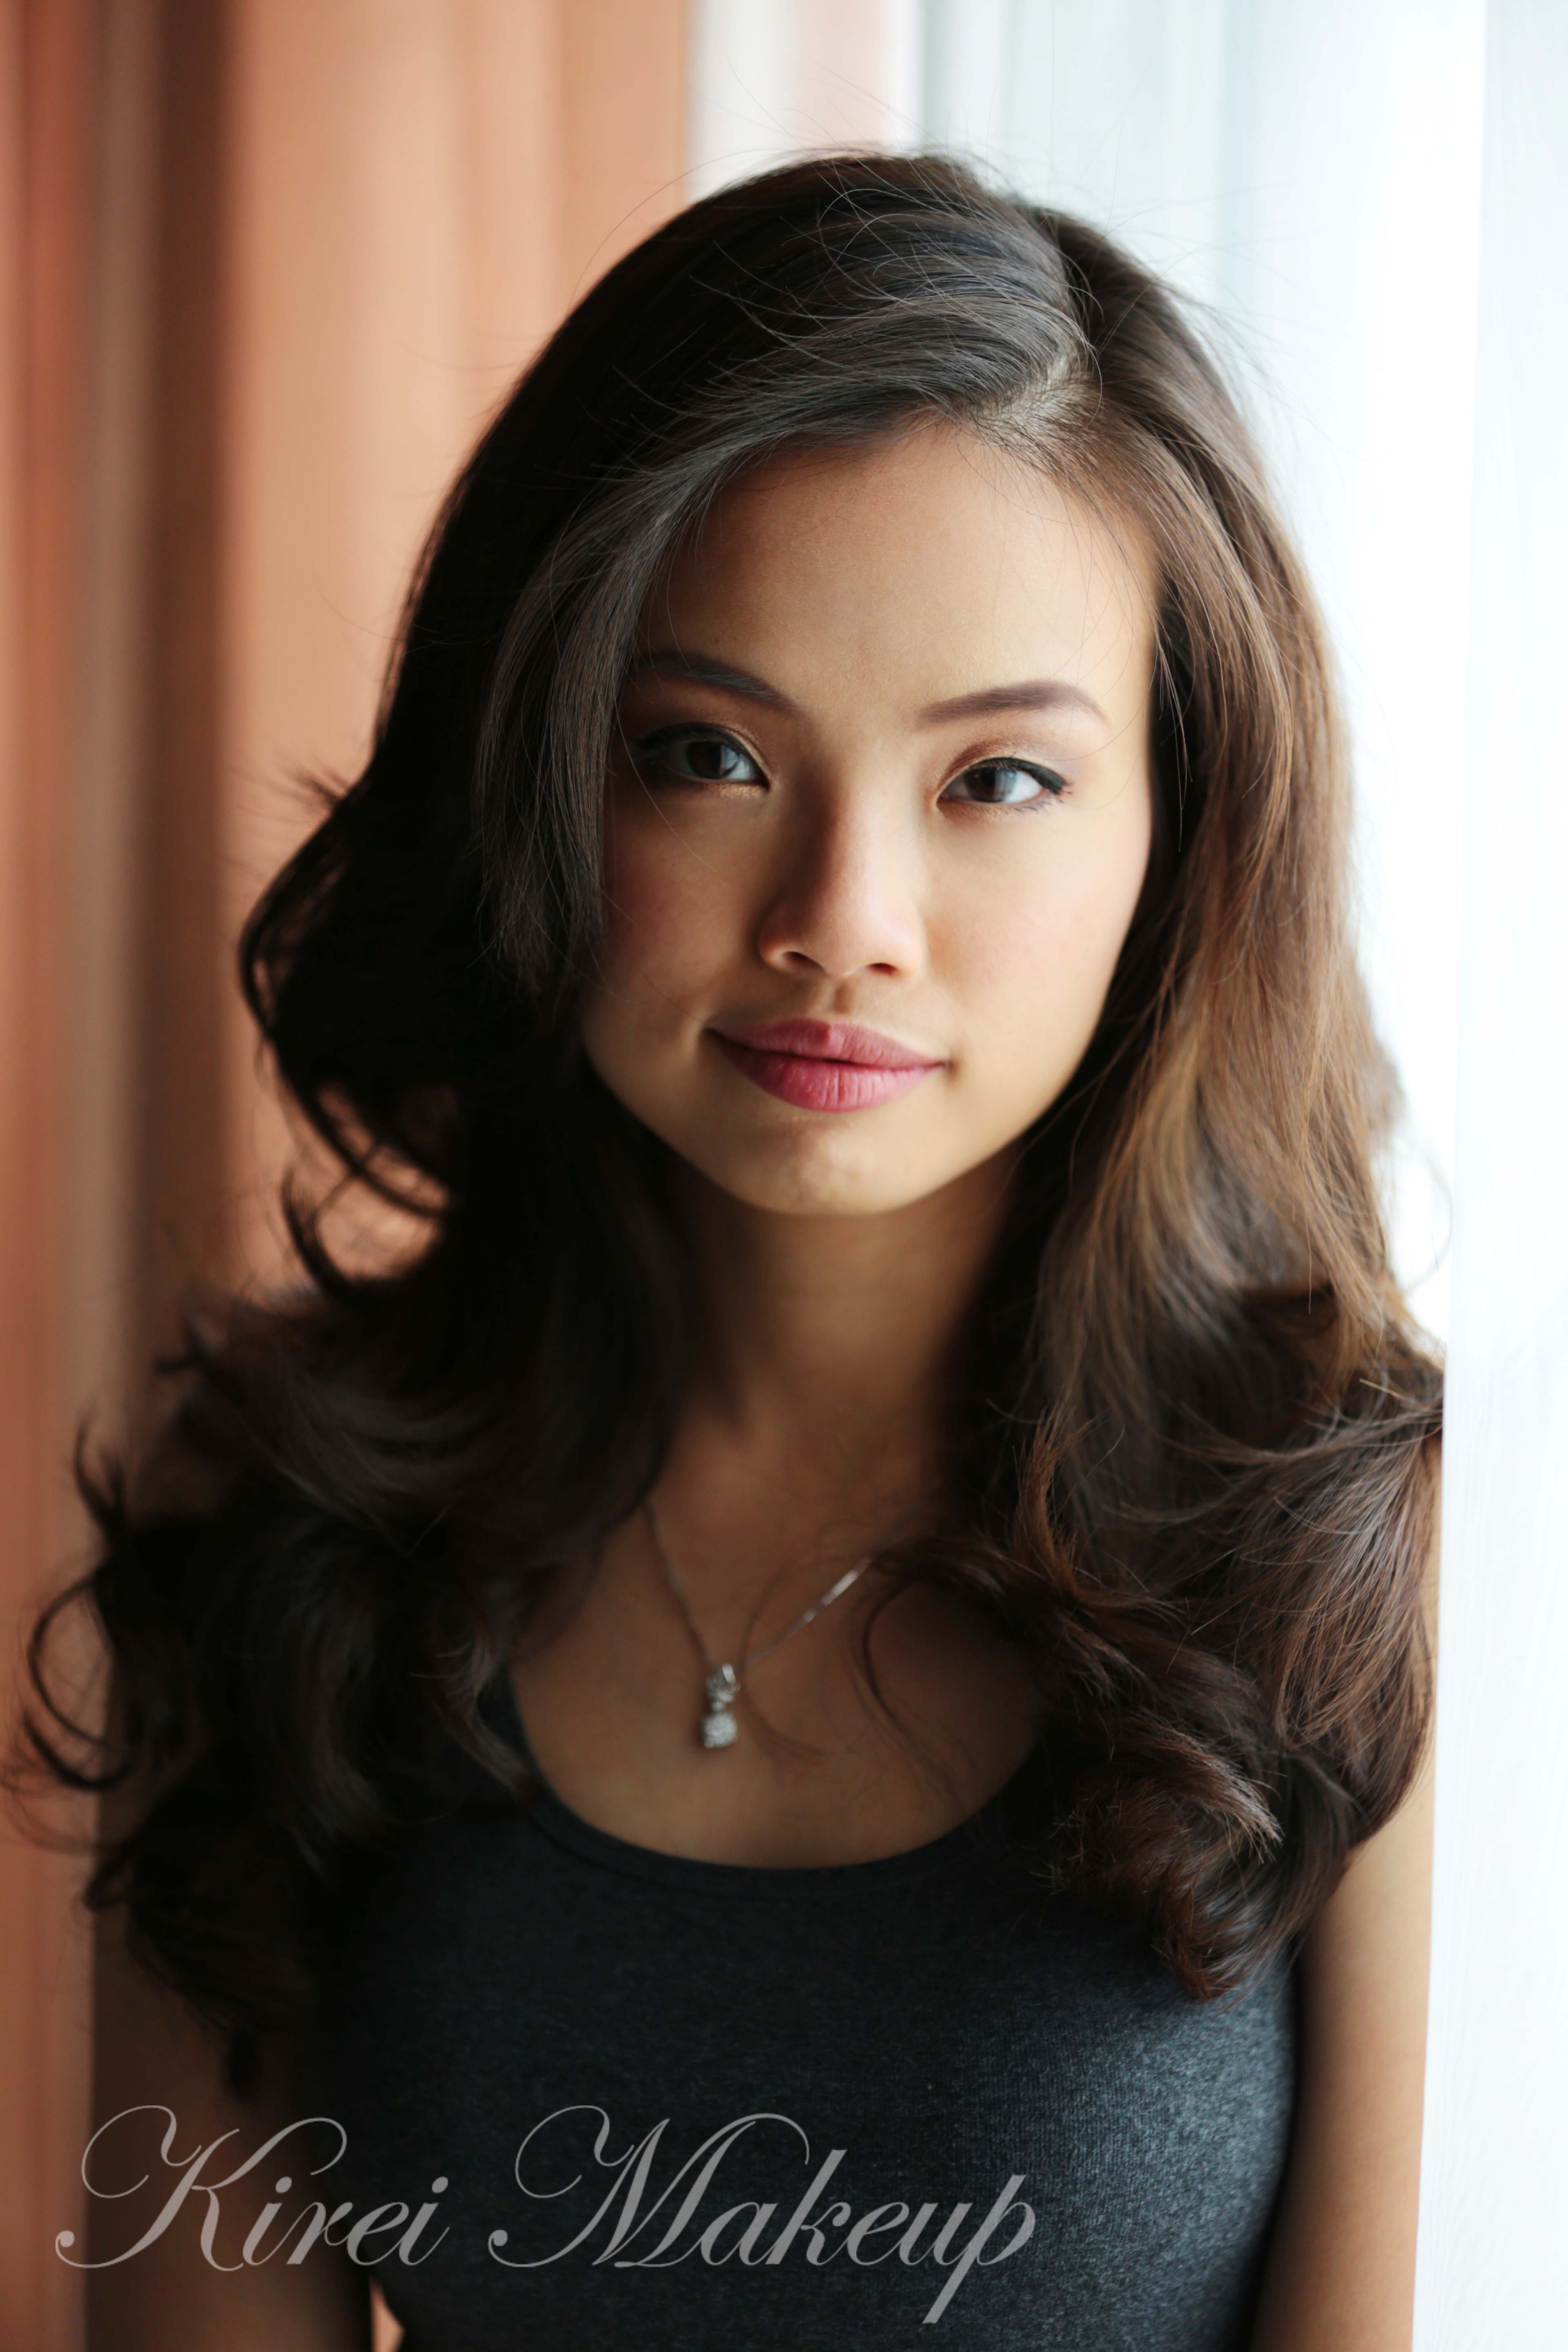
10. For the face, I applied Estee Lauder Double Wear Light foundation using a foundation brush.

11. Under the eyes, I applied MUFE HD Concealer.

12. I contoured my face using MAC Shadowy and a face fan brush.

13. On the cheeks, I applied MAC Fleur Power blush mixed with MAC Cubic blush.

14. For the lips, I applied Chanel Confidentielle lipstick.

iron man inspired makeup

Product of the Week: Maybelline Express Volume Turbo Boost Mascara

Finally I get the chance to upload my Product of The Week! In this week’s installment, I’d like to present my favorite mascara at the moment. My favorite mascara of all time was actualy L’oreal Carbon Black mascara, but since I can’t find it here in Indonesia, I’ve to go look for another mascara to replace my Carbon Black.

I was at Carrefour and decided to get the Maybelline Express Volume Turbo Boost macara. Actually, I’ve tried the Maybelline Volume Express Hypercurl mascara last year, but it didn’t do anything much to me. So, I was a bit skeptical about the Maybelline Express Volume Turbo Boost mascara, but after my first try, I fell in love with it.

I bought the mascara for IDR Rp. 63,300 at Carrefour in Jakarta.

 maybelline volume express turbo boost mascara

From Maybelline Indonesia website:

Tebal dalam sekejap, tanpa gumpalan

  • Untuk hasil bulu mata 5x lebih tebal dalam sekejap dan tanpa gumpalan.
  • Super tebal, super cepat, bulu mata menakjubkan.
  • Waterproof

From Maybelline Canada website:

• Long-lasting waterproof turbo-boost formula and patented Anti-Clump Brush quickly thicken lashes for up to 5x more volume
• Contact lens safe, ophthalmologist-tested
• Waterproof, also available in Washable

For Best Result

Sweep brush upwards from root to tip to build instant volume. Do not let dry between coats. Removes easily with Expert Eyes® Moisturizing Eye Makeup Remover.

maybelline volume express turbo boost mascara

I found that the instruction from Maybelline Canada website is very useful. I applied this mascara as per instruction (sweep upwards and not to let it dry between coats) to get the best out of this mascara. Even when I did let it dry between application, there’s something about the bristle of the mascara that doesn’t let the product to get clumpy.

I love the fact that this mascara holds my curl all day long! Not only curls, it definitely gave me extra length on my lashes. However, it was not as volumizing as it promises. I don’t really mind it. I like my lashes to be more feathery and soft to touch, so this mascara is perfect for me. I’ve been using the mascara for the last few tutorials last week if you’d like to see more pictures.

You can apply the mascara lightly just for curls and length for a day makeup, or you can layer several coats of the mascara for a more intense, dramatic lashes. You can definitely layer this mascara and get maximum length, curl and a bit more volume. I personally like it the way I wore it in the picture below for daily use.

I’ve worn this mascara for a good 6 hours without smudging in Indonesia. However, keep in mind that I was inside an air-conditioned environment most of the time. I’m not sure how long this mascara will last if I was outdoor.

maybelline volume express turbo boost mascara

Will I buy this mascara again? ABSOLUTELY!

I gave this mascara 4.5 winks out of 5. It’s missing 0.5 because it does not give 5x the volume (compared to my bare lashes).

Coral and Blue

I wanted to do another look with the MUFE Aqua Cream no. 9. I had to find a good reason to buy it right? Hahaha…I decided to incorporate some blue and yellow. I found inspiration from my trip to Bali couple months a go. The performers in Bali use a lot of blue, pink and gold. In my own twist, I decided to use coral, blue and yellow (and a tiny bit of bronze). When I used to perform(Balinese traditional dance) back when I was a kid, they used to put the 3 dots using a toothpaste (applied using toothpick). For this look, I added 3 tiny dots at the end of the eyeliner to replace the toothpaste.

I’ve found an issue with the MUFE Aqua cream no. 9. You have to work really2 fast to blend it. If you want a lot of colors on your lid, you have to apply it thinly first and then layer it as soon as you can. Speed is your friend when using this product.

Let me tell you my sad story. Ah, talking about it made me so angry! Anyways, so as you guys know I owned Maybelline 24hr Color Tattoo in Edgy Emerald, Tenacious Teal and Inked in Pink. I always made sure that any of my cream products are closed tightly. However, for some reason, I guess may be when I was rushing since I have been traveling a lot these couple months, my Tenacious Teal wasn’t properly stored! The lid was loose and guess what! It’s drying out!!! *sigh* Oh the horror! The worse part is that I can only get them in Canada since it’s not sold in Asia yet! *cry*

Anyways…I have to go get alcohol soon so I can revive my Tenacious Teal to its original state. So, do forgive me if the Tenacious Teal isn’t looking so tenacious in this tutorial.

Let’s get down to business now, shall we? 🙂

mufe aqua cream no. 9

How-to:

1. Using a synthetic brush, I applied 2-3 layers of MUFE Aqua Cream shadow in no. 9 on the lid, focusing most of the products on the center of my eyelid.

2. Using another synthetic brush I applied Maybelline Tenacious Teal 24hr Tattoo on the outer half of the lid. I blended the edge of the crease using a blending brush.

3. Using a flat eyeshadow brush, I applied Ben Nye Cosmic Blue on top of Maybelline Tenacious Teal. I blended the color on the crease using a fluffy blending brush.

4. I applied L’oreal Pepsy Coral infallible eyeshadow on the inner half of the lid.

5. Using a small fluffy brush, I applied Smashbox Blackout eyeshadow on the outer V and I blended the shadow using a clean blending brush.

6. I also blended the L‘oreal Pepsy Coral towards the blue using a clean blending brush.

7. I lined my waterline using NYX Jumbo pencil in Milk.

8. Using a small shader brush, I applied MUFE eyeshadow no. 71 on top of the white eyeliner.

9. I applied Smog eyeshadow from NAKED 1 palette along the lower lash line using an angled eyeliner brush.

10. I created a winged eyeliner along the upper lash line using Kat Von D Trooper eyeliner. I also created 3 tiny dots at the end of the eyeliner using the same product.

11. I curled my lashes and applied mascara on top and lower lashes.

12. I filled my brows in using Chanel Mistre brow pencil.

maybelline 24hr tattoo tenacious teal

13. For the face, I applied Estee Lauder Double Wear Light foundation with a foundation brush.

14. I applied YSL Touche Eclat under the eyes, my cheekbones, bridge of the nose and on my cupid’s bow.

15. I applied Benefit Coralista blush on the cheeks and Chanel Confidentielle lipstick on the lips.

yellow eyeliner

Silver Smoke

Please do forgive me for the unrully brows. I’ve been trying to grow them out so I can try out BrowHaus at Grand Indonesia, but I’m dying to tweeze them myself! *breathe in breathe out* Hopefully by the end of the week I can get them waxed!

If you read my tweets (follow my twitter: @KireiMakeup), I’ve wanted to do a tutorial using my Urban Decay Naked 2 Palette. Today’s look is a silver smoky makeup. I think the look would look great on brides and those who prefer smoky makeup for prom/parties. Lots of drama on this look. Very intense! Lots of silver, lots of shimmer and very dark around the lashes and outer V.

If you aren’t too comfortable with blending or applying eyeshadow on the outer V, alternatively what you can do is to apply silver all over the lid and create a heavy liner on upper and lower lashes with black eyeliner (as well as on the waterline). Top it off with lots and lots of mascara.

With this look, try to “wing” the smoky eyes slightly for an uplifting effect. You need a good blending brush (or two) for the smoky effect.

How-to:

1. I prepped my eyelid using Urban Decay Primer Potion in Sin.

2. On the lid, I applied Pistol from UD Naked 2 palette using a flat eyeshadow brush.

3. On the inner part of the lid, I applied Suspect from UD Naked 2 palette using a flat eyeshadow brush (not in picture).

4. Using a small fluffy blending brush, I applied  Blackout from UD Naked 2 palette on the outer V and slightly on the crease.

5. Using Smashbox bullet brush, I blended the crease out to ensure there’s no harsh line.

6. Using an angled eyebrow brush, I applied Suspect on the inner half of the lower lid and Blackout on the outer half.

7. Using Blackout, I created a winged liner along the upper lashline, making the liner thicker on the outer part and thinner on the inner part.

8. I lined my waterline using L’oreal Voluminous Smoldering eyeliner.

9. I curled my lashes and applied Maybelline Volume Express Turbo Boost mascara on both top and bottom lashes.

10. I filled my brows using Dollywinked brow pencil. I applied Foxy from Naked 2 palette under the brows.

11. (optional), I applied Ardell Demure and 110 false eyelashes on the upper lashes.

silver smoky eyes

12. For the face, I applied Estee Lauder double wear light foundation using a foundation brush from the center of the face blending it towards the outer perimeter of the face.

13. Under the eyes, I applied YSL Touche Eclat and blended it using my finger.

14. On the cheeks, I applied MAC Cubic.

15. I applied MAC Shadowy on the sides of the nose.

16. For the lips, I applied Chanel Confidentielle lip rouge.

urban decay naked 2

Brun

I had the pleasure of having Wiwin to come over to my place and allowed me to give her a makeover. We did it just for fun, ’cause you know, I was bored and had been bugging her to let me do her pretty face 😉

We went out afterwards and ooh boy, this hot babe was the center of attention..hahahaha…Her fiance, Geoffrey, came with an arsenal of lenses and camera. He took all the photos below. Pretty amazing couple, eh?

Since we were going out, she didn’t want the makeup to be too smoky, and she wanted a bronze eyeshadow to be incorporated into the look. So, I did something similar to my “Warm Brown Smoky” tutorial, but added Urban Decay Half-Baked on the eyelid (on top of All That Glitter). On top of that instead of MAC Sketch eyeshadow, I used MAC Brun eyeshadow.

asian natural makeup

Her eyebrows were recently “shaved” by another makeup artist and it was wonky. So, I had to filled it in using Chanel brow pencil in Mistre to re-shape the brows and set it with MAC Omega eyeshadow.

No falsies applied since she didn’t want it. We didn’t want to go overboard with the look.

No black liner on waterline because I want to keep her eyes looking bigger and wide. Black eyeliner on the inner rim will close her eyes and makes the eyes look smaller. Instead, I used a beige eyeliner to brighten up her eyes and created a bigger eye illusion. I also created a winged liner along her upper lashline to lift her eyes.

asian natural makeup brida;

For her base, I prepped it with CoverFX primer and Make Up For Ever HD Foundation. I concealed any blemishes and under eyes circles using MAC Pro Conceal and Correct palette. I also applied a little bit of Chanel Universal Bronzer on her face (hollow of the cheeks and temples). For blush, I applied Revlon Rosy Glow cream blush on her cheeks.

I set everything using Cinema Secret loose powder. She wanted her nose to look higher, so I applied MAC Shadowy very lightly on the sides of her nose I also applied the same contour powder on the temples, hollows of the cheeks and her jawline. I applied MAC Fleur Power blush on her cheeks.

For the lips, I applied my favorite lipstick of all time: Revlon Mauve It Over matte lipstick, and applied a little bit of L’occitane lip balm on top of it.

asian bridal natural makeup

Her hair was set on rollers and rolled up in a bun during makeup session. Just FYI, that is her natural hair color! Beautiful, yes?

Oh, yes, that’s my family’s dog, Yorkie 😉 He made an appearance this time.

asian natural makeup

MUFE Smoky Palette

These couple days I’ve been digging my makeup stash, trying to find which palette I’ve been putting aside and barely used. I have to say, I am a product hoarder. I think some (or most) of you can relate to me, right? Come on you bloggers out there, I know you’re probably as bad as me 😉

Anyways, I managed to find the Make Up For Ever Smoky palette that I bought and barely touched. I fell in love with this palette again! The pigments are amazing and you have all the basic colors you need for smoky eyes. You have the earthy tones like brown (dark and light), the highlighters (white and champagne), the medium and darks (blue, purple and black). What’s not to love? I wonder why I didn’t fell in love with it as much last time..Oh well!

How-to:

1. I applied the green eyeshadow from the MUFE Smoky palette on the eyelid using a flat eyeshadow brush.

2. Using a clean blending brush, I feathered out the edge of the crease.

3. I applied the light brown eyeshadow from the Smoky palette slightly above the crease using the brush that comes with the palette.

4. Using a clean blending brush, I blended out the edge so there’s no harsh line on the crease.

5. Using a small shader brush, I applied the blue eyeshadow from the MUFE Smoky palette on the lower lid.

6. I also applied the black eyeshadow from MUFE smoky palette on the outer half of the lower lid using an angled eyeliner brush.

7. I lined my waterline and tightline using MAC Engraved eyeliner.

8. Using an angled eyeliner brush and the black eyeshadow from MUFE Smoky palette, I created a winged liner along the upper lashline.

9. I curled my lashes and applied Maybelline Volume Express Turbo Boost mascara on both top and lower lashes.

10. I also applied Ardell Demure lashes to make my lashes look slightly thicker. My real lashes were longer than the falsies surprisingly.

11. Eyebrows are filled using Dollywinked brow pencil.

asian smoky eyes

12. For the face, I applied MUFE HD foundation using Sigma Round Kabuki brush.

13. Under the eyes, I applied Chanel Eclat Lumiere.

14. For the cheeeks, I applied MAC Cubic blush.

15. I applied Tarte Lipsurgence in Hope for the lips very lightly on the center of the lips and blending it outwards using my finger.

smoky eyes for asian

Cutie Mcpurple

I wanted to use my pastel and light eyeshadow palette lately. I managed to find my MAC Cutie eyeshadow palette which was from ages a go. I barely used the palette since I wasn’t sure how I was going to tackle the color back when I bought this palette. On top of that, I was into smoky eyes, neutral shades back then.

Anyhow, I don’t think the MAC Cutie palette is on sale anymore. Even if it is, please don’t buy it, it’s not worth your money. The pigment pay-off is so-so, the colors are too light for anyone who’s above NC 15 and it’s not that wearable. I had to pack the colors several time for it to show up. The colors are very sheer if you don’t use any base underneath.

How-to:

1. I applied NYX Jumbo pencil in Milk on the upper lid, blending using my ring finger all the way up to the brow bone.

2. Using a flat eyeshadow brush, I applied MAC Goody Goody Gum Drop on the inner half of the eyelid.

3. Using another flat eyeshadow brush, I applied MAC Boy Crazy on the outer half of the lid.

4. Using Smashbox bullet brush, I applied MAC Azuki Bean on the outer V.

5. Using a small shader brush, I applied MAC Moshi Moshi on the inner corner.

6. I lined my waterline and tightline using L‘oreal Voluminous Smoldering eyeliner.

7. I also lined the eyeliner along my upper lashline.

8. Using a small angled eyeliner brush, I applied MAC Boy Crazy on the inner half of the lower lid and MAC Azuki Bean on the outer half.

9. I curled my lashes and applied Maybelline Volume Express Turbo Boost mascara on the upper as well as lower lashes.

10. I filled my brows in using Dollywinked brow pencil.

Pastel makeup

11. For the face, I applied MUFE HD foundation using CoverFX foundation brush.

12. Under the eyes, I applied MUFE concealer.

13. For the cheeks, I applied MAC Fleur power blush.

14. The look is completed by applying Revlon Mauve It Over matte lipstick on the lips.

MAC CutieMu

Candiliscious

Sooo, as you guys know, I posted a sneak preview of today’s tutorial on Instagram and Twitter. If you didn’t check it out, follow me on both account (handle name: @KireiMakeup). I also mentioned on my tweet that I went to Plaza Indonesia to shop at Make-Up For Ever. I bought this gorgeous aqua cream shadow in no. 9, which is a beautiful shimmery coral color. I knew the moment I laid my eyes on it, I wanted to do a bright look. Thus, I paired the deliciously bright coral with a minty green. I love how this look turns out! So very summer-y! Kinda looks like candies, no?

I think this MUFE Aqua Cream no. 9 is actually for the lips, so you might want to test it out first if there’s any reaction when you apply it to your eyes. I had no sensitivity or negative reaction towards it, so I proceeded to apply it to my eyes.

I also filled in my brows slightly different this time since I’m trying to grow my brows out so I can re-shape them again. Instead of the usual arch, I drew the brows slightly lower this time, which helped with the overall look. I think the softer, lower brows make the look more wearable and framed the face softer.

The key to this look is to quickly blend the cream shadows before they dry out. Once the creams dry, you might have a difficult time blending it. The look works with just the cream shadows alone, but I like to set it with eyeshadows to make it last longer and for the colors to look even brighter.

How-to:

1. Using a synthetic brush (mine is an art brush from a bookstore), I applied Maybelline Color Tattoo 24-hr in Edgy Emerald on the inner half of the lid.

2. Using a flat eyeshadow brush, I applied Make Up For Ever Aqua Cream Shadow in no. 9 on the outer half, blending it towards the Edgy Emerald and on the crease slightly. I used a clean fluffy blending brush from Urban Decay to blend the crease.

3. Using a clean flat eyeshadow brush, I applied a mint green eyeshadow from Gosh Spring Passion (limited ed.) on top of Maybelline Edgy Emerald.

4. I also applied L’oreal Pepsy Coral infallible eyeshadow on top of MUFE no. 9 aqua cream shadow. I blended the color towards the mint so there’s no harsh line separating the 2 shadows.

5. Using a small fluffy brush (mine was given by a chinese-based brush company), I mixed MAC Passionate and MAC Vibrant Grape at the back of my hand, then I applied it lightly on the crease.

6. I applied MUFE Aqua Cream no. 9 on the lower lid using a clean angled eyeliner brush.

7. On top of that, I also applied the same mix of MAC Passionate and MAC Vibrant Grape on the outer half of the lower lid. I also added L’oreal Pepsy Coral infallible eyeshadow on the inner corner of the lower lid.

8. Using an angled eyeliner brush, I created a thin winged liner along the upper lashline using MUFE Aqua Black gel liner. I lined my waterline using whatever that was left on the brush.

9. I filled in my brows using Dollywink brow pencil.

10. I curled my lashes, applied L’oreal Curl Impac Collagene mascara on the upper and lower lashes.

11. For some extra fun, I applied Ardell no. 110 false eyelashes and squeezed both fake and real lashes together so there’s no separation. At this time, I found that the liner on my waterline wasn’t black enough, so I applied Physician’s formula black eyeliner on it.

12. I applied MAC Brule eyeshadow under the brows.

coral and mint makeup

13. For the face, I applied MUFE HD Foundation using a Sigma Round Kabuki brush.

14. For concealer, I used L’oreal Magic Touche concealer under the eyes.

15. I applied Chanel Universal bronzer on the cheeks, temples and jawline.

16. For the cheeks, I applied MAC Cubic blush.

17. Lastly, I applied Tarte Lipsurgence in Hope on my lips.

mufe cream shadow

Warm Brown Smoky

Who says we have to stick to black and grey in creating a smoky eyes look? Brown gives a more softer approach, and definitely warmed up the face. Brown smoky eyes will look great on any eye color, especially blue and green! In this tutorial, I layered a few different browns to warm up the eyes and it’s okay if it is messy! It gives that bedroom eye vibe, without looking like a panda ;). If you’re having difficulty doing a smoky eyes makeup using black, try using brown, it’s more forgiving.

Funny enough, quite a few of brides also like this type of makeup, especially for those who prefer a more natural look. I think this look goes with anything! Bridal, prom, date, night-out. It’s so simple and easy without being too overpowering.

How-to:

1. Using a flat eyeshadow brush, I applied MAC All That Glitters all over the lid.

2. Using a fluffy blending brush, I applied MAC Mulch on the outer corner of the lid.

3. Using a small shader brush, I applied MAC Sketch on the outer V and crease of the eye.

4. Using a small fluggy blending brush, I dipped the brush very lightly into MAC Bronze eyeshadow and blended it on the crease.

5. I used a clean blending brush to blend the edge of the crease.

6. Using an angled eyeliner brush, I applied MAC Woodwinked on the inner corner of the lower lid and applied MAC Mulch on the outer corner of the lower lid.

7. I lined my waterline using MAC Chromagraphic eyeliner in NC30.

8. Along the upper lashline, I applied MAC Smolder eyeliner and smudged it using a  pencil brush. I also added Smashbox Blackout eyeshadow along the line to set it using an angled eyebrow brush.

9. Using a clean blending brush, I blended the edge of the outer V to erase the harsh line.

10. I filled my brows in using Chanel brow pencil in Mistre.

11. I curled my lashes and applied Maybelline Volume Express Turbo Boost mascara on the upper and lower lashes.

12. Below the brows, I applied MAC Blanc Type lightly using a flat eyeshadow brush.

bridal makeup

13. For the face, I applied MUFE HD Foundation using a Sigma Round Kabuki brush.

14. For the under eyes, I applied MUFE concealer.

15 For the contour, I applied MAC Shadowy on the hollows of the cheeks, temples and sides of the nose.

16. For the blush, I mixed MAC Well-Dressed and MAC Fleur Power and applied it on the cheeks.

17. For the lips, I applied Chanel Levres Scintillantes Glossimer no. 165 (Volupte).

asian smoky eyes

Spring/Summer 2013 RTW Beauty

Hi everyone! I’m back! Just to give a quick update, last week I was in Japan for a short trip. I just returned on Saturday and currently I’m having fever, coughs and stuffy nose. I promise I’ll try to put up a post as soon as I can, but please bear with me the posts might be going up tomorrow onwards. I’ve a makeup haul, product review and tutorials waiting for you! I just need to recuperate first and get better!

Anyhow, with that said, don’t forget to go over to my Instagram account to see pictures from Japan 😀

Now, let’s get going to Spring/Summer 2013 Makeup Trend! Similar theme seems to be popping out throughout the show – bushy thick brows, bare skin and very little to no blush. The look has a retro feel to it, yet it’s kept modern with the downplay of the blushes. Below are a few of my favorites from the Spring 2013 Ready-to-Wear collection.

Bright bold colors aren’t going anywhere, and it’s definitely not reserved only to clothings! We’re seeing a punch of cobalt blue, bright pink, seafoam green and mint as seen on Anna Sui, Christian Dior and Jean Paul Gaultier. Bright colors are here to stay! I simply love the use of a bold color with strong liner. Definitely a great look to be paired with muted clothes or if you’d like, wear it with a black headband or even a hat (read: Boy George). Keep in mind that since the eyes are so strong, leave everything else bare. Skin are fresh and dewy with very little blush or contour. Lips are soft and nude in Dior, or if you are bold enough, give red lips a try. Black mascara is a definite must to make your eyes stand out even more.

anna sui 2013 makeup

Anna Sui 2013 Spring RTWspring 2013 makeup trend

Christian Dior 2013 Spring RTW spring 2013 makeup trend

Jean Paul Gaultier 2013 Spring RTW

 Of course, if you are afraid to try bright colors, you can definitely give silver eyeshadow a try, as seen on Chanel. Using Chanel Illusion d’Ombre Long-Wear Luminous Eyeshadow, Peter Phillips (creative director for Chanel) layered the cream eyeshadow all over the lid to achieve a high-shine look. The eyes are rimmed with black liner to intensify the look. I recommend this look for everyone! Silver is making a return in a very sophisticated way. Obviously, you don’t have to wear it all the way to the brow bone. Keep it on the lid, buffing the color slightly just over the crease. Paired it with a shiny, peach lips (blot excess gloss) and a nude blush.

spring 2013 makeup trend

Chanel 2013 Spring RTW

 If silver isn’t your thing, you can always change it to a more muted color like sandy-gold eyes seen on Derek Lam. Contour on the cheeks using bronzer to give it a healthy glow, while brows are kept thick and bushy for a sporty look. Very simple and effortless. Tres chic!

spring 2013 makeup trend

Derek Lam 2013 Spring RTW

 Of course, if all the above isn’t working for you, there’s always the usual clean bare face and red lips look. These classic looks never fail! In DVF, the girls are tanned and glowy, in 3.1 Phillip Lim eyelashes are clumpy with bare skin all over and lastly Burberry presented an earthy tone natural look with red lips.

philip lim 2013 makeup

3.1 Phillip Lim 2013 Spring RTW spring 2013 makeup trend

Diane Von Furstensberg 2013 Spring RTW spring 2013 makeup trend

Burberry Prorsum 2013 Spring RTW

All images are courtesy of Style.com