Product of The Week: Kanebo Kate Super Sharp Liner

So, I’ve been slacking a little on my Product of the Week…hehehe..my apologies, I’ll try to update it regularly every week! Anywaaays, as you guys know, I have been using my new Kanebo Kate Super Sharp Liner a lot lately in my tutorials. I bought it on my Japan trip, and regretted for not buying more! I can’t actually remember how much it cost. I actually didn’t even know that this eyeliner was by Kanebo. I bought it in some random drugmart in Osaka while waiting for the rest of the group to show up.

In general, this is an awesome eyeliner! I can say that this is probably the dupe for Kat Von D Trooper eyeliner. It stayed throughout the day, smudge-proof, but at the same time it can be removed easily with makeup remover. You can create thin winged liner, or thick winged liner. Simply love it!

Kanebo Kate Super Sharp Eyeliner

The Kate Super Sharp liner actually have shorter bristles, but it felt more compact compared to Kat Von D’s Trooper. The bristles are very firm, which made it ideal to create a sharp line. I mean, you can actually doodle on your face with this if you want. The bristles don’t get separated at all.

Kanebo Kate Super Sharp Eyeliner

You can create sharp thin lines using the tip of the brush, or a thicker line if you lay the brush flat. The eyeliner itself is very black, but might be a bit shiny when it dries. If you like a matte finish, you might want to add a black eyeshadow on top of it.

The eyeliner takes a while to dry off (may be around 20-30seconds), so make sure you look down or keep your eyes close after application, if not you might end up smudging it. I actually like the fact that it doesn’t dry instantly so I can smudge it (esp. on the lower lid).Kanebo Kate Super Sharp Eyeliner

The eyeliner is smudge-proof once it dries. However, you might want to be careful, as it is not water-resistant. Below is a picture of the eyeliner after I spritzed some water on my hand. The eyeliner stayed, but as you can see, some of the ink started to dispersed and get dissolved.

I might have exaggerated the water a little, but you might not want to use this eyeliner to go swimming. I have worn this eyeliner for a good 8 hours, and it stayed throughout the whole time. I was outdoor, in the beach when I wore this eyeliner. I’ve also used this on a bride client last week for her wedding in Bali.

Kanebo Kate Super Sharp Eyeliner

Photo below is traces of eyeliner after I wiped it once using Bodyshop Vit. E facial wipes. It disappeared completely after the second wipe. You can remove this eyeliner easily without having to use much product, no tugging or pulling on the skin. Very easily removed with wipes.

I usually removed my makeup using Shu Uemura cleansing oil, and found that this eyeliner gets removed in an instant.

Kanebo Kate Super Sharp Eyeliner

Smoky Pink

This is a requested look by one of my Twitter followers, @Cara_ev! She requested for a pink smoky look using black eyeshadow instead of brown. I’ve done something similar using peach eyeshadow in Smoking Peach, and mint in Smoky Mint, and silver in Silver Smoke…well you get the gist! All my smoky eyes tutorials are listed under Tutorials –> Smoky Eyes.

asian smoky eyes

How-to:

1. Using a synthetic art brush, I applied Maybelline Inked in Pink color tattoo all over my eyelid. You can substitute this with any cream base or eye primer of your choice.

2. Using Smashbox Bullet Brush, I applied Urban Decay Blackout eyeshadow (from Naked 2 palette) on the outer V.

3. Using a clean blending brush (emphasis on the CLEAN), I blended Blackout towards the center of the lid.

4. Repeat step 2-3 several times until you reach enough intensity from the black eyeshadow to your own liking.

5. I applied Blackout underneath the outer half of the lower lid using a small shader brush.

6. Using a clean flat eyeshadow brush, I applied L’oreal Infallible eyeshadow in Sweet Strawberry.

7. I applied L’oreal Sweet Strawberry infallible eyeshadow on the inner corner of the lower lid using an angled eyebrow brush.

8. Using Kate Sharp eyeliner, I created a winged liner along the upper lash line. You can skip this if you’d like.

9. I lined my waterline and tightline using L’oreal Voluminous Smoldering eyeliner.

10. I curled my lashes using Shu Uemura eyelash curler.

11. I applied Clinique lash building primer on top and lower lashes, and then applied Maybelline Express Volume Turbo Boost mascara on top of it.

12. I filled in my brows using Shu Uemura brow pencil. I applied MAC Brule under the brows.


asian smoky eyes

13. On my face, I applied MUFE HD foundation no. 118 using a foundation brush starting from the center of my face blending it outwards.

14. I also applied MUFE HD concealer no. 335 under the eyes.

15. On the cheekbones and bridge of the nose, I applied MAC strobe cream using a clean foundation brush.

16. I also applied MAC mineralized skinfinish in deep as contour powder.

17. I applied MAC Cubic very lightly on the cheeks.

18. For the lips, I applied YSL Pur Couture rouge no. 17 using a lip brush.

bridal pink smoky eyes

For the hair, I applied hot rollers all over, and I straightened my hair using Chi hair straightener for the first photo. On the second photo, I curled my hair using curling irons (curling it all outwards), in big sections.

Silver Fox

I was mesmerized by Chanel’s Spring 2013 RTW runway makeup, that I’ve decided to do an inspired look based on it. I usually prefer warm-toned colors, like gold and bronze over silver, so it was definitely interesting to do this look.

I used Tinsel eyeshadow from the Sleek Makeup iDivine Sparkle 2 palette in this tutorial. I believed the makeup artist for Chanel used a silver cream eyeshadow (illusion d’ombre) to create the look. Since I don’t own any silver cream eyeshadow, I decided to use a powder eyeshadow. Tinsel eyeshadow is very creamy and can be easily blended.

It’s a very simple and wearable look. Since the focus is on the eyes, everything else is downplayed. In the runway, models were seen with bare face, but I decided to add a blush just so that I don’t look too washed out.

How-to:

1. I applied Tinsel all over the lid using a flat eyeshadow brush.

2. Using a fluffy blending brush, I blended the color from the crease all the way up to the brow bone.

3. Using a small shader brush, I applied Tinsel on the lower lid.

4. I created a winged liner along the upper lashline using Kate Sharp eyeliner.

5. I also lightly lined the lower lashline using the same eyeliner.

6. I lined my waterline using L’oreal Voluminous Smoldering eyeliner.

7. I curled my lashes, and applied Maybelline Express Volume Turbo Boost mascara on both upper and lower lashes.

8. I filled my brows in using Dolly Winked Brow pencil no. 3. (if you notice the difference between the last 2 pictures below on the brow, that’s because I brush the brows after I filled them in using a clean spooly).

chanel inspired makeup

9. For the face, I applied Urban Decay Naked foundation using IPKN Auto Wave makeup.

10. Under the eyes, I applied MAC Pro Conceal/Correct palette in Medium.

11. I powdered my face lightly on the T-zone using loose powder.

12. On the cheeks, I applied MAC Dainty blush.

13. On the lips, I applied Chanel Levres Scintillantes in Volupte.

silver makeup

Tropical Punch

Another look from the Sleek Makeup palette, this time I tried the iDivine Ultra Mattes V1 Brights. I’m not sure how I feel about this palette. The colors are absolutely breathtaking, the pigments were amazing, yet there’s something missing. I’m not quite sure how to put it. I mean, the color glides like a butter, but when it’s time to blend, the eyeshadow seems to just disappear into the abyss. I mean, it’s just gone gone gone. I’ve to re-apply and re-blend the blue eyeshadow (on the crease) over and over again, even so I still am not too happy with the end result.

Anyways, for swatches and close-up pictures on just the palette itself, please click on this post Sleek Makeup iDivine Swatches.

I think I might give this palette another try some time soon. Anyways, don’t forget if you want to buy anything from Luxola, esp. the Sleek Makeup iDivine palettes, go to the LUXOLA website and put LXBLOG when you check out to get 15% off! (any underlined and bold words will lead you to luxola website, or to another post of mine).

How-to:

1. Using a flat eyeshadow brush, I applied MAC Paint Pot in Soft Ochre all over my eyelid up to the brow bone (not in picture).

2. Using a clean flat eyeshadow brush, I applied Sleek Makeup DragonFly eyeshadow on the center of my eyelid in a patting motion. Watch out for fallout, kids!

3. Using another flat eyeshadow brush, I applied Bolt from the same palette on the outer corner of the lid and slightly on the crease.

4. Using another clean flat eyeshadow brush, I applied Pucker from the same palette on the inner corner of the lid.

5. I use a fluffy blending brush to blend the edge of the blue eyeshadow to remove any harsh line.

6. I used a clean small fluffy brush just to blend it so there’s no harsh lines separating the 3 different eyeshadows.

7. I applied Dragonfly on the lower lid using a small shader brush.

8. Using an angled eyeliner brush, I applied Smashbox Blackout eyeshadow on just the outer corner of the lower lid. I applied this eyeshadow right along my lower lash line.

9. I lined my waterline and tightline using L’oreal Voluminous Smoldering eyeliner.

10. Using Kate Sharp eyeliner, I created a large winged eyeliner along my upper lashline.

11. I curled my lashes and applied Maybelline Express Volume Turbo Boost mascara on both top and bottom lashes.

12. I filled my brows in using an angled eyebrow brush, as well as a mixture of MAC Omega and MAC Brun eyeshadow.

13. I applied Pow from the iDivine V1 palette under the brow and on the inner corner of the eyes.

matte brights eyeshadow

14. I applied Urban Decay Naked foundation using a foundation brush from the center of my face, blending it outwards.

15. Under the eyes, I applied MAC Pro Conceal/Correct concealer in Medium.

16. I powdered my face using CoverFX translucent powder.

17. I applied MAC Blunt as a contour on the hollows of the cheeks and sides of the nose.

18. I applied Benefit Coralista on the cheeks and completed the look by applying Tarte Lipsurgence in Hope.

idivine ultra mattes v1 brights makeup

Spring Lilac

I couldn’t resist to try my new Sleek Makeup iDivine Snapshot palette that I bought from Luxola! Oh, just to let you know, there’s a 10%  15% off if you use the code LXBLOG when you check out over at Luxola (over $25 purchase) 😉 For swatches on the iDivine palettes, please check Sleek Makeup iDivine Swatches post.

Anyways, so I wanted to try the Lotus Flower and Green Iguana shadows for this look since those 2 eyeshadows were the ones that caught my attention the most. I LOVE…let me repeat, I LOVE Lotus Flower! Amazing color, so perfect for Spring/Summer! Green Iguana too is oh so prettyy! For some reason, my camera doesn’t pick the green, instead it might look bluish on your screen.

How-to:

1. Using a flat eyeshadow brush, I applied Lotus Flower from Sleek Makeup iDivine Snapshot palette on the inner half of my upper eyelid.

2. Using another flat eyeshadow brush, I applied Green Iguana on the outer half.

3. Using a clean blending brush, I blended the edge and the crease to remove any hard line.

4. Using a small fluffy brush, I applied Urban Decay Hijack on the outer V and crease.

5. Using a clean blending brush, I blended UD Hijack.

6. Using a small shader brush, I applied Lotus Flower on the inner half of the lower lid and Green Iguana on the outer half.

7. I created a tiny winged liner along my upper lashline using Kat Von D Trooper eyeliner.

8. I lined my waterline and tightline using L’oreal Voluminous Smoldering eyeliner.

9. I curled my lashes using Shu Uemura eyelash curler and applied L’oreal Double Extender Curl mascara on both top and lower lashes.

10. I filled my brows in using Shu Uemura brow pencil.

sleek makeup lotus flower

11. I applied MUFE HD foundation all over my face.

12. Under my eyes, I applied Bobbi Brown peach corrector.

13. On the cheeks, I applied Benefit Hoola and Benefit Coralista.

14. On the lips, I applied Chanel Confidentielle lipstick.

sleek makeup green iguana

Sleek Makeup i-Divine Swatches

If you have been on my Twitter or Instagram, you should know that I’ve just received my Sleek Makeup palettes that I purchased from Luxola. I got my hands on it this weekend when I was in Bali, so I have yet to play with it. I wanted to swatch these palettes first before I do any tutorials with them. I’ve heard so much raves about these palettes on the blogsphere and youtube, that I was so excited when I get received them!

First of all, let me mention how great the Staff at Luxola are! I am affiliated with Luxola, but what I’m going to tell you guys is 100% based on my experience. You guys should know by now that I would never recommend anything that, in my personal and professional opinion, is below standard and expectations. Let me tell you what happened before we proceed to the swatches itself.

I bought (yes, bought! with my own money) several products from Luxola website. I’ve checked out and paid for all the items in my cart at end of March. I was told that my products would arrive between 5-8 business days. I was happy and excited to get the products before my trip to Japan. 8 days later, my shipment was nowhere to be found! I contacted Luxola, checked my tracking number and found out that my shipment was stuck at Indonesian customs! I tried calling Indonesian post to find out what’s going on, even went on their twitter asking questions but no answer.

I was devastated. I contacted Luxola regarding the issue and they tried to help me by contacting the courier service that they’ve used over in Singapore. Luxola Staff patiently replied to every single one of my emails promptly. I went to Japan, came back just to find out that customs isn’t releasing my shipment. No letters, no contact information, nothing to assist me to get the shipment out of customs! I almost gave up. That’s $100 worth of products that I’m not going to receive ever.

However, an email came through from Luxola. They messaged me saying that they will ship a new set of products (of whatever that I’ve bought) to my bff in Singapore. I was so thrilled when I read the message!

I was so happy! To be honest, I had the same issue with another online store at the same time, and they weren’t even as helpful or offered any assistance like Luxola. By this time, I was jumping up and down, and told my bff to keep the package for me till we meet again. Not even 2 days after, my package arrived at my bff’s and she was holding it for me! I mean, talking about fast and amazing services! So, thank you Luxola for the great service and assistance that you’ve offered.

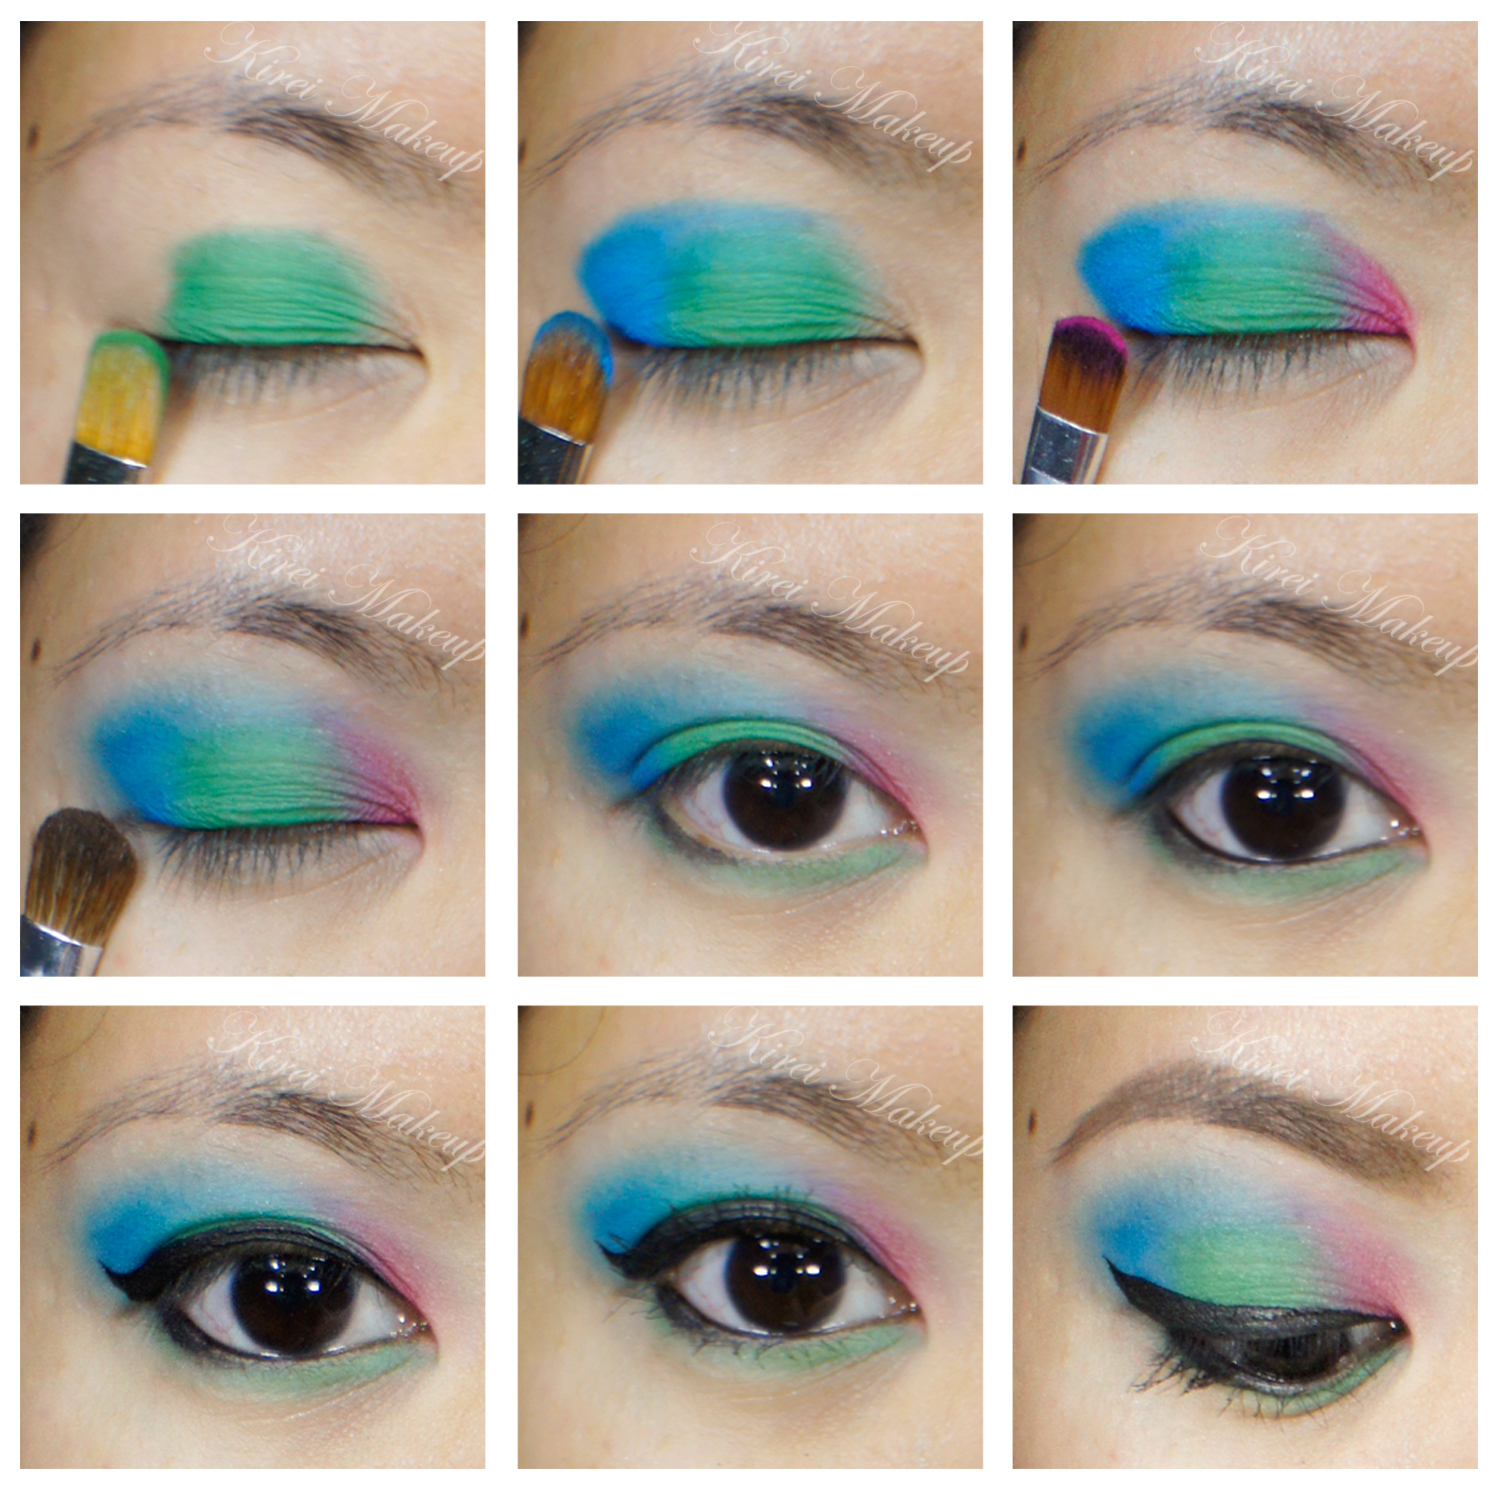
Ok, let’s get on the swatches!
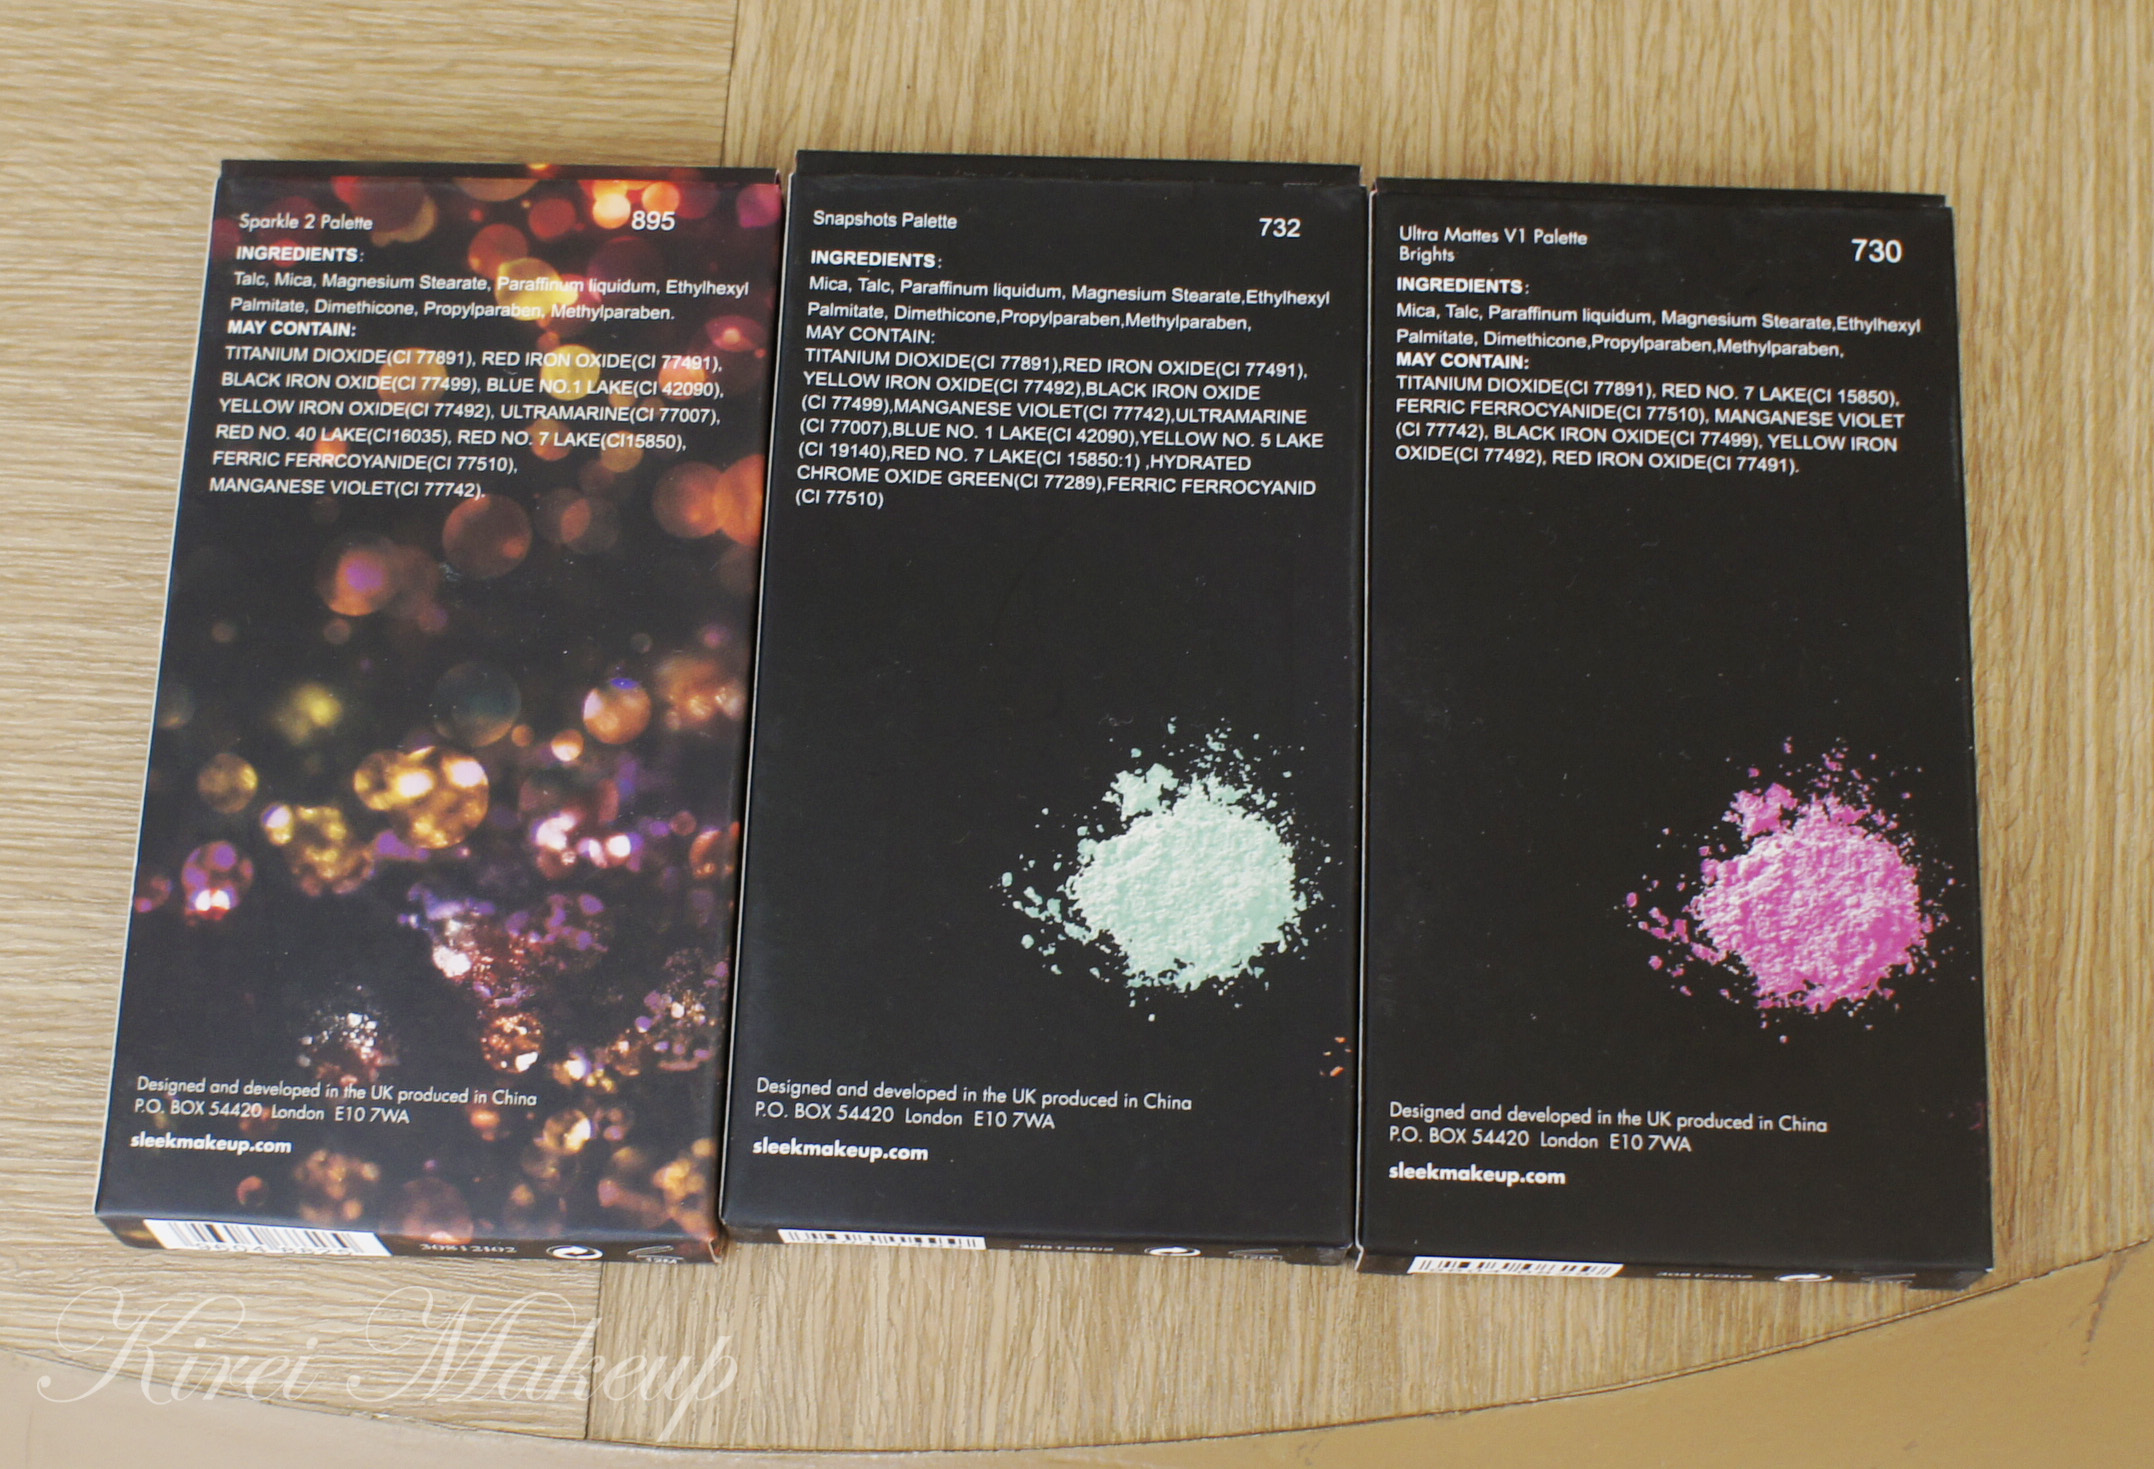
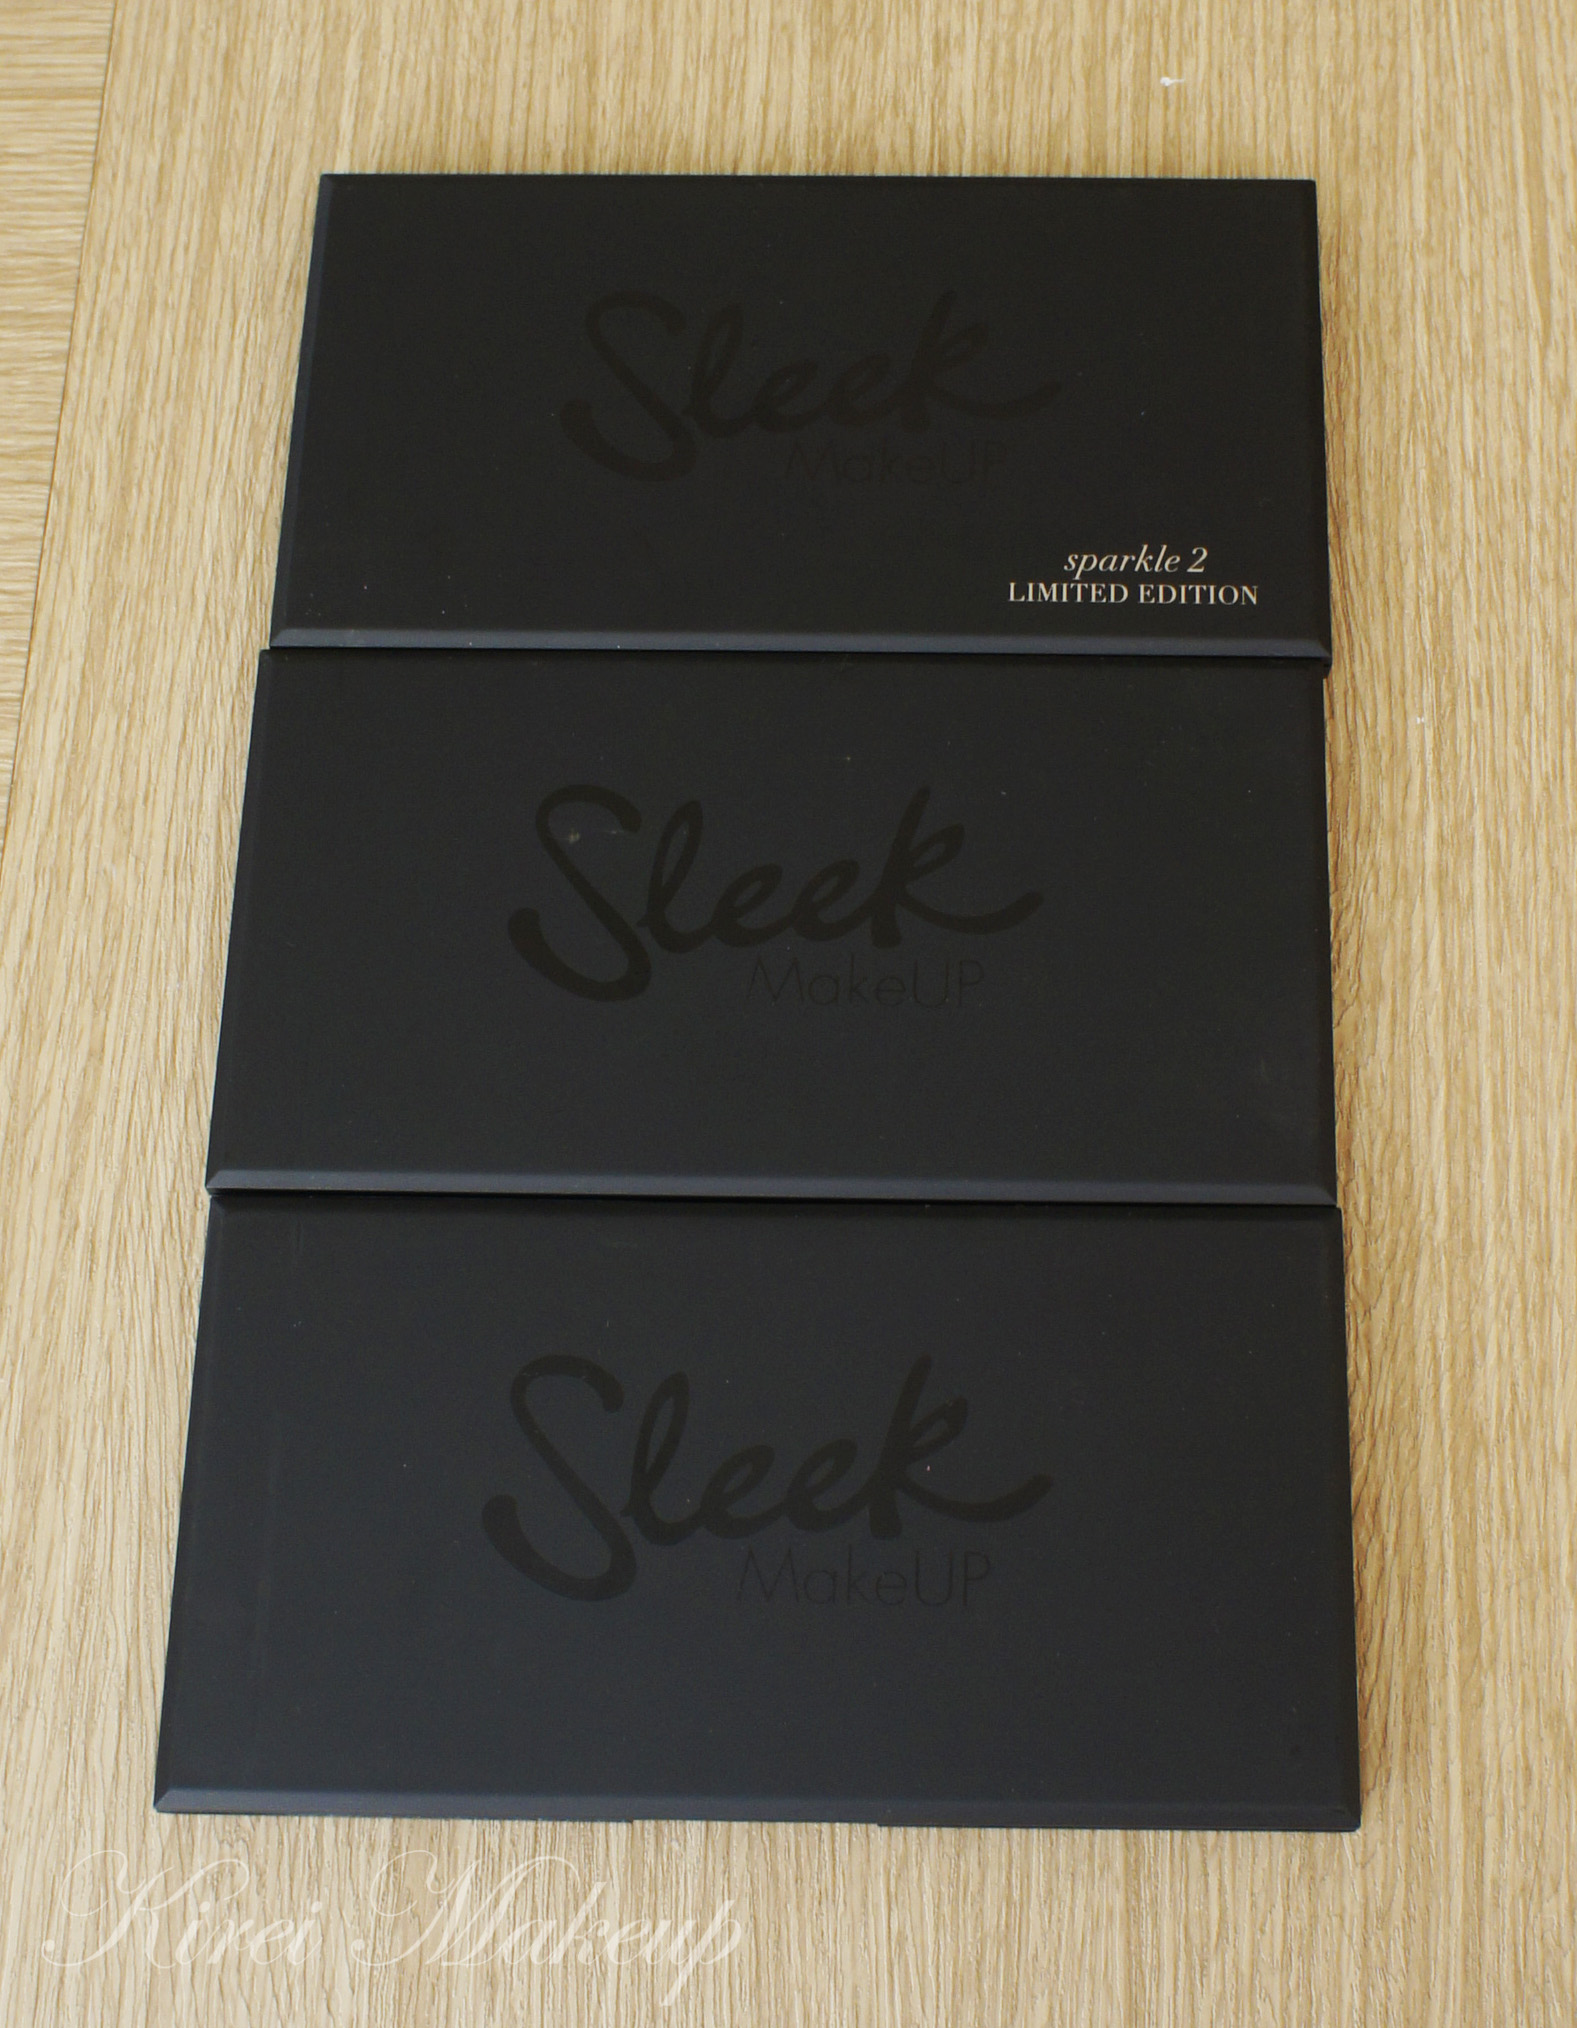
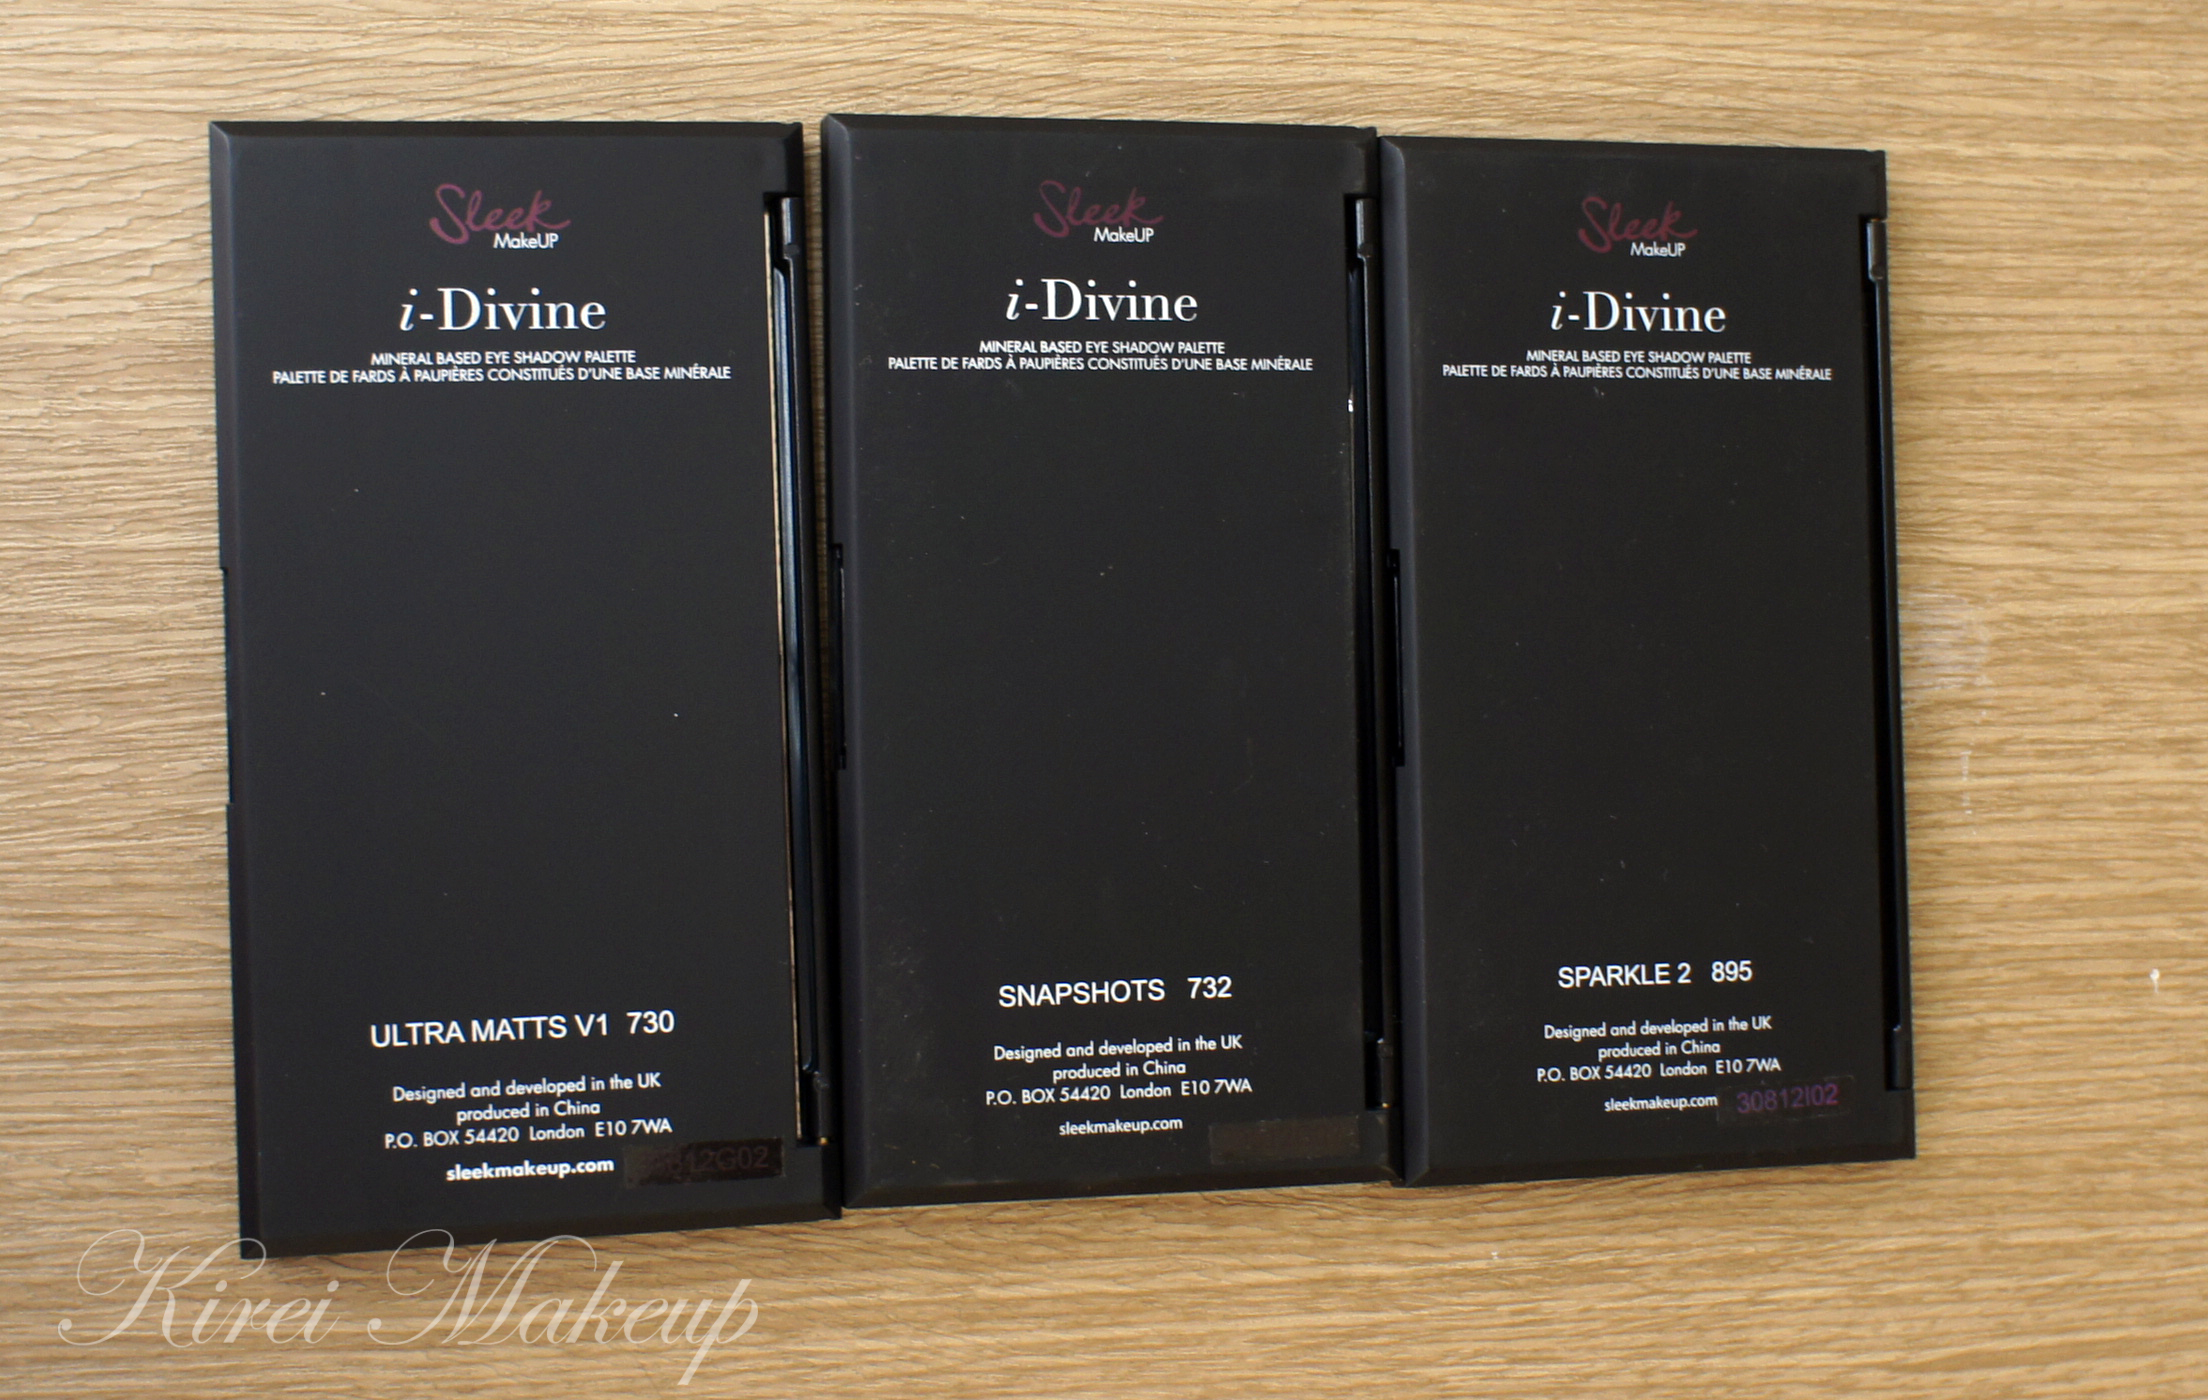
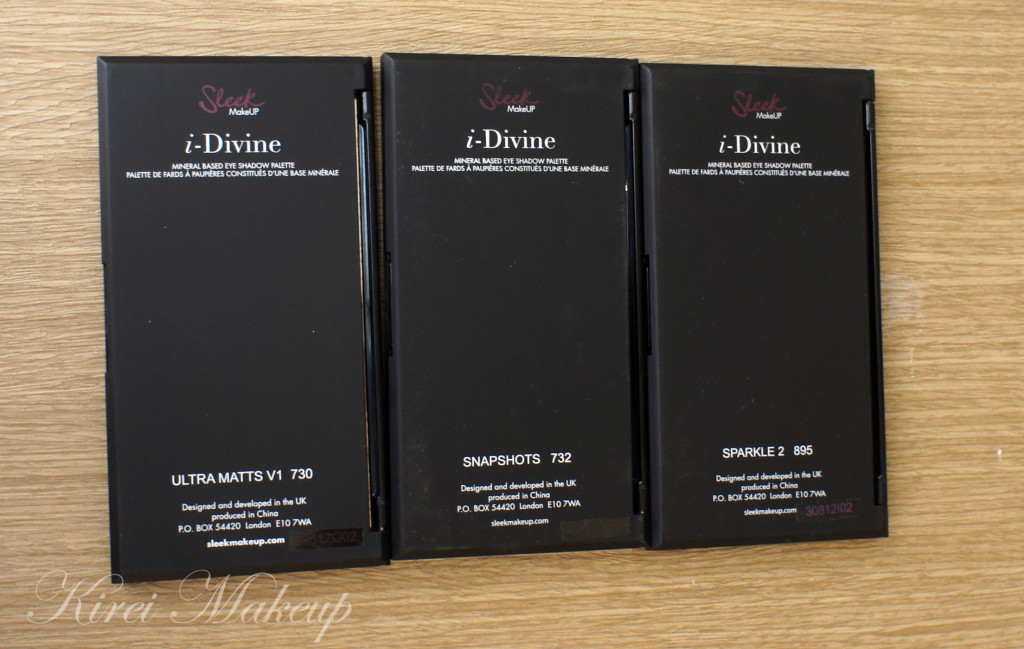
I bought 3 Sleek Makeup palettesSparkle 2, Snapshots and Ultra Mattes V1 Brights.

Sleek Makeup palettes

sleek sparkle palette

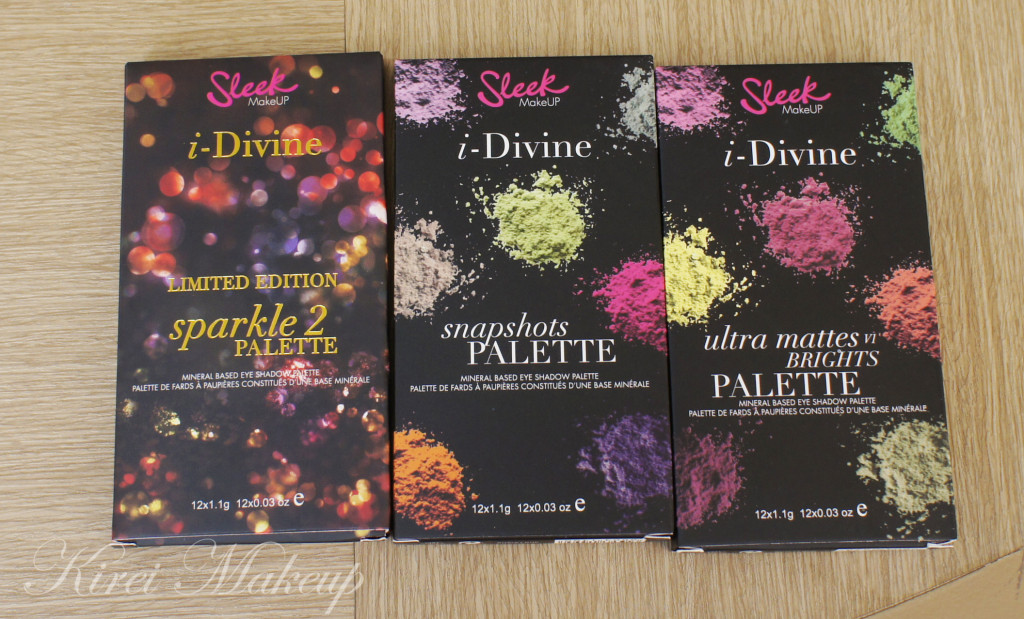
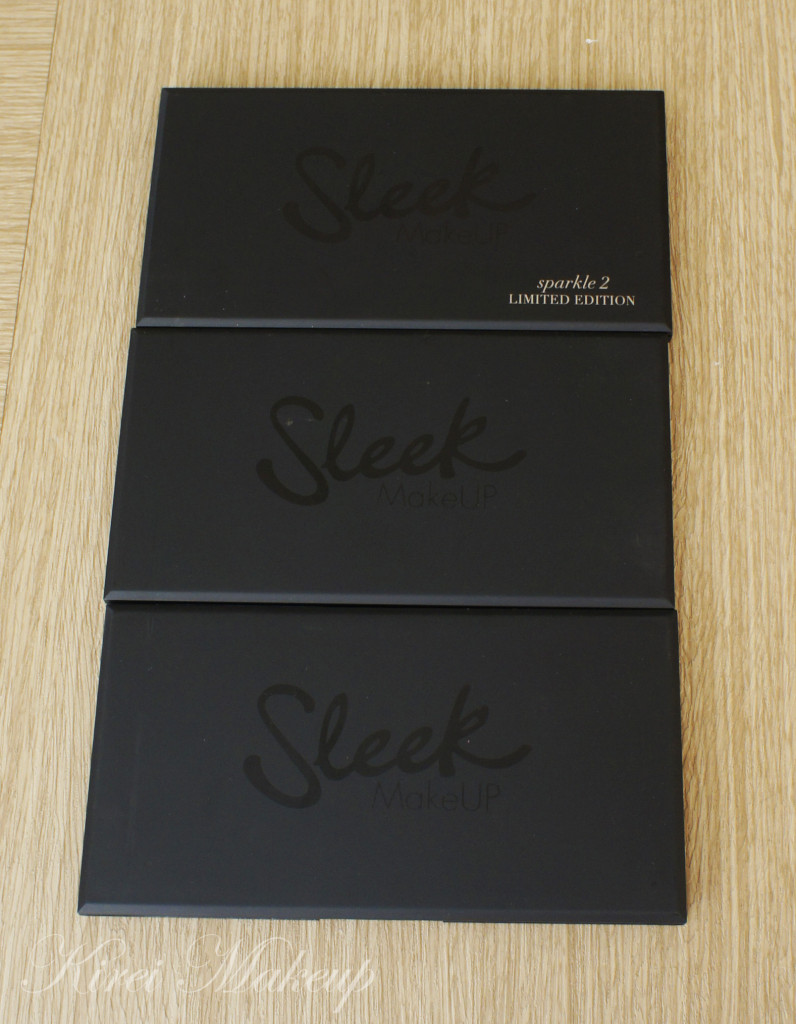
It comes in a black casing. Very light and small. The boxes above actually remind me of chocolate bars for some reason. Oh just to let you guys know, the reason why I bought these 3 palettes is because these 3 cannot be shipped to U.S.A or Canada (according to Sleek Makeup website). I wanted to buy them when I was in Canada, but since it cannot enter the country, I decided to buy them here.

Each palette costs IDR Rp. 157,000. From Sleek Makeup website it costs £7.99/palette.

sleek makeup

sleek makeup

The Sparkle 2 palette is a limited edition palette. My first impression when I opened the palette was “that’s a lot of sparkle”..well it is called the Sparkle palette. I didn’t expect the sparkle to be so huge! I’m a little afraid that the sparkle might be rough and hurt my eyelid. I’m also a bit skeptical on how much sparkles going to stay on the lid. I’ve worked with glitters and sparkles before, I find that I’ve to use some sort of “adhesive”, let it be cream or liquid to make it stick to the skin. I guess I just have to try it, right? 😉

sleek sparkle 2 palette

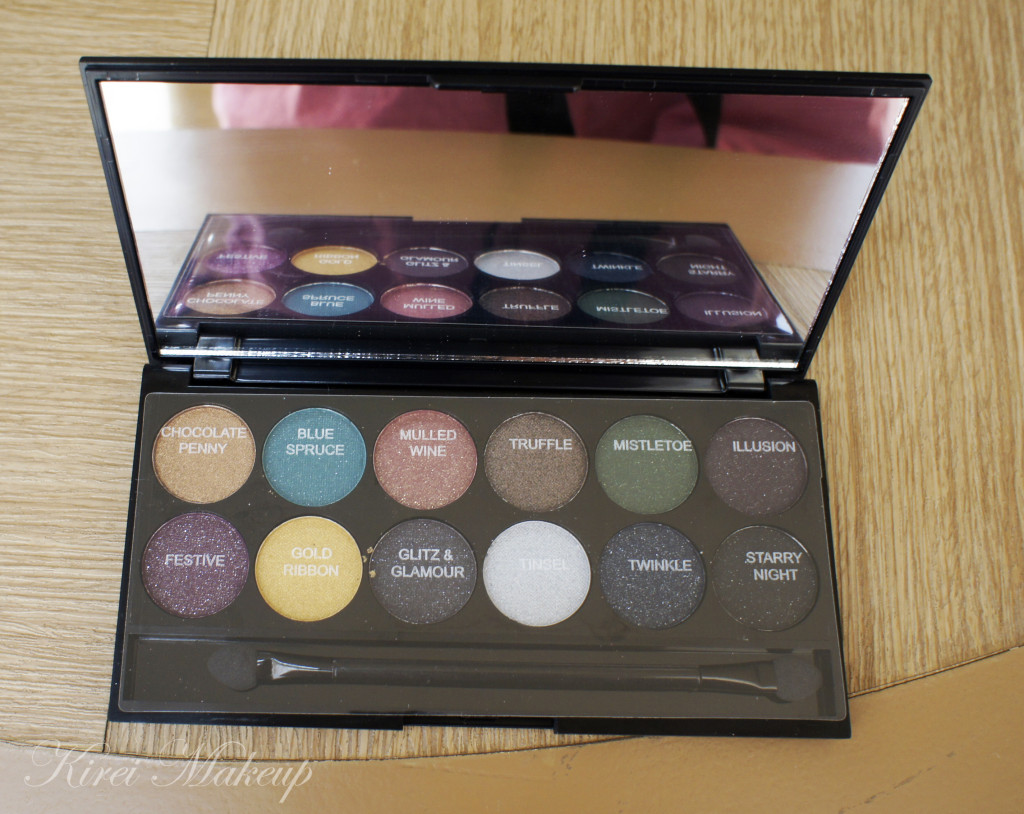
The Sparkle 2 Palette comes with 12 shades. 4 of which are shimmery, while the other 8 has glitter/sparkles in them. The 4 shimmery eyeshadows are Chocolate Penny, Gold Ribbon, Truffle and Tinsel. The 8 glittery ones are Festive, Blue Spruce, Mulled Wine, Glitz & Glamour, Mistletoe, Twinkle, Illusion and Starry Night.

sleek sparkle 2 palette

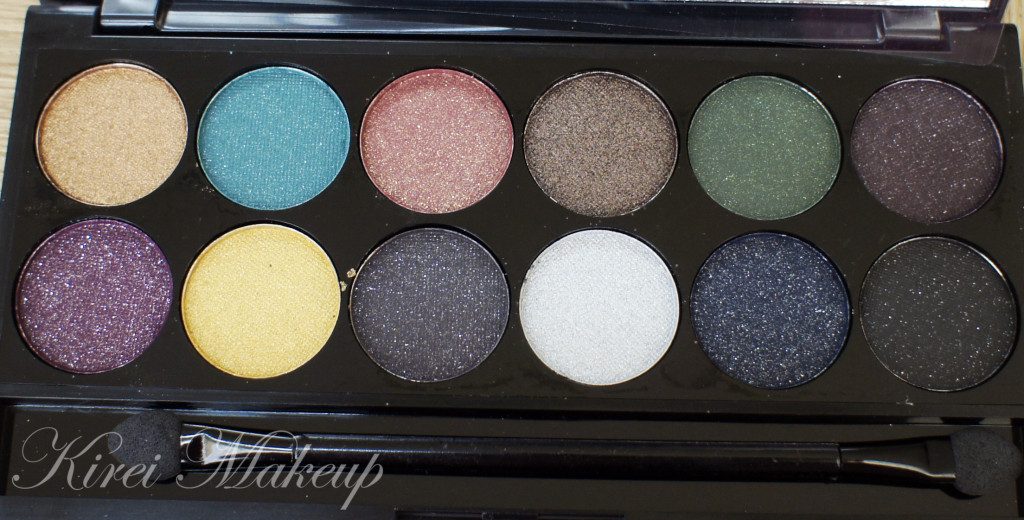
On the top part (L-R)

  • Chocolate Penny – golden bronze.
  • Blue Spruce – a turquoise with silver sparkles. Feels dry when touch, and surprisingly does not swatch very well considering how vivid the color is.
  • Mulled Wine – crimson with gold glitter.
  • Truffle – deep rich chocolate metallic color. Very buttery and has a lot of pigments.
  • Mistletoe – forest green with silver glitter.
  • Illusion – an eggplant purple eyeshadow with silver glitter.

On the bottom part (L-R)

  • Festive – plum eyeshadow with silver glitter (the only one you can see with sparkles on the swatch below)
  • Gold Ribbon – bright golden yellow with shimmer.
  • Glitz & Glamour – grey with silver sparkles.
  • Tinsel – silver shimmery eyeshadow.
  • Twinkle – navy blue with silver sparkles.
  • Starry Night – black with silver glitters.

sleek sparkle 2 palette swatch

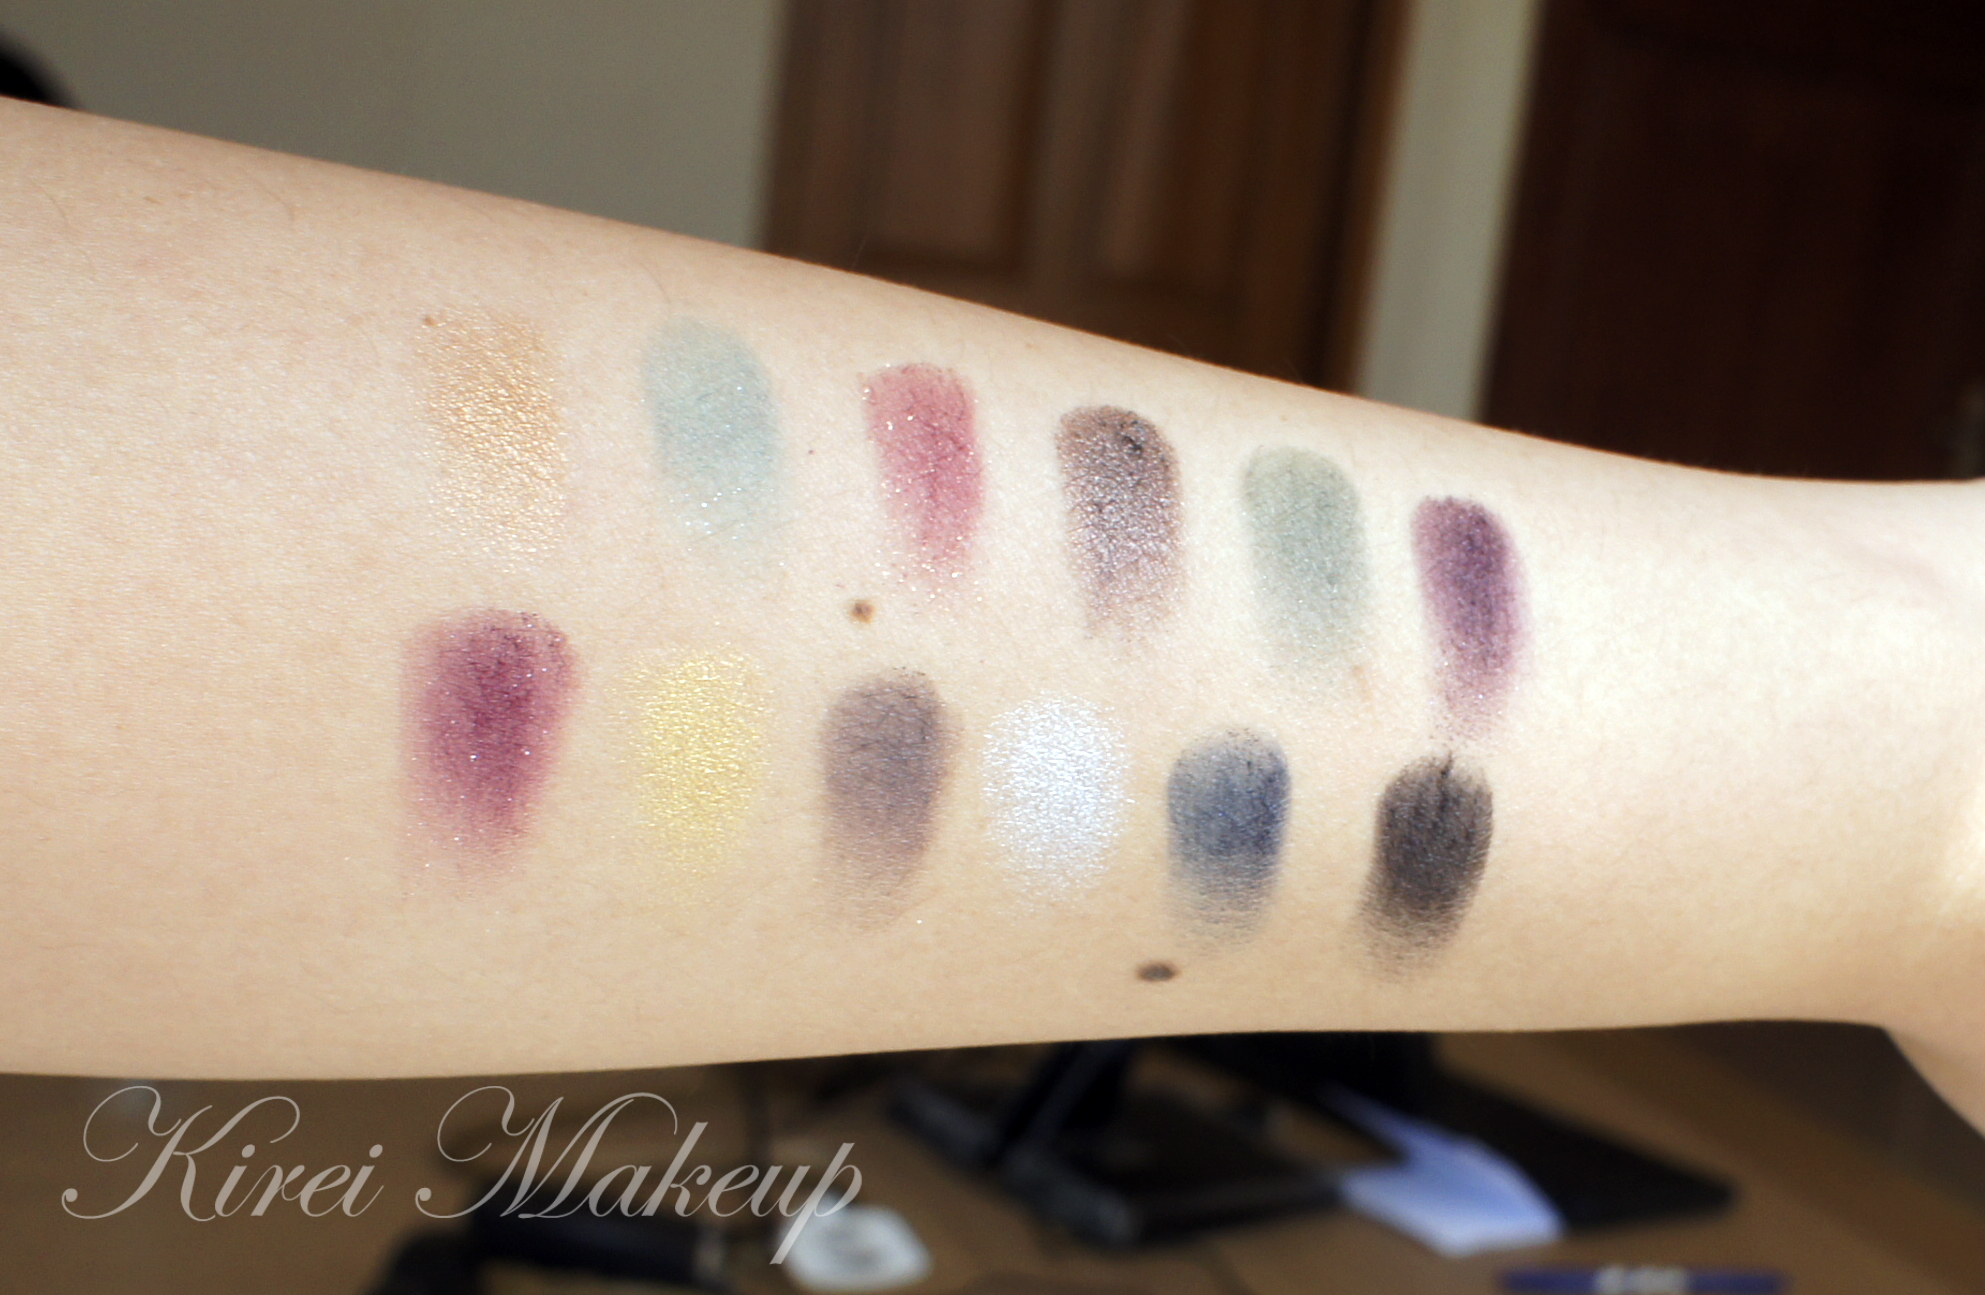
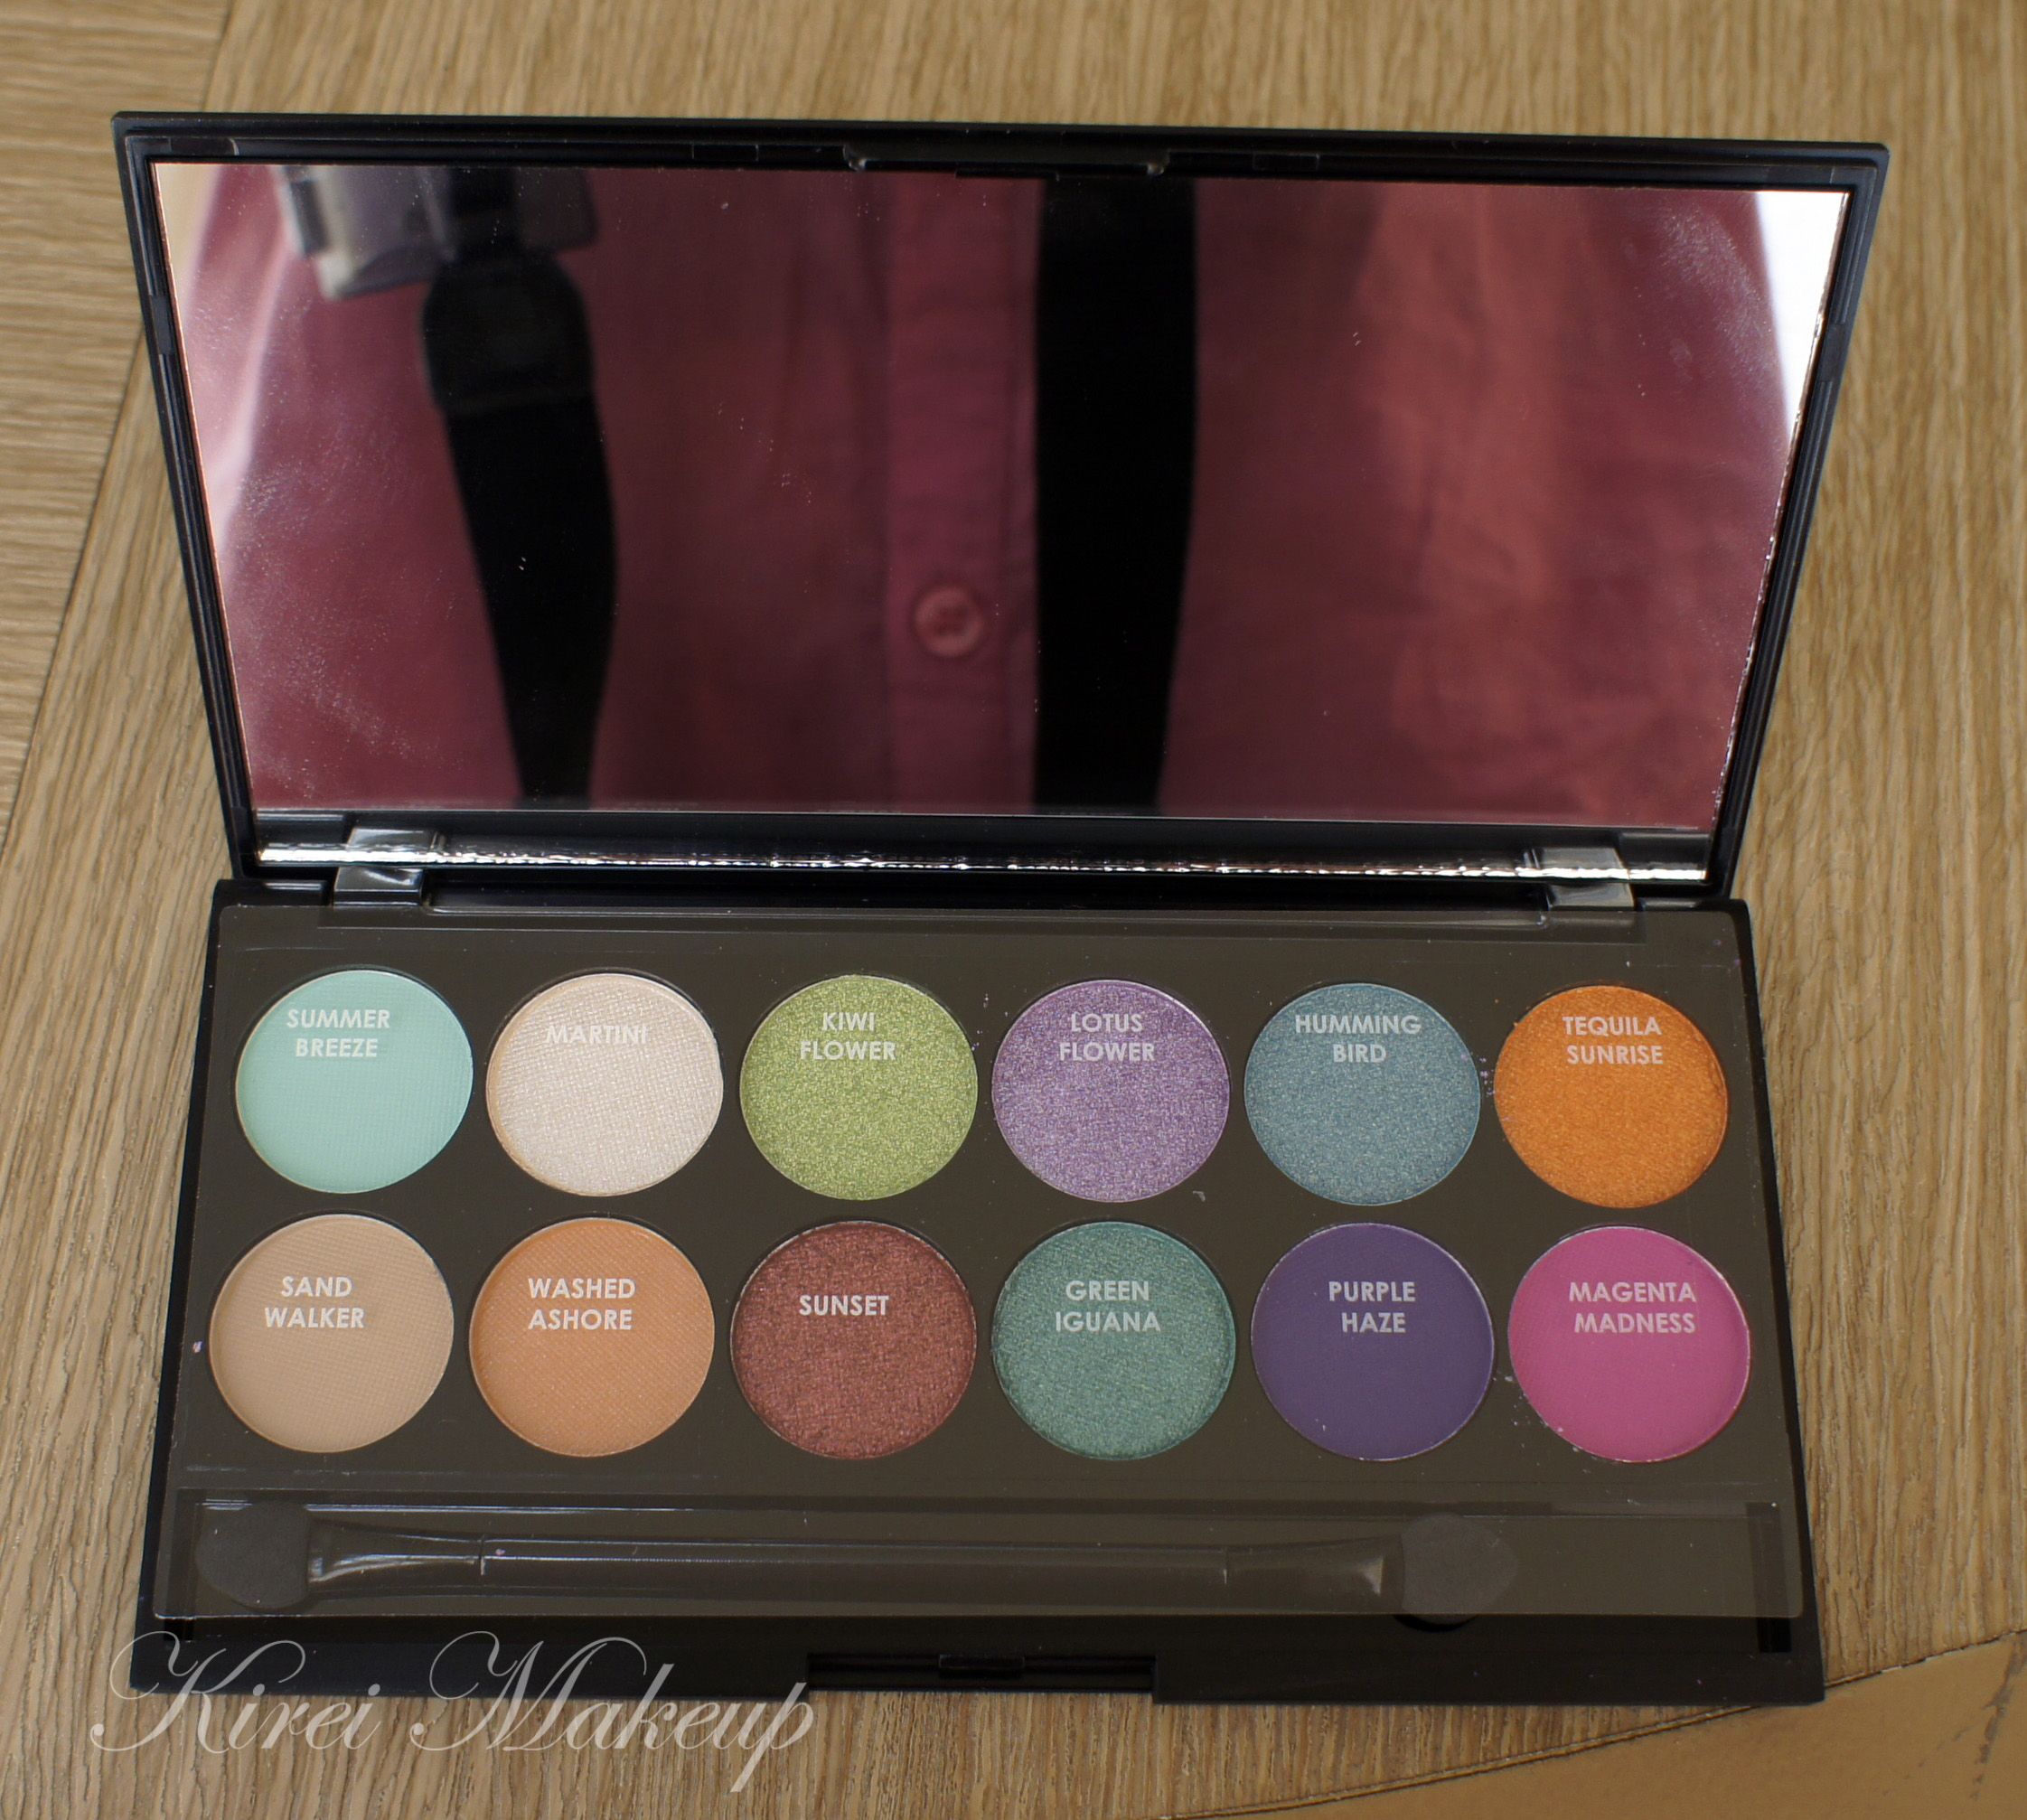
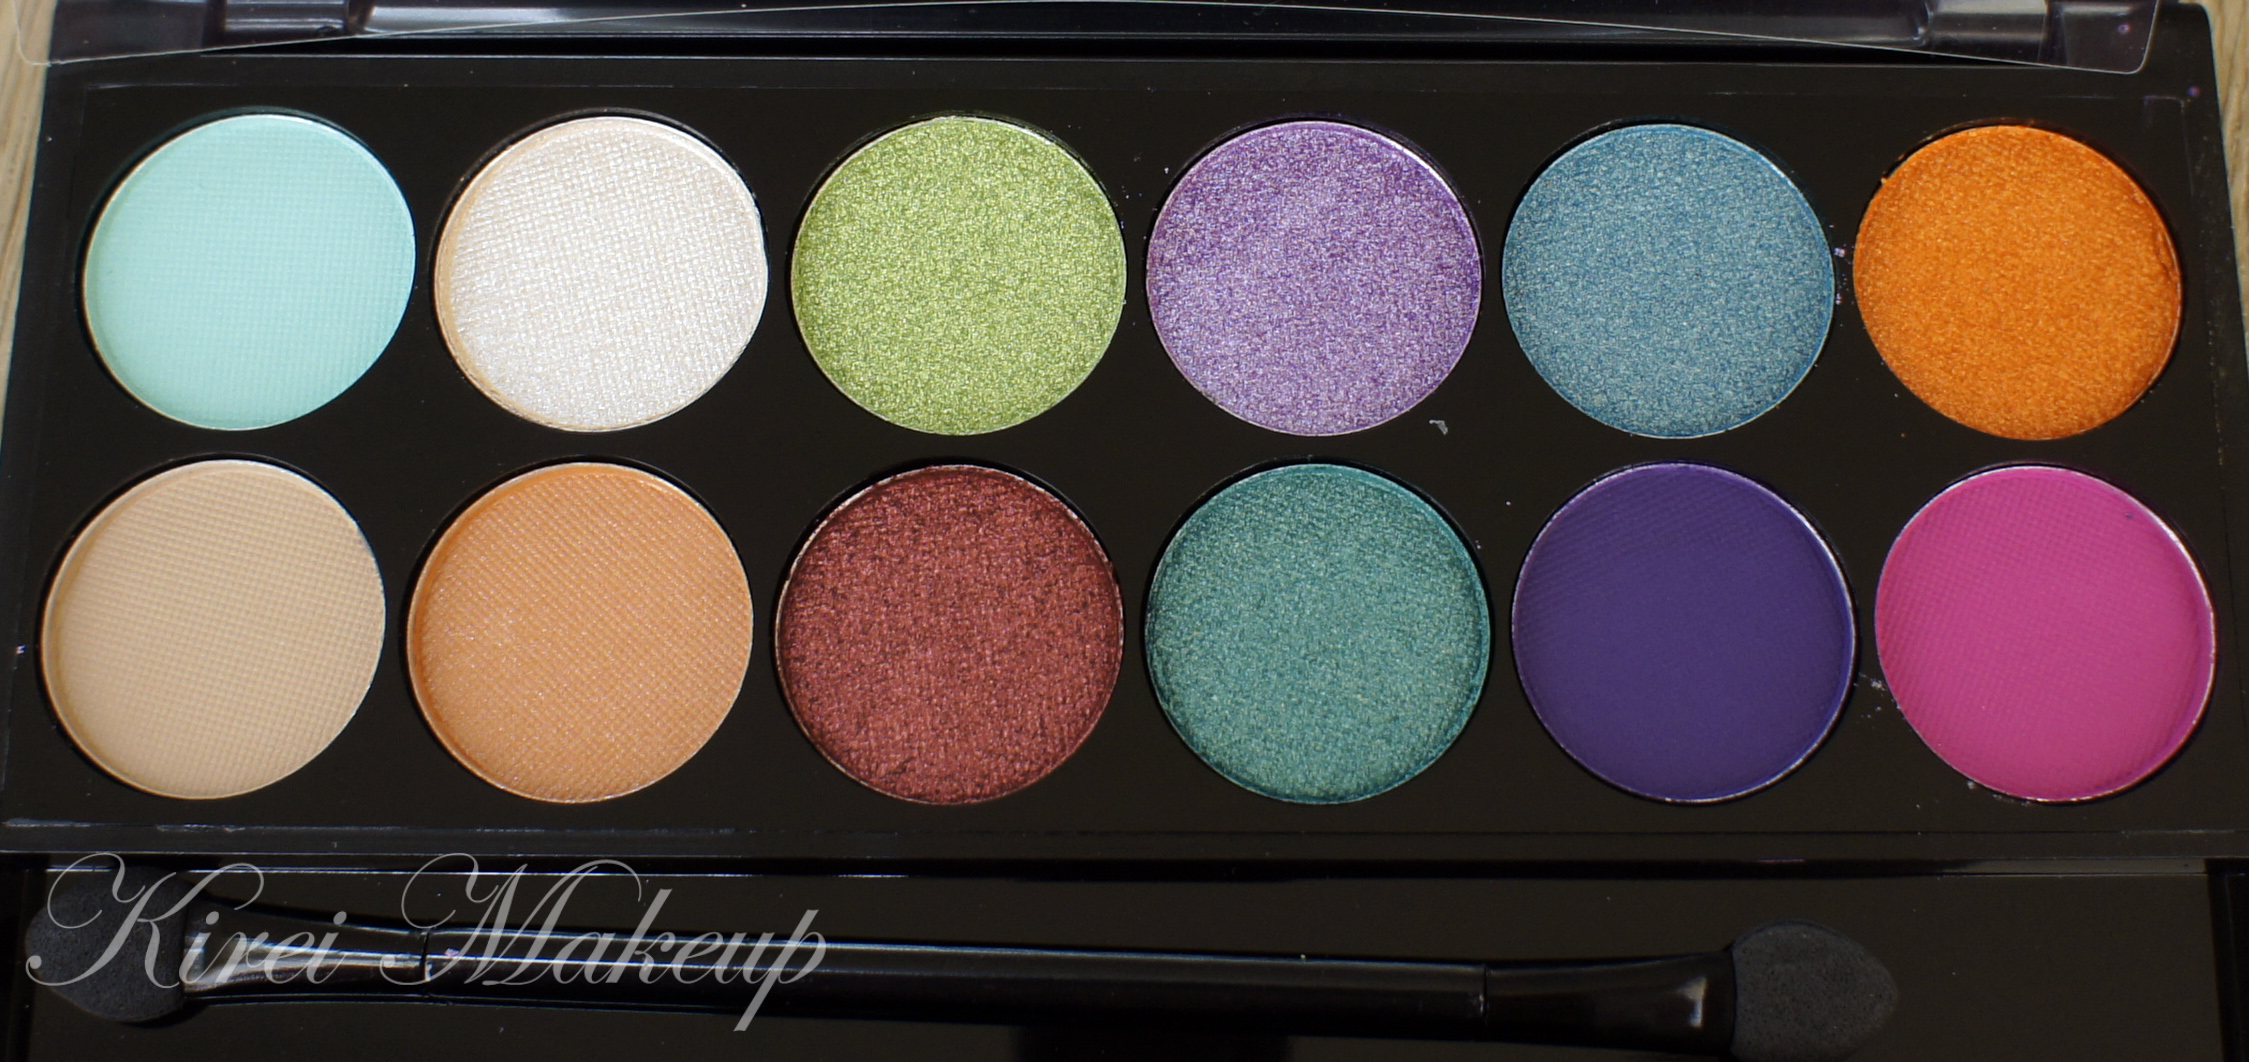
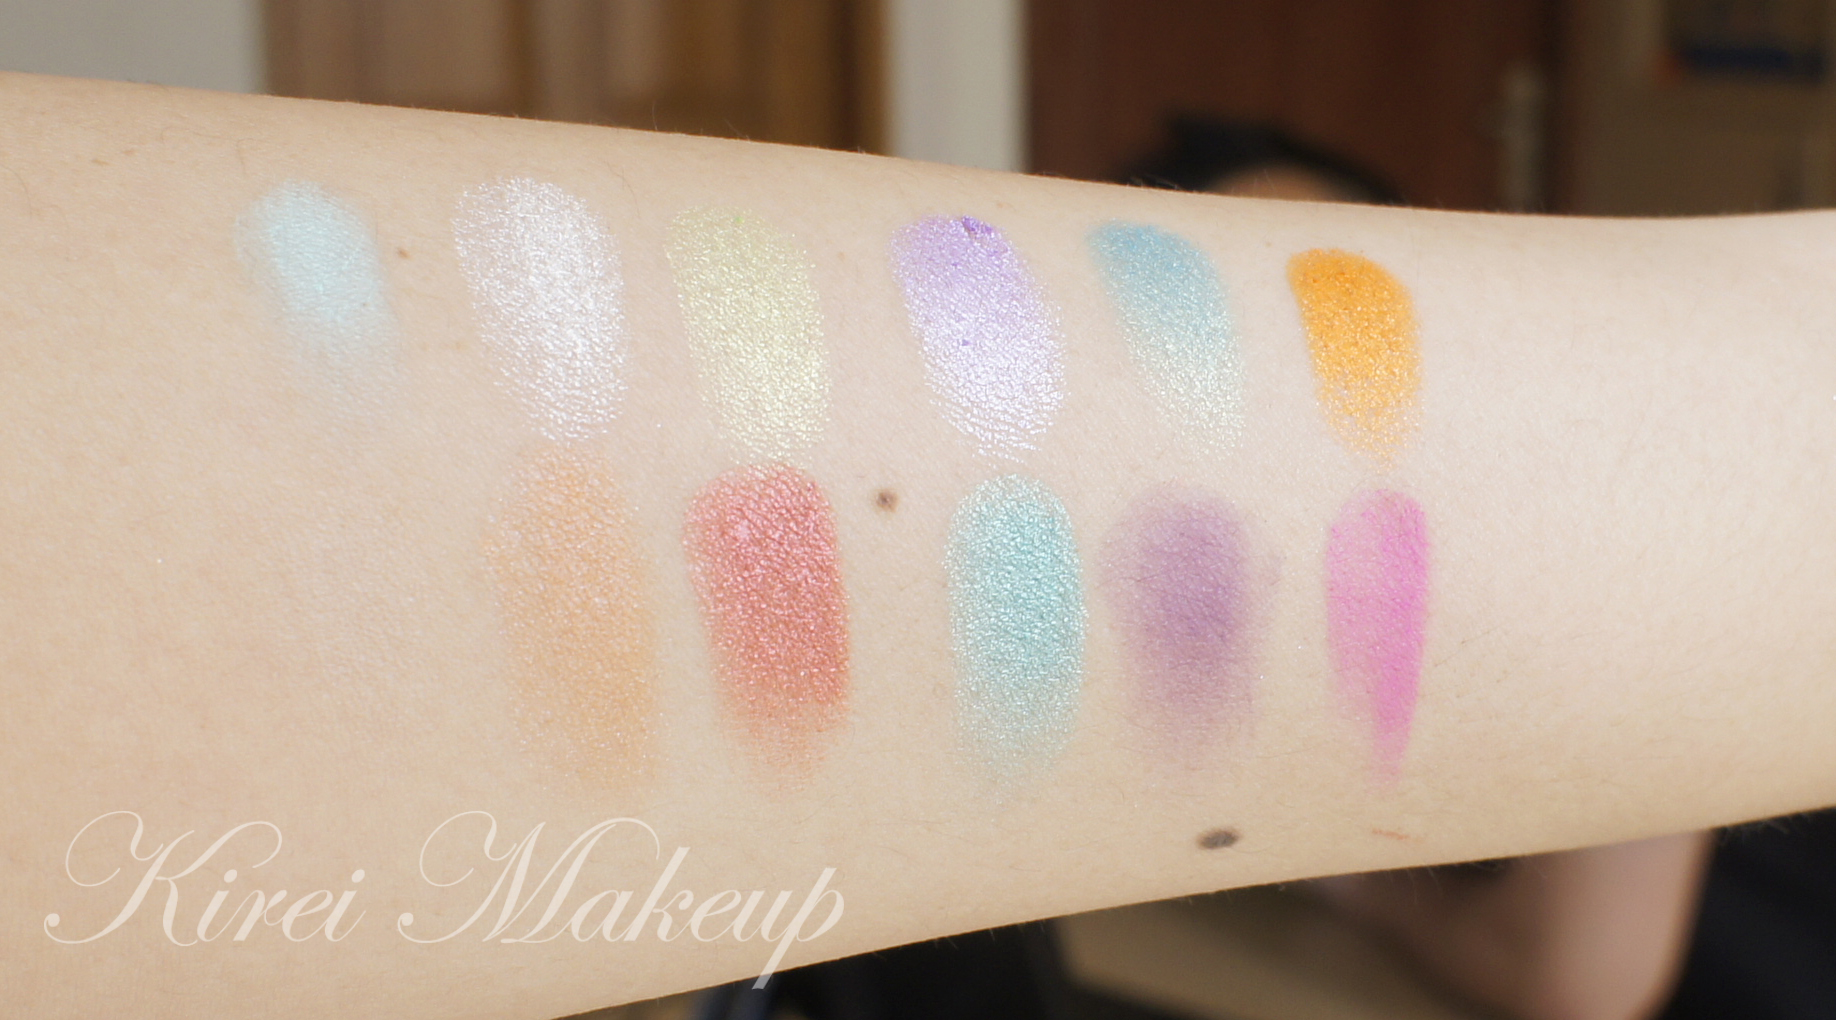
The Snapshot palette is one that I really wanted to get. It has a combination of matte and shimmer eyeshadows. It has a whole loads of bright eyeshadows, and some neutral ones. I absolutely love and adore this palette.

In this palette there’s 5 matte eyeshadows and 7 shimmer eyeshadows. The 5 matte ones are Summer Breeze, Sand Walker, Washed Ashore, Purple Haze and Magenta Madness. The 7 shimmery ones are Martini, Kiwi Flower, Sunset, Lotus Folower, Green Iguana, Humming Bird and Tequila Sunrise.

Sleek snapshot palette

During the swatching process, I found that Sand Walker does not show up on my arm because, it’s pretty much the same color as my skin. That shadow probably would work as a great base for my eyelid.

I also find that the shades on this palette turns out to be more on the medium shades range on my skintone. Nothing too dark for contour or crease color. Perhaps using a primer/base under the eyeshadows will make the shades brighter.

Sleek snapshot palette

From the Top (L-R):

  • Summer Breeze – matte cyan.
  • Martini – shimmery vanilla.
  • Kiwi Flower – shimmery chartreuse green.
  • Lotus Flower – shimmery lavender.
  • Humming Bird – shimmery deep turquoise blue.
  • Tequila Sunrise – shimmery orange.

On the bottom (L-R):

  • Sand Walker – matte beige nude shade.
  • Washed Ashore – matte light orange.
  • Sunset – shimmery copper.
  • Green Iguana – green teal shimmer.
  • Purple Haze – matte purple with cool undertone.
  • Magenta Madness – fuschia pink matte shade.


Sleek snapshot palette swatch

The last palette is the Ultra Mattes V1 Brights, which is a very popular palette. I’ve heard raves about this palette on how great the colors were even though they are mattes. When I first opened the palette, my eyes immediately went to Dragon Fly shade. It’s soooo beautiful! It’s bright, it’s gorgeous and it’s so creamy when touched. The shades just seem to glide on the skin smoothly.

sleek ultra mattes V1 brights


sleek ultra mattes V1 brights

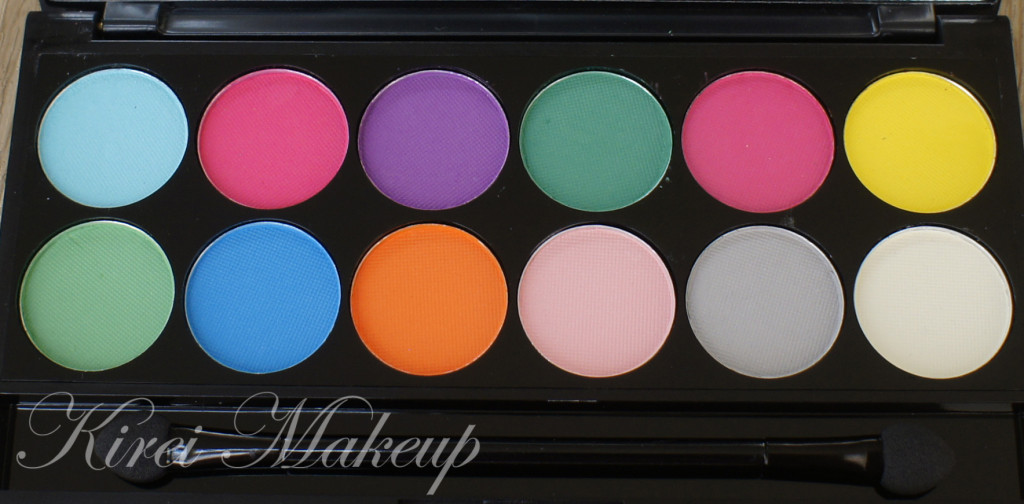
All the colors on this palette are matte. It does not feel chalky at all, instead it has a creamy, velvety texure to it. Most of the colors look pretty good without a primer when swatched. Even the lighter ones like pink, grey and white, though it might look light and chalky, you can still see the slight difference in hue on my arm.

On the top layer (L-R):

  • Chill  – aqua blue.
  • Pout – hot pink.
  • Sugarlite – purple with red undertone.
  • Dragonfly – jungle green (yes, it is a color, I did not make this up).
  • Pucker- another hot pink shade. I think this shade is very similar to Pout, but slightly lighter.
  • Bammi – true yellow.

On the bottom layer (L-R):

  • Cricket – grass green.
  • Bolt – electric blue.
  • Strike – orange (similar to that in Pantone’s).
  • Floss – ballerina pink
  • Crete – soft grey.
  • Pow – vanilla.sleek ultra mattes V1 brights swatch

All in all, I think all 3 palettes are pretty awesome. It’s a tad more expensive than the original price from Sleek, but I still think it’s a good price by Luxola. I’m one happy gal!

Peek a Blue

How’s everyone this weekend? I hope you guys had a blast, because I sure did! I went to Bali for a friend’s wedding. I also did her makeup/hair and couple of the other friends. It was a small, intimate wedding which was really awesome since usually weddings in Indonesia are grand and big. It was nice and refreshing. I also get to soak up the sun and enjoyed a lot of awesome seafood..bahahaha…

Anyhow, let’s get the tutorial started! I’ve been wanting to do something similar to this look (highlight in the middle of the eyes) with a more neutral shades, but oh heck why not use bright colors? 😀

You can obviously substitute all the colors below to whatever you want.

How-to:

1. I applied MUFE Aqua Cream Shadow no. 1 using a synthetic art brush on the eyelid and along the lower lashline.

2. Using a flat eyeshadow brush, I applied Burnt Red from the YSL Pure Chromatic quad no. 7. This eyeshadow turned out looking more like cranberry than burnt red when applied on top of black base.

3. I blended the edge using a fluffy blending brush.

4. Using another flat eyeshadow brush, I applied MAC Metallic Crush Pigment in Raindrop.

5. I used another blending brush to blend the lines where the 2 eyeshadows met.

6. Using an angled eyeliner brush, I applied UD Half-baked eyeshadow on the inner corner of the lower lid, and Burnt Red on the outer corner of the lid.

7. I lined my waterline and tightline using L’oreal Voluminous Smoldering eyeliner.

8. Along the upper lashline, I created a winged liner using Kate Sharp eyeliner.

9. I filled my brows using a mixture of MAC Omega and MAC Brun.

10. I curled my lashes using Shu Uemura lash curler and applied L’oreal Double Extender Curl mascara on both top and bottom lashes.

11. I also applied YSL Touche Eclat right underneath my brows.

blue makeup

12. I applied MUFE HD foundation on my face using a foundation brush from the center of my face and blending it outwards.

13. I applied YSL Touche Eclat on the bridge of my nose and underneath my eyes along to my cheekbones.

14. I contoured the sides of my nose and on the hollows of my cheeks using MAC Shadowy.

15. I applied Chanel Blush de Horizon on my cheeks.

16. I finished the look by applying YSL Rouge Pur Couture no. 7 lightly using a lip brush on my lips.

ysl pure chromatics no. 7

Sunset Inspired

I’ve been wanting to do a sunset inspired makeup for a while, but couldn’t find the right colors to do it. Well, ever since I got my hands on that MUFE Aqua Cream no. 9, I couldn’t resist playing with that color. I think it’s probably one of my favorite colors so far. I just want to use it all the time!

If you see anything that’s underlined and bold in the sentences below, it means that I’ve link it to another tutorial/review that I’ve done in this blog. The links are not spam nor will it lead you to another site.

How-to:

1. I applied MUFE Aqua Cream Shadow no. 9 all over my lid using my finger. (for other tutorials using this color please refer to Coral and Blue, and Candiliscious)

2. Using a flat eyeshadow brush, I applied Smashbox Soft Shimmering Coral from the Admire Me palette on top of the aqua cream.

3. Using Smashbox bullet brush, I applied purple eyeshadow from Sariayu’s Karimunjawa palette.

4. I blended the edge of the shadow using a clean blending brush.

5. Using an angled eyebrow brush, I applied Lancome All Made Up eyeshadow on the inner corner of the lower lid, and the purple eyeshadow from step 3 on the outer half.

6. Using a Kate Super Sharp liquid eyeliner (bought from a Japanese drugstore during my trip), I created a winged liner along the upper lash line.

7. I lined the outer third of my lower lid using the same eyeliner and used an angled brush to smudge the liner slightly.

8. I filled my brows using a mixture of MAC Omega and MAC Brun using an angled eyeliner brush.

9. I curled my lashes and applied L’oreal Double Extender Curl mascara.

10. I applied my face powder right below my brows.

coral and purple makeup

11. Under the eyes, I applied the yellow corrector from MAC Pro Conceal/Correct palette in Medium.

12. On my face, I applied MUFE HD foundation using a Sigma Round Kabuki brush.

13. I powdered my face using Cinema Secret loose powder.

14. I applied MAC Shadowy to contour my face and MAC Peaches blush on my cheeks (for my contouring tutorial please refer to Subtle Contour/Highlight/Blush).

15. On my lips, I applied Revlon Mauve It Over lipstick.

sunset makeup

Subtle Highlight, Contour and Blush

I was asked to show how I do contouring by a few readers as well as my clients. So, I’m going to show you how I do highlight, contour and blush placement. For the eyes, please refer to my previous post Rosy for the tutorial.

I do contour differently depending on the shapes of the face, but in general, everyone always asked to get the hollows of the cheeks contoured, as well as nose (esp. for asians), and sometimes the jawlines. The idea of contouring is to make the facial structure looks sunken in. On the other hand, highlighting is all about making your feature stands out.

In this tutorial, my highlight/contour/blush technique used powder products. This is a very subtle way to contour/highlight/blush the face. If you want a heavier application, feel free to add more products.

Below is the Before and After photo.

contour and highlight asian

Just let me mention that this is NOT the only way to do highlight/contour/blush. There’s so many different version, you just have to play around and find what you like and which version you prefer. I might do a heavier contour/highlight/blush with cream products next week 🙂

Below is the “Before” photo with bare face.

how to contour

1. I applied moisturizer (Clinique Dramatically Moisturizing Gel) and face primer (Smashbox Foundation primer) all over my face before I started out.

tips: For mature and/or dry skin, I probably would choose to use a thicker moisturizer like the Clinique Dramatically Different Moisturizing Lotion, Elizabeth Arden 8hr cream, or Embryolisse  etc to ensure that their skin gets enough hydration before foundation application.

For pictures below, please note that I only applied foundation, highlight, contour and blush on one side of my face (the left side on your screen). The other side is kept bare as a comparison.how to highlight

2. I applied  YSL Touche Eclat in no. 1.5 on the places where I want my features to stand out: bridge of my nose, under the eyes, on top of the cheekbones, forehead, top of the brow, cupid’s bow and chin.

3. Using your finger/sponge/brush to feather the highlighter out and blend to the skin.

how to contour

4. Using the handle of a fan brush, I placed the brush underneath the cheekbone. You should be able to feel a hollow area under your cheekbones. The area where you want to contour is from your ear to just before the corner of your mouth.

5. Using MAC Shadowy pro powder and the face fan brush, I applied the contour right at the hollows of the cheeks towards the corner of the mouth. Stop your contour about 2-3 fingers away from the corner of your mouth.

6. Use whatever is left on the brush to be applied on the temples and jawline.

how to contour

7. I used a fluffy angled brush and MAC Shadowy powder to contour the side of the nose.

8. I placed the brush in the middle (see photo below), and swiped it down and up. Blend the line down to the side of the nose to remove any harsh line.

how to contour nose

9. Using Benefit Hervana blush, I applied it to my cheeks with a blush brush.

10. I applied the blush to the center of my cheeks without smiling so that the blush doesn’t get droopy. This will help to create an illusion of a higher cheekbone. This will benefit mature women to create a face lift and look younger.how to apply blush

Below is the side view of what we’ve done in the steps above. Keep the highlight/contour/blush at an angled to create an illusion of high cheekbones.

how to highlight

Below is the After photo with both sides of the face completed.

how to highlight

Rosy

Today’s look is more on the softer, romantic, feminine colors. This look is great for first date, or for whoever wants a more natural look. Will work great on brides as well!

I also wanted my eyes to look bright and open, so I skipped the black liner on the waterline. Instead, I opted for a beige eyeliner. If you prefer a more darker version to this, feel free to substitute the dark shadow and eyeliner to black.

For this look, the focus is on the overall appearance. Nothing stands out too much, yet the whole look feels right and if done correctly, people will notice a subtle difference in your face but cannot put their finger why you look so great 😉

FYI, if you’d like to know how I contour, highlight and apply my blush come check the blog out tomorrow 😉

How-to:

1. I applied Bobbi Brown Rose Gold cream shadow all over the lid using my ring finger.

2. Using a flat eyeshadow brush, I applied Urban Decay Toasted eyeshadow on top of the base.

3. Using the same flat eyeshadow brush, I applied Urban Decay Busted eyeshadow on the outer V of the eyes.

4. I used a clean blending brush to blend the edge of UD Busted eyeshadow.

5. Using a small shader brush, I applied UD Toasted on the inner half of the lower lid and UD Busted on the outer half of the lower lid.

6. I lined my waterline using MAC Chromagraphic eyeliner in NC30.

7. I created a slight winged liner along my upper lashline using UD Blackout eyeshadow and an angled eyeliner brush.

8. I used whatever was left on the eyeliner brush to line the outer half my lower lash line (very close to the lashes).

9. I filled my brows in using Shu Uemura brow pencil.

10. I curled my lashes and applied L’oreal Double Extender Curl mascara on both top and bottom lashes.

11. I applied my face powder right underneath the brows.

Urban Decay Hustle

12. For the face, I applied MUFE HD Foundation using a foundation brush.

13. Under the eyes, I applied YSL Touche Eclat.

14. For the contour, I applied MAC Shadowy.

15. On the cheeks, I applied Benefit Hervana blush.

16. On the lips, I applied YSL no. 17 lipstick lightly using a lip brush.

urban decay naked palette