M.A.C Old Gold Duochrome

So, yesterday we’ve talked about M.A.C Melon loose pigment. Today, I want to show another of my favorites which is M.A.C Old Gold. If you’ve read my blog way back in 2008, I’ve always talked about M.A.C Duochrome eyeshadows and pigments. I’ve always loved these duochrome products and I think that they don’t get enough credits for their amazingness!

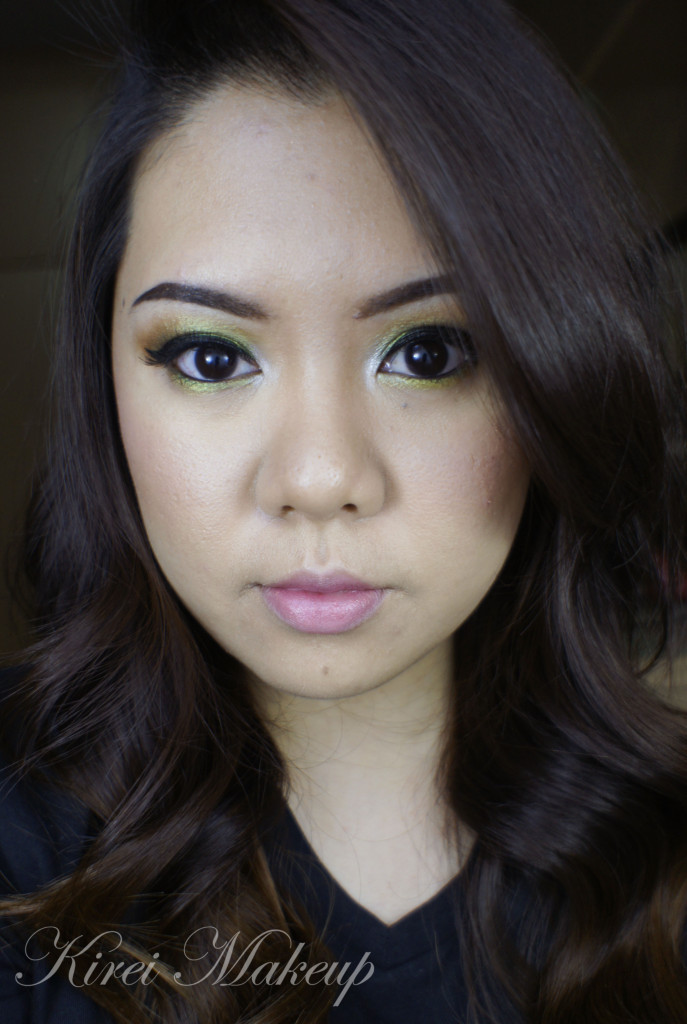
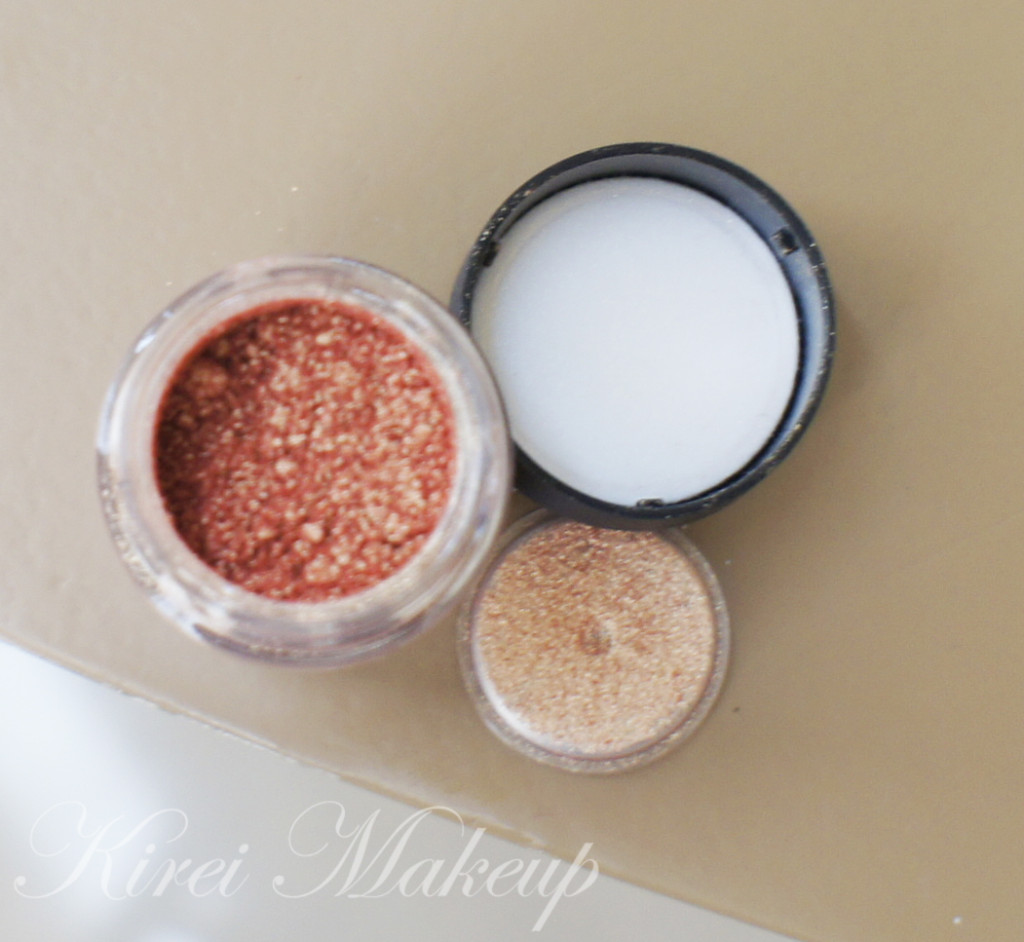
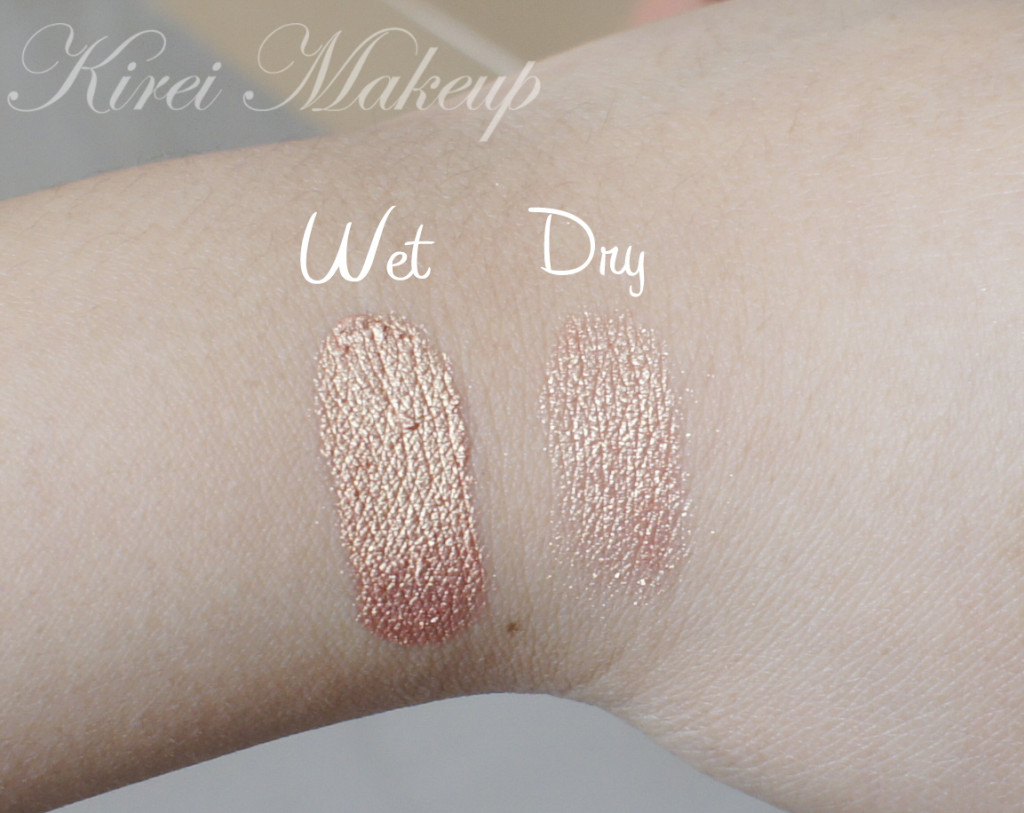
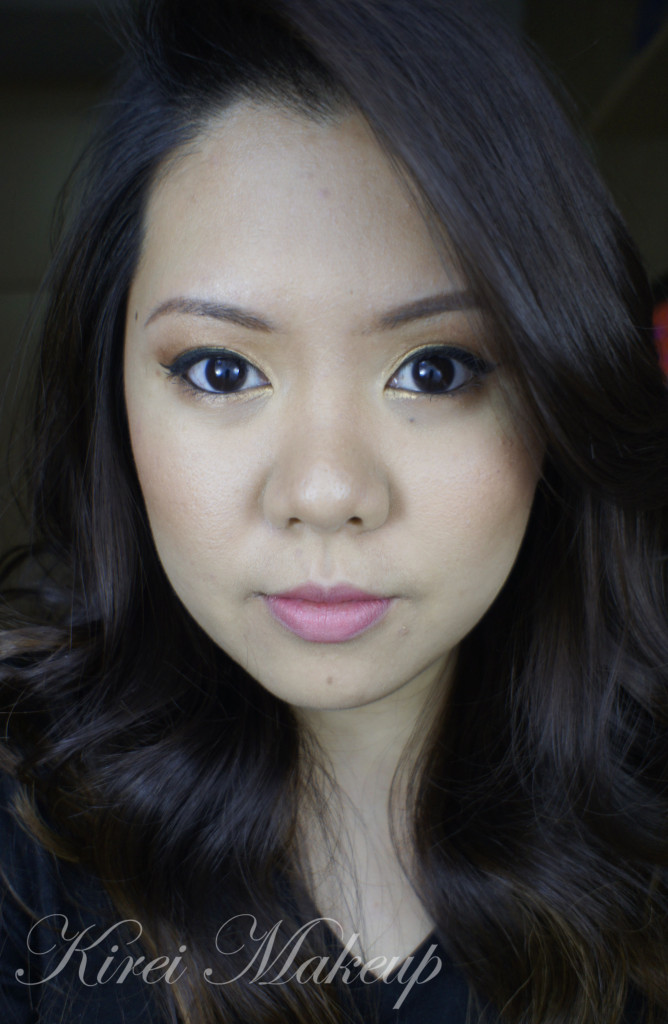
M.A.C Duochrome is basically 1 eyeshadow with 2 colors. For example, M.A.C Old Gold (which I used below) actually is a shade of bronzy gold, with green shimmers. If you apply this dry on your skin, you’ll get a gold shade with orange undertone. However, if you apply this eyeshadow wet OR on top of a dark base, you get the green shimmers to show through instead of the gold.

A few examples of MAC Duochromes are: Club eyeshadow (brown with blue), Stars ‘n Rockets (pink with purple), Blue Brown pigments (brown with blue), Reflect Transparent Teal (clear glitter with teal) etc. You get the idea 😉

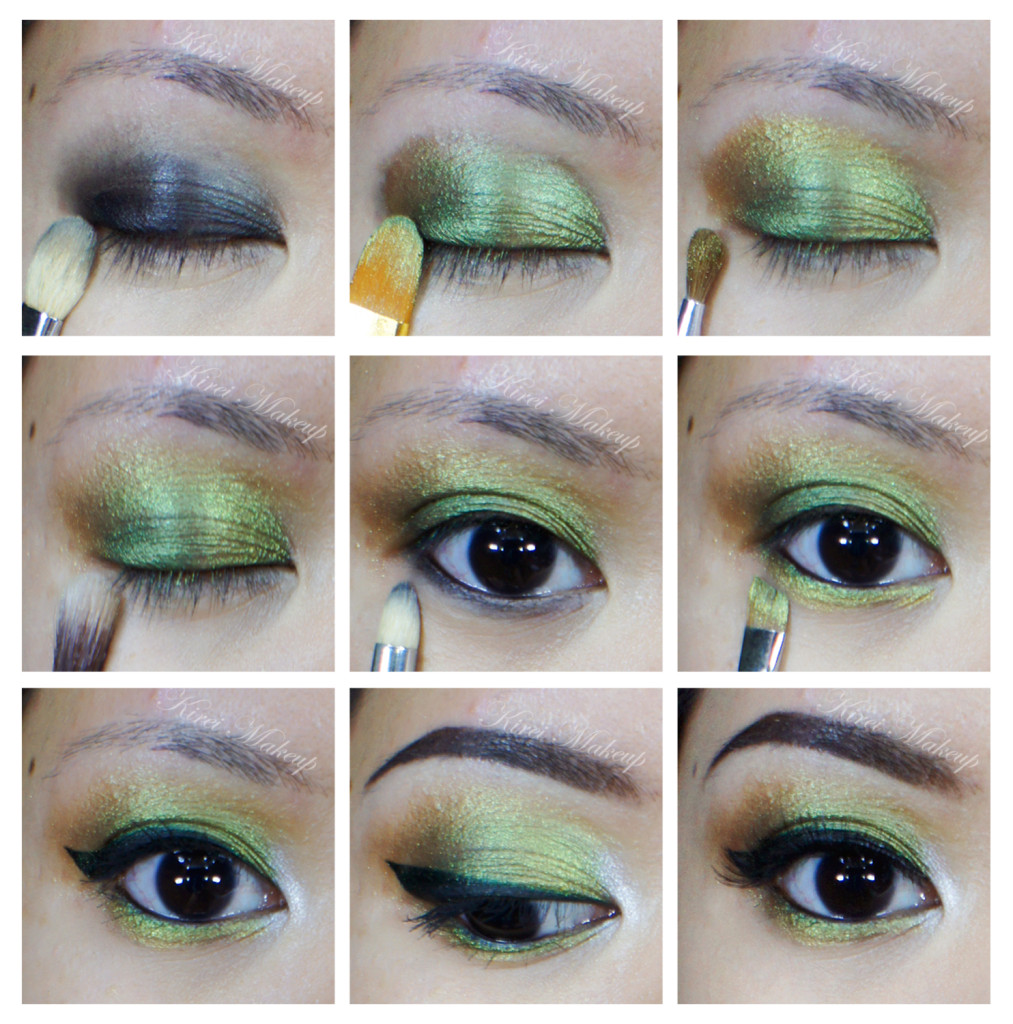
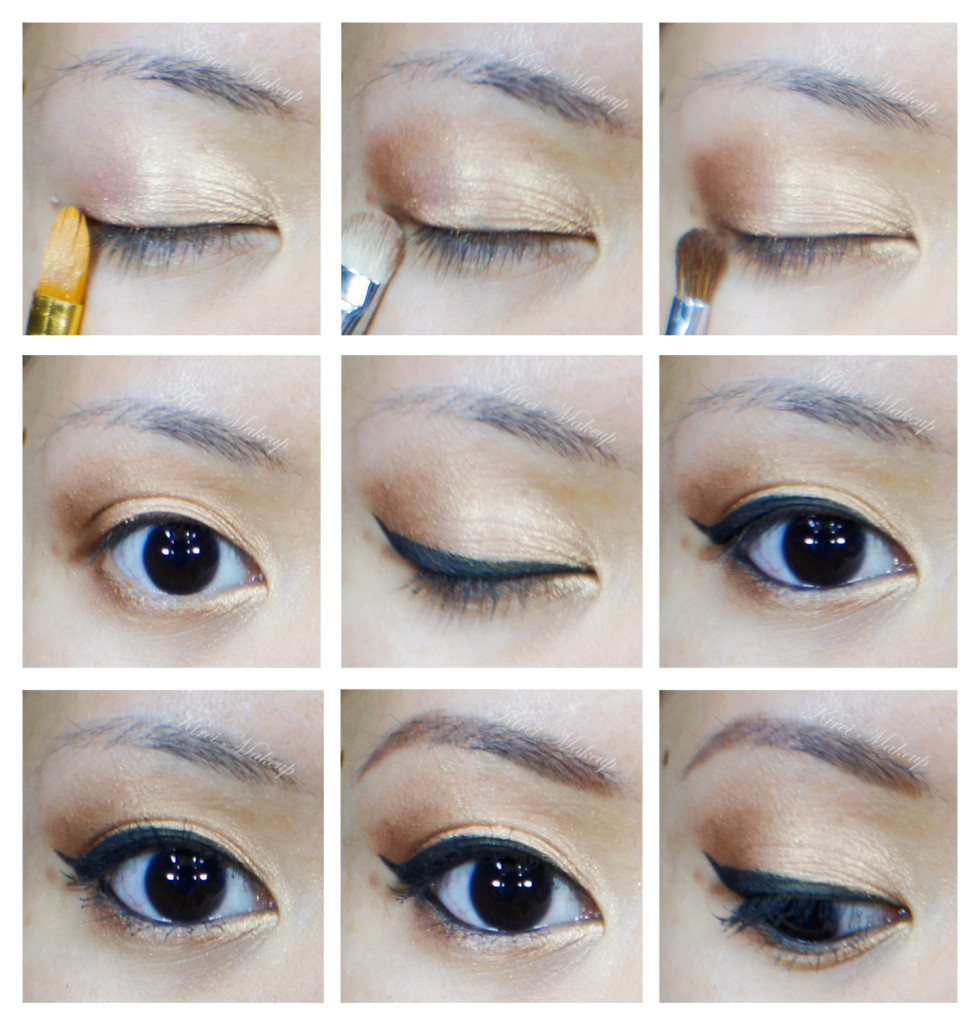
So for this look, I wanted to show the easiest and fastest way to use this duochrome. So fun, and easy!

How-to:

1. I applied L’oreal Voluminous Smoldering eyeliner all over the lid, and blended the crease using a fluffy blending brush. You can use whatever dark base you want, whichever works for you.

2. Using a damped synthetic art brush, I mixed M.A.C Old Gold pigment on the back of my hand, and then applied it all over the lid.

3. Using a small fluffy brush, I applied MAC Old Gold pigment slightly above my crease. I applied this pigment dry.

4. Using a clean UD Fluffy brush, I blended the crease to remove any harsh edge.

5. I lined my waterline and lower lid using L’oreal Voluminous Smoldering eyeliner. Using a clean pencil brush, I smudged the eyeliner.

6. Using a damped angled eyebrow brush, I once again mixed Old Gold at the back of my hand. I, then, applied it on top of the  smudged liner.

MAC Old Gold pigment

7. Using a flat eyeshadow brush, I applied Martini from Sleek Makeup iDivine Snapshot palette on the inner corner of the eye.

8. I created a winged or cat-eye liner using Kate Super Sharp eyeliner.

9. I filled my brows using MUFE Aqua Gel Brow.

10. I curled my lashes and applied Maybelline Express Volume mascara.

11. For added drama, I applied Quo false lashes.

12. I applied MUFE HD Foundation all over my face using a foundation brush.

13. I applied Benefit Hervana on my cheeks, and contoured my face using MAC Studio Tech NW 55.

14. For the lips, I applied Chanel Confidentielle lipstick to complete the look.

mac duochrome

Product of The Week: M.A.C “Melon” Pigment Color Powder

I know, I know..I’ve been a bad blogger..missing so many days of posting, not to mention forgetting to post last week’s Product of the Week…Oh well…Last week wasn’t a good week for me in my personal life, not to mention all the heavy rain cause a lot of laziness and procrastination..I haven’t even work out for a week! hahahaha..

Anyways, since I missed last week’s Product of the Week, I’ve decided to put this week’s installment on Monday. I’ll try to do another one this Wednesday, but no promises since my lover (aka bff), Liz, is coming to see me!!! I’m gonna be busy for a while…

So, in this week’s installment, I want to show you guys M.A.C Melon Pigment Color Powder.

What is MAC Pigment Color Powder?

Pigment is a highly concentrated loose colour powder that contains ingredients to help it adhere to the skin. Create a subtle wash of colour or an intense effect. Does not streak or cake. Easy to blend and long-lasting. Please note: Pigments are sold by weight not volume. Containers can appear to be less than full due to settling of the product. 

M.A.C Cosmetics, 2013

MAC Melon Pigment

Let me just say that I have been using this pigment for a looong time. Like I said in my Summer Splash post, I always go back to this pigment for my Summer makeup. Now that I’m in the Tropics, I tend to wear this a lot more than other eyeshadow. I have quite a small collection of M.A.C loose pigments, but this shade, Melon, is definitely my favorite.

M.A.C Melon (is?) was a Pro Product. I’m not sure if this product is still being sold. I took a look at the MAC Cosmetics website and this shade is no longer in their pigment list. I know that some stores might still carry them until their stock is finish. If you can’t find it, you may want to try NYX loose pearl eyeshadow for the dupe.

In my opinion, M.A.C Melon is a gorgeous shimmering peachy gold shade. It’s very peachy and warm, which works very well in most skintone. For those with lighter and medium skin tone this would be a good medium color. Wear it alone with a lot of mascara on the lid for a good light wash of color. For those with darker skin tone, this would be a good highlighter color.

The other best part about this pigment is you can use it dry or wet. If you like it sheer, you use it with a dry brush. If you like a bit more intensity, use it dry. Either or, the result is gorgeous. Use it dry and you end up with a frosty finish, use it wet and you end up with a pearly finish.

You can also use this as nail color. Mix it with clear nail polish and ta-daaah you just created a nail polish. I might do a tutorial using loose pigments on your nails.


mac melon pigment

Longevity

On myself, whether I apply it wet or dry, it seems to last the whole day (8 hours) with little creasing. Applying it on top of a primer would probably help esp. if you have oily lids.

Price

It’s USD$ 21/each. Each container consists of 4.5g of pigment. I’m not sure how much it is in Indonesia.

Pros

  • Amazing pigment pay-off.
  • Intense and very concentrated color.
  • Beautiful shade for any skintone.
  • Can be used wet or dry.
  • A lot of product in the container (even though it’s less than in the past, but there’s still a lot of product in the smaller newer container). This product will last a good while.
  • Easily blendable.
  • Long lasting.
  • Multi-purpose.

Cons

  • A lot of fall-out if you use it dry and don’t tap the excess off your brush.
  • Hard to use if you are not used to it.
  • Pricy compared to other brands like NYX, Coastal Scents etc. (if you don’t have a Pro discount)

mac melon pigment review

For this product, I give it 4.5 winks out of 5! It’s an amazing product, with great pigment pay-off, which is what every artists always love! For me, and other professionals who work in the beauty industry, you can buy this product with your Pro Discount. Even though other brands might have similar color to M.A.C Melon, I still think M.A.C Melon has the extra vibrancy and shimmer, not to mention there’s something unique with that peachy undertone of this pigment.

I am not in any way sponsored/endorsed/being paid by the company to review this product. I bought this out of my own pocket and any review pertaining to this product is purely my own opinion. Please be reminded that each individual reacts differently to the product. Always do a test patch whenever possible before using the product on yourselves.

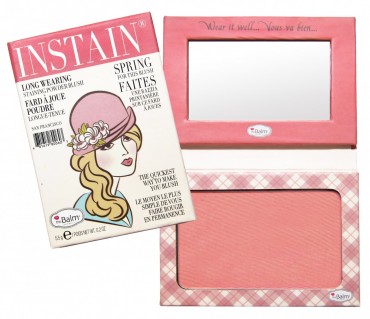
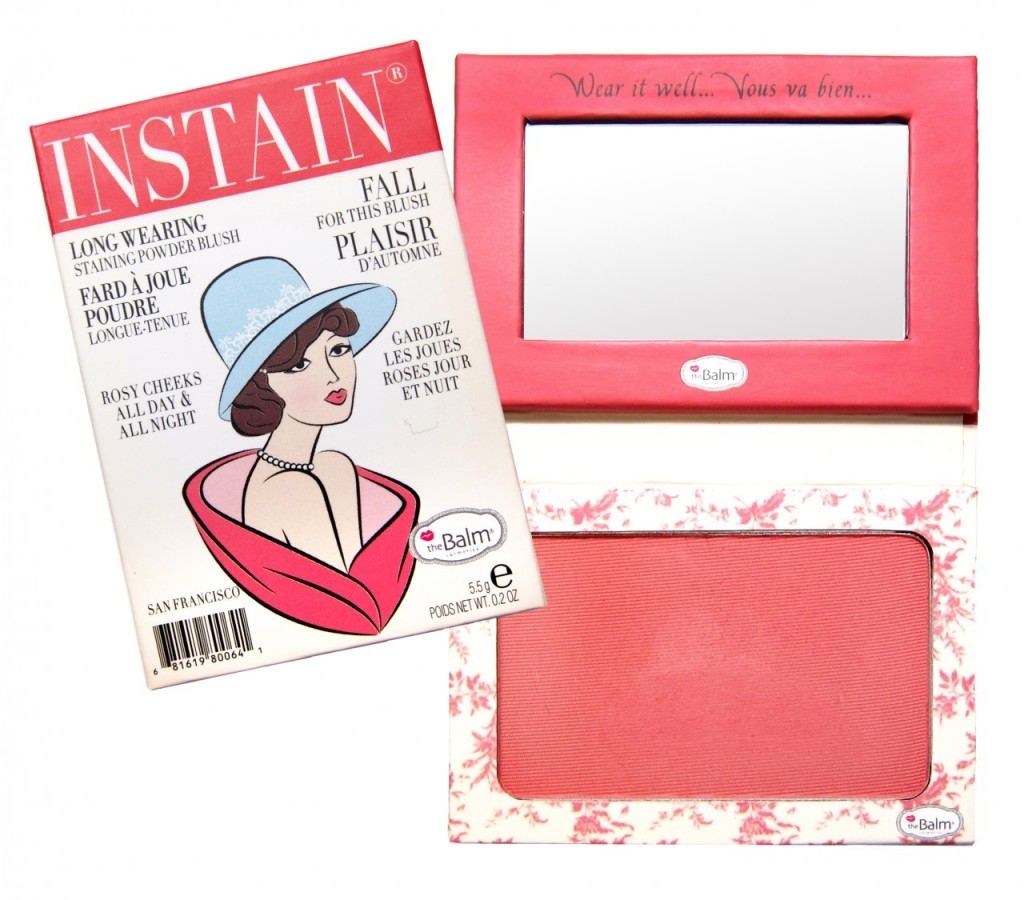
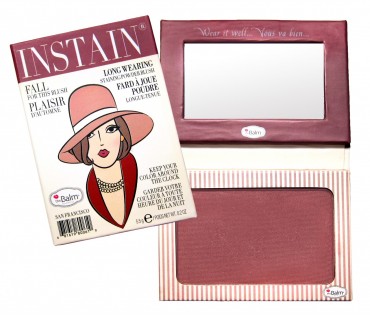
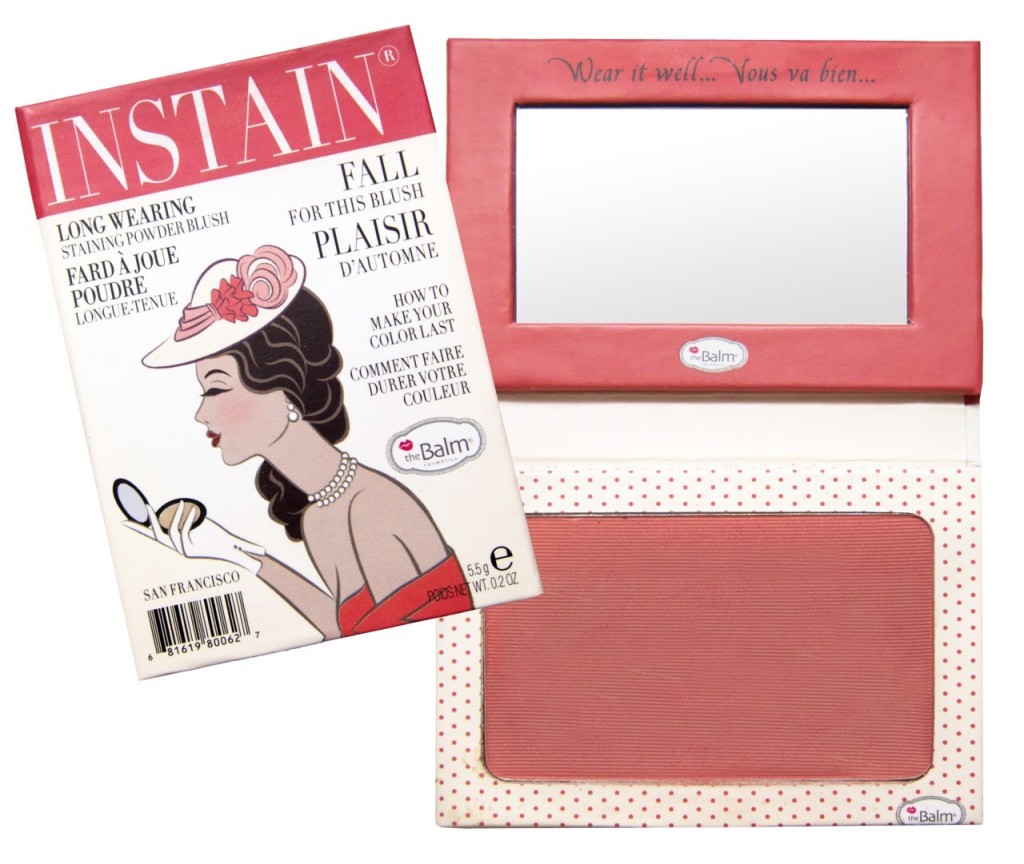
Instain by The Balm [sponsored post]

Joy (Hi!!) from Nail Polish Canada contacted me earlier last week to see if I want to give The Balm Instain products a try. I wanted to get my hands on the Instain since it’s The Balm new blush product range, but sadly I’m not in Canada. Nevertheless, I wanted to share more info about these blushes with you guys. So, read on below and if you (my Canadian readers) are interested in purchasing them, you can grab them from Nail Polish Canada website for CAD$22/each. I’m not sure if this line is out yet in Indonesia. I know The Balm has several booth in Jakarta, but I don’t know if it is going to be available here.

The Balm Cosmetics line boasts a wide range of high quality make-up including powders, bronzers, lips stains, blushes and more.  The Balm’s philosophy is “Beauty in five minutes” and with their multi-use and quick fix products it is easy to achieve stunning looks within minutes.

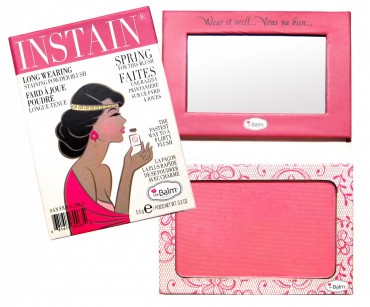
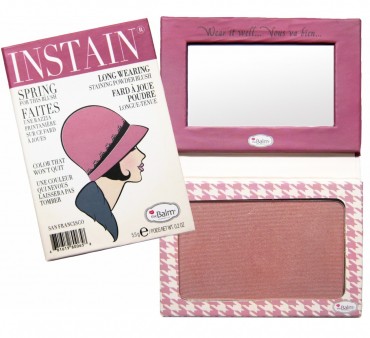
The Balm Cosmetics has just released a new long-lasting blush, Instain.  Instain was created in six different shades and comes in the brand’s trademark nostalgic packaging.  With it’s high pigmentation and long lasting ability, Instain blush would make for a great addition to any makeup bag.  The blush comes in a compact case, perfect for travel or on-the-go make-up applications.

The Balm Instain blushes come in:

1. Lace Instain Blush Bright Pink

The Balm blush

2. Houndstooth Instain Blush – MauveThe Balm Instain blush

3. Argyle Instain Blush  – Petal PinkInstain The Balm

4. Toile Instain Blush – StrawberryThe Balm Instain

5. Pinstripe Instain Blush – PlumThe Balm Instain

6. Swiss Dot Instain blush PeachThe Balm Instain blush

Summer Splash

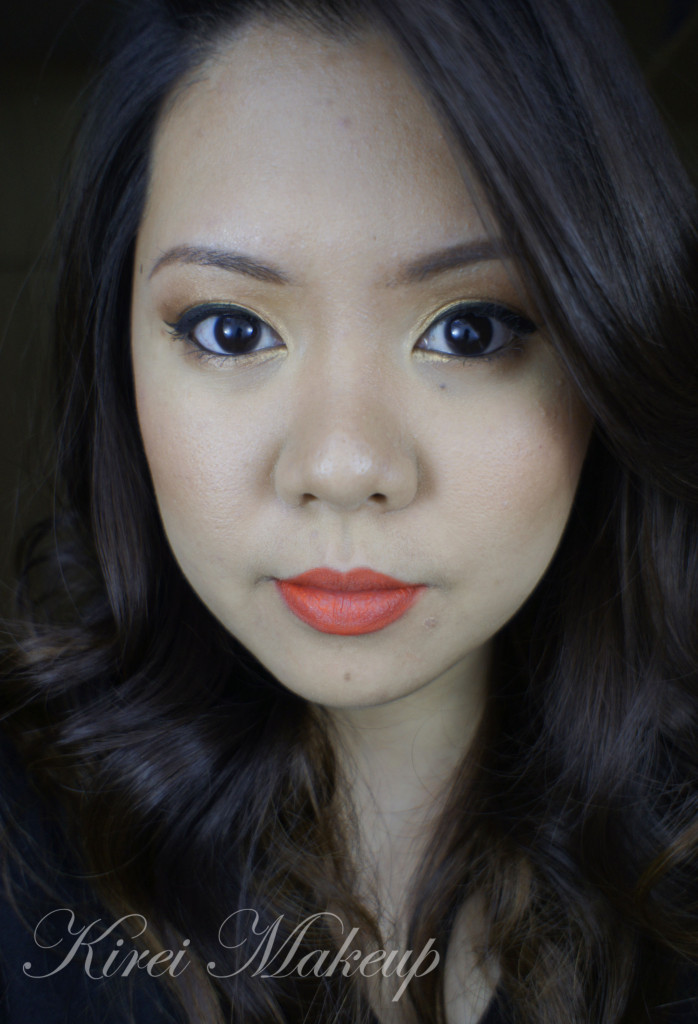
This look today is one of my fav. summer makeup. It doesn’t matter where I am in the summer, somehow I always seem to resort back to this look. It’s very light and bright, and of course you can always eliminate some of the steps below to make it easier and to suit your own look. Most of the time, I only used the MAC Melon pigment on my lid with mascara, skipping the liner and the contour colors altogether.

Anyways, the 2nd look to this post used an orange lip liner. I don’t know where my orange lipstick is, so I only used the lip liner to fill my entire lip. Of course you can change the lips to whatever color you want, red, pink, or even nude. No rules, just fun playful makeup.

How-to:

1. Using a synthetic brush, I dipped the brush in water and then dipped it in MAC Melon pigment. I mixed it at the back of my hand to turn it into a paste form and applied this paste to my lid, and on the inner corner of the lower lid.

2. Using a shader brush, I applied MAC Bronze eyeshadow on the outer V and on the crease. I used whatever left on the brush and ran it through the lower lid.

3. Using a clean fluffy brush, I blended the crease to remove any harsh edge.

4. I applied Smashbox Deep Golden Brown on the outer corner, blending it inwards. I focused most of the color on the outer V of the lid.

5. Using whatever left on the brush, I applied it on the lower lid.

6. Using an angled eyeliner brush and MUFE Aqua Black, I created a winged liner along the upper lash line.

7. I lined my waterline using whatever product remained on the brush from step 6.

8. I curled my lashes and applied Maybelline Express Volume Turbo Boost mascara on both top and bottom lashes.

9. I filled my brows in using Shu Uemura Hard Formula 9 brow pencil.

natural makeup

10. I applied UD Naked foundation all over my face using a foundation brush.

11. I contoured my face using MAC Studio Tech in NW 55. (If you want to know how I contour my face, check out this post for powder contouring or here for cream contouring)

12. I applied MAC Peaches blush on the cheeks.

13a. For the lips, I applied YSL Pur Couture rouge no. 17 using a lip brush.

natural bridal makeup

13b. For the orange lips, I lined and filled my lips using MAC Entertain Me lipliner.

orange lips

Cat-itude

Have you guys watched The Croods? I just watched it not too long a go, and I love the cute sabertooth tiger! I drew inspiration from his fur colors! I love how it turned out. The eyeshadows I used are my favorites bright colors – chartreuse and teal. I’ve never thought that these 2 colors will work together, but I ended up loving it. MAC Bitter is so gorgeous, it’s been a while since I play with the eyeshadow and I can see myself using it more frequently in the near future.

How-to:

1. I applied MAC Bitter on the inner half of the lid using a flat eyeshadow brush.

2. Using another flat eyeshadow brush, I applied MAC Birds and Berries on the outer half.

3. Using a small fluffy brush, I applied MAC Club on the outer V and on the crease.

4. I blended out MAC Club using a fluffy blending brush.

5. Using an angled eyebrow brush, I applied MAC Bitter on the inner corner of the lower lid and MAC Birds and Berries on rest of the lower lid.

6. I also lined my waterline using L’oreal Voluminous Smoldering eyeliner.

7. Using a small shader brush, I applied UD Perversion eyeshadow on the outer V and along the crease.

8. I blended the eyeshadow out using a fluffy blending brush.

9. Along the upper lid, I created a winged liner using Kat Von D Trooper eyeliner.

10. I curled my lashes and applied Maybelline Volume Express Turbo Boost mascara on both upper and lower lashes.

11. I filled my brows in using MUFE Aqua Brow Gel.

mac rated r

11. For my face, I applied MUFE HD Foundation and foundation brush.

12. I applied MAC Shadowy as contour and MAC Cubic as blush.

13. On the lips, I applied MUFE Soft Apricot Rouge Artist Natural.

mac r rated

Shimmering Sienna

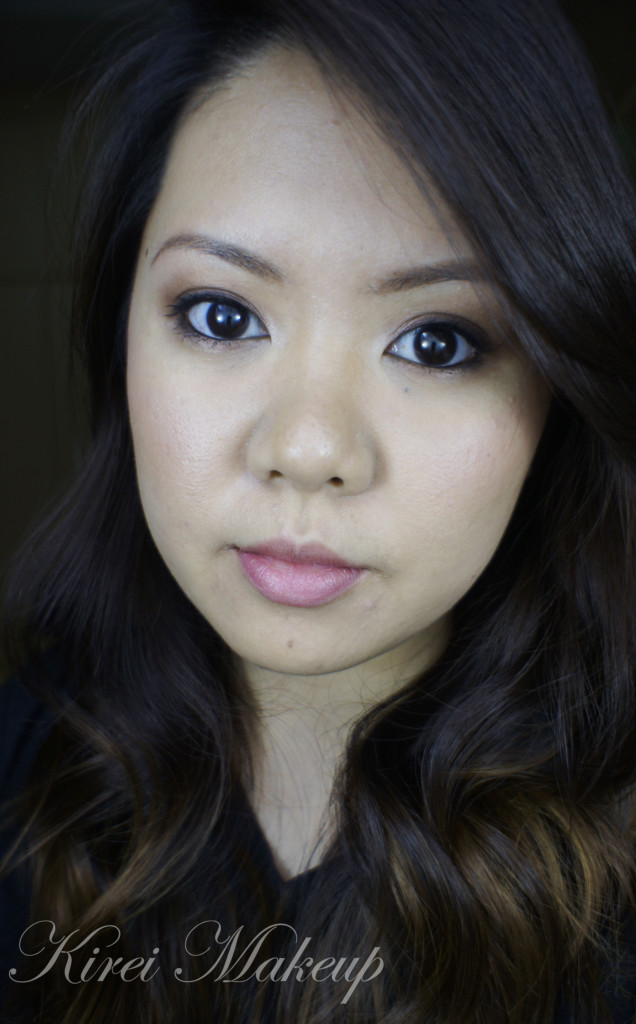
I love copper-colored eyeshadow, which I think look great for those with light colored eyes, and fair skin. It can look very intense and smoky, it looks so pretty! You have to try it. On me, it ends up quite light and not as smoky, which I don’t really mind. It’s a pretty good look for summer nights. Very light and not too heavy at all.

How-to:

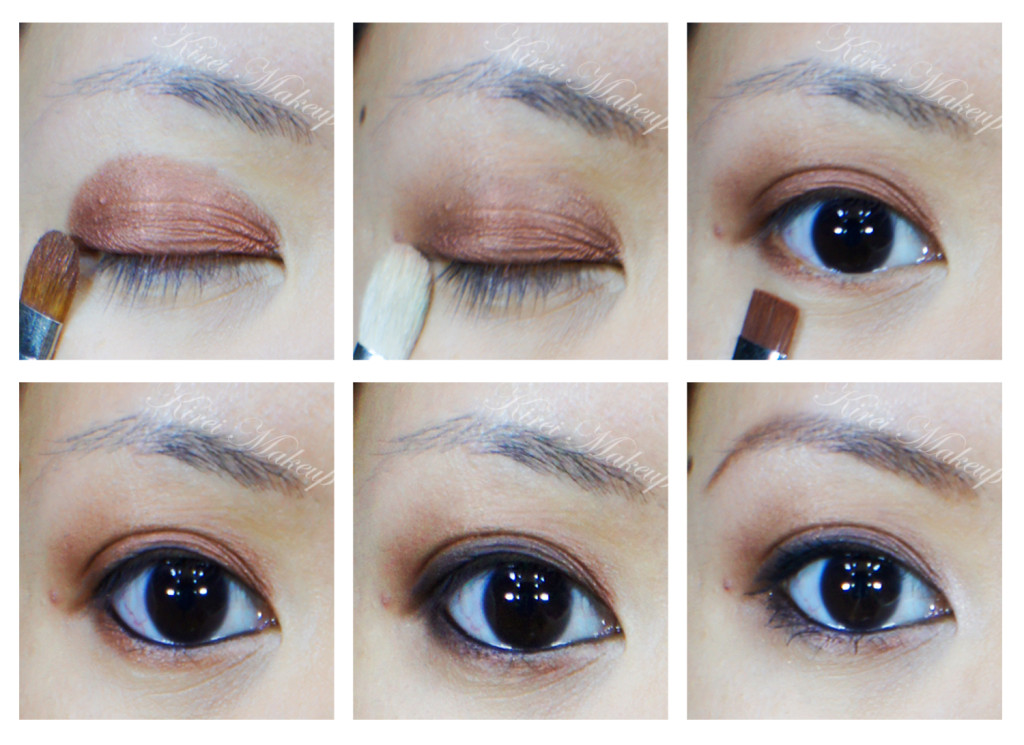
1. I applied Revlon Satin eyeshadow in Shimmering Sienna all over my lid using a flat eyeshadow brush.

2. Using a clean fluffy brush, I blended the edge so there’s no harsh line.

3. I applied the same eyeshadow on the lower lid using Sigma Flat Shader brush.

4. I lined my waterline, tightline and upper lashline using L’oreal Voluminous Smoldering eyeliner.

5. Using an angled eyebrow brush, I applied Smashbox Blackout eyeshadow along the upper lash line and used whatever is left on the brush on the outer corner of the lower lid.

6. I filled my brows in using Shu Uemura Hard Formula 9, and applied Maybelline Express Volume Turbo Boost mascara.

Copper smoky eyes

7. I applied MUFE HD Foundation all over my face using a foundation brush.

8. On the cheeks, I applied Benefit Hervana.

9. For the lips, I applied MAC Dervirsh lipliner, and applied Clinique Chubby Stick in Bountiful Blush.

Asian copper smoky eyes

Product of The Week: MUFE HD Foundation

Sorry for the late Product of the Week installment! I’m still recuperating from my flu. Anyhow, here’s one of my fav. foundation on my kit! Make Up For Ever HD Foundation! I’m sure you’ve been hearing a lot of people raving about it. I’m going to share with you why I choose this as My Product of the Week!

It wasn’t until last year that I completely fell in love with this foundation. I think it was just a big rave and overrated. I’ve used it on models and brides, they absolutely love the finish. It’s great for sensitive skin, no reaction whatsoever (so far). It looks great photographed too, no flash back. However, I didn’t seem to like it on myself until just recently, for some reason. I’m not even sure why. Might be because currently my shade is quite hard to match to most of the foundation in the market.

Anyways, I bought mine for CAD$49 (not incl. tax) in Sephora Canada. It’s a big price tag, just CAD$1 difference than luxury brand foundation like Chanel or Dior. I decided that no. 118 would be a good match for my skin. Back in 2009, I had to mix 117 and 123 for my shade since I already owned those shades for my kit.

What is MUFE HD Invisible Foundation?

The MAKE UP FOR EVER HD Complexion products use innovative formulas to create a new generation of make up which is both invisible on HD cameras and to the naked eye. The HD Foundation is an oil-free medium-to-full coverage liquid foundation which covers skin imperfections, while remaining invisible on-screen and in real life. Its extremely fine texture is supple and easy to apply. Enriched with moisturizing agents, it leaves the skin soft and radiant. It is available in a wide range of shades to suit all skin tones.
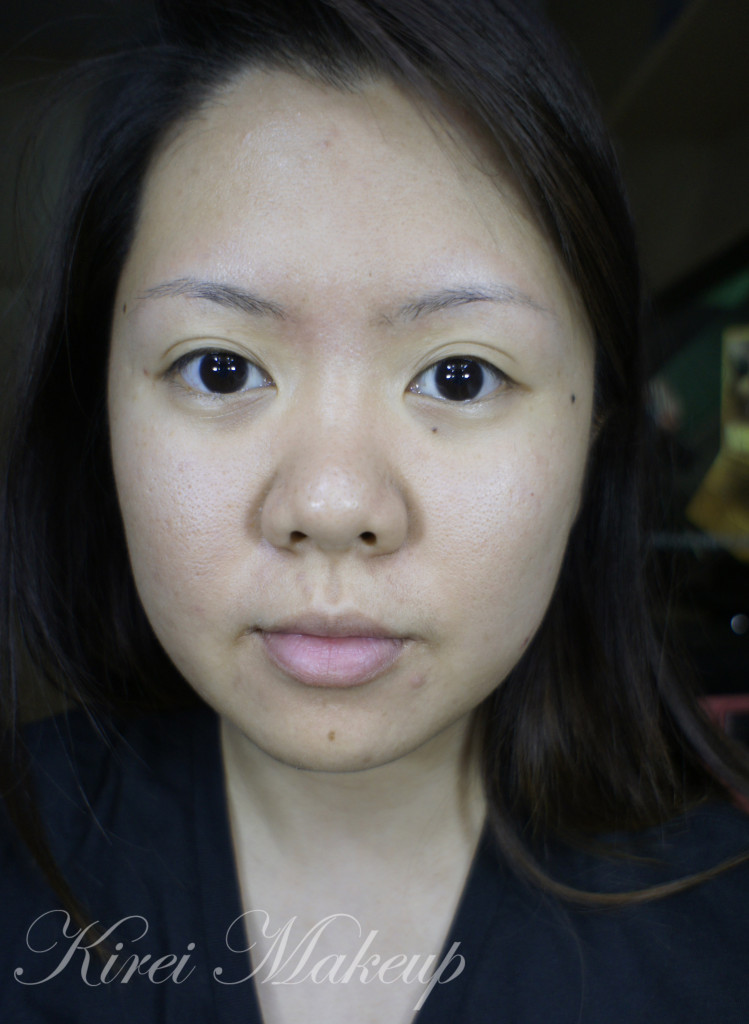
MUFE HD foundation 118 review

I’m not wearing any makeup on the photo above and as you can see, I have a lot of redness and acne scars, and a gigantic pimple! My skin condition at the moment is combination oily.

No. 118 is described as Flesh – for light skin with beige undertone (Sephora Canada)I tend to use this shade 118 or 117 on Chinese-descendant Indonesians as well. 118 is a good match for those with skintone like mine  *UPDATE: I bought shade 120 and it was perfect for my skintone! It’s yellow based, while 118 is more on a neutral shade (beige). So, I went from a good match to a perfect match! Those who are quite fair might like 117. As a comparison, I’m slightly lighter than an NC 30, but darker than NC 25 in MAC Studio Fix Fluid. I’m an NC 27 for MAC Studio Tech foundation. I’m 4.0 in Urban Decay Naked foundation.
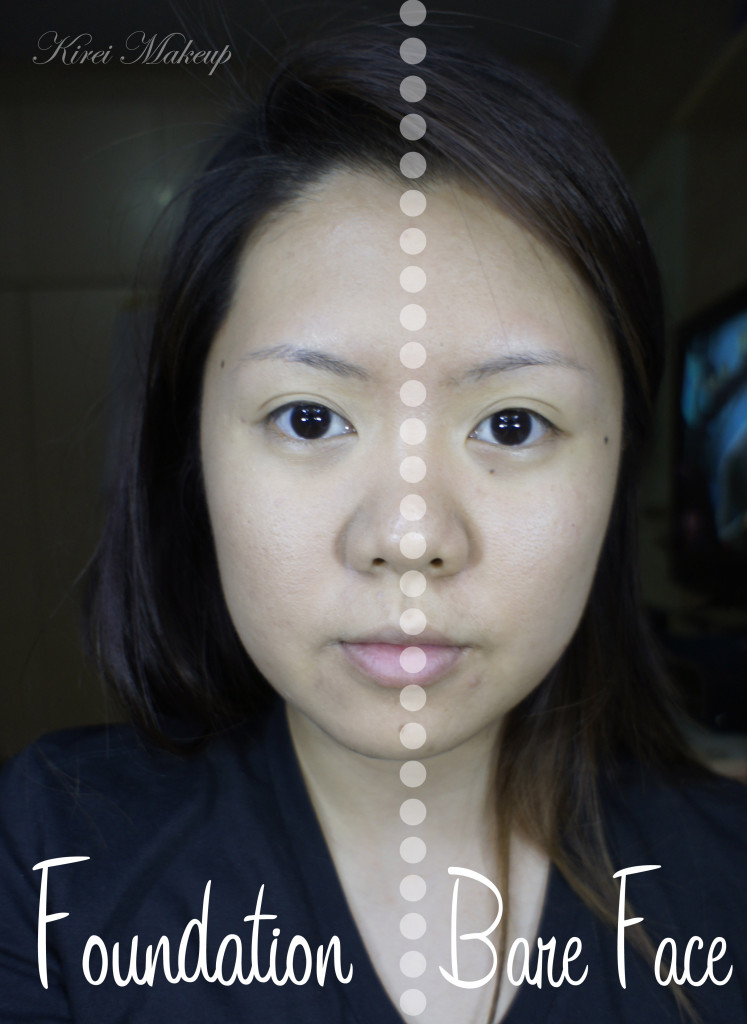
MUFE HD foundation 118 review

Coverage

This product is supposed to have a medium-to-full coverage. I agree. With this foundation (as well as other medium/full coverage foundation) you can actually play around with the coverage. If you want a thin, sheer coverage, apply this to your face with a damped sponge or you can mix it with your moisturizer.

If you prefer a fuller coverage, you can apply this foundation using a buffing brush (like the Sigma Round or Flat Kabuki brushes). Try to avoid this method if you have dry, flaky skin. If you prefer a medium coverage, like me, I prefer to apply this foundation using a normal flat foundation brush (that’s what I used for pictures above and below).

Word of caution: do apply a LITTLE and add more if needed. I’ve seen a lot of youtube “gurus” that definitely used too much foundation. For this review, I only used 1 pump of foundation to cover my entire face. 1 PUMP for the ENTIRE FACE. I actually have extra for neck and chest.

Finish

As you can see in the picture, even though the foundation covers most of my imperfection, it doesn’t leave the skin flat. The skin is still showing through. It doesn’t feel cakey or heavy at all when it dries. I have to say it has a semi-matte finish. It’s not dewy or glowy, but it’s also not entirely matte. *UPDATE: It has a more matte finish compared to other “natural” finish foundation like the Diorskin Star*

Longevity

I’ve used this in photoshoots, bridal makeup, my own makeup etc. It lasted a good 5-6 hours without powdering. If you do powder your face after applying this foundation, it’ll last the whole day in cooler climate. In hotter climate, with powdering, might last a good 6-8 hours depending on your activity. For a bridal makeup that I did in Bali, the bride only needed 1 powder touch-up and that’s it.

If you are very oily, I suggest to powder it. If you have dry skin, you can skip the powder to avoid your skin looking too dry.

Packaging

The foundation comes in a clear plastic bottle with a pump included. Keep in mind if you are going to bring this for traveling, store it properly. I have yet to have any breakage or spillage incident in my luggage or zuca bag yet (hopefully never).

Price

30ml for CAD$49. I’m not sure how much it is in Indonesia.
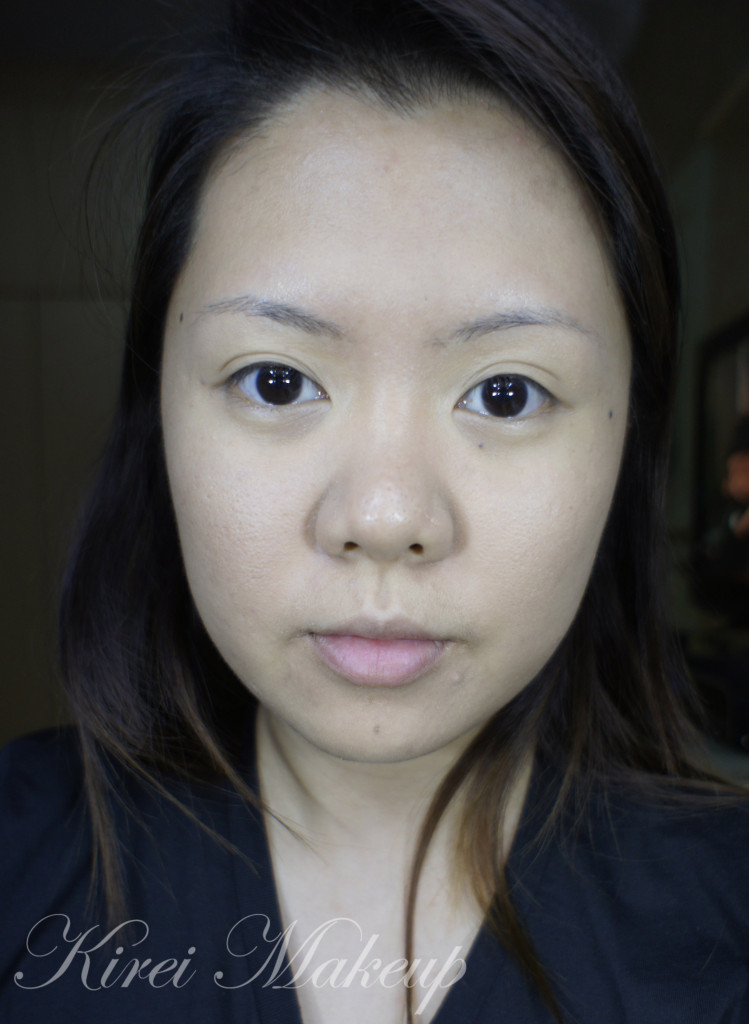
MUFE HD foundation 118 review


Pros:

  • You can play around with coverage
  • Amazing range of color – 26 shades in N. America.
  • Great for those living in hot climate, like in the Tropics since this foundation will last the whole day.
  • Foundation comes with a pump which make it easier to take the product out.
  • Skin looks great in photograph and real life.
  • Great for any type of skin, but especially good for those with combination to oily skin, as well as those with sensitive skin.
  • Very little product is needed to cover the entire face.

Cons:

  • Pricy.
  • Bottle is prone to breakage.
  • The pump takes practice. If you pump too much, you end up wasting the product.

Verdict:

If you cannot stand MAC foundation, or have sensitive skin, this foundation is definitely worth a try. It gives an amazing finish to the skin without being overly matte or dewy. It makes the skin look very natural, and not cakey at all. I’ve used this on those with sensitive skin, and there were no reaction whatsoever so far.

Please note that I bought this product with my own money. This is not an ad or sponsored post.
Sea Siren

I’m sooo sorry I’ve been missing for a while! First of all, my face has gotten better, but then I’ve gotten sick over on the weekend, continuing to the weekday. My July started out pretty awesome, eh? *sarcastic look*. Anyways, I was bored since I stayed in bed for couple days and so I made this look.

I wanted to actually unbox the June Beauty Treats box and posted it, but since I was very disappointed with the very late delivery and the products I received, I decided not to post it here. I’ve posted pictures of what I received on my Twitter, so feel free to check it out to see what’s in the box. I will not be renewing my subscription with them after this month. A few other bloggers have expressed similar disappointment as well.

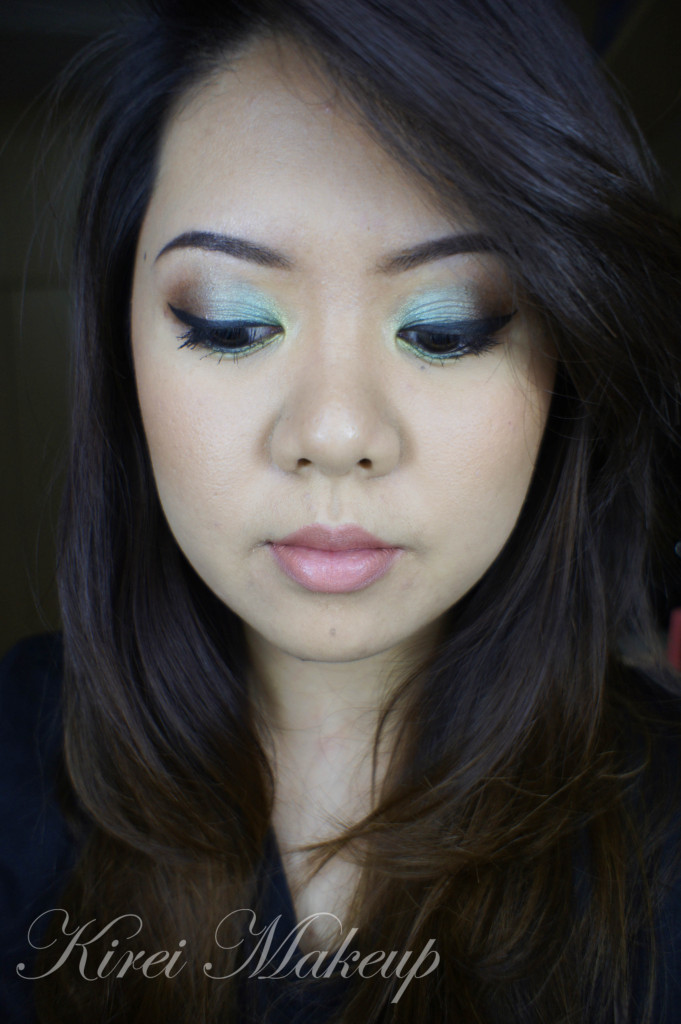
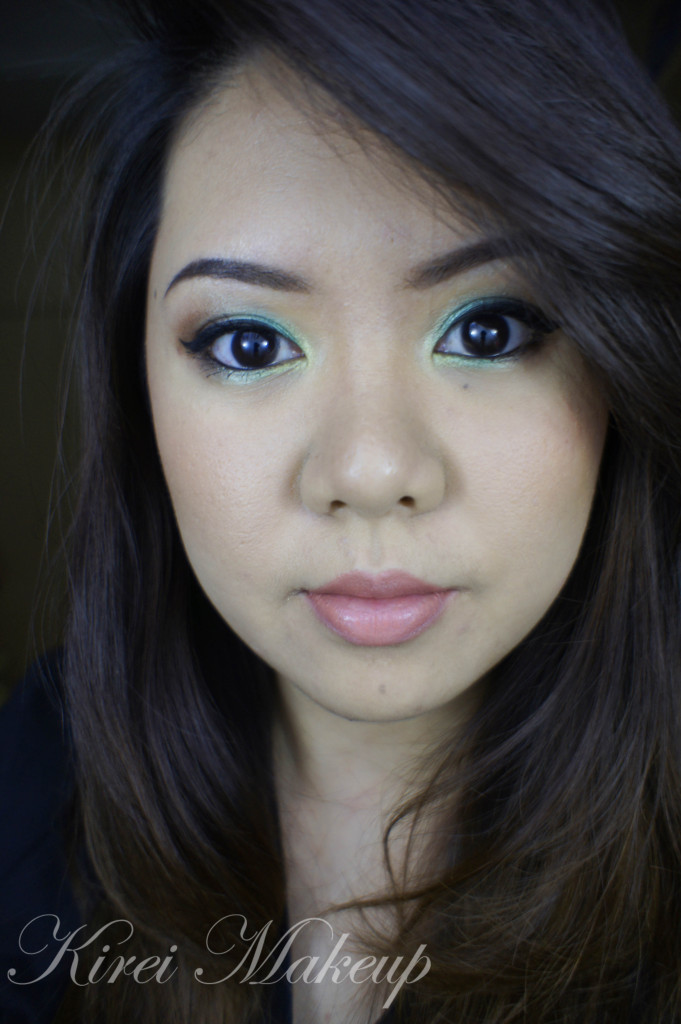
Anyhow, this look is similar to my “Hint of Mint“, but instead of using a mint eyeshadow, I used a turquoise and a light green. I think it turns out to be very pretty. I feel that the light green really bring the whole combo together. It’s wearable if you dare to wear colors out. Very tropical! I used my Sleek Makeup palettes for this look since I want to play with the palettes some more.

Oh, I also played around with my nails on Monday, so if you haven’t seen it, go over to my Instagram to check it out.

How-to:

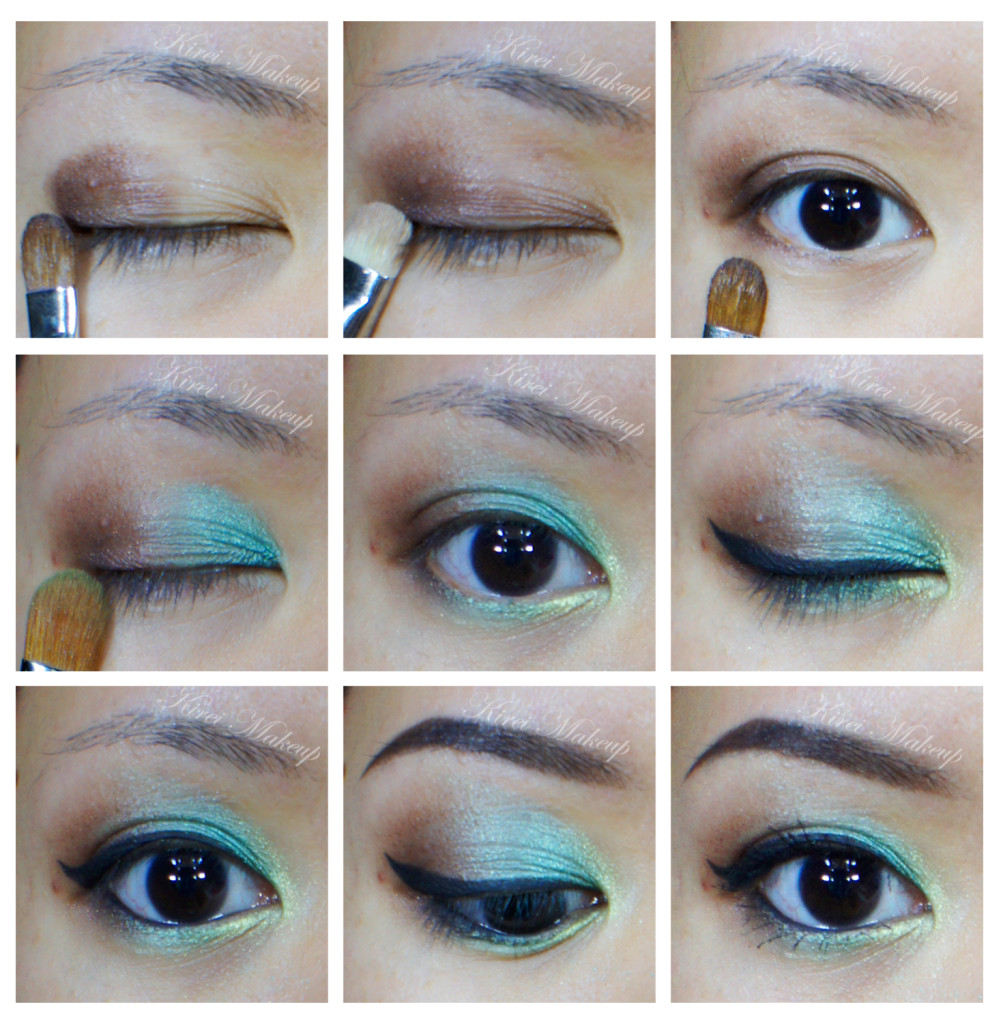
1. I applied Truffle from Sleek Makeup iDivine Sparkle 2 palette on the outer corner of my lid using a flat eyeshadow brush.

2. Using a MAC 239 (shader brush), I blended the color towards the inner part of the eyelid.

3. Repeat step 1 and 2 if necessary.

4. I used whatever was left on the flat eyeshadow brush from step 1 and applied it to the outer half of the lower lid.

5. Using a clean flat eyeshadow brush, I applied Green Iguana from the Sleek Makeup iDivine Snapshots palette on the inner part of the eyelid. I also applied this color in the middle of the lower lid.

turquoise eyeshadow

6. I applied Kiwi Flower from the Sleek Makeup iDivine Snapshots palette on the tear duct area using a pencil brush as a highlighter.

7. Using MUFE Aqua Black and an angled eyeliner, I created a winged liner along my upper lash line.

8. I lined my waterline using L’oreal Voluminous Smoldering eyeliner.

9. I filled my brows in using MUFE Aqua Brow Gel and an angled eyebrow brush.

10. I curled my lashes and applied MUFE Smoky Lash mascara on my lashes.

sleek makeup snapshot

11. For the face, I applied UD Naked foundation using a foundation brush.

12. I applied Benefit Dallas bronzer along the outside perimeter of my face.

13. On the cheeks, I applied MAC Peaches blush.

14. I filled my lips using L’oreal Colour Riche Lip Liner in Beyond Pink, and applied MUFE Rouge Artist Natural Lipstick in N39 (Soft Apricot).

sleek makeup snapshot

Fiery

As mentioned previously and on twitter, I’m having a breakout on my face and so I decided to do just a tutorial for the eyes. I apologize, but there were 2 very persistent ones right above my lips and 1 on the cheek that’s super painful. Anyhow, I hope those pesky pimples will be gone soon. I also just ran out of my benzoyl peroxide (I bought one from Canada), and couldn’t find a replacement for it in Jakarta yet. If anyone has any recommendation, let me know.

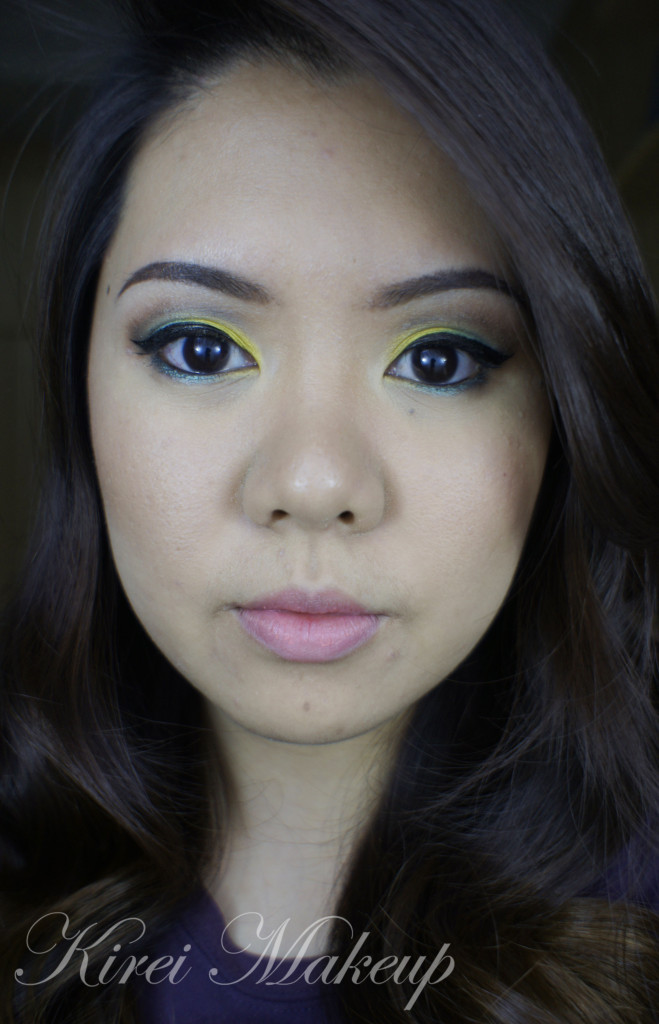
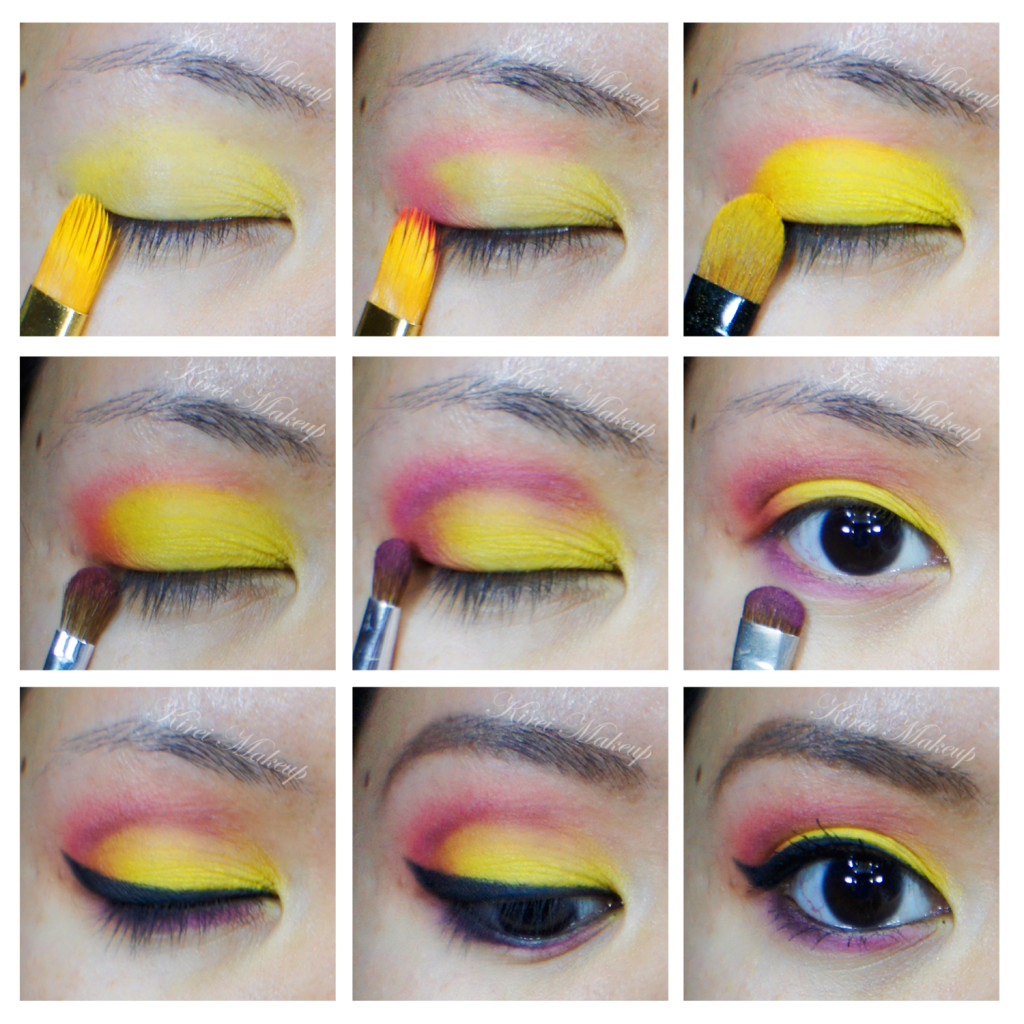
For the tutorial, I wanted to use my Sleek Makeup Ultra Matte Brights v1 palette since I find it quite hard to use this palette. I find a difficult time blending the eyeshadow from this palette, and since the colors are matte, I also find it quite hard to create depth for my eyes. However, I actually think I quite nailed this look. I love the combination of the yellow and the bright pink. I know this might not be a wearable look since it’s extremely bright, but I had a fun time doing it. Might work for Halloween or for whoever love wearing bright makeup.

How-to:

1. Using a synthetic brush, I applied PAC face paint cream in Yellow all over my eyelid.

2. I applied PAC face paint cream in Shocking Pink on the outer V and on the crease using a synthetic art brush.

3. Using a flat eyeshadow brush, I applied Bammi from Sleek Makeup iDivine v1 palette on the eyelid.

4. Using a small fluffy brush, I applied Pucker from the same palette on the outer V and on the crease lightly.

5. Using a smaller more dense brush (similar to a small shader brush), I applied Sugarlite from the palette on the crease only.

6. I applied Sugarlite on the lower lid using a smudge brush.

7. (not in picture), I also applied a black matte eyeshadow brush on the outer corner of the lower lid using an angled brush.

8. Using Sigma eyeliner brush, I applied MUFE Aqua Black along the upper lash line creating a winged liner.

9. I lined my waterline using L’oreal Voluminous Smoldering eyeliner pencil.

10. I filled in my brows using Shu Uemura Hard Formula 9 Brow Pencil.

11. I curled my lashes and applied Maybelline Volume Express Turbo Boost on both upper and lower lashes.

 Sleek Makeup Matte Brights v1

Lily Cole Bodyshop Shimmer Cube Look #2

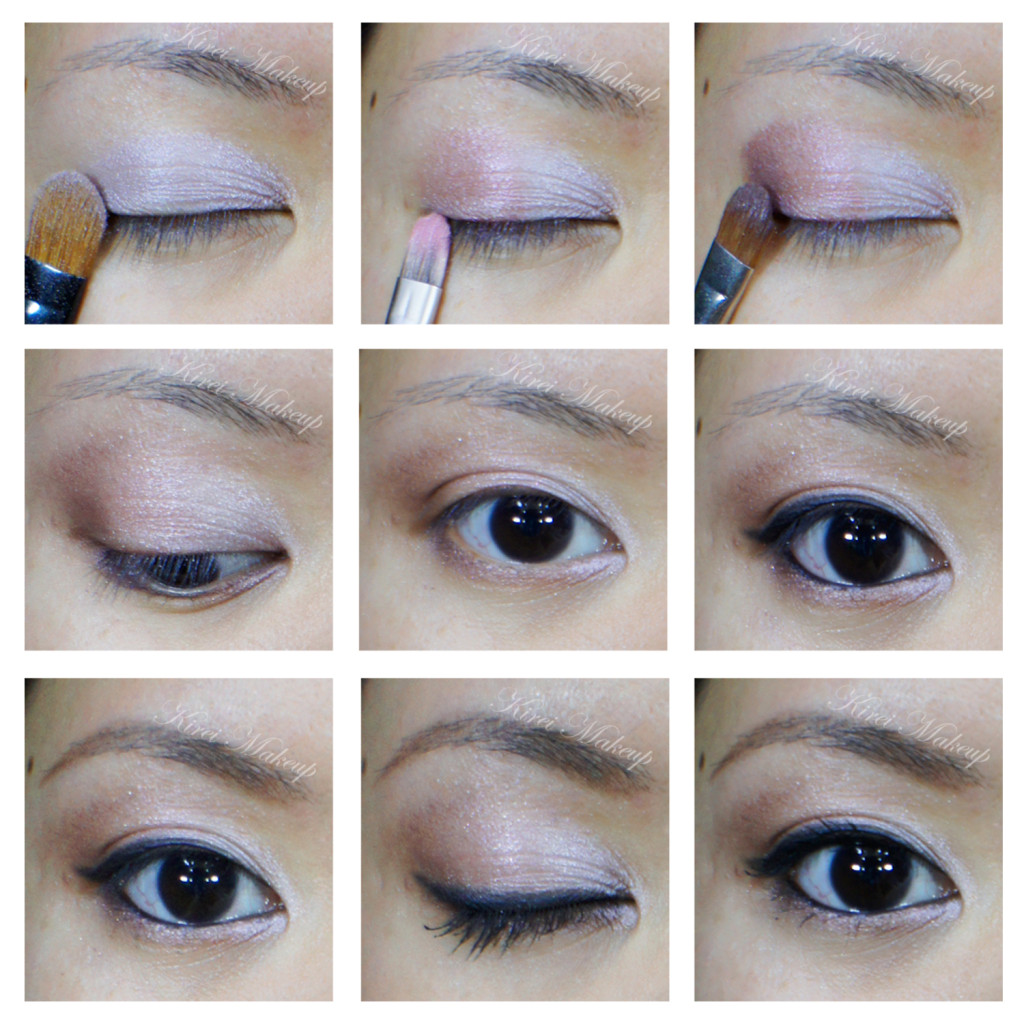
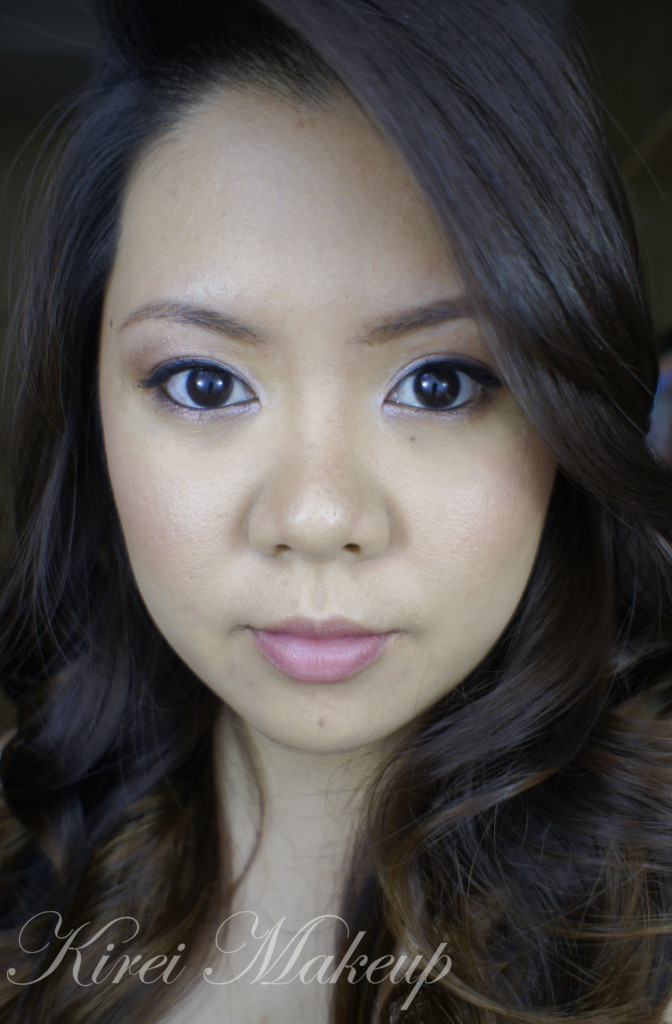
I wanted to do another tutorial using the Lily Cole BodyShop Shimmer Cube that I bought in April. I’ve done a review in this post Body Shop Lily Cole Shimmer Cube, and a tutorial in this Spring Lilac post. I really love the eyeshadow combination, and wanted to create another look that’s wearable and not too over the top, yet at the same time there’s still a play of colors on the eyes.

I decided to use the eyeshadows dry for a sheer wash of color. If you like a more intense color, feel free to apply the eyeshadows wet. I like how this look ends up to be very light and just enough. I think it’s perfect for the Summer, esp. since the weather is getting really hot in Jakarta.

How-to:

1. I applied the Live Lilac eyeshadow from BodyShop Lily Cole Shimmer cube using a flat eyeshadow brush all over my lid.

2. Next, I applied Think Pink eyeshadow from Bodyshop Lily Cole Shimmer cube on the outer half of the lid using a flat eyeshadow brush.

3. On the outer corner only, I applied Go Violet using a flat eyeshadow brush.

4. Using a clean blending brush, I blended Go Violet on the crease.

5. I applied Think Pink on the lower lid, as well as Go Violet on the outer corner of the lower lid using a small shader brush.

6. I dabbed Live Lilac on the inner corner of the lower lid using a pencil brush.

7. Using L’oreal Voluminous Smoldering eyeliner, I lined my waterline, tightline and along the upper lash line creating a small flick at the outer corner.

8. I filled my brows using Shu Uemura Hard Formula 9 eyebrow pencil.

9. I curled my lashes and applied Maybelline Volume Express Turbo Boost mascara.

Lily Cole Bodyshop Shimmer Cube

10. For the face, I applied Urban Decay Naked foundation using foundation brush.

11. On the cheeks, I applied Benefit Hervana.

12. I completed the look by applying Clinique Chubbystick Lip pencil in Bountiful Blush.

Lily Cole Bodyshop Shimmer Cube